Mopar 82212725 User manual

1
RHBNAVIGATIONRADIOKIT
DURANGO
CALLOUTDESCRIPTIONQUANTITY
1Harness1
2Antennabaseandantennawhip1
3RHBRadio1
4ZipTies10
TOOLSREQUIRED
DrillRulerPhillips
HeadScrew
Driver
FiberTrim
Stick
Scissors3mm(1/8
in.)DrillBit
5mm(13/64
in.)DrillBit
19mm(3/4
in.)
Center
Punch
DeburTool10mm
Socket(1/4
inDrive)
1/4Drive
Ratchet
1/4Drive
Torque
Wrench
TapeT45Torx®3/8Drive
Ratchet
3/8Drive
Torque
Wrench
PROCEDURESTEPS:
Vehiclebeingupgradedfrom(AM/FMonly)youwillneedtodothefollowing:
•RADIOREPLACEMENT
•SDARS/NAVIGATIONANTENNACABLEANDANTENNAINSTALLATION
Dec30,2010KK6861240Rev.1

2
Vehiclebeingupgradedfrom(AM/FMandSATELLITEAudio(SDARS))youwillneedtodothefollowing:
•RADIOREPLACEMENT
•ANTENNAREPLACEMENT
RADIOREPLACEMENT
1.Disconnectandisolatethebatterynegativecable.
2.UsingatrimstickC4755orequivalent,workaround
theperimeterofthebezel,andacrossthemiddlere
leasingtheretainingclips(1)andseparatethebezel
fromtheinstrumentpanel.
3.Disconnecttheelectricalconnectors(1)andremove
thebezel.
4.Removetheradiomountingfasteners.
CAUTION:Pullingtheantennacablestraightoutoftheradiowithoutpullingonthelockingantennaconnector
coulddamagethecableorradio.
Dec30,2010KK6861240Rev.1

3
CAUTION:Pullingtheantennacablestraightoutofthe
radiowithoutpullingonthelockingantennaconnec
torcoulddamagethecableorradio.
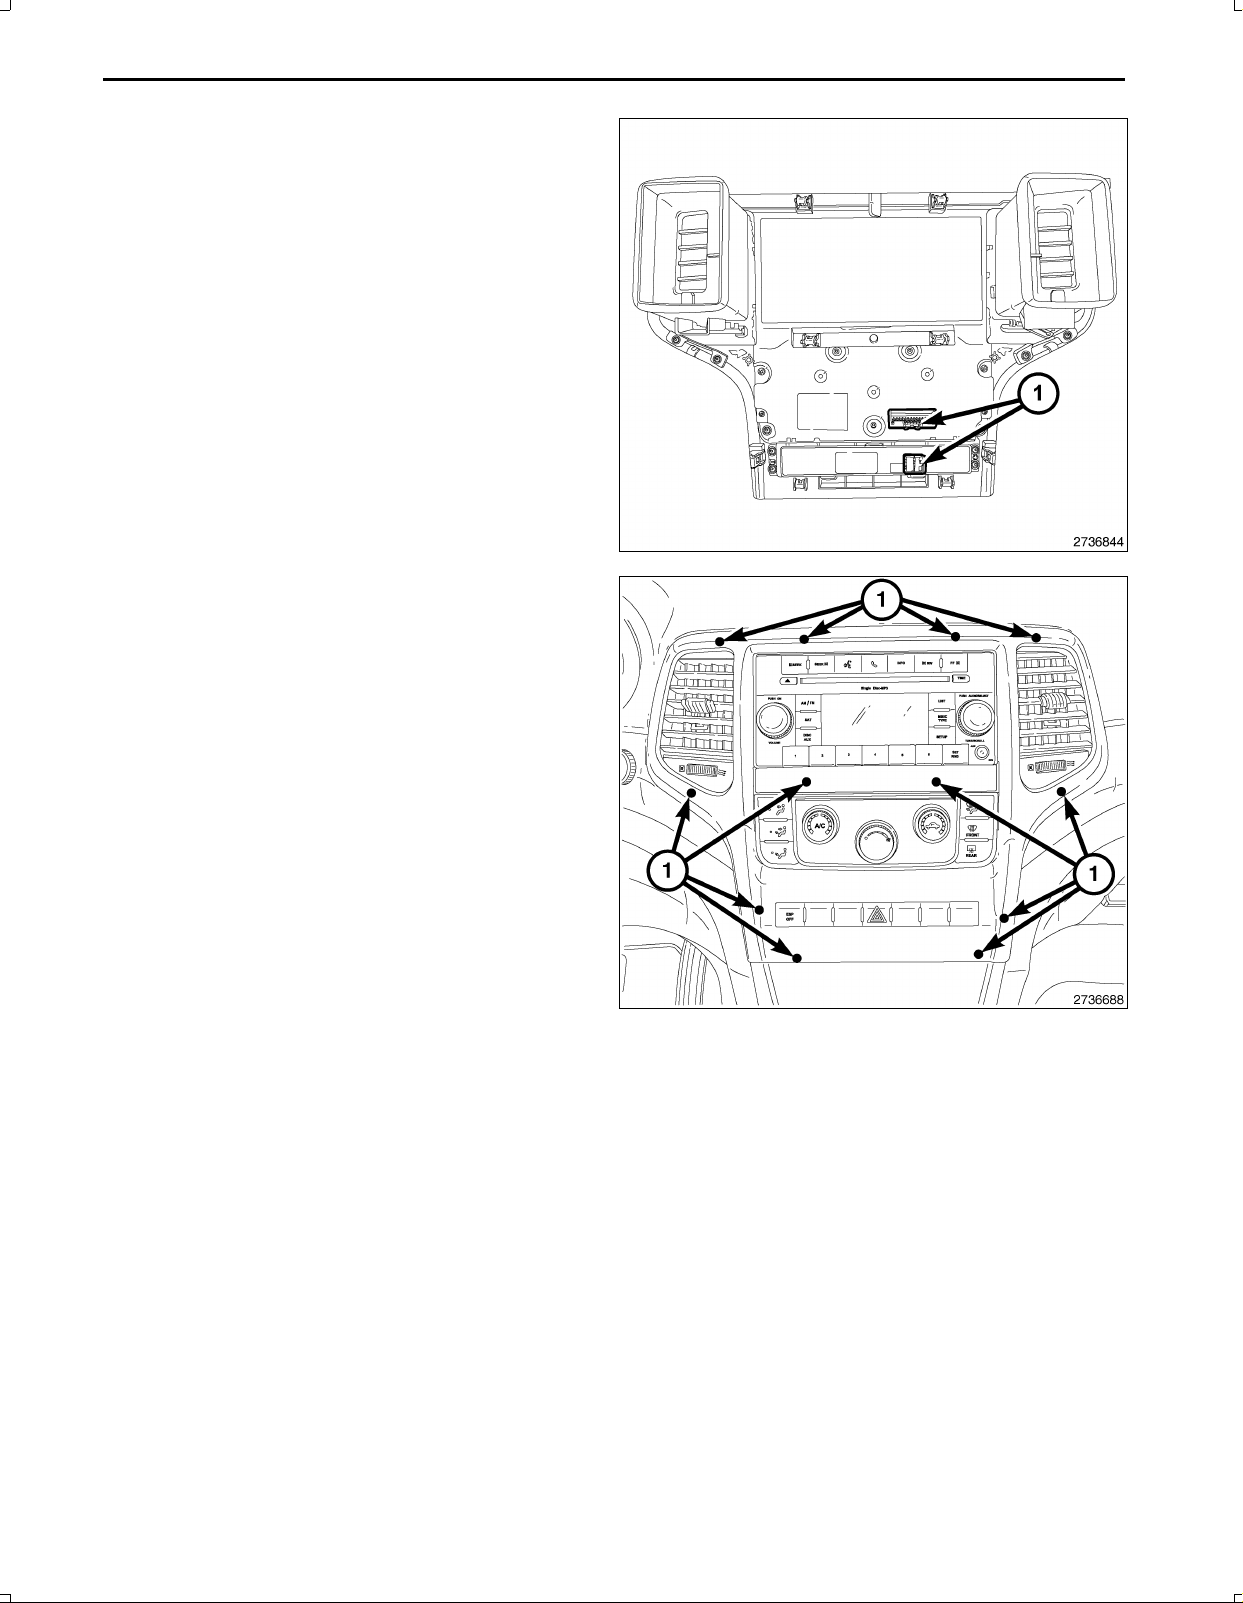
5.Pulltheradiooutfarenoughtoaccessthebackofthe
radio.
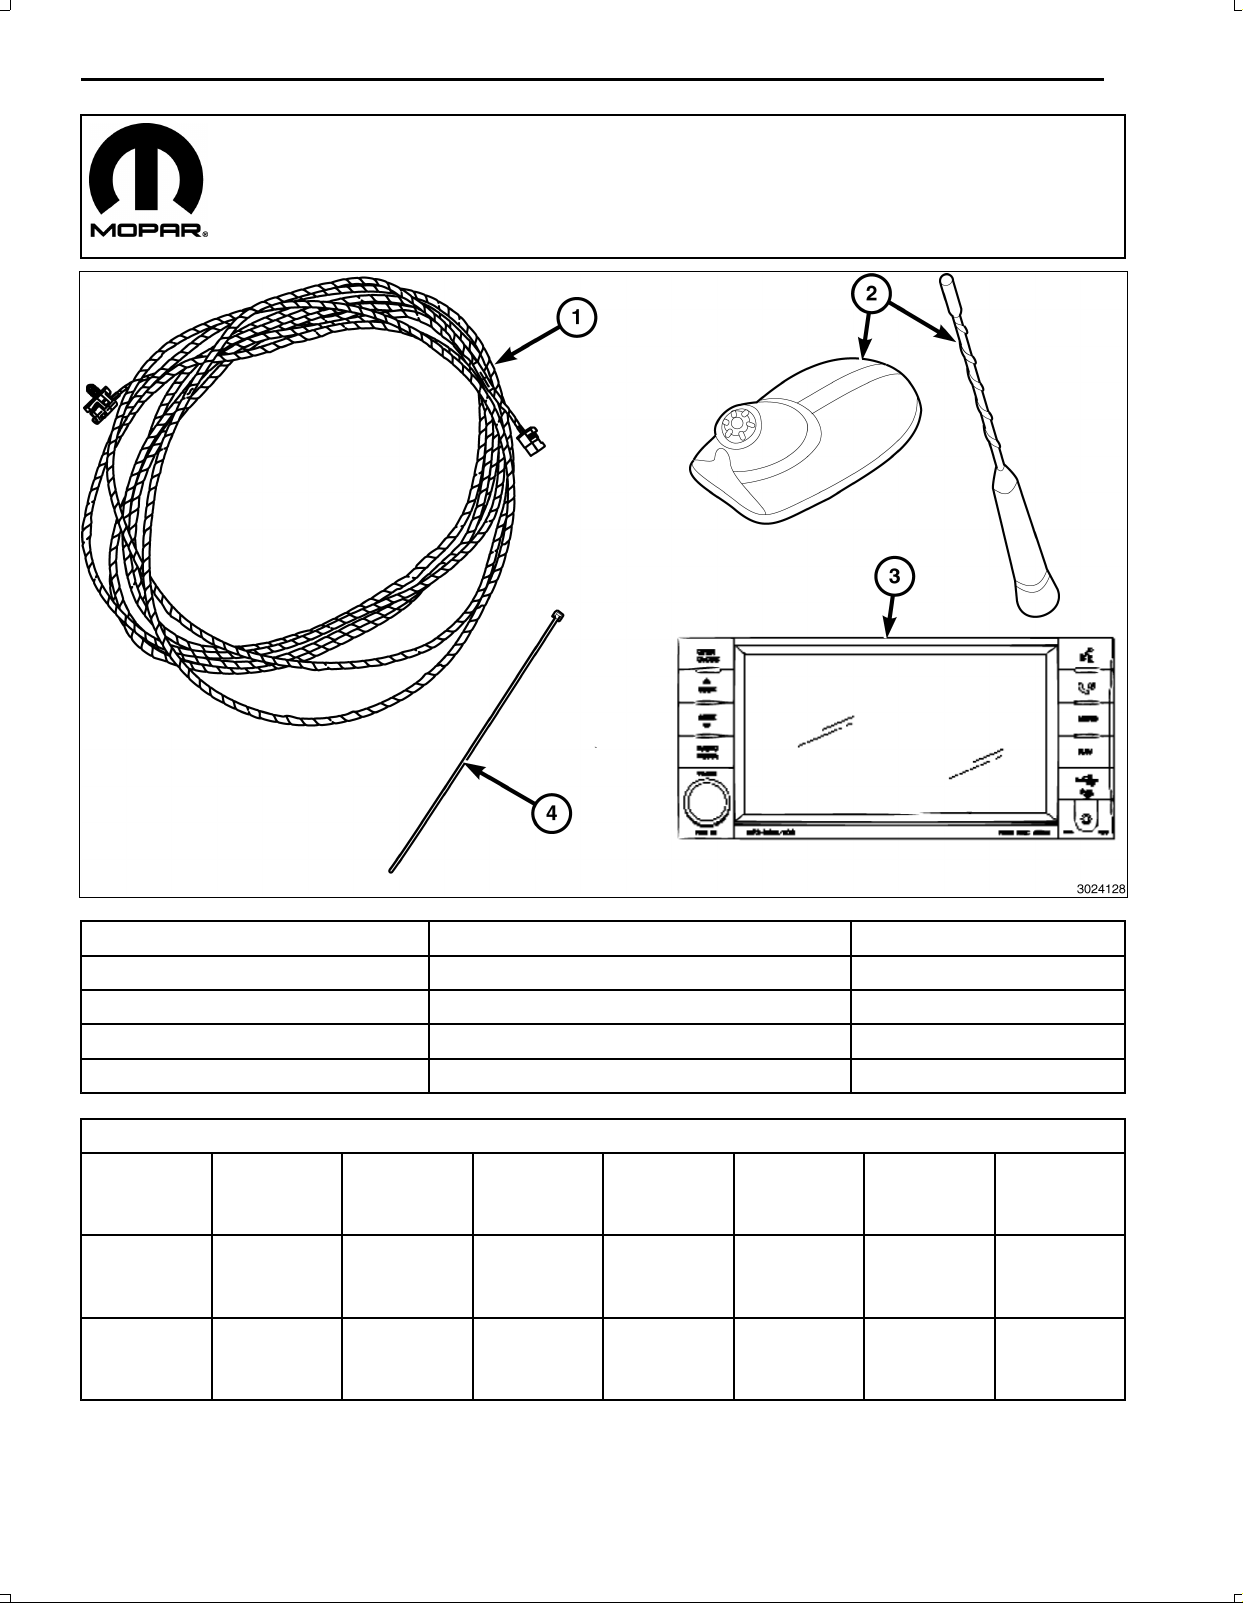
6.DisconnecttheAM/FMantenna(2)andelectricalcon
nectors(1).
7.Ifequipped,disconnectthenavigationantenna(3).
8.Ifequipped,disconnecttheUSBconnectors(4).
9.Removetheradiofromtheinstrumentpanel.
NOTE:Vehiclebeingupgradedfrom(AM/FMonly),dothefollowing:"SDARS/NAVIGATIONANTENNACABLE
ANDANTENNAINSTALLATION"
NOTE:Vehiclebeingupgradedfrom(AM/FMandSATELLITEAudio(SDARS)),dothefollowing:continuetothe
nextstep.
10.ConnecttheAM/FMantenna(2)andelectricalcon
nectors(1).
11.Connectthesatellite/navigationantenna(3).
12.Ifequipped,connecttheUSBconnectors(4).
Dec30,2010KK6861240Rev.1

4
13.Positiontheinstrumentpanelcenterbezeloverthein
strumentpanelandconnecttheelectricalconnectors
(1).
14.Pressfirmlyandevenlyaroundtheperimeterand
acrossthemiddleofthebezeltoseattheretaining
clips(1)andinstallthecenterbezel.
15.Connectthenegativebatterycable.
16.ContinueontoUPDATEVEHICLECONFIGURATION.
Dec30,2010KK6861240Rev.1

5
SDARS/NAVIGATIONANTENNACABLEANDANTENNAINSTALLATION
1.Openandremovetheloadfloorlid(1).
2.UsingtrimstickC4755orequivalent,removetheload
floorgaphider(1).
3.Removethescrews(1).
4.UsingtrimstickC4755orequivalent,separatethere
tainingclips(3)andremovetheliftgatescuffplate(2).
Dec30,2010KK6861240Rev.1

6
5.Removethestoragetubs.
6.Removethesparetireandjack.
7.Removethetwofrontcargoloopscrews(1).
8.Removetherearnuts(3)andremovetheloadfloor
bin(2).
9.UsingatrimstickC4755orequivalent,disengagethe
retainingclipsthatsecuretheupperliftgatetrimpanel
(1)totheliftgateopeningandremovethetrimpanel.
10.Ifequipped,disconnectthecargolampelectricalcon
nector.
11.UsingatrimstickC4755orequivalent,disengagethe
retainingclipsthatsecurethedriversideuppertrim(1)
tothebody.
12.Releasethetetherfromthetrimandremovethehead
linertrim.
Dec30,2010KK6861240Rev.1

7
13.UsingatrimstickC4755orequivalent,releasethere
tainingclipsandseparatethedriversideDpillartrim
fromthepillar(1).
14.Ifequipped,disconnectthespeakerelectricalconnec
tor.
15.Releasethetwotethersfromthetrimandremovethe
Dpillartrim.
16.Removethepushpins(1)andlowertherearofthe
headliner(2)downenoughtoaccesstheantenna
area.
17.UsingatrimstickC4755orequivalent,disengagethe
retainingtabsthatsecurethedriversidedoorsillscuff
platetotheretainingclipsinthedoorsillandremove
thedriversidescuffplates(1).
Dec30,2010KK6861240Rev.1

8
18.Positionthedriverreardoorseal(1)aside.
19.UsingatrimstickC4755orequivalent,disengagethe
retainingfastenersthatsecurethedriversidequarter
trimpaneltothequarterpanel.
20.Pullthequartertrimpanelawayfromthequarter
panel.
21.Ifequipped,disconnecttheflashlightelectricalcon
nector(2).
22.Removethequartertrimpanel(1).
23.Separatethedriverfrontdoorseal(1)fromthedoor
frameandpositionaside.
Dec30,2010KK6861240Rev.1

9
24.UsingatrimstickC4755orequivalent,disengagethe
retainingtabsthatsecurethedriversidelowerBpillar
trimpaneltotheBpillar.
25.Removethedriversidecowltrimpanel.
26.Removethebolts(2)andremovethedriverssidesi
lencerpanel(1).
Dec30,2010KK6861240Rev.1

10
27.UsingatrimstickC4755orequivalent,separatethe
steeringcolumntrimring(1).
28.UsingatrimstickC4755orequivalent,separatethe
retainingclipsandremovethecover(1).
29.DisconnecttheAM/FM(2)andthe5voltpower(1)
wireharnessconnectorsfromtheantenna.
30.Removetheantennamountingretainer(3).
31.Frominsidethevehicle,andusingaflatbladedtool,
depressoneoftheretainingtabsontheantenna.
Pushuptheonesideoftheantennaconnector
throughtheroofpanel.Depresstheothersideofthe
connectorandremovetheantenna.
Dec30,2010KK6861240Rev.1

11
32.Removetheoldantennafromthevehicle.
33.Installthenewantennaintothevehicle.
Tightento6.7N∙m(57In.Lbs).
34.ConnecttheSDARS,AM/FM(2)andthe5voltpower
(1)wireharnessconnectors.
35.Startingfromtheantennaroutetheantennadownthe
driverssideDPillar,ziptiewerenecessary.
36.Routetheantennacablealongthebodyharnesson
thedriversideofthevehicle,ziptiewerenecessary.
37.Routetheantennacablealongthedriversidedoor
jamstothedriversidecowlarea.
Dec30,2010KK6861240Rev.1

12
38.Routethedrivercowlareatoundertheinstrumentpanel.
39.Routetheantennacableacrossthesteeringcolumnopeninganduptotheradiotoopening.
40.Ziptie(1)theantennacable(2)tothedashharnessinseveralplacessothatthecablewillnotinterferewiththe
steeringshaft.
41.IfaupdatedantennaisneededgotoANTENNAREPLACEMENT
42.UsingatrimstickC4755orequivalent,separatethe
steeringcolumntrimring(1).
Dec30,2010KK6861240Rev.1

13
43.Positionthesteeringcolumnopeningcover(1)back
andseattheretainingclipsfully.
44.Positionthesteeringcolumntrimring(1)backandseattheretainingclipsfully.
45.Installthesilencerpanel(1)andinstallthescrews(2).
46.Installthedriversidecowltrimpanel(1).
Dec30,2010KK6861240Rev.1

14
47.InstallthedriversidelowerBpillartrimpanel(1)tothe
Bpillar.
48.Positionthedriverfrontdoorseal(1)backandseat
fully.
49.Positionthedriversidequartertrimpanel(1)backinto
thevehicle.
50.Positionthefrontlocatingpinintothebodyandseat
thepushpinnearthelocationpinfully.
51.SeattheclipatthetopofthetrimpanelintotheCpillar
first.
52.Seatthetwofrontpushpins.
53.Seatthepushpinattherearofthequarterglass.
54.Connecttheflashlightelectricalconnector(2)andthe
powerliftgateswitch,ifequipped.
55.Positiontherearlocatingpinintothebodyandseat
theremainingpushpins.
Dec30,2010KK6861240Rev.1

15
56.Positionthedriversidereardoorseal(1)backand
seatfully.
57.Aligntheretainingtabsonthedriversidedoorsillscuff
plate(1)withtheretainingclipsinthedoorsillanden
gagetheretainingtabsthatsecurethescuffplateto
thedoorsill.
58.Positiontheheadliner(2)backintopositionandinstall
thepushpins(1).
Dec30,2010KK6861240Rev.1

16
59.ConnectthetwotetherstotheDpillartrimpanel(1).
60.Ifequipped,connectthespeakerelectricalconnector
(2).
61.Positionthetrimpanel(4)backandengagethelower
tabs(4)intotheupperquartertrimpanel.
62.Positionthepanelbackontothepillarandseatthere
tainingclips(3)fully.
63.Connectthetethertothetrimpanel.
64.Positionthedriversideuppersidetrim(1)andseat
theretainingclipsfully.
65.Ifequipped,connectthecargolamp(2)electricalcon
nector.
66.Positionthetrim(3)intoplaceinsertingtheouterclips
firstthentheinnerones.
67.Seattheretainingclipsfully.
Dec30,2010KK6861240Rev.1

17
68.Installtheloadfloorbin(2)andinstallthecargoloop
screws(1).
69.Installthenuts(3).
70.Positiontheliftgatescuffplate(2)backintothevehicle
andseattheretainingclips(3)fully.
71.Installthecargoloopscrews(1).
72.Positiontheloadfloorgaphider(1)backintoplace
andseattheretainingclipsfully.
Dec30,2010KK6861240Rev.1

18
73.Installtheloadfloorlid(1).
ANTENNAREPLACEMENT
1.Openandremovetheloadfloorlid(1).
2.UsingtrimstickC4755orequivalent,removetheload
floorgaphider(1).
Dec30,2010KK6861240Rev.1

19
3.Removethescrews(1).
4.UsingtrimstickC4755orequivalent,separatethere
tainingclips(3)andremovetheliftgatescuffplate(2).
5.Removethestoragetubs.
6.Removethesparetireandjack.
7.Removethetwofrontcargoloopscrews(1).
8.Removetherearnuts(3)andremovetheloadfloor
bin(2).
9.UsingatrimstickC4755orequivalent,disengagethe
retainingclipsthatsecuretheupperliftgatetrimpanel
(1)totheliftgateopeningandremovethetrimpanel.
10.Ifequipped,disconnectthecargolampelectricalcon
nector.
Dec30,2010KK6861240Rev.1

20
11.UsingatrimstickC4755orequivalent,disengagethe
retainingclipsthatsecurethedriversideuppertrim(1)
tothebody.
12.Releasethetetherfromthetrimandremovethehead
linertrim.
13.UsingatrimstickC4755orequivalent,releasethere
tainingclipsandseparatethedriversideDpillartrim
fromthepillar(1).
14.Ifequipped,disconnectthespeakerelectricalconnec
tor.
15.Releasethetwotethersfromthetrimandremovethe
Dpillartrim.
16.Removethepushpins(1)andlowertherearofthe
headliner(2)downenoughtoaccesstheantenna
area.
Dec30,2010KK6861240Rev.1
Table of contents
Languages:
Other Mopar Car Navigation System manuals