manuals.online logo
Brands
  1. Home
  2. •
  3. Brands
  4. •
  5. Morgan
  6. •
  7. Cooker
  8. •
  9. Morgan MIC-2520 User manual

Morgan MIC-2520 User manual

SER MAN AL
Inducti n
C ker MIC-2520
E-mail: electrical.appliance@dksh.com
www.morgan.my
Market Expansion
Services by
www.dksh.com.my
facebook.com/morganappliances
32
Thank you for purchasing a quality MORGAN appliance. We trust that you will have a pleasant
experience with your new product. To guarantee safety and best efficiency, please read this
manual carefully and keep a copy for future reference.
IMPORTANT SAFEGUARDS
MODEL MIC-2520
RATED VOLTAGE / FREQ ENCY 220-240V~ 50Hz
RATED WATTAGE 2000W
POT CAPACITY 2.0L
PARTS IDENTIFICATION
SPECIFICATIONS
When using electrical appliances, basic safety precautions should always be taken, including
the following:
1. READ ALL I STRUCTIO S carefully & save it for future reference.
2. Unplug from the power supply when not in use and before cleaning.
WARNING: Allow surface to cool before assembling or disassembling parts.
3. Operate the appliance only on level and stable surfaces.
4. Use only with induction-compatible cookware.
5. Do not allow power cord to hang over edge of table or counter or touch hot surfaces.
6. Ensure exterior of pan is dry before use.
7. Do not heat empty pan.
8. Take precautions not to spill any liquids into air vents.
9. To protect against the risk of electrical shocks, do not immerse power cord, power plugs or unit in
water or other liquids.
10.This appliance is not intended for use by persons (including children) with reduced physical, sensory
or mental capabilities; or lack of experience and knowledge, unless they have been given
supervision or instruction concerning use of the appliance by a person responsible for their safety.
11.Do not leave appliance unattended when it is powered on.
12.Do not touch hot surfaces. Always use handles or knobs.
13.Do not cook on a broken cooktop. If cooktop should break, cleaning solutions and spillovers may
penetrate the broken cooktop and pose a risk of electric shock.
14.Clean cooktop with caution. If a wet sponge or cloth is used to wipe spills on a hot cooking area, be
careful to avoid steam burns. Some cleaners can produce noxious fumes if applied onto a hot
surface.
15.Do not operate any appliance with a damaged power cord or power plug, after the appliance
malfunctions or has been damaged in any manner. Contact your nearest authorized consumer
service center (see separate Warranty) to return for examination, repair or adjustment.
16.A short power cord is supplied to reduce the risk of entanglement or tripping over a longer cord,
especially by children.
17.The appliance should be placed on a flat surface to prevent the pot from slipping when placed on the
cooking zone.
18.Extension cords are available and may be used if care is exercised in their use. The marked
electrical rating of the extension cord should be at least as great as the electrical rating of the
appliance.
19.The use of accessory attachments not recommended by the appliance manufacturer may cause
injuries.
20.Do not use outdoors or while standing in a damp area.
21.Do not place on or near a hot gas or electric burner, or in a heated oven.
22.Exercise extreme caution when moving any pot or pan containing hot oil or other hot liquids from this
appliance.
23.Allow at least 4- 6 inches of optimum air circulation above and on all sides when using this appliance.
24.Do not use this appliance for anything other than its intended use.
Crystal Plate Top
Air Inlet
Power Cord &
Power Plug
Air Vent Control Panel
WARNING
• The air inlet is located under the cooktop. Make sure it has access to fresh air and is not
covered/obstructed.
• Risk of burns from residual heat. After powering off, the cooking zone needs some time to
cool down.
54
IMPORTANT SAFEGUARDS
CAUTION
HOW INDUCTION COOKING WORKS
25.This appliance is for household use only.
26.To disconnect, turn the unit off, then detach power plug from the power supply.
27.Do not operate your appliance in a garage or under a wall cabinet. Always unplug the unit from the
power supply before storing to avoid a fire hazard.
28.This appliance has a polarized power plug (one blade is wider than the other). To reduce the risk of
electric shock, this power plug is intended to fit into a polarized one-way power supply only. If the
power plug does not fit fully into the power supply, reverse the power plug. If it still does not fit,
contact a qualified electrician. Do not attempt to modify the power plug in any manner yourself.
29.Do not place metallic objects such as knives, forks, spoons, lids, cans and aluminium foil on the
cooktop.
30.Keep magnetized items away from the unit. Items such as radios, televisions, and automatic banking
cards can affect the performance of the unit.
SELECTING COOKWARE FOR INDUCTION COOKTOPS
CONTROL PANEL
To reduce the risk of electric shock, burns, fire or injury:
1. Always unplug appliance from the power supply immediately after use.
2. Do not use while bathing or in a shower.
3. Do not place or store appliance in damp/wet areas.
4. Do not immerse into water or other liquids.
5. Do not reach for unit that has fallen into water. Unplug it from the power supply immediately.
6. Care should be taken so that objects do not fall and liquids are not spilled onto the appliance.
TO RED CE THE RISK OF ELECTRIC SHOCK, DO NOT REMOVE COVER. THERE ARE NO SER-
SERVICEABLE PARTS INSIDE.
TO RED CE THE RISK OF FIRE OR ELECTRIC SHOCK, DO NOT EXPOSE THIS NIT TO WATER
OR MOIST RE.
SAVE THESE INSTR CTIONS FOR HO SEHOLD SE ONLY
NOTE:
• For illustrative purposes only. Actual Control panel may vary. However, the functions & usage remain
the same.
• Power on the induction cooker and press the function for different cooking functions.
1. Induction cooking uses electromagnetism to transfer energy into the bottom of your cookware.
2. The surface of the cooktop does not work the same way as conventional cooktops as power is sent
directly to the cookware.
3. As long as power is transferring into the cookware, the cookware will stay hot.
4. Once power is stopped, removed or reduced, the cookware will begin to cool instantly.
WARNING! HOT SURFACE!
Risk of burns from residual heat. After powering off, the cooking zone needs some time to cool
down.
• Use only induction-compatible cookware
• Selecting the proper induction-compatible cookware is very important to the efficiency of your
induction cooktop.
• If you are not careful in your selection of cookware for your cooktop, the cookware may not work
efficiently or possibly may cause damage to the electronics. Cookware that meet the requirements
are:
Material Cookware with bottom made of magnetic cast iron, stainless steel, enamel, porcelain
on steel.
Shape Flat bottom
Size Bottom diameter of at least 4.7” – 8.7” (12 – 20cm)
Weight Up to 8kg (17.6lbs) (including contents)
• As a general rule, if a magnet sticks to the bottom of the cookware, it will work on an induction
cooktop. Conversely, if a magnet does not stick to the cookware, it will not work on an induction
cooktop.
• Consult the manufacturer or authorized dealer to ensure you are purchasing compatible cookware
for your induction cooker.
7
SAFETY FUNCTIONS AND FEATURES
6
USING YOUR INDUCTION COOKTOP
• Pollution free: no burning, smoke or harmful gases like carbon monoxide, nitrogen dioxide and
formaldehyde
• Safe: no flame, no exhaust
• Easy-to-clean: high-rigidity glass faceplate
• Automatic shutoff: cooktop turns off 30 seconds after pan is removed
• Protection against overheating
CLEANING AND MAINTENANCE
• Because it does not generate its own heat, the induction cooktop has no grates or carbon build-up
to clean.
• o scorching heat going up the sides of your cookware means cookware stays cleaner longer.
• Use a damp cloth with mild soap to clean the control panel
• Use a nonabrasive cleaning product to clean the cooktop (available in most grocery stores).
Note: Any other servicing should be performed by an authorized service representative.
TROUBLESHOOTING
Error Code Possible Reasons Solution
E0 Incompatible cookware used Use a compatible cookware
E1 IGBT sensor open circuit/short circuit Contact authorized service centre
E2 IGBT overheated Contact authorized service centre
E3 Over-voltage 270V Inspect power supply
Wait for power supply to resume
E4 Under-voltage 90V Inspect power supply
Wait for power supply to resume
E5 Top plate sensor open/short circuit Wait a few minutes for appliance to cool down &
check pot/pan.
E6 Top plate overheated Contact authorized service centre
The above are the recommended solution for common failures.
IMPORTANT: Do not attempt to disassemble/repair the appliance yourself to avoid any personal
injuries and/or damage to the appliance. Consult your authorized service centre.
OPERATION
• Once the unit is plugged into a power supply, place your induction-ready cookware on the cooktop
and press O /OFF to power on the appliance.
• Cookware detection: Unit will beep and automatically turn off after 30 seconds if cookware is not
compatible.
• OTE: If the unit is turned on and no cookware is detected on the cooktop, the unit will beep and
turn off after 30 seconds.
• If you remove the cookware from the cooktop during operation mode, the unit will beep and will
automatically turn off after 30 seconds.
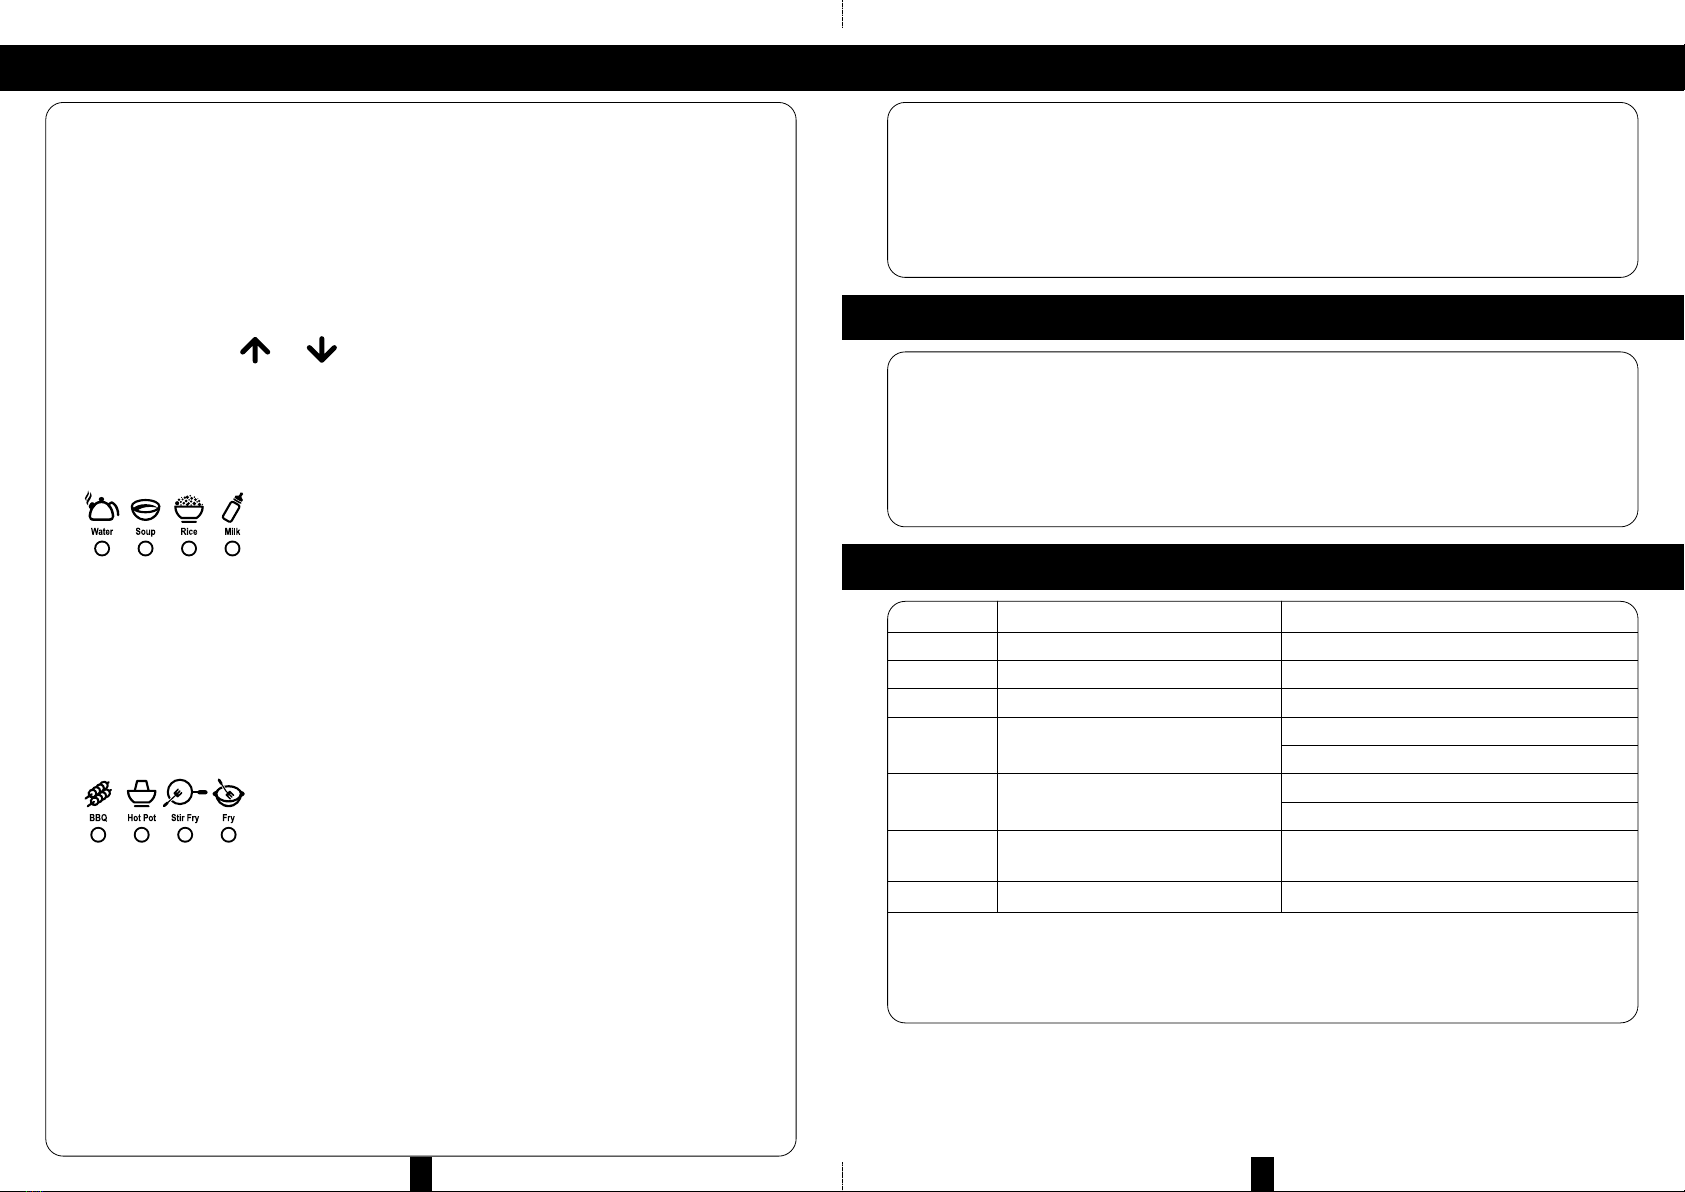
HEAT SETTINGS ( ) ( )
• These two buttons are for adjusting heat levels range from 60°C to 240°C.
• The corresponding power level is from 200W to 2000W with 10 heating levels. These buttons are
also used for setting the pre-set and timer functions.
• After appliance has powered on, select the desired function for cooking using the function selector
switch.
• Pressing any button will illuminate the corresponding LED beside it.
• The WATER/MILK/RICE/SOUP functions display the default times, and they are 2000(W),
80 (°C), 1000(W) and 1600(W) respectively.
• By default, these values are the time duration of 4 functions. Upon reaching the pre-set time, the
appliance will automatically shut off.
• Press the UP & DOW buttons to adjust.
• Finally, choose either of the 4 functions to finish setting when timer elapses, the designate function
will activate automatically.
• Pressing any button will illuminate the corresponding LED beside it.
• The initial display on the screen is different.
• For Hot Pot, BBQ, Fry and Stir Fry FU CTIO S- it display 1400(W), 240 (°C) ,200 (°C), 2000(W)
respectively.
• Press the UP & DOW buttons to adjust the power/temperature.
NOTE: The cooking surface will be hot after use, and care should be taken when adding on
or removing cooking utensils from the cooktop to avoid burns.

Other Morgan Cooker manuals

Morgan MMC-NC3100 User manual

Morgan

Morgan MMC-NC3100 User manual

Morgan MBH-IC13 User manual

Morgan

Morgan MBH-IC13 User manual

Morgan MIC-BB20EC User manual

Morgan

Morgan MIC-BB20EC User manual

Morgan MMC-3400A User manual

Morgan

Morgan MMC-3400A User manual

Popular Cooker manuals by other brands

Tricity Bendix SE310 user manual

Tricity Bendix

Tricity Bendix SE310 user manual

Glem 534 Series manual

Glem

Glem 534 Series manual

STOVES ST RICH DX S900DF GTG user guide

STOVES

STOVES ST RICH DX S900DF GTG user guide

AEG 10369MN-MN user manual

AEG

AEG 10369MN-MN user manual

Summit B41602 instruction manual

Summit

Summit B41602 instruction manual

Fisherman's Habit 94171 Assembly and operation instructions

Fisherman's Habit

Fisherman's Habit 94171 Assembly and operation instructions

Tricity Bendix SIE 233B Operating and installation instructions

Tricity Bendix

Tricity Bendix SIE 233B Operating and installation instructions

Cuckoo CRP-J06 FUZZY SERIES operating instructions

Cuckoo

Cuckoo CRP-J06 FUZZY SERIES operating instructions

ILVE UP60 User instructions, installation, maintenance

ILVE

ILVE UP60 User instructions, installation, maintenance

Parkinson Cowan CSG 404 Owner's and installation guide

Parkinson Cowan

Parkinson Cowan CSG 404 Owner's and installation guide

Cata COMBI 604 R Installation, use and maintenance instructions

Cata

Cata COMBI 604 R Installation, use and maintenance instructions

Argos Bush BCLU100DFB Installation & user's instructions

Argos

Argos Bush BCLU100DFB Installation & user's instructions

Hanseatic 2013C(G)3.334eETsDpHbW user manual

Hanseatic

Hanseatic 2013C(G)3.334eETsDpHbW user manual

Kuppersbusch EKDG 6800.0-75 Service manual

Kuppersbusch

Kuppersbusch EKDG 6800.0-75 Service manual

M-system MIB60 user manual

M-system

M-system MIB60 user manual

Cuisinart Non-Stick Cookware Use and care guide

Cuisinart

Cuisinart Non-Stick Cookware Use and care guide

Tricity Bendix SE305 Operating and installation instructions

Tricity Bendix

Tricity Bendix SE305 Operating and installation instructions

Smeg C9IMXA manual

Smeg

Smeg C9IMXA manual

manuals.online logo
manuals.online logoBrands
  • About & Mission
  • Contact us
  • Privacy Policy
  • Terms and Conditions

Copyright 2025 Manuals.Online. All Rights Reserved.