manuals.online logo
Brands
  1. Home
  2. •
  3. Brands
  4. •
  5. Motic
  6. •
  7. Laboratory Equipment
  8. •
  9. Motic D-Moticam BTI User manual

Motic D-Moticam BTI User manual

This manual suits for next models

4

Popular Laboratory Equipment manuals by other brands

Radleys Carousel 6 Plus instructions

Radleys

Radleys Carousel 6 Plus instructions

Hemotherm 400MR Operation & technical manual

Hemotherm

Hemotherm 400MR Operation & technical manual

mrclab DVO Series Operation manual

mrclab

mrclab DVO Series Operation manual

CoolLED pE-800 quick start guide

CoolLED

CoolLED pE-800 quick start guide

Luminex Guava easyCyte Maintenance Guide

Luminex

Luminex Guava easyCyte Maintenance Guide

IKA A10 basic operating instructions

IKA

IKA A10 basic operating instructions

Belden HIRSCHMANN RPI-P1-4PoE installation manual

Belden

Belden HIRSCHMANN RPI-P1-4PoE installation manual

Koehler K1223 Series Operation and instruction manual

Koehler

Koehler K1223 Series Operation and instruction manual

Globe Scientific GCM-12 quick start guide

Globe Scientific

Globe Scientific GCM-12 quick start guide

Getinge 86 SERIES Technical manual

Getinge

Getinge 86 SERIES Technical manual

CORNING Everon 6000 user manual

CORNING

CORNING Everon 6000 user manual

Biocomp GRADIENT MASTER 108 operating manual

Biocomp

Biocomp GRADIENT MASTER 108 operating manual

Cole Parmer Stuart SB3/1 instruction manual

Cole Parmer

Cole Parmer Stuart SB3/1 instruction manual

BEVS 2501/2A user manual

BEVS

BEVS 2501/2A user manual

Qiagen DML 3000 user manual

Qiagen

Qiagen DML 3000 user manual

Queensgate NANOSCAN OP400 Quick start instructions

Queensgate

Queensgate NANOSCAN OP400 Quick start instructions

Parr Instrument 4560 Operating instructions manual

Parr Instrument

Parr Instrument 4560 Operating instructions manual

Integra DOSE IT operating instructions

Integra

Integra DOSE IT operating instructions

manuals.online logo
manuals.online logoBrands
  • About & Mission
  • Contact us
  • Privacy Policy
  • Terms and Conditions

Copyright 2025 Manuals.Online. All Rights Reserved.

D-Moticam BTI
Microscope Tablet / Camera
Use and Care Manual
Introduction
Thank you for purchasing the D-Moticam BTX5-8 / BTX5-10/BTI8/BTI10 Tablet-Camera system. The
BTI provides an effective method of attaching a camera system to any c-mount trinocular
microscope using a 0.5x c-mount adapter. The image from the microscope can be viewed on the
provided tablet or via WiFi to any WiFi enabled device.
The camera portion of the BTI houses a WiFi transmission antenna. WiFi allows any WiFi
enabled device to view, measure and annotate the microscope image through the available
MotiConnect application. The MotiConnect app can be downloaded through Google’s PlayStore
or Apple’s AppStore.
Tablet Bracket Quick Assembly
Camera Registration
It is important to make sure you have registered your device on the Motic Images website:
Tablet Bracket
Moticam X5
C-Mount
Connect to the Moticam X5 WiFi signal –Quick Start
1. First plug the power supply (wall adapter and USB A to Micro USB cable) into the back of the Moticam X5
camera.
2. Press in the camera button to turn the camera on.
3. You will notice a Blue LED start to blink. During this time, the Moticam X5 will establish a WiFi network.
4. The Moticam X5 camera can support up to 5ea devices at one time.
5. Once the camera establishes its network, you will see the camera on WiFi list of available devices.
6. By default the Moticam X5 operates at 2.4 GHz. Instructions for switching it to 5 GHz can be found further
below.
7. The Moticam X5’s SSID signal is printed on a label on the camera. To log onto your camera, simply connect your
included tablet to that signal. The password for the network by default is 12345678.
MotiConnect Quick Start
1. From the main tablet screen, click on MotiConnect App Icon
2. Secondly, from the MotiConnect app, click on Camera Device. From here click on Motic WiFi Camera.
This will open the WiFi camera live image. You can begin viewing.
Using a WiFi device that operates with Android or IOS
1. For best performance, we recommend to use WiFi devices, such as tablets, with a screen not smaller than 7
inches. For iOS devices we suggest using iOS 5 or higher while for Android Devices we suggest using Version 4.0
or Higher.
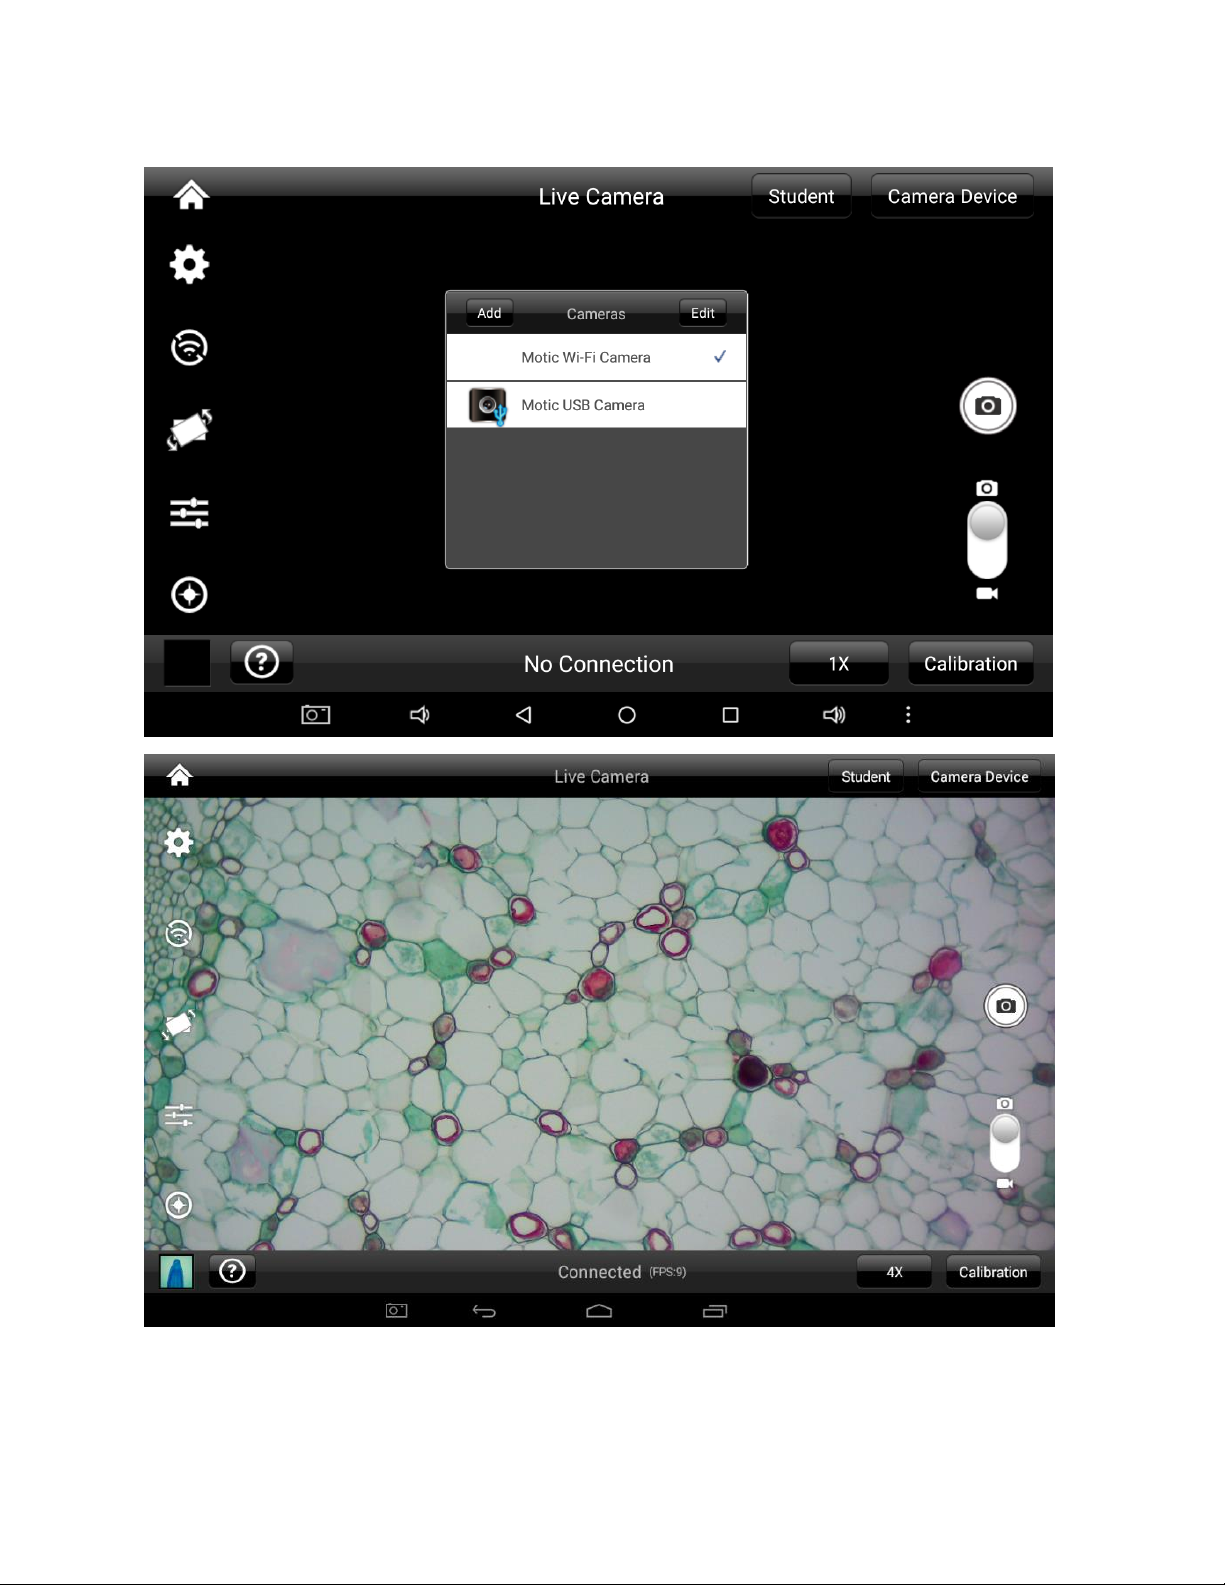
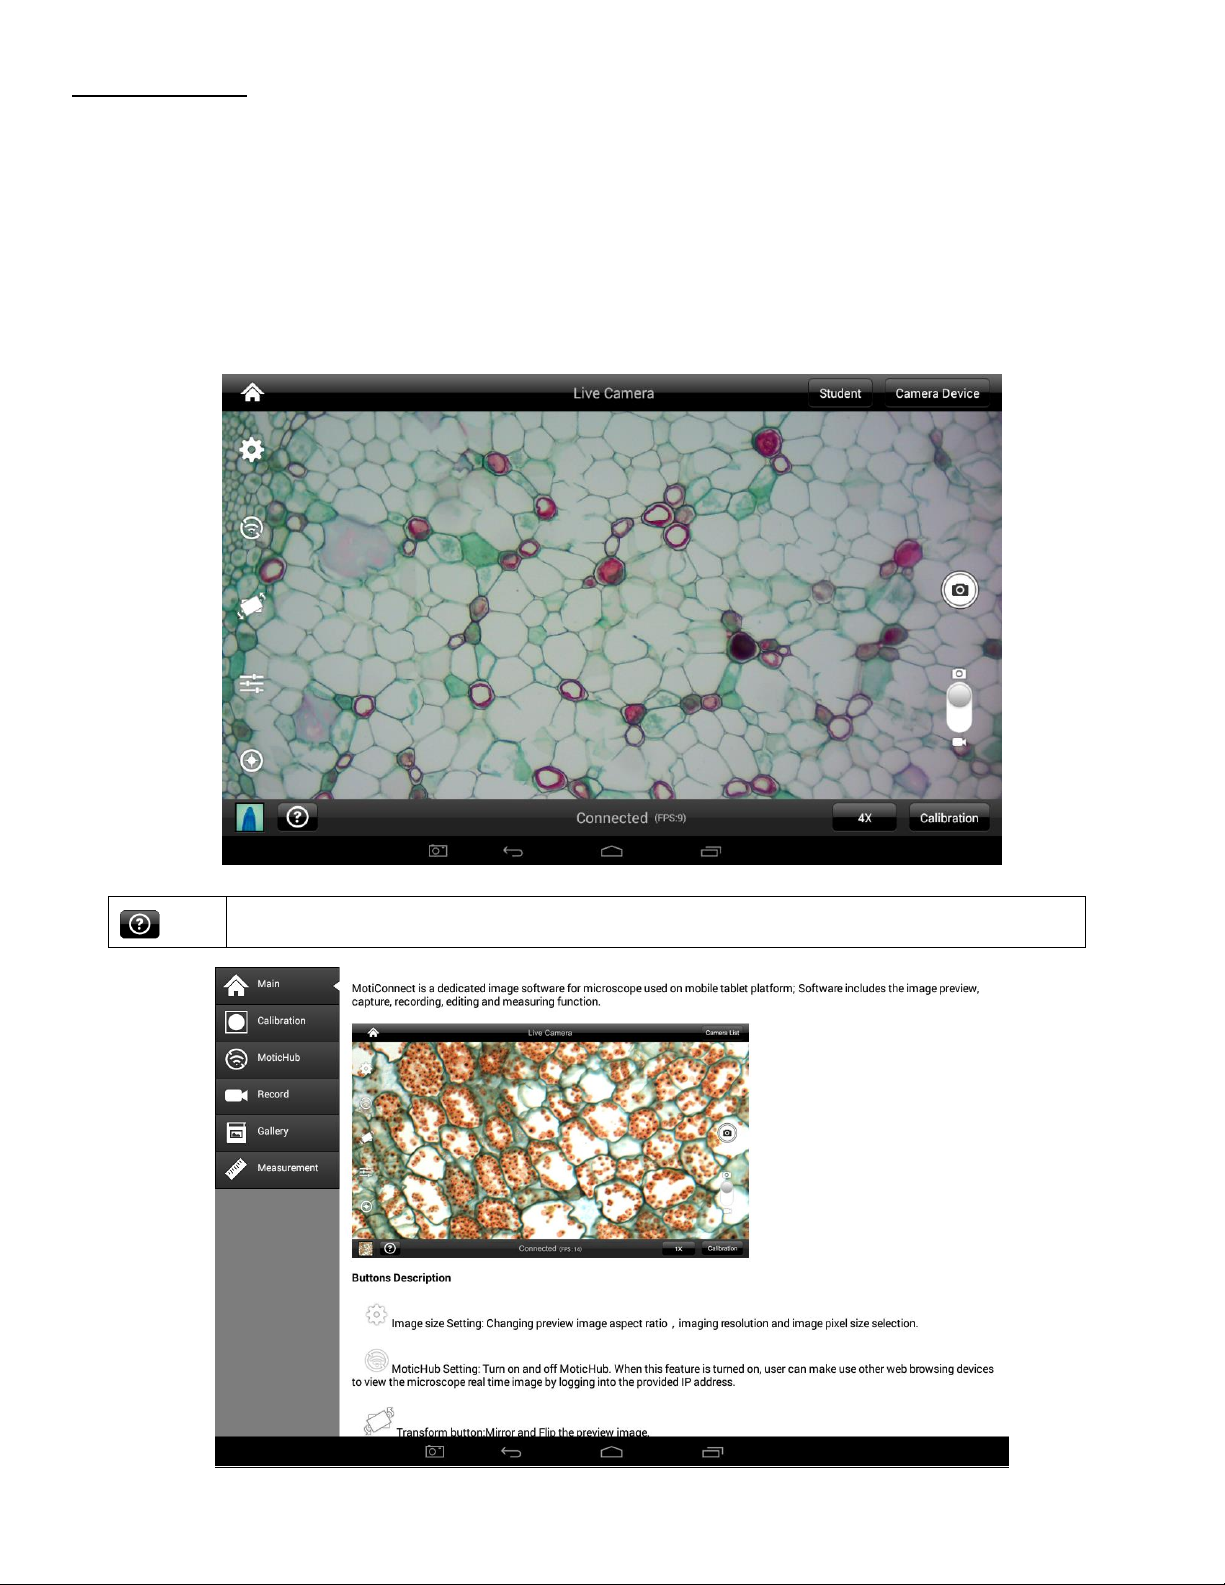
2. To operate and use the camera on your tablet, please download our free App called MotiConnect. For iPad you
can find this on the AppStore, for Android devices you can find this on Google Play.
Use the Moticam X5 on your WiFi or Network enabled computer
The Moticam X5can also be used with Motic Images Plus software. See links below for software download:
Motic Images 3.0 for Windows
(64-bit): https://www.dropbox.com/s/h85ubvwvktbabd3/Plus3.0ForPC%28x64%29.zip?dl=0
(32-bit): https://www.dropbox.com/s/jxy447co307ro19/Plus3.0ForPC%28x86%29.zip?dl=0
Motic Images 3.0 for Mac
https://www.dropbox.com/s/9ek73kynwcwyt1c/Motic%20Images%20Plus%203.0.dmg?dl=0
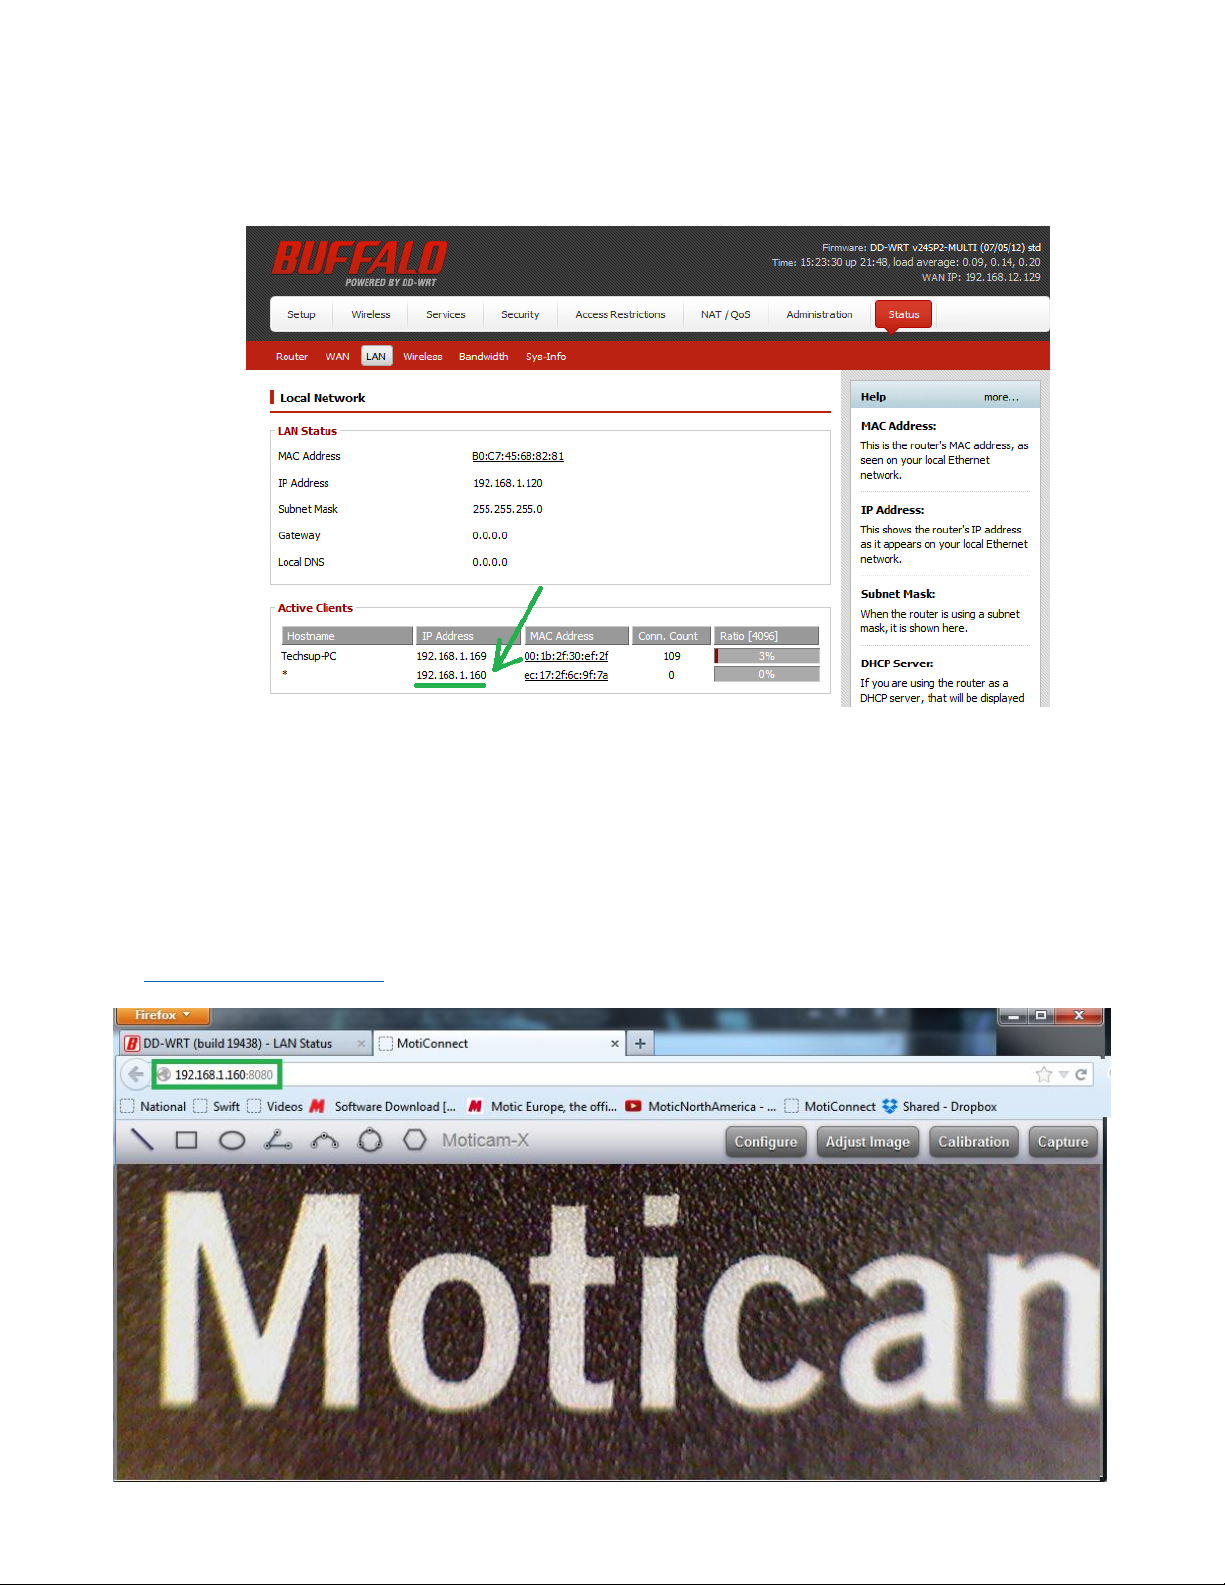
To view the camera in our product’s MI Devices interface, simply log your computer onto the Moticam X5WiFi signal, by
selecting this WiFi connection and entering the password. Then open the MI Devices interface by clicking on the camera
icon within Motic Images Plus and select Moticam X5 from the drop down menu. Then click on Open.
Switching the Moticam X5 between 2.4 GHz and 5 GHz
First, always make sure you have installed the latest version of the MotiConnect App or Motic Images software.
Secondly before switching from 2.4 GHz to 5 GHz make sure you are using a device with confirmed 5 GHz capability.
Failure to use a 5 GHz device will render the camera unusable until a 5 GHz device is connected. The Moticam X5 SSID
will not be visible to any 2.4 GHz devices in 5 GHz mode. Please heed this warning. 5 GHz mode will allow for faster
frame rates for improved video and screen resolution.
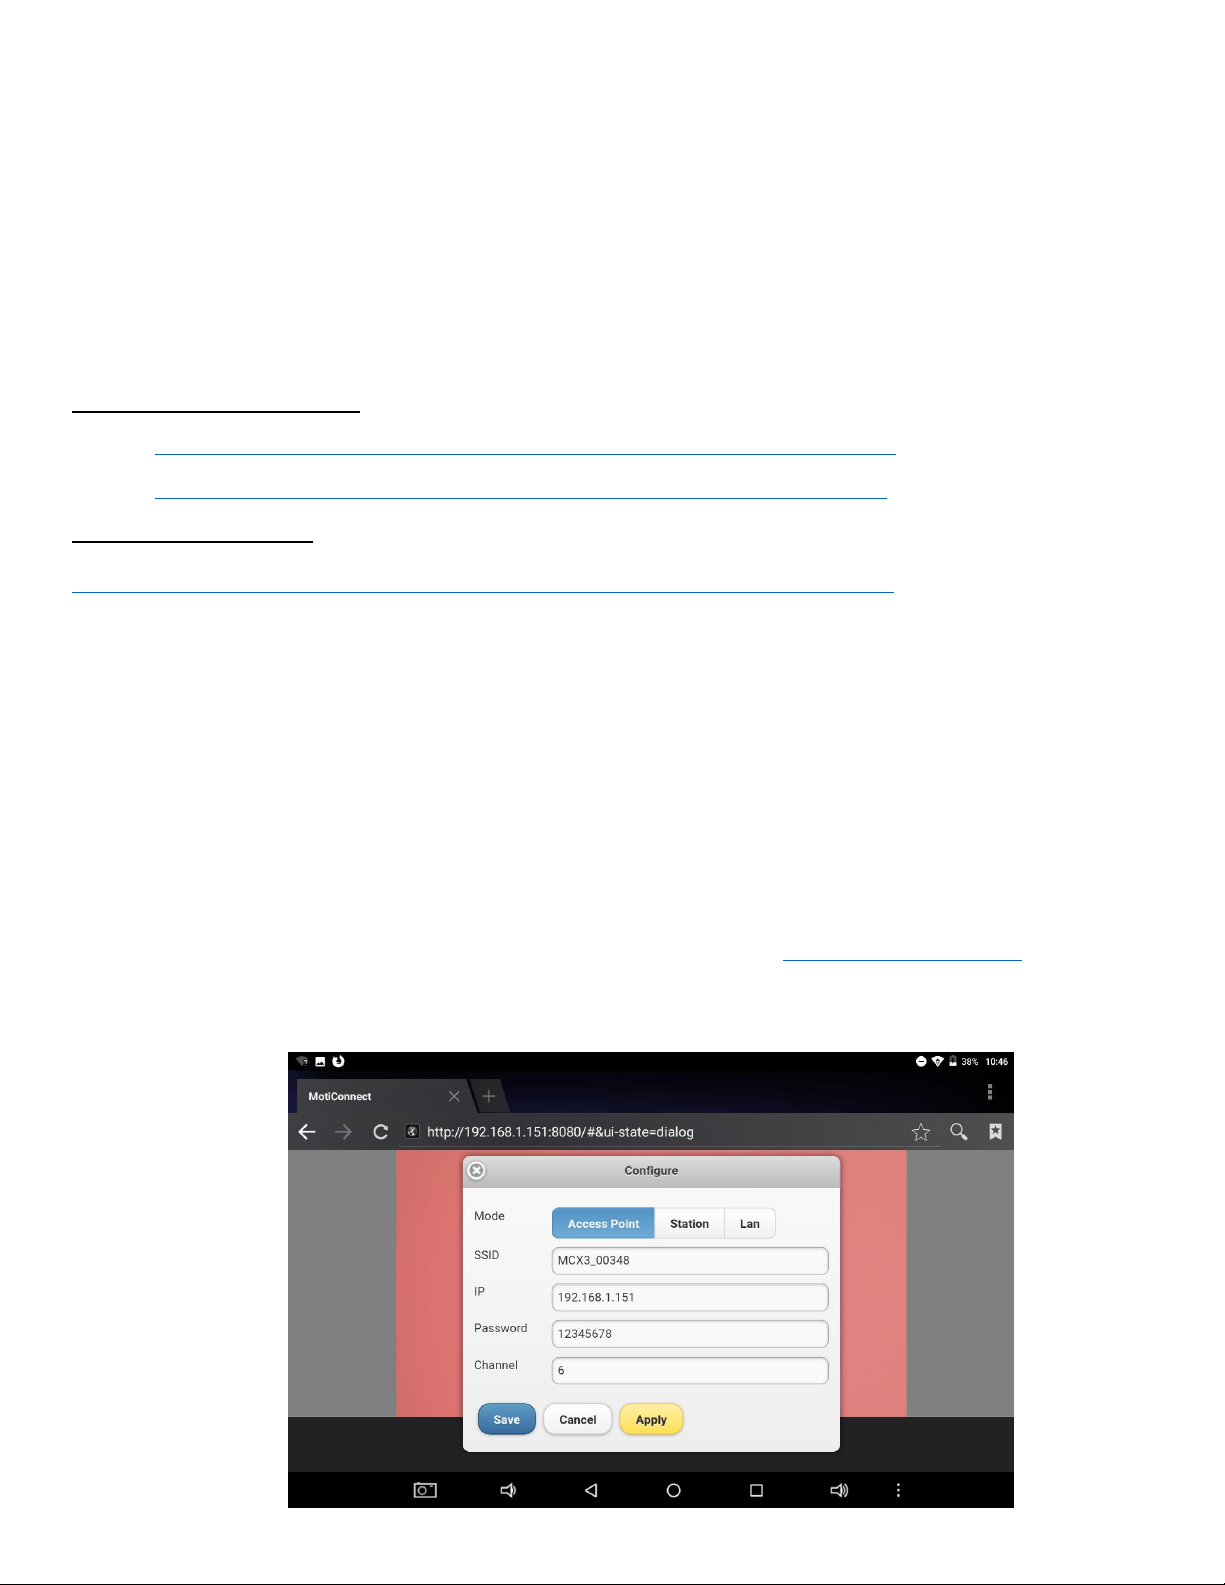
1. With your 5 GHz ready device open the IP app using any an HTML5 browser.
2. When the browser opens, type in the following in the address bar: http://192.168.1.151:8080
3. When the MotiConnect webpage opens, select the configure tab.
4. Under Access Point, locate Channel.
5. By default the Channel will be either 1 or 6: See picture below
•
6. When using either Channel 1 or 6, the camera can be used in 2.4Ghz mode.
7. If you wish to change the camera mode to 5Ghz, change the Channel to 149 or 157
•
8. Once changed, you will need to click on Save first, then Apply. Make sure to write down any and all changes
you make on this tab. Any changes made here will affect how you connect to the camera later.
9. The camera will disconnect and no longer be available for detection on any 2.4Ghz devices.
10. With your 5Ghz device, locate the camera on your available WiFi devices. The SSID and Password will
remain the same unless you changed it on the Configure Tab.
11. Open the MotiConnect app, select image adjustment icon, select H264, close and re-open the app.
12. There should be a noticeable increase in frames per second. (FPS rate will vary by device)
Linking the Moticam X5 to a network (Wired using RJ-45)
1) Connect an Ethernet cable from the RJ-45 port on the Moticam X5 to the back of your router in one of the LAN
ports and turn on the Moticam X5.
2) Go to your router’s configuration page (usually 192.168.0.1) and log into the router.
3) My router uses DD-WRT, and the following steps will be different for different brands of routers. You will need
to find where your router lists the IP addresses of devices that are connected to it. You will then find what IP
address was assigned to your Moticam X5, so that you may access the Moticam X5 from any device connected
to that network.
4) On my router, you click “Status” then you click the “LAN” tab in order to find the connected devices to the LAN.
The Moticam X5 shows up on my network as having a Hostname of * and an IP address of 192.168.1.160. The
new Moticam X5 will usually show up as “MoticamX” in the list of connections. Write down the IP address
assigned to your Moticam X5.
5) You may now enter the IP address into any browser of any device connected to the network, or you can use
Motic Images Plus 3.0 (PC or Mac) or MotiConnect (Android/iOS/Chromebook). In my case, I am using
http://192.168.1.160:8080
TABLET SOFTWARE
This android tablet comes equipped will all the necessary software needed to start using your equipment out of
the box. Since it is an android tablet, you will be able to connect to your office/school Wi-Fi network to access
the internet and download additional applications. The primary application for accessing your camera is
MotiConnect.
MOTICONNECT OVERVIEW –HELP MENU
MotiConnect is a dedicated image processing Android app for Motic cameras, which includes image preview,
capture, recording, editing and measuring functions. Please refer to the Application Help guide for a complete
description of the MotiConnect Application.
HELP BUTTON
Help Menu - Opens a new window which provides a complete description of all the features available with the
MotiConnect Application
CALIBRATION –(*Optional –not necessary to use your microscope*)
To prepare for the calibration process, please make sure you have the calibration slide. The calibration slide has
four individual dark round circles. Each dark round circle corresponds with each objective on your microscope.
•The 1.5mm dot (150um –microns) with the 4X objective.
•The 0.6mm (600um –microns) with the 10X objective.
•The 0.15mm (150um –microns) with the 40x objective.
•The 0.07mm (70um –microns) with the 100X objective.
To begin the calibration process, place the calibration on the stage.
1. First place your calibration slide on the stage, switch to the 4X objective, and move the slide over to the
1.5mm dot.
2. With the dot centered on the tablet screen, select the calibration button, located on the bottom right
hand side of the screen.
3. You should have a bright green circle on the screen.
4. Click the calibration button a second time.
5. This time the calibration settings window will open.
6. In the objective magnification window select the objective you captured the dot with. In this case the
4X objective.
7. In the diameter window select the diameter of the dot you captured. In this case the 150um. Then click
OK.
8. The last window that will open is the Save Sign window. Since you capture this image with the 4X
objective, it is best to enter this on this line.
9. The objective line should default to the objective you are calibrating. In this case it should say 4X.
10. The X and Y numbers on the next two lines should be near identical. Look at the first three numbers. As
long as they are the same within one or two digits, you have a good calibration.
11. Click Ok and you are done.
Calibration
To begin click on Create Calibration. Get out your Calibration Slide.
The software will capture the image from the preview mode and input the image into calibration mode.
Now put the Calibration slide on the stage of the microscope and focus the dot in the center of the screen. For
4x Objective, use the 1.5mm dot. For 10x Objective, use the 0.6mm dot. For the 40x Objective, use the 0.15mm
dot. For the 100x Objective, use the 0.07mm dot.
After your dot is in focus, select “Create Calibration” then “Calibration” to add a new set of calibration
parameters into the calibration table. You should have a bright green circle (shown below). If you don’t have a
bright green circle, the calibration failed. Make sure the slide is clean and the image has sufficient lighting.
If the calibration is successful, choose what objective you’re using on the microscope under “Objective
Magnification” then select the length of the diameter of the dot, then tap OK. A calibration is needed for each
objective that will be used in measuring, so repeat the process if necessary.
Software will provide the um/Pixel X and um/Pixel Y based on the previous users provided information.
Users can save those parameters with user assigned own Sign Name. This new Sign Name will be saved in the
calibration table for the future use.
Objective Magnification: If users change the objective magnification number, please ensure same magnification
number is selected on the software. There is no need to re-calibrate the system.
TRANSFERING IMAGES TO YOUR COMPUTER