Motor Scrubber ProWash User manual

1
PROWASH
USER
MANUAL

2 3
MotorScrubber ProWash
combines 2 machines, the
MotorScrubber backpack
system which connects to
the ProWash cart.
Short Handle ProWash
Available
Glass Fibre, Non-conductive
Poles Available

4 5
THANK YOU FOR
PURCHASING
MOTORSCRUBBER
PROWASH
ProWash has been designed to speed up your
cleaning, and make it easier for you to perform labour
intensive tasks with less eort. With 360rpm scrubbing
power you can expect outstanding cleaning results.
We hope you enjoy using your ProWash, please
feel free to leave comments and feedback at
motorscrubberclean.com/support.
MACHINE OVERVIEW .......................................................................................................................... 7
ProWash Cart ................................................................................................................................... 7
MotorScrubber ... ............................................................................................................................ 8
Harness ................................................................................................................................................. 9
POWER ............................................................................................................................................................... 10
ProWash Cart ................................................................................................................................... 10
MotorScrubber ............................................................................................................................... 10
ATTACHING THE CONTROL HANDLE ................................................................................. 11
FILLING THE WATER TANKS ......................................................................................................... 12
USING THE PROWASH ....................................................................................................................... 13
CLEANING METHOD ............................................................................................................................. 14
GENERAL INFORMATION ................................................................................................................ 15
Changing a Brush ........................................................................................................................ 15
Underwater Use ............................................................................................................................ 15
Adjusting the Flip Clip .............................................................................................................. 16
BATTERY INFORMATION ............................................................................................................... 17
MotorScrubber Battery ............................................................................................................ 17
Cart Battery ....................................................................................................................................... 17
Safety Information ........................................................................................................................ 18

6 7
PLEASE READ ALL INSTRUCTIONS
When using electric products, basic safety precautions should always be followed to
reduce the risk of electric shock and personal injury, including the following:
Consider your work area environment. When using the MotorScrubber be aware of
overhead electrical wires. MOTOR SCRUBBER IS POWERED BY DC CURRENT ONLY. DO
NOT ATTEMPT TO OPERATE MOTORSCRUBBER WITH AC CURRENT.
NON-CONDUCTIVE POLES ARE AVAILABLE ON SPECIAL ORDER.
• Always flush out chemical with clean water after every use.
• Never pull the MotorScrubber by its cord or yank it to disconnect it from the battery.
• Keep the cord away from heat, oil and sharp edges.
• Keep your MotorScrubber clean. For safer operation follow instructions for attaching
accessories. Keep the upper handle switch area dry, clean and free from oil, grease
and water.
• Disconnect the MotorScrubber when not in use AND WHEN ATTACHING
ACCESSORIES.
• Inspect for damage before using MotorScrubber.
• When servicing, use only genuine parts and accessories.
• MOTORSCRUBBER IS A POWER TOOL. AS WITH ANY POWER TOOL, ALWAYS USE
BOTH HANDS TO ENSURE SAFE OPERATION.
• Ensure you adopt the correct posture when using MotorScrubber. Adjust the position
of the control handle so your arm is straight when holding the handle. Your back
should be straight at all times.
Save these instructions for future reference.
HEALTH & SAFETY
When using the ProWash we
recommend the following PPE:
• Gloves
• Chemical Visor
• If using irritant chemicals we
recommend wearing waterproof
jacket and trousers

8 9
1. HANDLE GRIP
2. ON / OFF SWITCH
3. TRIGGER
4. WATER CONNECTOR
5. CONTROL HANDLE
6. FLIP CLIP
7. WATER PIPE
8. JET
9. MOTOR HOUSING
10. ROTATING DISC
MOTORSCRUBBER
OVERVIEW
10
1
2
3
4
5
6
7
98
Dierent Jets
available to change
the flow / spray
angle to suit your
requirements.
1. TROLLEY HANDLE
2. REEL HANDLE
3. 20M / 65FT HOSE
4. HOSE REEL
5. REEL LOCKING PIN
6. PUMP
7. BATTERY COMPARTMENT WITH
BATTERY & CHARGE PLUG
8. ON / OFF BUTTON
9. CHEMICAL BOTTLE
10. CHEMICAL HOSE
11. CHEMICAL DOSING DIAL
12. WATER HOSE
13. WATER BOTTLE CAP
14. 25L / 6.6GAL BOTTLE
15. CHASSIS
16. WHEELS
17. PUSH FIT CONNECTOR
PROWASH CART OVERVIEW
1
2
34
5
6
7
9
10
13
14
15
16
REAR VIEW FRONT VIEW
8 111217

10 11
1. BACKPACK
Before use, the battery coiled cord needs
connecting to the battery terminals. It
is vitally important to connect the cable
with the correct polarity. If the cable is
connected incorrectly it could cause fire
when plugged into the charger.
Open the battery compartment in the
harness. Connect the red wire from the
battery coiled cord to the red battery
terminal and connect the black wire from
the battery coiled cord to the black battery
terminal. Please contact you local dealer if
you have any questions.
To operate the MotorScrubber using
the harness, connect the electrical plug
(p9-4) from the battery to the electrical
plug attached to the handle on the
MotorScrubber (p9-5).
2. CART
Fully charge the battery before use, a full
charge takes 5 hours. You can give the
battery a top up charge after use.
A fully charged battery will give
you 8 hours continuous pump and
MotorScrubber use.
To charge the battery, open the battery
compartment door (p7-7), plug the charger
into the battery plug. Plug the battery
charger in the mains socket 110 - 240v.
CONNECTING THE POWER
To Handle To Backpack
1. CARRY HANDLE
2. CHARGER POUCH
3. BATTERY PACK
4. ELECTRICAL CONNECTOR
5. ELECTRICAL CABLE
The harness should be put over your
shoulders like a backpack. There are two
adjustable straps which can be pulled
to tighten the shoulder supports to a
comfortable user level.
The sternum clip oers extra support
and is tightened by pulling the
adjustment strap.
The Velcro belt strap can be fastened
across your abdomen or if you prefer not
to use this make sure this is fixed behind
you, then the shoulder straps only can
be used without the belt.
HARNESS OVERVIEW
1
2
3
4
5

12 13
• It’s important to fill both water
containers equally with fresh
water. You can purchase a quick fill
adapter to do this more easily (code:
MSPRO50).
• Both containers have been designed
so they can be easily lifted from the
trolley.
• Filling the water bottles Method 1:
1. Take the trolley to the nearest
water filling station
2. Unscrew the cap from each
bottle and remove the pipe
3. Fill each bottle with equal
amounts of water
4. Re-insert the pipe into each
bottle and ensure they are
pushed to the bottom of the
bottle
5. Screw each cap into place
• Filling the water bottles Method 2:
1. Remove the water hose via the
push fit connector, p7-17
2. Attach the push fit connector
to the quick fill hose adaptor
(MSPRO50)
3. Fit the hose adapter to your
tap and turn the water on. This
method fills each bottle equally.
• Fit the chemical bottle:
1. With a 5l chemical of your
choosing, slide the square or
round bottle into the bottle
compartment, p7-9
2. Unscrew the bottle cap
3. Feed the chemical hose into the
bottle, p7-10
NB: You can drill a hole in the bottle
cap and feed the hose through the
cap so it seals with your chemical
bottle, if required.
FILLING THE WATER & CHEMICAL
MSPRO50
ATTACHING THE CONTROL HANDLE
1. Cut the rubber strip into two pieces.
Place one piece into the half circle of
the handle grip and the other in the
half circle of the handle base. See
Fig 1.
2. The handle is best positioned 40cm
/ 16” from the bottom of the switch
housing however this can be placed
wherever is the most comfortable for
the user.
3. Make sure the on/oswitch is facing
downwards.
4. In your desired position, rest the
MotorScrubber pole in the half circle
of the handle grip, as shown in Fig 2.
Place the handle base directly on top
of the handle grip and insert the two
screws.
5. Use a 4.5mm Allen key to tighten the
two screws evenly. See Fig 3.
1. Handle Grip
2. Screws x 2
3. Rubber Strip x 1
4. Handle Base

14 15
• With the MotorScrubber at its
shortest length, rest on the surface
which is to be cleaned.
• Open the flip clip, p8-6, and extend
the pole using the surface to support
the weight of the MotorScrubber.
Once at its longest close the flip clip
into place.
• Working from the highest point
spray the chemical and turn your
MotorScrubber on. Move left to
right working the chemical into the
surface.
• Bring the MotorScrubber down in
small sections using the surface to
support the weight of the machine.
The MotorScrubber can be used at
dierent angles to clean all areas
without bending, you can switch
to the short handle for close up
cleaning tasks. Let MotorScrubber
do the work guiding it downwards
from left to right.
• To rinse switch othe chemical. It
takes 30 seconds to clear chemical
out of the pipe. Hold down the
trigger to spray down surface with
water
• You can purchase dierent length
handles for dierent cleaning tasks.
AFTER USE
• Ensure the pump is rinsed thoroughly
with only water.
• Disconnect MotorScrubber from the
water pipe.
• Rewind the hose and lock the reel
using the locking pin.
• Switch othe ProWash
• Ensure you store your ProWash clean
and dry.
Short
Handle
CLEANING METHOD
Position your ProWash centrally to your
cleaning task. The hose reel allows you to
clean 20m either side of your ProWash.
Fill both the water and chemical bottles as
per the instructions on page 11.
Connect the MotorScrubber battery as per
instructions on page 10.
1. First you must unlock the hose reel.
Located the locking pin, p7-5, on the
side of the hose reel. Pull outwards
using the metal ring and turn 90
degrees.
2. Unwind the amount of hose needed
for your job
3. Use the quick fit coupling at the
end of the hose to attach to the
MotorScrubber
4. Switch on the power button of the
ProWash cart, p7-8
5. Make sure the tanks are filled with
water and the chemical tap is in the
OFF position, p7-11. Pull the trigger
on the handle of the MotorScrubber
to prime the system this will take 1-2
minutes. This removes air from the
system.
6. You can now spray on demand.
When you are not spraying the pump
will build up to pressure and switch
oautomatically.
7. Set the chemical to your desired
level of dosing - 1% to 9%; Turn
the tap anti-clockwise to open the
chemical flow, this will automatically
mix with the water. To increase the
amount of chemical simply open the
tap more, to stop the flow turn the
tap clockwise to the OFF position.
ATTENTION: If the chemical tap is turned
past the OFF position, to the right, it
will draw air into the system and lose
pressure.
USING THE PROWASH

16 17
ADJUSTING THE FLIP CLIP
The flip clip allows for super fast adjustment of the telescopic pole
Release the black clip by pushing up the release catch. Adjust the pole to your desired
length then push the black clip back into position.
TIGHTENING
If the telescopic pole is slipping while in use
you will need to ensure the clip is tightened
appropriately.
To do this locate the green adjustment
screw and ensure the black clip is in an
open position as indicated in the photo, left.
Being careful not to over tighten, turn the
screw clockwise until you can comfortably
push the black clip back into its lock
position. If the black clip is dicult to push
back, turn the green screw anti-clockwise
until it is easy to push back into position.
For an instructional video please visit
motorscrubberclean.com/support
1. Turn the MotorScrubber upside down and support with the
inside of your foot. See picture.
2. Line-up the tabs on the disc with the hub on the MotorScrubber.
3. Hold the hub firmly to prevent rotation. Press down while
turning the disc clockwise until it locks in place.
4. To remove, press down on the disc and turn it counter-
clockwise holding hub until tabs are free. Then lift othe disc.
CHANGING A MOTORSCRUBBER BRUSH
UNDERWATER USE
• Because its motor head can be fully-immersed
in water, the MotorScrubber is ideal for many
underwater cleaning tasks. One of the more popular
uses of the MotorScrubber is cleaning the “scum line”
above the water level in swimming pools, spas, boats,
etc.
• Immersing the head for long periods of time could
aect its water-proofing seals due to the eects of
prolonged heating and cooling. The seals could
contract and allow water to make direct contact
with the motor, which would cause a motor failure.
Guidelines need to be followed to avoid this.
• The seals should be inspected before each use to
check for signs of corrosion that would compromise
its water tightness. If the unit is used underwater on
a regular basis an internal inspection of the head is
required each month by a competent technician, this
is to check for water ingress.
•WE RECOMMEND NOT USING THE
MOTORSCRUBBER FULLY SUBMERGED IN WATER
FOR MORE THAN 2 MINUTES CONTINUOUSLY.
MOTORSCRUBBER SHOULD THEN BE REMOVED
AND ALLOWED TO COOL FOR 5 MINUTES.
• Waterline cleaning where MotorScrubber is half in
and half out of the water has no limitations.
• Regular underwater usage will reduce the lifetime of
the head unit. MS4000 complete motor head can be
purchased and replaced when required. 1 year is the
suggested life of regular underwater use.
Submerge
up to 25cm
away from
the switches

18 19
IMPORTANT SAFETY
INSTRUCTIONS
• To protect against risk of electrical
shock do not put battery charger in
water or any other liquid.
• Do not operate in the presence of
explosives and/or flammable fumes
or liquids.
• Do not store or carry battery so that
metal objects can contact battery
terminals - the battery could short
circuit causing fire, personal injury or
damage to the battery.
• Never attempt to open battery for
any reason. If the housing of the
battery breaks or cracks, immediately
discontinue use and do not recharge.
The battery should be replaced.
• Do not charge a battery if it is wet or
shows any evidence of corrosion.
• Do not incinerate the battery; it can
explode in a fire.
• Plug the battery charger directly into
a 120VAC/60HZ or 240VAC, with the
correct plug adaptor, electrical outlet
(Do not use an extension cord).
• Charge the battery only with the
MotorScrubber battery charger.
• Do not use the charger in wet or
damp conditions. It is intended for
indoor use only.
• Do not use the charger near sinks or
tubs. Do not immerse in water.
• Do not allow the cord to hang over
the edge of a table or counter, or
touch hot surfaces.
• Do not use the charger for any other
uses other than MotorScrubber
batteries.
• Do not operate charger with
damaged cord or plug, have them
replaced immediately.
• Do not operate charger if it has
received a sharp blow, been dropped
or otherwise damaged in any way.
Return the appliance to your local
distributor for examination, repair or
electrical or mechanical adjustment.
Do not disassemble charger.
• For best results do not charge a
battery when it or air temperature
is below 40°F (5°C) or above 105°F
(40°C).
• Unplug the charger when not in use
and before cleaning or maintenance.
• Do not abuse the cord. To reduce the
risk of damage to the electric plug or
cord, never carry the charger by its
cord or yank the cord to disconnect.
Instead, grasp the charger plug and
pull to disconnect. Keep charger cord
away from heat, oil and sharp edges.
• Flush eyes and skin with water if
contact is made with acid.
•NEVER ATTEMPT TO OPERATE
THE MOTORSCRUBBER FROM AN
ELECTRICAL OUTLET. OPERATE
THE MOTORSCRUBBER ONLY
FROM THE 12-VOLT BATTERY.
BATTERY INFORMATION
The ProWash system uses
2 batteries, 1 for the cart
and 1 in the backpack to
power the brush.
MOTORSCRUBBER BATTERY
1. First, connect the coil cord into the
charger and then plug the charger
directly into a 120 VAC/60HZ or 240
VAC electrical outlet.
2. You can use an adapter or a charger
made for the AC source being used.
(Do not use an extension cord).
3. When the MotorScrubber is fully
charged the light will turn green.
4. IMPORTANT After charging,
disconnect the charger from the
outlet and disconnect the charger
from the battery.
• MotorScrubber uses a rechargeable
sealed lead-acid battery
• Capacity: 12-volt, 7.0 amp-hour
• Non-spillable
• Depending upon the average depth
of discharge, over a 1000 discharge/
charge cycles can be expected.
• Do not charge in a gas-tight
container
• Do not short the battery terminals
• Do not incinerate
• Flush with water at once if contact is
made with electrolyte (acid)
• The battery should be charged
before using your MotorScrubber,
after each use, and if unused for 4
months. A full charge takes 8 hours.
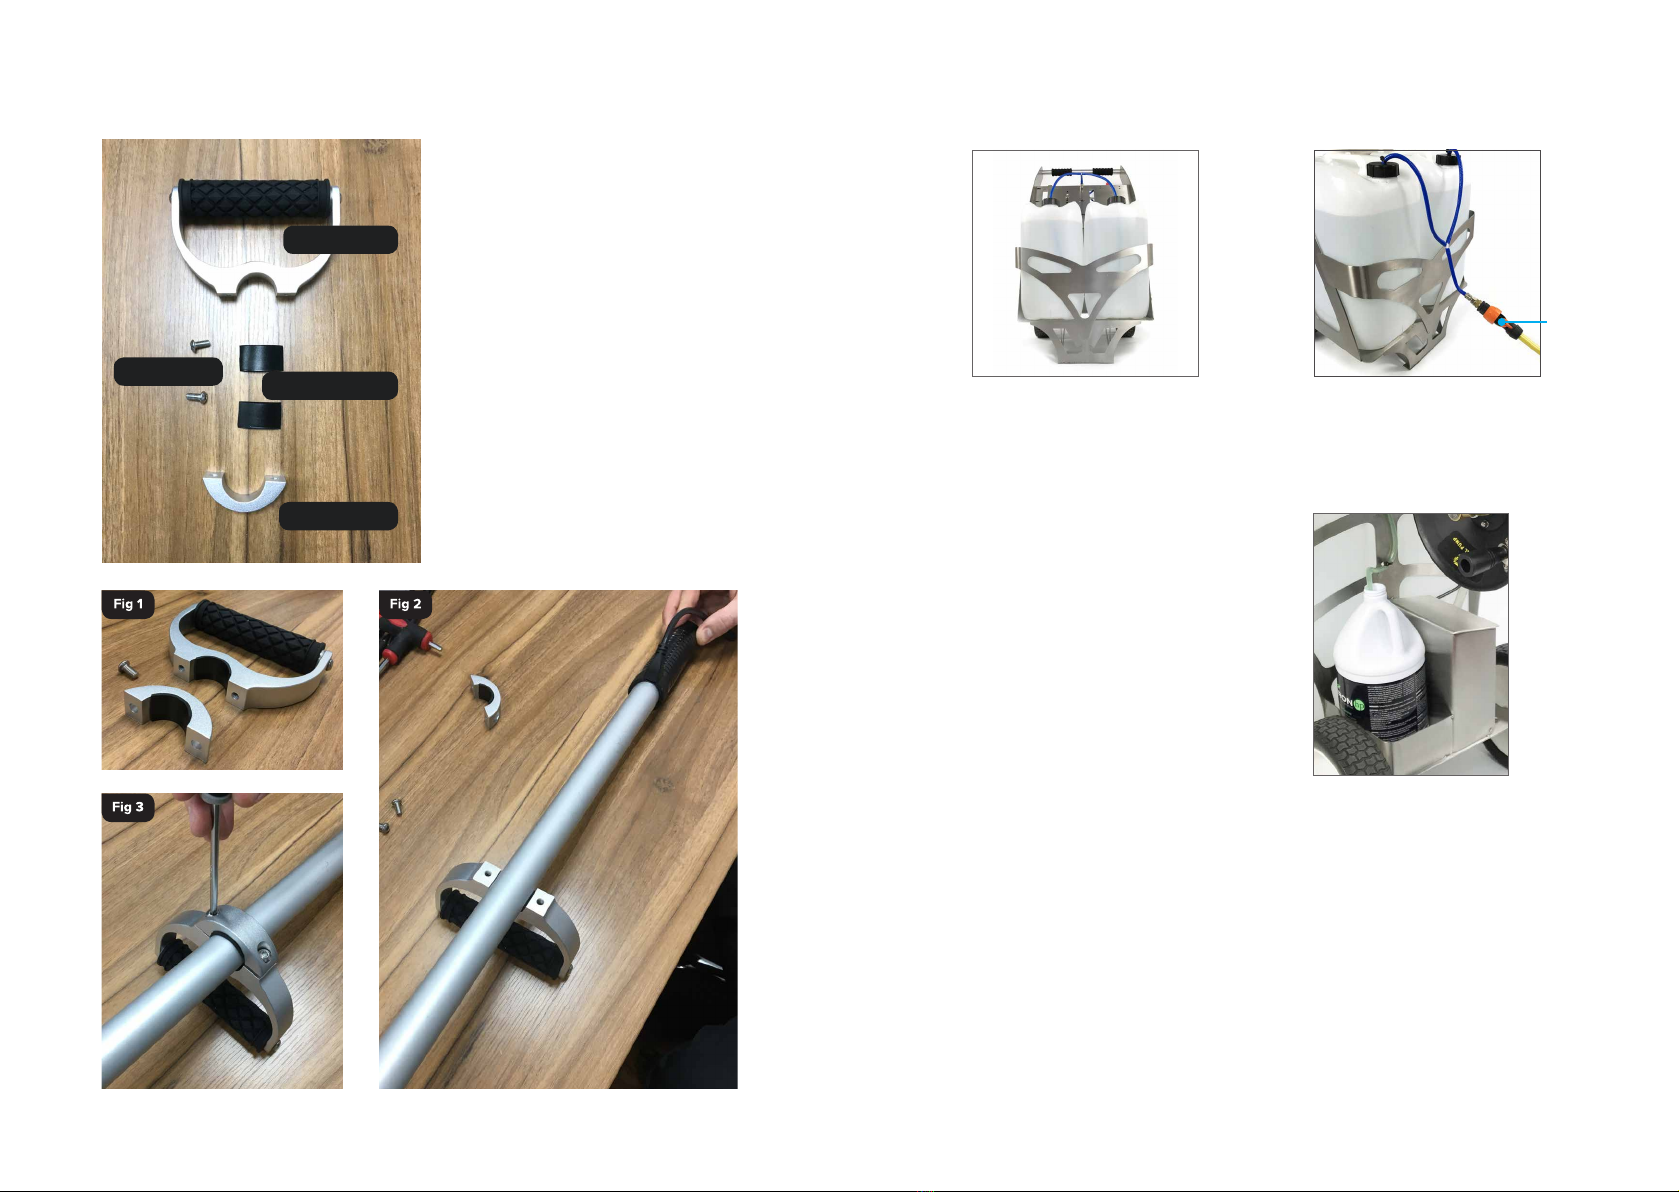
CART BATTERY
• Fully charge the battery before use,
a full charge takes 5 hours. You can
give the battery a top up charge after
use.
• A fully charged battery will give
you 8 hours continuous pump and
MotorScrubber use.
• To charge the battery, open the
battery compartment door (p7-7),
plug the charger into the battery
plug. Plug the battery charger in the
mains socket 110 - 240v. Visit our YouTube
channel for
instructional videos

20
PHOTOS VIDEOS INFORMATION
MOTORSCRUBBERCLEAN.COM
Table of contents