Moultrie 35mm User manual

IMPORTANT:
•Please take a few moments to read and
understand these instructions before
using the your camera system.
•Please call Moultrie Customer Service at
(205) 664-6700 if you have any questions.
•Don't forget to send us your registration.
•Good luck and have fun with your
wildlife photography.
Instruction Manual
Instruction Manual
35mm Wildlife
Surveillance Camera
Photo System
35mm Wildlife
Surveillance Camera
Photo System
Q
UICK
S
TART
G
UIDE
Q
UICK
S
TART
G
UIDE
P
AGES
3 & 4
60045_10504_cvr.pdf

60045_10504_pg.1.pdf
Tracking Game
To track game, set up the Game Spy system to record the activity automatically. The imprinted
photos will show you when and what type of wildlife frequents the area day or night.
General Surveillance
The Game Spy system can be used as a device to monitor areas that might be prone to criminal
activity. The automatic flash can also act as a deterrent to repel would be criminal activity. The
Game Spy system can be used anywhere that requires constant surveillance.
Photo Fun
Remove the camera and use it for any event, day or night, that requires a quality focus free
camera. Take pictures of family, friends, scenery, sporting events, vacations, etc…
Questions or problems call us
Moultrie Customer Service
(205) 664-6700 page 1
INTRODUCTION
Your wildlife surveillance system is easy to use. Infrared activated, it
records events on 35mm film and or counts activity on a LED display.

page 2
QUICK START INSTRUCTIONS
1Load fresh alkaline batteries
2-9V in unit & 2 AA in camera.
Match polarities (
+) and (
+).
Set camera date back, close
camera lens and connect plug
to camera port.
2
3Secure camera, open camera
shutter, and slide unit power
switch to (ON) and back to
(OFF), then push camera test
button.
Close camera Shutter, remove
camera & load film, connect
plug to camera, close cover.
4
60045_10504_pg.2.pdf

page 3
QUICK START INSTRUCTIONS
5Mount system, aim with
laser, switch to off.
7Set test switch to (IR test), close
cover, turn unit on and wait at
least 1 min. for the unit to warm
up. Step aside and wait for the
light to go out. Any motion will
activate the blinking red light.
Switch unit off, return test switch
to (normal).
6Set surveillance functions:
MODE: 24 HR or daylight only.
DELAY: 1,5,or 20 minutes delay
between photos. If you have any problems, check:
•Are batteries fresh and installed properly?
•Do you have enough daylight in location?
•Is the camera lens open?
•Is the camera plugged in?
•Is the film loaded properly?
•Is the test switch in normal?
•Is the power switch on?
•Is the unit in the delay period?
•Change batteries and set up again.
8Lock case, switch unit on and
wait at least 1 min. for the unit
to warm up. If you want to test
fire system and take the first
picture, wait for delay time to
expire and walk in front of unit.
if not, do not walk in front of
unit!
For more help call: Moultrie Customer Service (205) 664-6700
60045_10504_pg.3.pdf

page 4
1
10
11
12
13
14
15
16
17
18
19
20
21
22
23
24
25
26
27
28
29
2
3
4
5
6
7
8
9
PARTS
1. Carry Clip Lug
2. Flash Port
3. Low Light Sensor Port
4. Lens Port
5. Camo Cover (optional)
6. Light Sensor
7. Infrared Sensor
8. Event Light
9. External ON/OFF Switch
10.Mounting Strap Lug
PARTS
11. Control Box Latch
12.Lockable Latch
13.Event Counter LED
14.Reset Button
15.Display Button
16.Delay Switch
17. Daylight/24hr. Switch
18.Sensor Test Switch
19.Computer Control Panel
20.9V Battery Holders
PARTS
21.Foliage Tie Down Lug
22.Camera Test Button
23.Protective Foam Padding
24.Camera Hold Down Socket
25.Camera Power Plug
26.Mounting Hole
27.Camera Back-up Battery Holder
28.Tripod Socket
29.Moisture Seal
CONTROL BOX IDENTIFICATION
60045_10504_pg.4.pdf

page 5
Cover Camouflage Cloth Cover (optional)
Construction Weather-resistant and lockable
Mounting Screw or adjustable strap
IR Sensor Infrared, heat & motion detection
IR Sensor Range 3.3 ft. - 26.2 ft. or 1m. - 8m
IR Sensor Angle 22° (+ or - 11°)
Automatic Activity triggers the 35mm camera
ON/OFF External switch
User Switch Panel Concealed
Mode Switch 24 hr. or daylight only
IR Switch Test or normal
Delay Switch 1/5/20 minute between event
Display Switch Lights counter
Reset Button Resets counter
LED Event Counter Stores up to 90 events
Camera Test Checks camera
CPU Power Supply Dual 9 volt batteries
Camera Back-up Battery Holders Holds 6 AA
alkaline batteries: see "Battery Facts" pg. 10 of these
instructions
Foam Padding Protect camera
Control Cable Quick connection to camera
Control Box Size (w)6.75" x (h)10.3" x (d)2.95"
Control Box Weight 32 oz. (including batteries)
CONTROL BOX SPECIFICATIONS
60045_10504_pg.5.pdf

page 6
PARTS
1. Shutter Release Button
2. Low Light Sensor
3. Focus Free Lens
4. Electronic Flash
5. Red-eye Reduction Lamp
6. Lens Cover ON/OFF Switch
7. Auto/Fill Flash Switch
8. Surveillance System Port
9. Flash Ready Light
10.DX Film Window
PARTS
11. Viewfinder
12. Film Imprinting Mode Switch
13. Year/Hour Button
14. Month Button
15. Day/Minute Button
16. LCD Date or Time Indicator
17. Wrist Strap Lug
18. Self-Timer
19. Film Chamber
20.Film Sprocket
PARTS
21. Film Take-up Spool
22.Film Tip Mark
23.Exposure Counter
24.Back Door
25.Battery Chamber
26.Automatic Rewind Switch
27. Tripod Socket
28.Back Door Latch
CAMERA IDENTIFICATION
1 2 3 4 5
76 8
9
19 20 21 22 23
25 26 27 28
10 11 12
13
14
15
16 17 18
24
60045_10504_pg.6.pdf

page 7
Type 35mm focus-free
Film Size 35mm color, black & white, print or slide
Film Speed IS0 200 - 800 (IS0 400 or 800 for best results)
Lens Quality precision optics
Film Loading Easy loading
Film Advance Motorized
Film Rewind Motorized, manual rewind switch
Exposure Counter Yes
Flash Built-in electronic
Fill-Flash (Auto/Fill button)
Red-Eye Reduction Yes
Ready Light Green LED type
DX Window Indicates type of film in use
Viewfinder Type big viewfinder
Tripod Socket Yes
Data Back Type LCD, time, date, or nothing
Data Back Display Year, month, day or time or nothing
Power 2 - AA alkaline batteries (without film and batteries)
Wrist Strap Keeps camera ready for action
See camera specification insert for more details on your model camera
CAMERA SPECIFICATIONS
60045_10504_pg.7.pdf

page 8
LOADING BATTERIES
9 Volt Batteries for Control Box
Open the control box by swinging the Control Box Latches (11)
open. Insert two fresh 9V alkaline batteries into the 9V Battery
Holders (20). Make sure that the + or - on the batteries match
the + or - indicated in the 9V Battery Holders (20). Make sure
the batteries are secured in their holders.
AA Batteries for Camera
Open the Battery Chamber (25) by sliding the latch in the
direction indicated by the mark on the cover. Place 2 AA
alkaline batteries into the Battery Chamber (25). Make sure
that the + or - on the batteries match the + or - indicated on the
battery chamber door. Close the battery chamber door. Make
sure it is closed securely.
Back-up Power Supply for Camera
Your wildlife camera system also comes with an additional
power supply for long camera life. Insert six fresh AA alkaline
batteries into the Camera Back-up Battery Holders (27). Make
sure that the + or - on the batteries match the + or - indicated in
the Camera Back-up Battery Holders (27). When using back-
up battery holders, alkaline batteries must always be installed.
CAUTION! Always use alkaline batteries, NEVER
rechargeable. Rechargeable batteries may damage circuitry
and void your warranty.
60045_10504_pg.8.pdf

page 9
Your wildlife camera system is battery operated. To provide maximum functionality and battery life you
need to be aware of the following Information.
• Use "alkaline" batteries ONLY. Rechargeable or non-alkaline batteries will cause poor camera
performance, damage the circuitry, and void your warranty.
• For best camera performance, install "alkaline" batteries in all available 9 volt or AA battery slots.
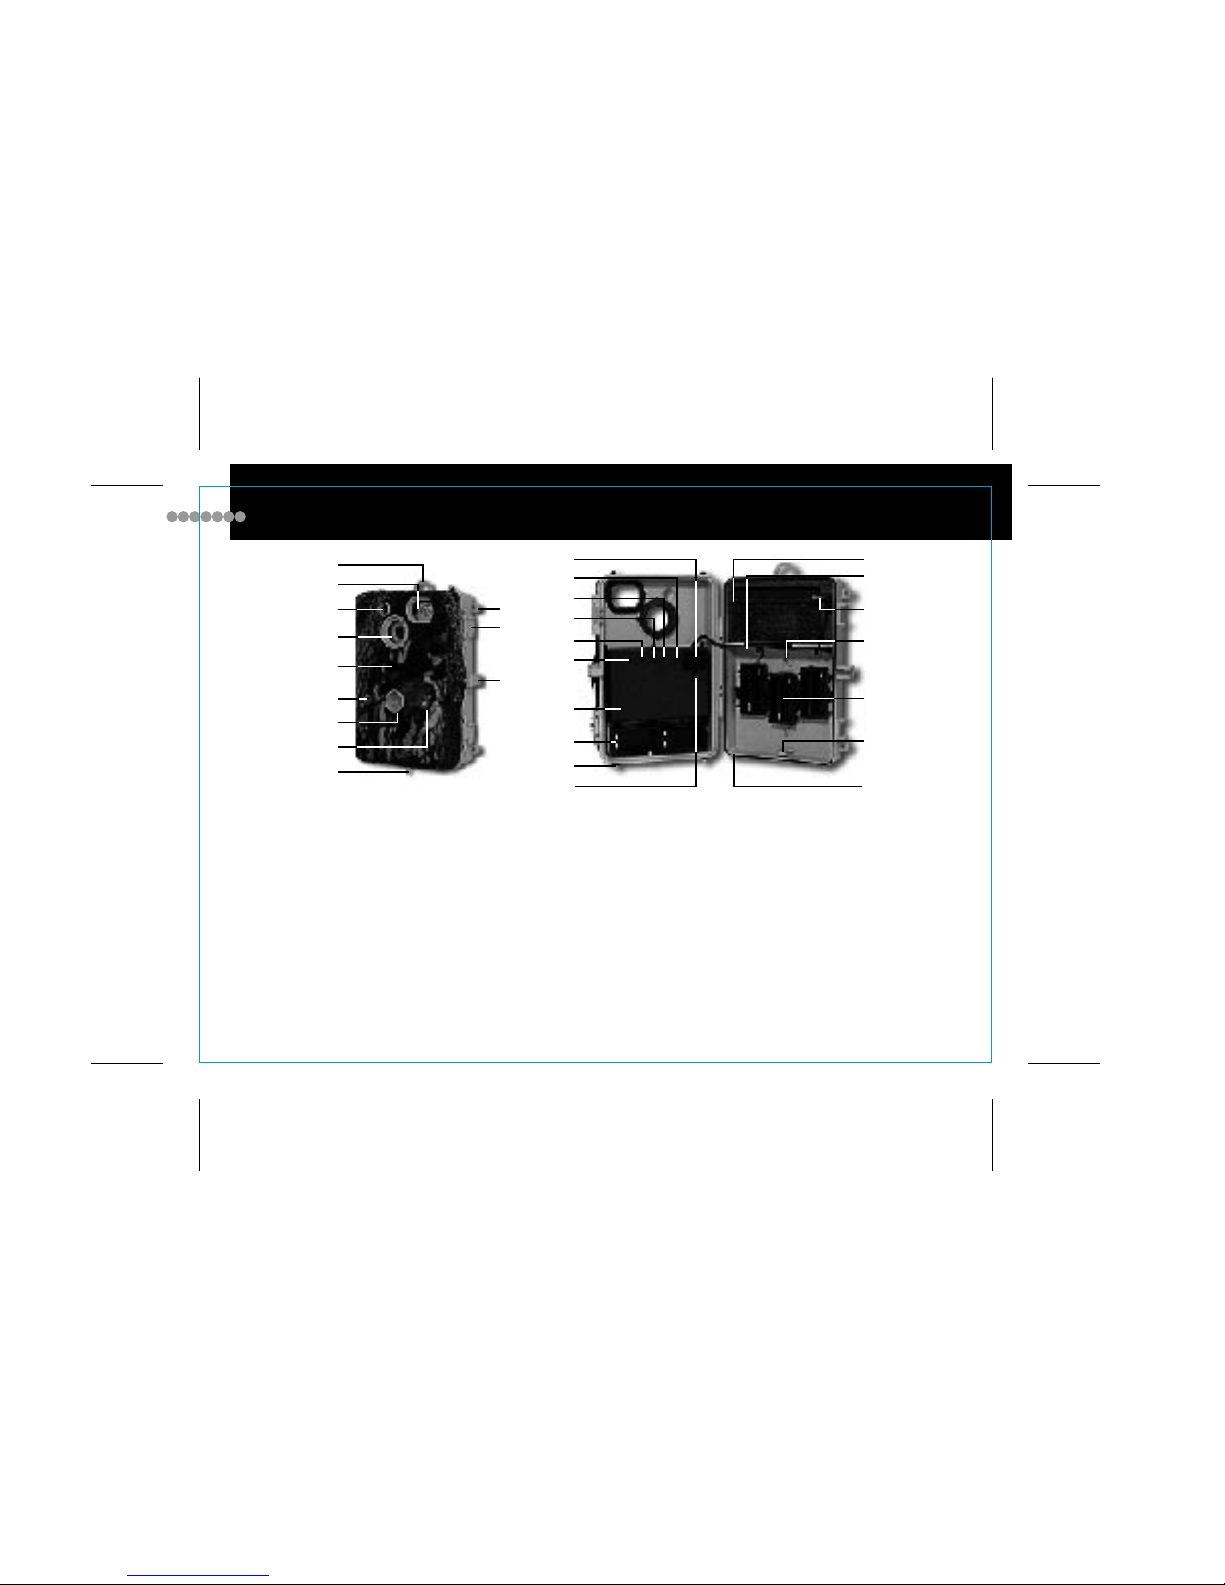
• The two 9 volt battery holders power the control box electronics that consist of the infrared sensor,
computer controlled activation circuitry, and event counter display.
• You can expect at least 7 days of continuous operation from one set of fresh 9 volt alkaline batteries.
• The two AA cells in the camera power the camera motor and flash.
• Cold weather will decrease battery life.
• While the 35mm camera will operate on its 2 AA alkaline batteries, we recommend that the camera
back-up battery holders be used for best camera and flash performance. Up to six additional AA alkaline
batteries can be inserted in the camera back-up battery holders. They are for camera and flash functions
only and must be inserted in pairs (2, 4, or 6).
• The AA alkaline battery life will vary greatly depending on the amount of pictures taken with and without
the flash. You can expect a fresh set of alkaline batteries to last 7 days or 144 flash exposures.
Note: After 7 days use, always replace the AA alkaline batteries to insure proper camera operation.
For Longer Battery Life
• Use the camera in the auto flash mode only, never fill-flash mode.
• Use longer delay periods.
• Use in daylight only mode.
• Always use fresh alkaline batteries.
• Use back-up camera AA alkaline battery supply.
• Check battery power with a battery checker or change alkaline batteries each time you change film.
CAUTION: Never use rechargeable or non-alkaline batteries. They may damage the electronic
circuitry and void guarantee.
BATTERY FACTS
60045_10504_pg.9.pdf

page 10
SETTING UP GAME SPY CAMERA SYSTEM
24 HR
DAY
MODE
20
5
1
DELAY
IR TEST
NORMAL
TEST
CAMERA
TEST
Attaching Control Box To a Tree or Pole
Using a bungee cord, attach the camera system to a tree or pole approximately 2.5 or 3 feet
above the ground. Make sure the camera is secure and will not move from the desired location.
Selecting Operation Mode
You can choose two types of operation modes to trigger the system. Slide the mode switch to the
appropriate setting.
• (24 hr. mode), The system will take a picture regardless of light situation 24 hours a day.
• (Day mode), during bright daylight hours
Selecting Delay Time
You can select any of three delay times. You can select 1 minute, 5 minutes or a 20 minute delay time
between pictures. Slide the switch to the appropriate time delay. The delay mode will not
automatically change after the switch has been changed, until the next picture is taken. Press the
camera test button to override.
Testing Camera
When the Camera Test Button (22) is pressed it will activate the camera to make sure the camera is
working properly. This will take one picture every time the button is pressed and the event counter will
add one digit to the Event Counter LED (13). Test will also work without film loaded.
Testing Infrared
To test IR Sensor, slide the Sensor Test Switch (18) upward to the "IR Test" setting and close the cover.
The IR sensor detects heat and motion, if working the IR sensor will activate a red LED light. The sensor
will work without triggering the camera. After testing the IR sensor, return the switch to "Normal"
position for normal operation. This mode is used to also aim the control box by walking in front of the
Game Spy system and noting when the red light comes on, indicating you are in the field of view.
60045_10504_pg.10.pdf

60045_10504_pg.11.pdf
page 11
Aiming Control Box
To aim your camera system, open front cover, slide the Sensor
Test Switch (18) upward to the "IR Test" setting and close cover.
Position and aim the system at your desired target area. Move
around to the front of the control box and check when the IR
sensor activates (with a red light). If it is not aimed properly
repeat the process until your desired target area is achieved.
Return Sensor Test Switch (18) to the "Normal" position after
system is aimed. Note: The maximum range of the IR Sensor
(7) is 26.2 ft.
Loading Film
To Load film, you must first turn the external ON/OFF switch to
OFF. Open the control box cover and remove the camera. To
remove the camera, Unscrew the camera mounting bolt from the
control box camera ledge and unplug the Camera Power Plug
(25) from the Surveillance System Port (8). Now the camera can
be removed. Open the Back Door (24) by sliding the Back Door
Latch (28) upward and gently swinging the door open. Insert
the film cartridge into the Film Chamber (19). Make sure the film
is completely inside the chamber. Pull the film leader out and lay
it across the Film Take-up Spool (21) until it extends to the Film
Tip Mark (22). Make sure that the film leader also engages
Film Sprocket (20). Check the film and make sure it is in the film
chamber completely. Close the Back Door (24) firmly. The
Exposure Counter (23) will show "S". Continue pressing the
Shutter Release Button (1) until the Exposure Counter (23)
shows the number "1". You are now ready to take a picture.
Important: Make sure the lens cover is closed all the time until
the camera has been securely connected to the control box
via the cable provided.

SETTING UP CAMERA SYSTEM
page 12
Turn Camera ON
Turn the camera on by sliding the Lens Cover ON/OFF Switch (6) to
the OPEN position and wait for the green Flash Ready Light (9) to
come on. Press the Shutter Release Button (1) a few times until the
Exposure Counter (23) indicates "1". The camera is now activated.
Important: Make sure the Exposure Counter (23) is rotating, which
indicates the film is advancing properly. Reinstall camera and make
the camera is secured with mounting bolt. Note: Do not activate the
fill-flash feature while the camera is being used with the game
camera system.
Turn Control Box ON
To turn the control box on slide the External ON/OFF Switch (9) to
the ON position. The your wildlife surveillance system is now
activated and ready for use.
Attaching & Removing the Camouflage Cloth Cover
To attach cloth cover, wrap around the front cover of system. Slip the
elastic tie down rings over the Foliage Tie Down Lugs (21) on the top
and bottom of system cover. Secure Velcro®tab Important: Make
sure that the cloth cover does not obstruct any optic or sensor ports
on the cover. To remove the cloth cover turn the system off and
simply do the reverse.
ON
60045_10504_pg.12.pdf

page 13
Retrieving Control Box
When you are ready to retrieve the system, approach the system from the back. Do not
stand in front of the system during this process. Switch the External ON/OFF Switch (9)
to the OFF position. This ensures that the sensor will not detect you and activate the
camera. Open the front cover of the control box. Turn the camera Lens Cover ON/OFF
Switch (6) to the OFF position. To check your event counter, turn the External ON/OFF
Switch (9) to the ON position and press the event counter Display Button (15). To clear
the display hold down BOTH the event counter Display Button (15) and Reset Button
(14). Note: The event counter may show more events than the pictures your camera
has taken. This is because the event counter records virtually all events and the camera
takes pictures of single events based on the selected delay time that you set
(see pg. 11). Unscrew the camera mounting bolt to release the camera from the control
box camera ledge. When you want to remove the camera from the system, unplug the
Camera Power Plug (25) from the Surveillance System Port (8) and remove the camera
from the control box. Remove the film. Important: Replace batteries with a fresh set of
alkaline batteries every time you change the film. Close the control box cover, remove
mounting straps and store accessories. You are now ready to transport control box.
Rewinding Film
When the Exposure Counter (23) indicates that you have taken the number of exposures
shown in the DX Film Window (10), and will no longer advance the film, you are at the
end of the roll. Important: you must rewind the film before opening the back door and
removing. Slide the Automatic Rewind Switch (26) in the direction of the arrow. The
camera will automatically rewind the film. Never open the door when the rewind motor is
running. Open the Back Door (24) by sliding the Back Door Latch (28) in the direction of
the arrow. Remove the film cartridge and take your exposed film to the processor as
quickly as possible.
MOVING CAMERA SYSTEM CHECKING EVENT COUNTER REWINDING FILM
OFF
60045_10504_pg.13.pdf

Camera will not work
External power switch not turned on. Lens cover ON/OFF
switch not turned on. Batteries low or installed incorrectly.
Camera not plugged in. Film is at the end of the roll.
Replace with fresh film. Control box test switch set in IR test
mode. Game camera system in delay mode.
Sensor will not work (Infrared)
Lens cover ON/OFF switch not turned on. Batteries low or
installed incorrectly. Camera not plugged in. External power
switch not turned on. Foliage obstructing sensor. Make sure
sensor is not blocked. Game camera system in delay mode.
Film will not advance
End of roll; rewind film and have it processed. Lens cover
ON/OFF switch not turned on. Batteries low or installed
incorrectly.
Blurry or partial pictures
Clean dirty lens port. Foliage obstructing lens optics, clear
away from lens port. Cloth cover not installed correctly.
Foggy pictures
Dirty lens port, blow loose dirt away and gently clean with
soft, lint free cloth or an untreated lens cleaning tissue.
Pictures too dark
Subject is not within flash range.
Control panel not working properly
External power switch not turned on. Batteries low or
installed incorrectly.
No wildlife captured in pictures
System left set to IR test mode. Switch to normal mode.
Animal moved too quickly for the camera to capture it.
System not aimed at area of high activity.
No pictures taken at night
System left set to day mode. Switch to 24-hour mode.
All pictures show only one animal
All pictures taken too quickly
System left set to a short delay time. Switch to a longer
delay time (5-minutes or 20-minutes). Try setting system up
in a different area.
Game Camera System damaged when you return
A person tried to steal or tampered with your surveillance
system. Use the security cable and padlock to ensure its
safety. An animal tampered with your game camera
system. Try a different location for it, preferably further
from the ground.
page 14
GAME CAMERA HELP
60045_10504_pg.14.pdf

page 15
35mm CAMERA SETTINGS
Film Imprinting
Mode Switch Day / Minute Button
Year / Hour Button Month Button
Installing Batteries
You cannot take pictures with this camera unless the batteries are
loaded properly and the lens cover is open. (see page 9)
Film Imprint Modes
To imprint (year-month-date) or (hour-minute) on pictures, press the Film
Imprinting Mode Switch (12) until the mode you want shows in the LCD
Date or Time Indicator (16). Select the type of imprint you want using
the Year/Hour Button (13), Month Button (14), or Day/Minute Button
(15). You can also choose not to have anything imprinted on your
pictures (- - - - -).
Loading Film & Turning Camera ON
(see pages 12 & 13)
Red-eye Reduction
Your camera comes with an automatic Red-eye Reduction Lamp (5) that
activates automatically when the Electronic Flash (4) is on. Pressing
down on the Shutter Release Button (1) activates the Red-eye Reduction
Lamp (5).
Fill-flash
When the sun or any bright light source is behind your subject, it acts as
a backlight and causes the subject to appear dark in the pictures. Fill-
flash will help you get better results in these situations. To activate the
fill-flash,
slide the Auto/Fill-Flash Switch (7) to the "ON" position
and wait for the Flash Ready Light (9) to come on.
Note: Always
turn flash off when not needed to conserve battery life.
60045_10504_pg.15.pdf

page 16
Dual Purpose
The 35mm camera within your wildlife surveillance system can also be
used for everyday use. Simply remove the camera from your control box.
Low Light Sensor
When pictures are taken in low light situations such as indoors or
outdoors in heavy shade or on dark overcast days, a flash is needed.
Your camera features a low light sensor that will automatically fire the
flash when it is needed.
Automatic Film Advance
The camera will automatically advance the film to the next exposure when
the shutter button is pressed and a picture is taken.
Step 1
Outside on bright sunny days, simply look through the Viewfinder (11)
and compose the picture you desire. Try to have your main subject well
lighted with the sun overhead or behind you, not behind the subject. For
best results keep your main subject at least 5' away.
4.9 ft.
∞
infinity
DUAL USE OF 35mm CAMERA
2 IN 1 MODULAR SYSTEM
60045_10504_pg.16.pdf

page 17
0 ft. 5 ft. 18 ft.
Flash Range
TAKING PICTURES WITH 35mm CAMERA
Step 2
Your camera has an Electronic Flash (4) that will automatically work when the surrounding light is not
sufficient, such as indoors, nights, or cloudy days. Turn the camera on by sliding the Lens Cover ON/OFF
Switch (6) to the "ON" position and wait for the Ready Light (9) to come on. You may now take a picture. If
your subject is backlit use the fill-flash feature (see pg. 16). Important: Always wait for the ready light to be
ON before taking a picture. Make sure that your subject is within the flash range. Turn the flash off when
not needed to conserve battery life.
Step 3
Hold the camera steady. Press the Shutter Release Button (1). For best results try to have the sun overhead or
behind you. The camera will automatically advance the film for your next picture until the last picture.
Important: Make sure that your fingers do not
cover up the lens or the flash.
Rewinding the Film
(see page 14)
60045_10504_pg.17.pdf

page 18
35mm CAMERA HELP
Shutter will not work
Lens cover ON/OFF switch not turned on. Alkaline
batteries low or installed incorrectly.
Film will not advance
Film not loaded properly, reload film. End of roll,
rewind film and have it processed.
Exposure counter does not turn when shutter button
is pressed
Indicates the film is not loaded properly and should
be reloaded. Alkaline batteries low or installed
incorrectly.
Film will not rewind
Indicates film rewind switch is not activated fully or
alkaline batteries low or old.
Blurry pictures
Lens obstructed by fingers, strap. Camera not held
steady or subject moved.
Pictures too dark
Not enough light on subject. Use a higher speed
film. Use fill-flash button when subject is backlit.
Subjects off center or cut off
Frame main subject in center of viewfinder.
Ready light off
Lens cover ON/Off switch not turned on. Alkaline
batteries low or installed incorrectly.
Ready light slow to light
Alkaline batteries are weak or have expired and
should be replaced.
Flash pictures too dark
Subject beyond flash range or picture taken before
ready light is on.
Flash pictures too light
Subject too close.
Short battery life
Turn off lens cover ON/OFF switch when you do
not use the camera. Alkaline batteries not used.
60045_10504_pg.18.pdf

page 19
CARE AND SERVICE
CONTROL BOX
1)Clean control box with a moist cloth
followed by a dry cloth.
2)Never store in a car.
3)Always clean lens and sensor optics by
blowing gently to remove dust and dirt
and wiping gently with a soft, lint free
cloth or an untreated lens cleaning tissue.
4)Clean computer control board and
battery chambers with a dry cloth. Do not
use lens cleaning fluid.
5)Do not use in freezing temperatures.
CAMERA
1)Store your film and camera away from
heat or direct sunlight.
2)Never store in a car.
3)Never wipe or rub lens, always clean with
lens cleaning fluid.
4)Always use fresh film and have your film
processed as soon as possible after you
have removed it from your camera. Do
not use lens cleaning fluid.
5)Do not use in freezing temperatures.
60045_10504_pg.19.pdf
This manual suits for next models
1
Table of contents
Other Moultrie Security Camera manuals
Popular Security Camera manuals by other brands

Marshall Electronics
Marshall Electronics CV610-U3-V2 user manual

Vicon
Vicon ROUGHNECK V910 Installation & operation manual

First Alert
First Alert PRO-DC2 BRK Series user manual

Dahua
Dahua IPC-PDBW82041N-B360 quick start guide

ONWOTE
ONWOTE Security NVR Kit Quick user guide

Vivotek
Vivotek IP9164-HT user manual