MOYA iSPA User manual


FCC WARNING
This device complies with part 15 of the FCC Rules. Operation is subject to the following two
conditions: (1) this device may not cause harmful interference, and (2) this device must accept
any interference received, including interference that may cause undesired operation.
Any changes or modifications not expressly approved by the party responsible for compliance
could void the user's authority to operate the equipment.
NOTE: This equipment has been tested and found to comply with the limits for a Class B
digital device, pursuant to Part 15 of the FCC Rules. These limits are designed to provide
reasonable protection against harmful interference in a residential installation. This equipment
generates, uses and can radiate radio frequency energy and, if not installed and used in
accordance with the instructions, may cause harmful interference to radio communications.
However, there is no guarantee that interference will not occur in a particular installation.
If this equipment does cause harmful interference to radio or television reception,
which can be determined by turning the equipment off and on, the user is encouraged to try to
correct the interference by one or more of the following measures:
-- Reorient or relocate the receiving antenna.
-- Increase the separation between the equipment and receiver.
-- Connect the equipment into an outlet on a circuit different
from that to which the receiver is connected.
-- Consult the dealer or an experienced radio/TV technician for help.
To maintain compliance with FCC’s RF Exposure guidelines, This equipment should be
installed and operated with minimum distance between 20cm the radiator your body: Use
only the supplied antenna.
11
0.05 ± 0.01PPM
SMART
TOUCH PANNEL
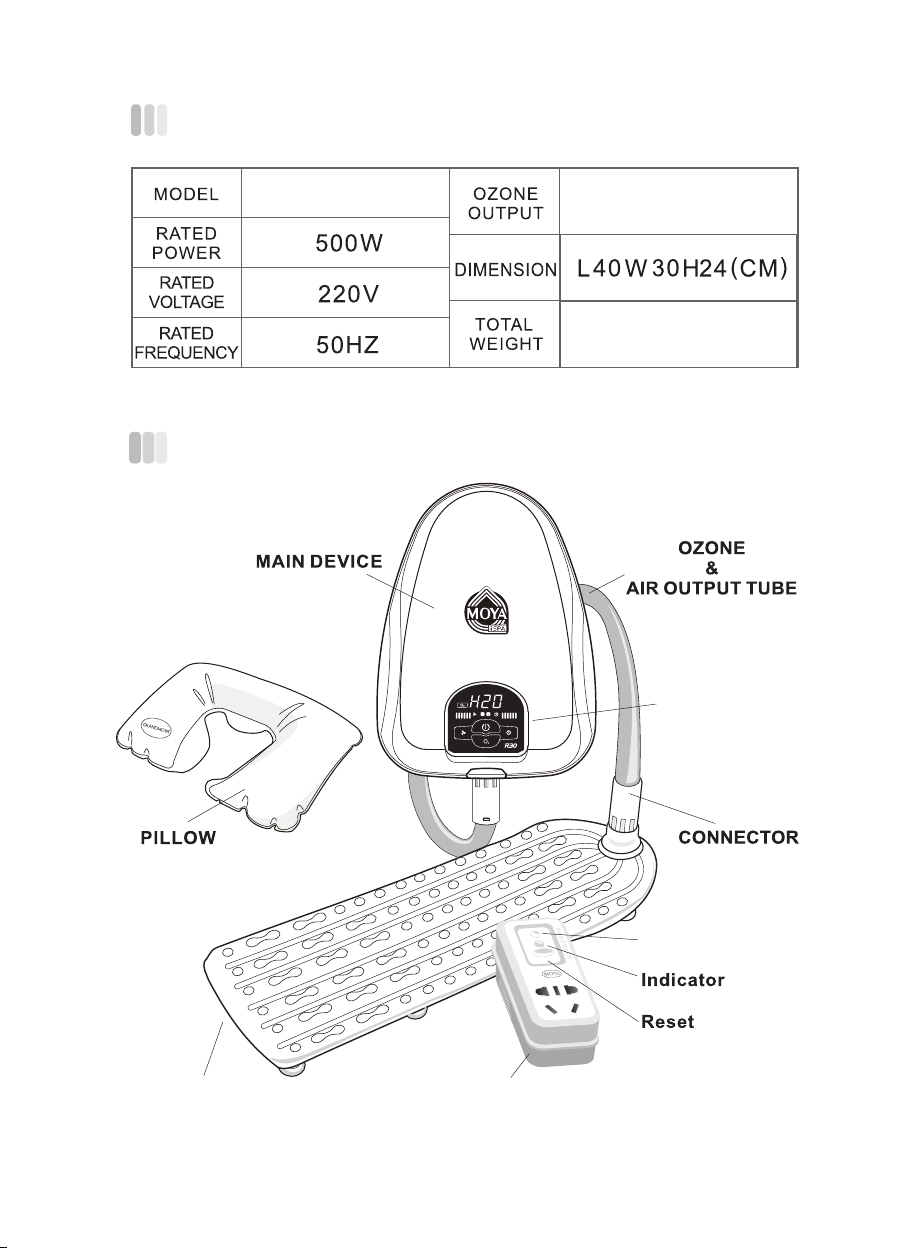
Specifications for iSPA
5.6 KG
T
测试復位使用前应进行测试
ENERGY EMITTING
SOFT PAD
LEAKAGE
PROTECTION PLUG
iSPA
Illustration of i-SPA Components

12
The control panel is divided into upper and lower areas, namely, status
display area and functional control area.
Status display area: display usage time, air quantity , ozone status, lock,
Bluetooth connection and other device status.
The functional control area adopts the touch control mode, and the user can
touch the opening equipment, air quantity, time length and other related
operations.
Status
Display
Area
Functional
Control
01
02
03
04 Air volume
Time
Automatic cycle indicator
Time status bar
Bluetooth indication
Lock in the indicator
Air volume status bar
ozone indicator
Power
Time
Ozone
Air volume
Status display area
Functional control
01 02
03
04
0506
07
08
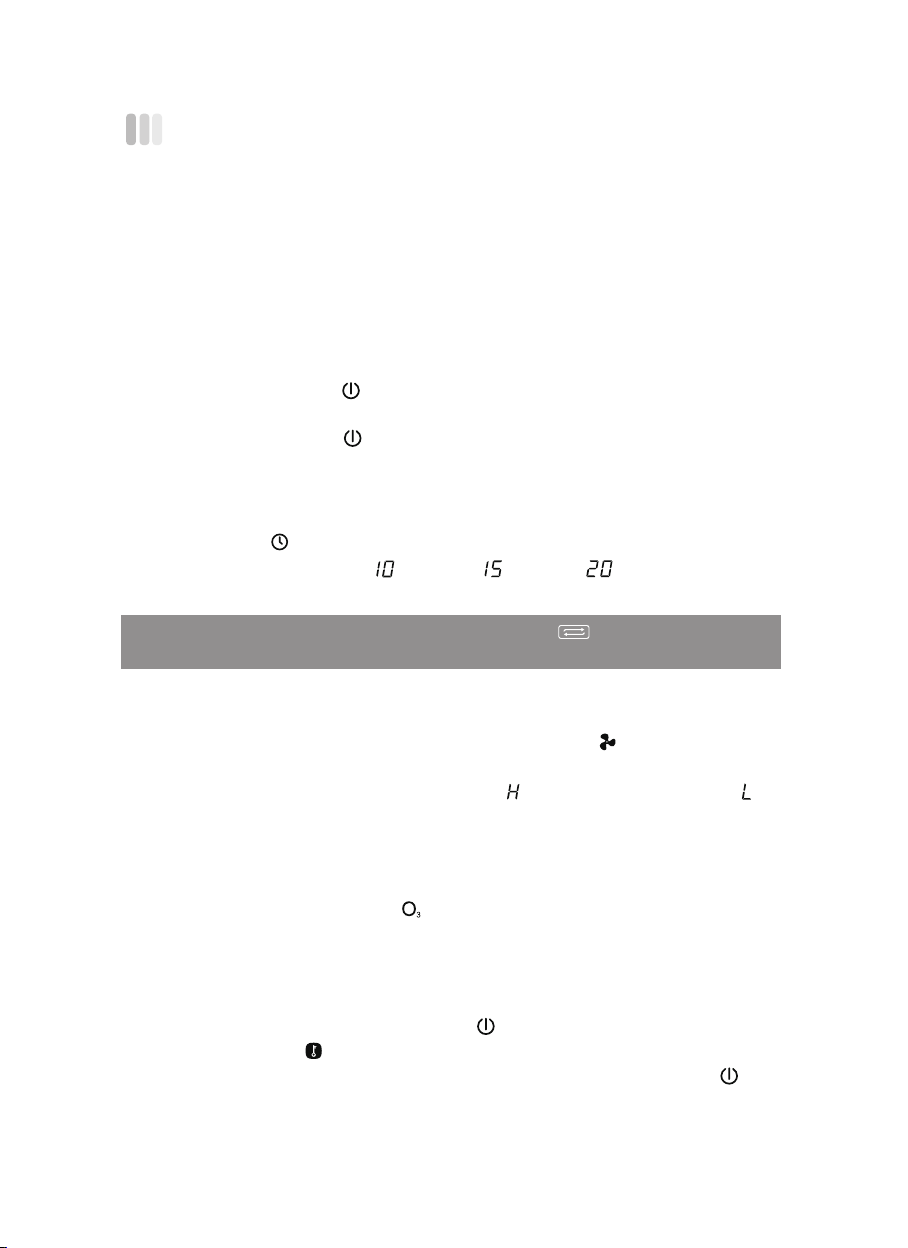
Control Panel Introduction
13
Equipment Operation Instructions
Before starting the machine, please confirm that the equipment power
plug is installed on the leakage protector equipped with the product (see the
'leakage protector' on the next page), and check whether the power supply
is normal, the equipment power indicator is on, indicating that the power
supply is normal.
Lock panel
Keep pressing the power button ( ) on the control panel for three
seconds to lock the indicator light.Open panel lock mode, pressing any
control key on the equipment panel; continuously press power key ( ) for
three seconds.
Start and close equipment
When the power supply is connected to the indicator light and turns on,
press the power button ( ) to start the device.The equipment is automati-
cally set to high speed mode, running for 15 minutes, the ozone is turned on;
press the power button ( ) again to close the power equipment.
Time adjustment Please adjust the time adjustment knob in the function-
al control area ( ), You can adjust the time.
Time adjustment
Time setting is divided into: minutes, minutes, minutes, automatic
cycle mode.
Note: When the automatic circulation indicator lamp () is on, the equipment
will enter the automatic continuous operation mode.
Please adjust the air volume adjustment knob ( ) in the functional
control area.
Air volume adjustment
Wind volume adjustment with wind volume and small wind volume to
provide user choice in cycle mode.
Touch the ozone button(),on the control panel to turn the ozone
function on or off.
Opening and closing ozone (O�)

Mobile Bluetooth Control
The APP in the iphone
Store searches for "GSPA"
or scans the QR code above
the iOS app and downloads
it on the mobile client.
scan the QR code above the
Android app and download
and install it on the mobile
client. * lease confirm the
Bluetooth permission in wechat.
Scan the QR code of the
above WeChat small program
or type "i巨晴摩雅" in Weixin
search to install WeChat .
iOS Android Wechat
The MOYA iSPA R30 has a Bluetooth wireless connection function, using
the mobile client connection steps:
1) Turn on Bluetooth online in the phone.
2) Download and install the following "GSPA" mobile application or wechat
applet to add attention.
3) After the installation or attention, open the application to add the device
and make online matching, you can use the mobile phone to control the
device.
Leakage Protection Plug
Test
T
测试復位使用前应进行测试
This device is to ensure the equipment to
operate under normal and safe conditions.
The status and steps in use are as follows:
1. Leakage protection test: Click the "reset"
button, the indicator lights up, indicating the
power is normally on; click the "test" button
to turn it off, indicating the leakage protection
is effective;
2. Click the "reset button" and the indicator
lights up, and the iSPA can be used normally.
3. Before every usage, please follow the above
steps for testing
14
15
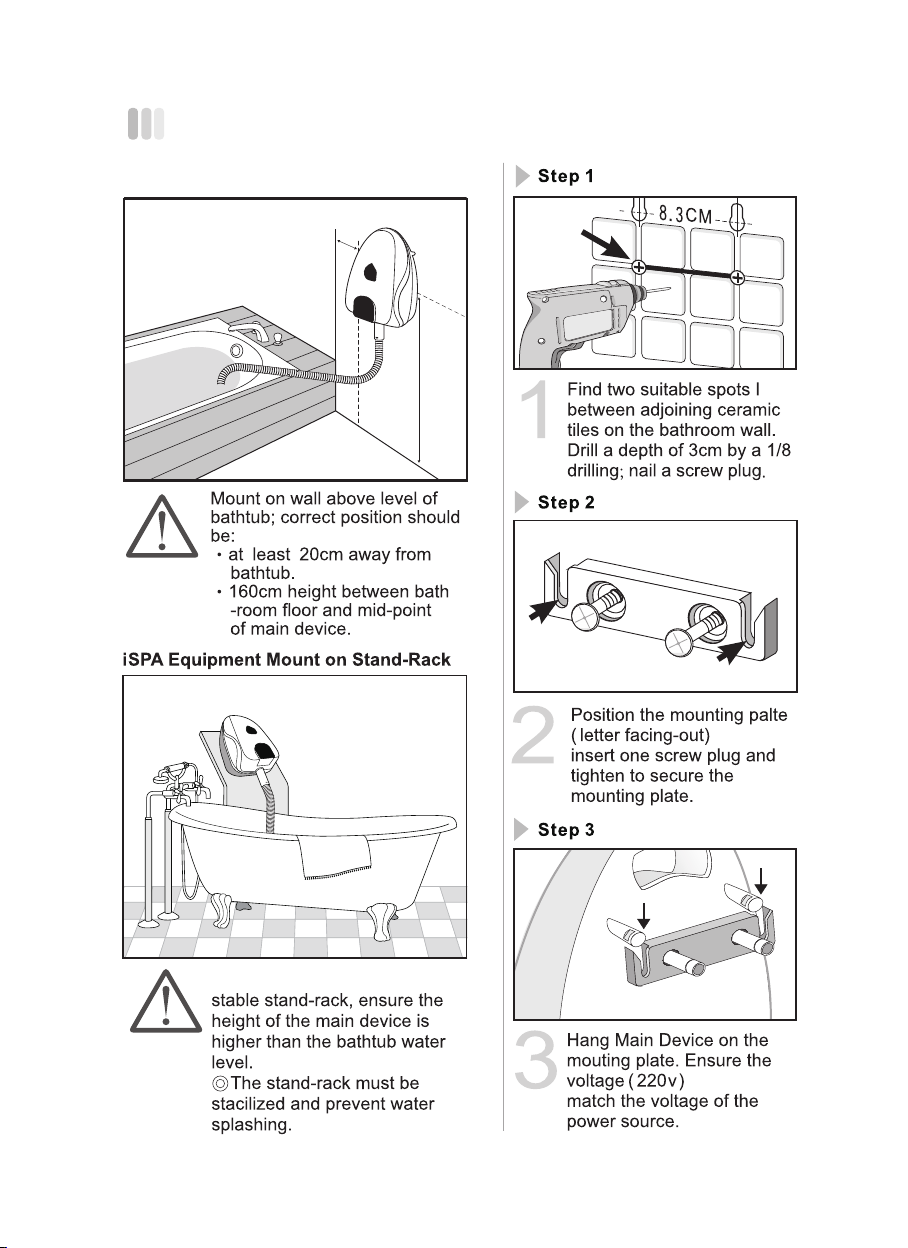
Installation of iSPA
20cm
160cm~162cm
iSPA Equipment Mount on Wall
iSPA Eauipment mount on the
GRANDMOYA
16
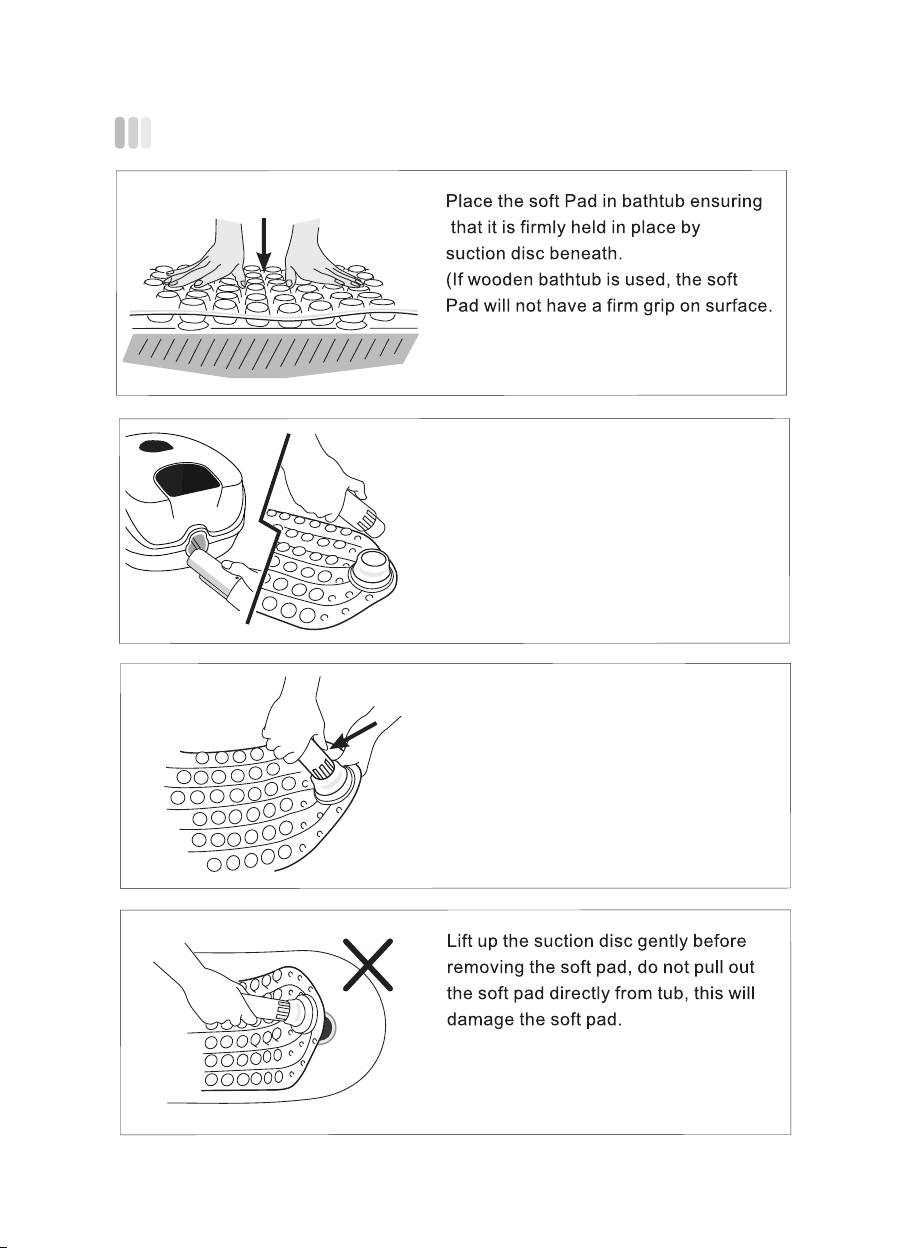
Connect both ends of the pipe to iSPA
machine and bubble pad until tight
enough. Comfirm two connection is
stable for each usage.
To disconnect the pipe from the Soft Mat,
please screw out the connector lightly.
Proper Handling of Soft Pad

17
Notice : Not everyone suits a SPA bath
Anti-Slip
Ventilation
The machine should installed at least one meter
higher than the bathtub, to avoid any dangerous
caused.
When the electric wire damaged, please call the
manufacturer's maintenance dapartment or
specialist.
※※WARNING
Safety Precautions for SPA Bath
1.Maintain cleanliness and good ventilation in the bathroom. Do not use it
in a badly-ventilated bathroom (when necessary, keep the bathroom door
open to allow for good ventilation).
2.Do not install gas or heater in the bathroom and/or use it.
3.During bath, do not lock the door and ask families to pay attention to
safety.
4.Do not submerge in the SPA for prolonged period under high temperature
or beyond one's health capacity. Otherwise, it may cause dizziness and
other dangers. Before bathing, please check that the temperature is safe
and suitable.
5.Do not submerge in the SPA for prolonged period as it may cause fatigue.
Ideally, each session should not exceed 15 minutes.
6.For those who use it for the first time or non frequent users, they should
not be submerged in water of too high temperature and should keep the
spa session short. They should put their arms outside the tub.
7.Do not use it when one is too full, too hungry or has consumed alcohol,
too tired or in an excitable state.
8.Refrain from keeping eyes opened when fully submerged.
9.Safety precaution is particularly important for young children, pregnant
women and the elderly. When using the SPA, they shall be accompanied
by family members or healthcare attendant.
10.Those suffering from hypertension, heart diseases, epilepsy and unhealed
wounds, or other diseases are not advised to use the SPA.
11. During bath, when one feels giddy or experiences chest distress, one
should immediately stop using the SPA, use wet towels to wipe and cool
down the forehead, cheek and arm, and place the hands on the bathtub
for support to stand up slowly until the breathing returns to normal.
12.When one goes in and out of bathroom or
bathtub, one should take precautions
against slippery floors to avoid slip or falls
due to the wet floor.

18
Four Principles of Bathing Safety
Sit high with your hands
on the bathtub
The water temperature
is below 40 ℃Do not take a bath if you feel unwellNo more than
10 minutes

19
Steps for a healthy bubble bath (SPA)
1. Before the spa session, rinse the body with water from the bathtub.
Wash the body with the hot water, starting from the area farthest away
from the heart, so as to allow the body to get used to the heat and
alleviate the burden on the heart.
2. Add in appropriate amount of Moya SPA Bath oil. Mix the Bath oil and
water well with one's hand. When in SPA, breathe deeply to take in the
herbal smell.
3. Place hands on the bathtub for support and get into the bathtub
carefully and gradually to prevent slipping, Get used to the water
temperature slowly. Squat in the bathtub for 2 minutes to allow the
bubbles to massage the bottom and anal parts etc.
4. Sit in the bathtub, bend one's legs and bring them towards the body.
Hold the position for 2 minutes to allow the bubbles to massage the
inner thigh.
5. Hold on to the bathtub and gradually relax the body and lie down in the
SPA. Submerge in SPA until the end of the bubble bath.
6. If one feels giddy or experiences breathing difficulty, it means that the
water temperature is too high. Take remedial action immediately. Rest
the elbow outside the bathtub, raise one's body in the lying position to
reduce the area that is submerged in the SPA or stop using the SPA
immediately.
7. At the end of the SPA session, do not stand up immediately. One
should
adjust one's breathing, hold on to the bathtub and get up gradually. If
one feels giddy, one should use a wet towel to sponge the forehead,
face and arm. Stand up only when the condition has stabilized.
8. Under normal circumstances, it is necessary to rinse or dry one's body.
Put on the bathrobe and take a rest to allow the body and the oil to
continue to activate until the oil dries up naturally. After bathing, rest
and relax for a while. Remember to drink water to avoid dehydration
and apply some moisturizer.
For a healthier and more comfortable bath,
do select our products :
MOYA SPA Bath Oil and MOYA SPA Bath Salt etc.,
Make your bathing more comfortable.

20
1. Do not drop, hit or submerge the main device
and Voltage Protector in water.
2. The installation and placement of this main
device is designed to prevent water seepage
or one from falling into the bathtub.
3. Please check that the voltage of the socket
is 220V before using.
4. Do not splash water directly on to the main device and power switch so as
to prevent power leakage, breakdown and ensure safe usage.
5. The soft pad is considered a consumable product. Remove it gently from
the suction disc. Do not exert force, otherwise any tearing, breakdown etc.
of the soft pad shall be replaced with cost.
6. Maintain cleanliness of the soft pad at all times. Use a soft, long bristle
brush for cleaning. Do not submerge the soft pad in the bathtub for
prolonged period. Hang it to drip dry after use so as to protect the proper
functioning of the components.
7. The company is not liable for any unauthorized dismantling of or repairs to
the main device.
Attention
Contact our
service
departmant
Contact our
service
departmant
Contact our
service
departmant
Troubleshooting
Malfunctions Solution 1 Solution 2 Solution 3
Main device
does not
start up
Turn Timer and Bubble
Intensity Control clock
wise to proper setting;
if correctly done, "Input"
indicator will light up
Check whether the
surface of bathtub
bottom is smoother or
has marks/protrusions
e.g. Dirt, non-slip pads,
anti-skid marks or is a
wooden surface
Check if the plug is
firmly connected to
power source; also
check whether
voltage is compatible
open the mobile
phone Settings,
find WeChat, click
on, open Bluetooth.
Clean the inside of
the bathtub properly.
If wooden tub is used,
please contact our
office to purchase the
exclusive bethtub.
Soft pad
will not
stick fast to
bathtub
Verify that someone
is online ( Bluetooth
display on the machine
control panel ), Just
disconnect or restart
the device.
Soft pad
will not
stick fast to
bathtub
Table of contents
Popular Massager manuals by other brands


Invacare
Invacare Madison Plus user manual

MassaMAX
MassaMAX A306-28 operating instructions

Drive DeVilbiss Healthcare
Drive DeVilbiss Healthcare D-Q-SIT DUO Instructions for use

Casada
Casada Quattromed lll instruction manual

Snailax
Snailax SL-233G Use & care manual

HoMedics
HoMedics SHIATSU PERFECT TOUCH MCS-1000HJ Instruction manual and warranty information