MPS AVIOR User manual
Istruzioni
di
montaggio
-
Assembly instructions
Instructionspour
le
montage
-
Montageanleitung
Instruccionespara
el
mantado (UK)
CD
CD
Per
il
montaggioiniziale
del
trasportino"Avior"
é
necessario
assicurarsi
che
le
parti
superiorivengano
adattate
alla
base
in
modo
da
farnecoîncidere
i
bordi.
Alcuni
scostamenti
possono
essere
causati
dal
metodo
di
imballaggio.Dopo
essere
stato
montato
correttamente/
il
pezzoriprenderà
la
formaoriginale.
'
UK)
'n,*h*°"y
some of the parts of the carrying
case
"Avior" may not match exactiy,
This
isdue to the packaging method. However,
once
the carrying
case
has
heen
assembled correctly, the
pièces
will
settie
info
the proper shape.
(^~$T~~)
**our
k
n-*00*0?!6
initial
du
'Trasporrino",
ilest
nécessaire
de
vérifier
que
lesparties
'••—supérieures
dela
cagesoientadaptées
à la
base
de
façon
à cequeles
bords
se
superposent.
Certainsmovements
des
composantspeuventêtre
dûsà la
méthode
cf
emballage.Aprèsavoirétémontéecorrectement,lapièceprendrasa
forme
originale.
Bei
der Erstmontage des Transportkorbes "Avior" ist es
nôtig,
sich
zuversichern,
dass
aer
obère
Teil exakt mit dem Rand der unteren
Hâlfte
passend
montiert
wird,
Dabei konnen kleine Abweichungen der
zwe/Teîle
vorkommen. Nachdem jedoch, bei der Erstmontage, aer Transportkorb
korrekt montiert wurde, nehmen die Teile die endgultige Form an,
La
primera
vezquese
monta
el
transportador"Avior"
es
importante
adaptarlostrèscomponentes
de
manera
que
losbordes
coincidan.
Algunas
deformaciones
puedendeberse
al
método
de
embalaje.
En
cada
caso,
después
del
primermontaje,
el
transportadortendra
la
formacorrecta.
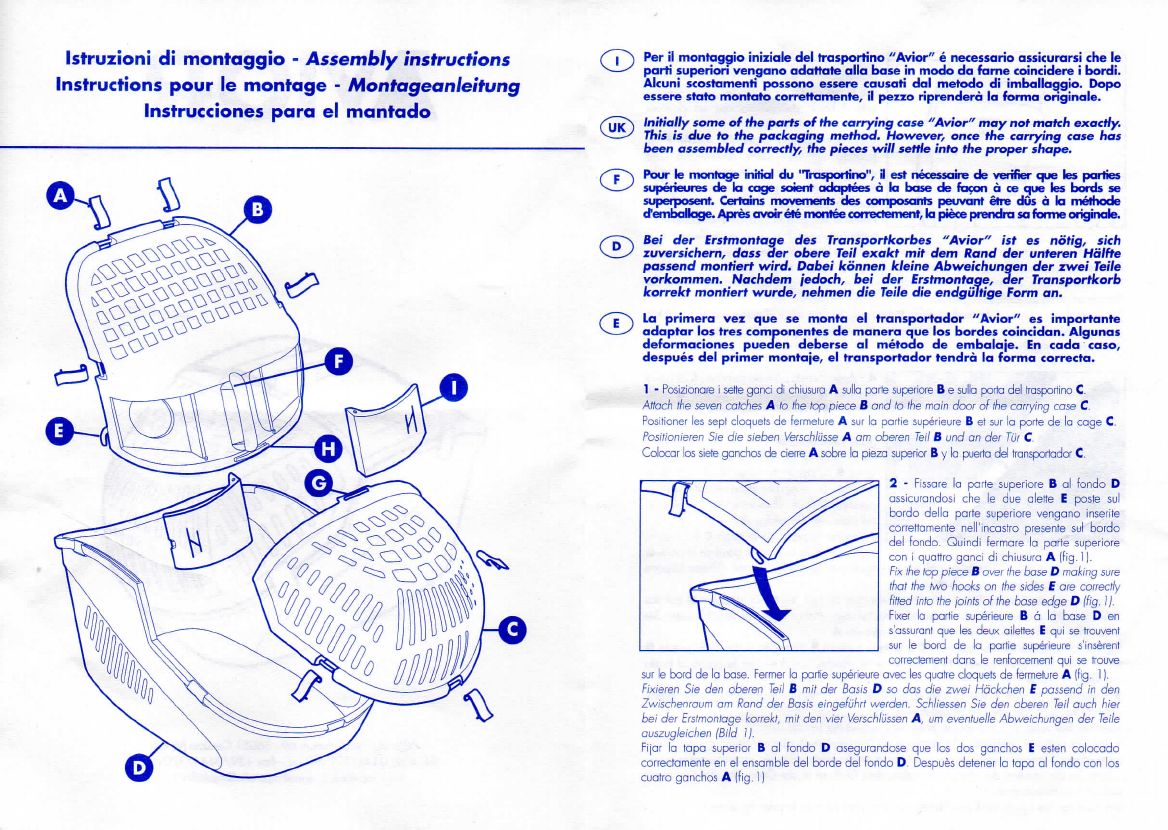
1
-
Posizionare
i
setteganci
di
chïusura
A
sulla
porte
superiore
Be
sulla
porta
del
trasportino
C.
Attach the
seven
catches
A to the top
pièce
B and to the main door of the carrying
case
C.
Positionerlesseptcloquets
de
fermeture
A
sur
la
partiesupérieure
B et
sur
la
porte
dela
cage
C.
Positionîeren Sîe die
sieben
Verschlusse
A am oberen Teil B und an der Tur C.
Colocar
lossieteganchos
de
cierre
A
sobre
la
piezasuperior
By
lapuertadeltransportadorC.
2
-
Fîssare
la
partesuperiore
B al
fondo
D
assicurandosi
cheledue
alette
E
poste
sul
bordo
déliapartesuperiorevenganoinserîte
correttamentenell'incastroprésente
sul
bordo
del
fondo.
Quindifermare
la
partesuperiore
con
i
quattro
ganci
dî
chiusura
A
(fig.
1
).
Fix
the top
pièce
B over the
base
D making sure
that
the two hooks on the
sides
E are correctly
fitted
into
the joints of the
base
edge D (fig.
I
j.
Fixer
la
partiesupérieure
B â la
base
D en
s'assurant
que
lesdeuxailettes
E qui
se
trouvent
sur
le
bord
dela
partiesupérieures'insèrent
correctementdans
le
renforcement
quise
trouve
sur
le
bord
dela
base.
Fermer
la
partiesupérieure
avec
lesquatrecloquets
de
fermeture
A
(fig.
1
j.
Fixieren
Sie den oberen Teil B mit der
Basis
D so dos die zwei
Hàckchen
E
passend
in den
Zwischenraum
am
Rand
der
Basis
eingefuhrt werden.
Schliessen
Sie den oberen Teil auch hier
bei
der Erstmontage korrekt, mit den vier
Verschlussen
A, um éventuelle Abweichungen der Teile
auszugleichen
(Bild 1).
Fijar
la
tapasuperior
B al
fondo
D
asegurandose.
quelosdos
ganchos
E
estencolocado
correctamenteen
el
ensamble
del
borde
del
fondo
D,
Despuèsdetener
la
tapa
al
fondo
con
los
cuatroganchos
A
(fig.
1
)
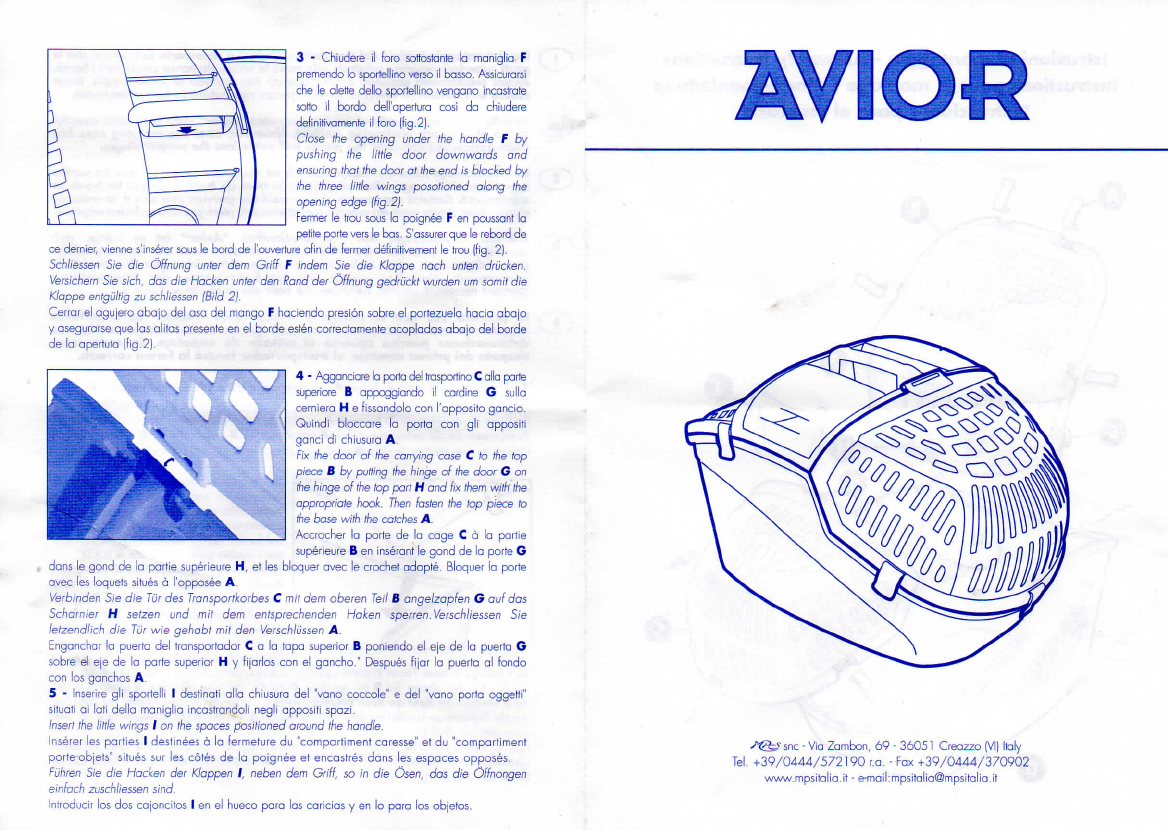
3
-
Chiudere
il
foro
sottosfante
la
maniglia
F
premendo
lo
sportellinoverso
il
basso.
Assicurarsi
che
le
alettedellosportellinovenganoincastrate
sotto
il
bordo
dellTaperiuracosi
da
chiudere
definitivamente
il
foro
(fig.2).
Close
the opening under the handle F by
pushing the
little
door downwards and
ensuring
that
the door at the end is blocked by
the three
little
wings posotioned along the
opening edge {fig.2).
Fermer
le
trou
sous
la
poignée
F en
poussant
la
petite
porte
vers
le
bas.
S'assurer
que
le
rebord
de
ce
dernier,viennes'insérersous
le
bord
de
l'ouvertureafin
de
fermerdéfinitivement
le
trou
(fig.
2).
Schliessen
Sie die Offnung unter dem Griff F indem Sie die Klappe nach unten drucken.
Versichern
Sie
sich,
das die Hacken unter den Rand der Offnung gedruckt wurden um somit die
Klappe
entgultig
zu
schliessen
(Bild 2).
Cerrar
el
agujeroabajodelasa
dei
mango
F
haciendopresiônsobre
el
portezuelahaciaabajo
yasegurarsequelasalitasprésenteen
el
bordeesténcorrectamenteacopladasabajodelborde
de
la
apertuta(fig.2).
4
-
Agganciarelaportadeltrasportino
C
allaparte
superiore
B
appoggiando
il
cardine
G
sulla
cerniera
H e
fissandoloconl'appositogancio.
Quindlbloccare
la
porta
congli
appositi
ganci
di
chiusura
A.
F/x
the door of the carrying
case
C to the top
pièce
B by
putting
the hinge of the door G on
the hinge o! the top
part
H and fix them
with
the
appropriate hook. Then fasten the top
pièce
to
the
base
with
the catches A.
Accrocher
la
porte
dela
cage
C à la
partie
supérieure
B en
insérant
le
gond
dela
porte
G
dans
le
gond
dela
partiesupérieure
H,et
lesbloquer
avec
le
crochetadapté.Bloquer
la
porte
avec
lesloquetssitués
à
l'opposée
A.
Verbinden Sie die Tur des Transportkorbes C mit dem oberen Teil B angelzapfen G auf das
Scharnier
H
setzen
und mit dem entsprechenden hiaken sperren.
Verschliessen
Sie
letzendlich die Tur wie gehabl mit den
Verschlussen
A.
Enganchar
la
puerta
del
transportador
C a la
tapasuperior
B
poniendo
elejedela
puerta
G
sobre
elejedela
partesuperior
H y
fijarlos
conel
gancho."Despuésfijar
la
puerta
al
fondo
conlosganchos
A.
5
-
Inserire
gli
sportelii
I
destinatiallachiusura
del
"vanococcole"
e del
"vanoporta
oggetti"
situati
ai
lati
déliamanigliaincastrandolinegliappositi
spazi.
Insert
the
little
wings I on the
spaces
positioned around the handle.
Insérerlesparties
I
destinées
à la
fermeture
du
"compartiment
caresse"
etdu
"compartiment
porte-objets"situés
surles
côtés
dela
poignée
et
encastrésdans
les
espaces
opposés.
Fuhren
Sie die Hacken der Klappen I, neben dem
Griff,
so in die Ôsen, das die Offnongen
einfach
zuschliessen
sind.
Introducir
losdos
cajoncitos
I enel
huecoparalascaricias
y enlo
para
los
objetos.
AVIOR
Table of contents


