mrk SM-2019BG User manual
mrk
INSTRUCTION MANUAL
Multifunction Stand Mixer - SM-2019BG
Herdsking Europe GmbH
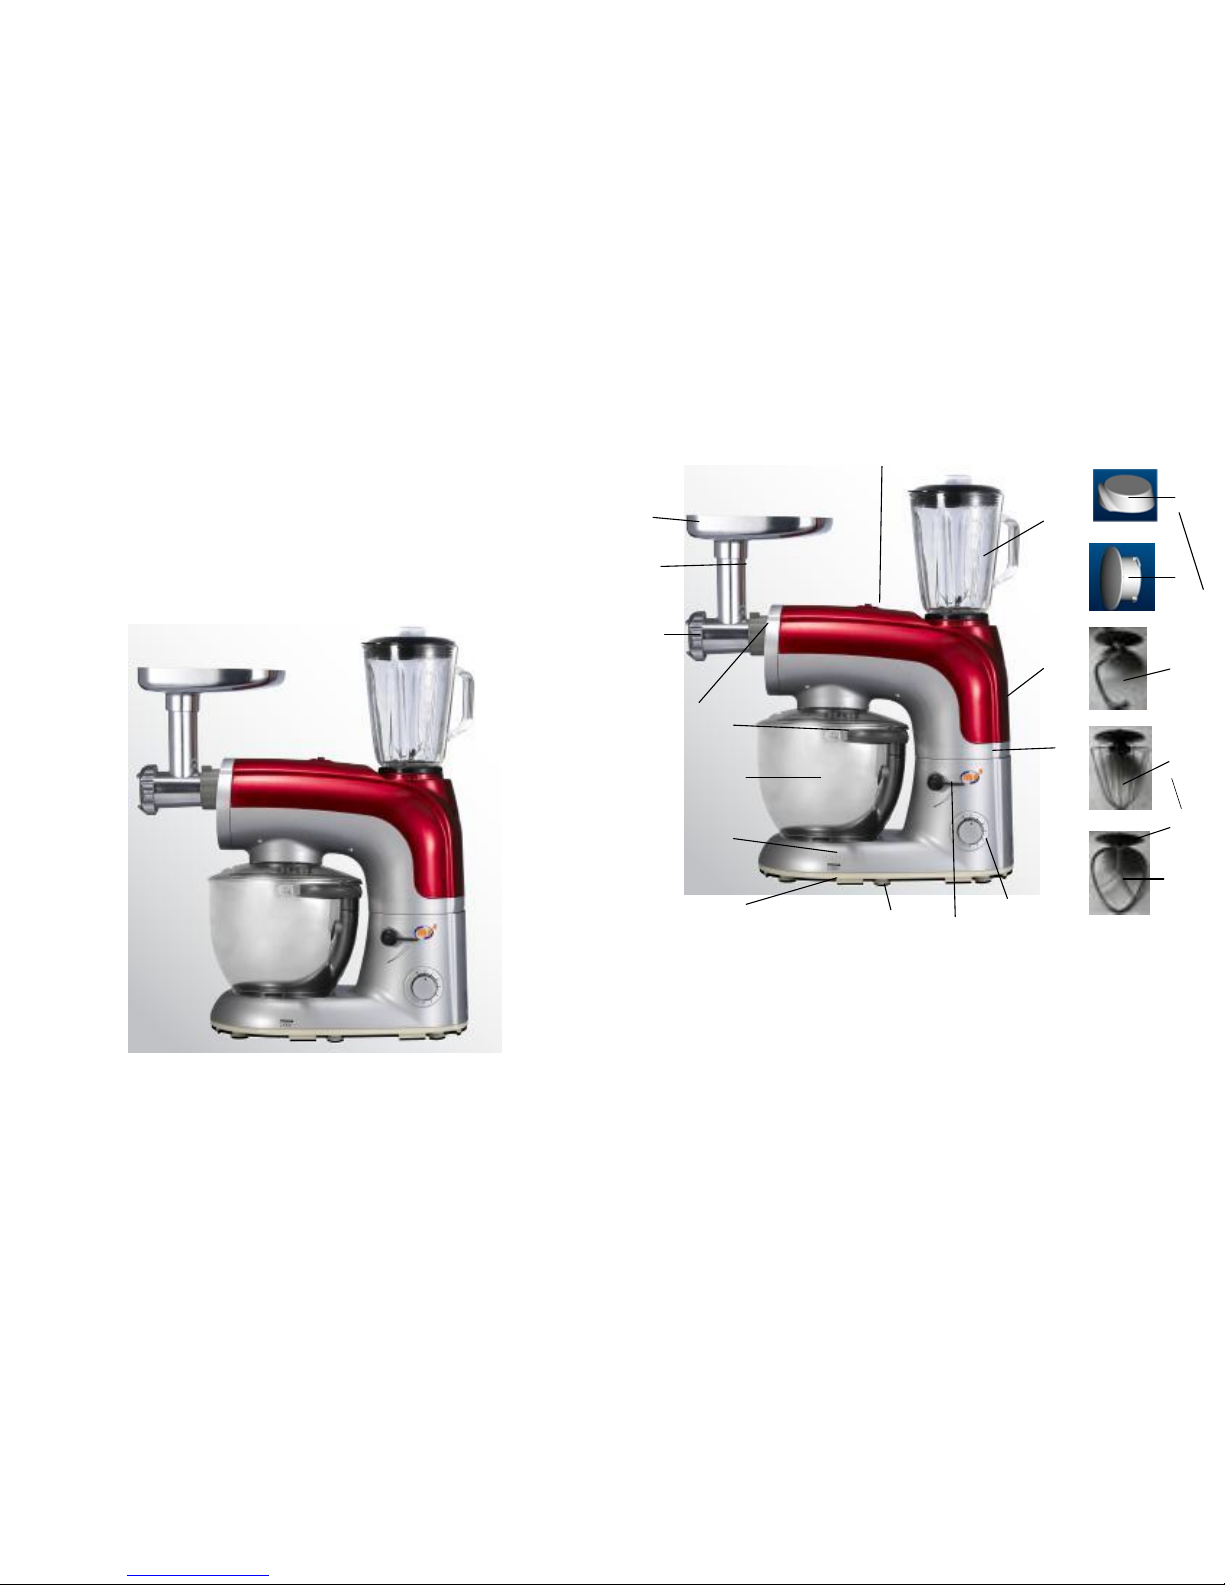
Fig.1 Overview of components and controls
1Filler tray
2Worm casing filler
3Lock ring
4Connector ring
5Splashguard cover
6Mixing bowl
7Base plate
8Lower housing
9Suction foot
10 Lever knob
11 Speed control button
12 Motor shelter
13 Swiveling arm
14 Mixing hook
15 3 Protective discs
16 Egg whisk
17 Kneading hook
18 Mixing jar
19 I/R switch
20 Protection cover of
meat grinder
21 Blender safety cover
1
10
6
7
8
17
14
13
12
5
11
9
2
3
4
18
19
20
21
16
15

Fig. 2 & 3 Assembling Meat Grinder
Fig. 4 Assembling Mixing Jar
1Plunger
2Filler tray
3Worm casing filler
4Silicone ring
5Worm
6SUS blade
73 drilled discs
84 pasta attachments
9Sausage adapter
10 Lock ring
11 Meat funnel
12 Cookie attachment
13 Cookie rail
1Mixing Jar
1a Measuring cup
1b Lid
1c Safety ring
1d Sealing ring
1e Blade block
1f Cup base

General Safety Instructions
1. Please read the information and safety advice contained in these operating instructions
carefully and thoroughly, before you use the kitchen machine for the first time.
2. This appliance should only be used for its intended purpose and is not fit for commercial use.
3. Make sure that the voltage shown on the rating label corresponds with that of the mains supply.
The rating label can be found on the bottom of the motor block. Before you connect the
multifunctional kitchen machine to 220V AC mains supply, make sure this appliance is switched
off (Fig.1, Lever Knob 10 and Speed Control Button 11 in the “0” setting).
4. Do not use this appliance near water to avoid electric shocks. Do not immerse the mains lead
in water or other liquid. Danger of electric shock!
5. Do not use outdoors. Keep it away from sources of heat, direct sunlight, humidity (never dip it
into any liquid) and sharp edges. Do not use it with wet hands. If the appliance is humid or wet,
unplug it immediately.
6. Always switch off the appliance, when you do not use the appliance, when you replace
accessories, when you clear the appliance or when the appliance is defect. Do not operate
the machine without supervision. If you leave the room, you should always turn the device off.
Pull out the plug from the socket.
7. Do not try to repair the appliance on your own. Always contact an authorized technician. To
avoid the exposure to danger, always have faulty cable be replaced only by the customer
service or by qualified person (electrician) and with a cable of the same type. Use only original
spare parts.
8. The appliance should be used and stored out of the reach of children. Careful supervision is
required, when it is used by or in the vicinity of children. Never allow your children to play with
the appliance unsupervised.
9. Persons (including children) with reduced physical, sensory or mental capabilities or lack of
experience and knowledge do not intend this appliance for use, unless a person responsible for
their safety has given them supervision or instruction concerning use of the appliance.
10. No liability is accepted for damages caused by improper use or failure to observe our
operational instructions and safety advices.
Social Safety Precaution for this Device
1. Switch off the appliance and disconnect from mains power supply before changing
accessories or attachments, which are moving during operation.
2. Make sure the accessory part is fitted correctly and placed firmly before switching on.
3. The drive shaft of the kneading machine starts turning, when the appliance is switched on. Do
not touch the rotating drive shaft during operation! For your own safety always attach the big
mixing bowl, even if you use the appliance as a blender or meat grinder.
4. Before use place the appliance on a flat level and sturdy surface. No objects, such as spoons or
dough scrapers, are allowed to insert into the bowl when the appliance is in operation.
5. During use never touch moving parts with your fingers.
6. Unplug the appliance when it is not in use or before cleaning.
7. Never use the machine with a damaged power cord! Let the customer service or qualified
person (electrician) repair the cable to avoid any danger of electric shock. Be careful while
cleaning the blender jar. The blades are very sharp.
8. Do not use mixing, mincing and blending function at the same time. Only one function can be
in use at a time.
Technical Specifications
Model No.:.....................................................................................................SM-2019BG
Power supply:................................................................................................220-240 V~, 50/60 Hz
Rated power consumption:........................................................................1200W
Mixing bowl capacity……………………………………………….................5,0 liter
Protection class:............................................................................................II
Max.. flour amount of mixing bowl……………………………………….…...1,5 kg.
Max.. liquid amount of mixing jar……………………………………….…...1,5 liter
These Data are subject to change without prior notice!
EC Directives of Conformity
The manufacturer hereby declares that the kitchen machine SM-2019BG complies with all current
relevant European directives such as
2004/108/EG - Electromagnetic Compatibility Directives
2006/98/EG - Low Voltage Equipment Directive
2002/72/EG - LFGB The European Commission Directives and BfR Recommendation
2002/95/ EG - EG-Directive The Restriction of the Use of certain hazardous Substances in
Electrical Equipment Directives (RoHS)
2004 GPSG - Equipment and Product Safety Law
2002/96/EC - The Waste Electrical and Electronic Equipment (WEEE) and is manufactured
according to the latest safety regulations
Intended Use
This device serves as
kneader for making dough, creams, cream milk, egg whites;
meat grinder for grinding food. You can form a paste or dough or sausage with different
attachments;
blender to puree, whip or mix.
1. It is intended solely for this purpose and should only be used therefore. It may only be used in
the way as described in this instruction manual.
2. You can not use the appliance for commercial usage. Any other use is considered
inappropriate and may even lead to property damage or personal injury.
3. The manufacturer assumes no liability for damages caused by improper use.
Trial Use
1. Turn the speed control button (11) at “0” and press the lever knob (10) to move the swiveling
arm (13) up.
2. Put the mixing bowl onto the base plate (7) and lock it as the arrowhead denotes.
3. Fix the protective discs (15) to one of the mixing tools you choose to use and lock it into the
machine. The protective discs prevent the driveshaft from being contacted with dough.
4. Press the lever knob to move the swiveling arm down. Make sure the arm is fixed together with
the base and then the lever turns to the arm to lock firmly.
5. Plug-in the cord and turn on the speed control button, then test every function for a few
seconds respectively.
6. After the trial turn off the speed control button at Speed “0”. Press the lever knob and move the
swiveling arm up, then take apart the mixing tool from the connector.
7. Take off the blender safety cover (21) from the upper housing.
8. Set the mixing jar onto the machine and pure a cup of water into the jar, and then repeats Step
4, 5 and 6.
9. You need only to lift the mixing jar up vertically to remove it, instead of rotating it.
10. Take off the mixing jar from the mixer drive shaft and set the safety cover to the machine.
General Application Methods
1 The Kneading Machine
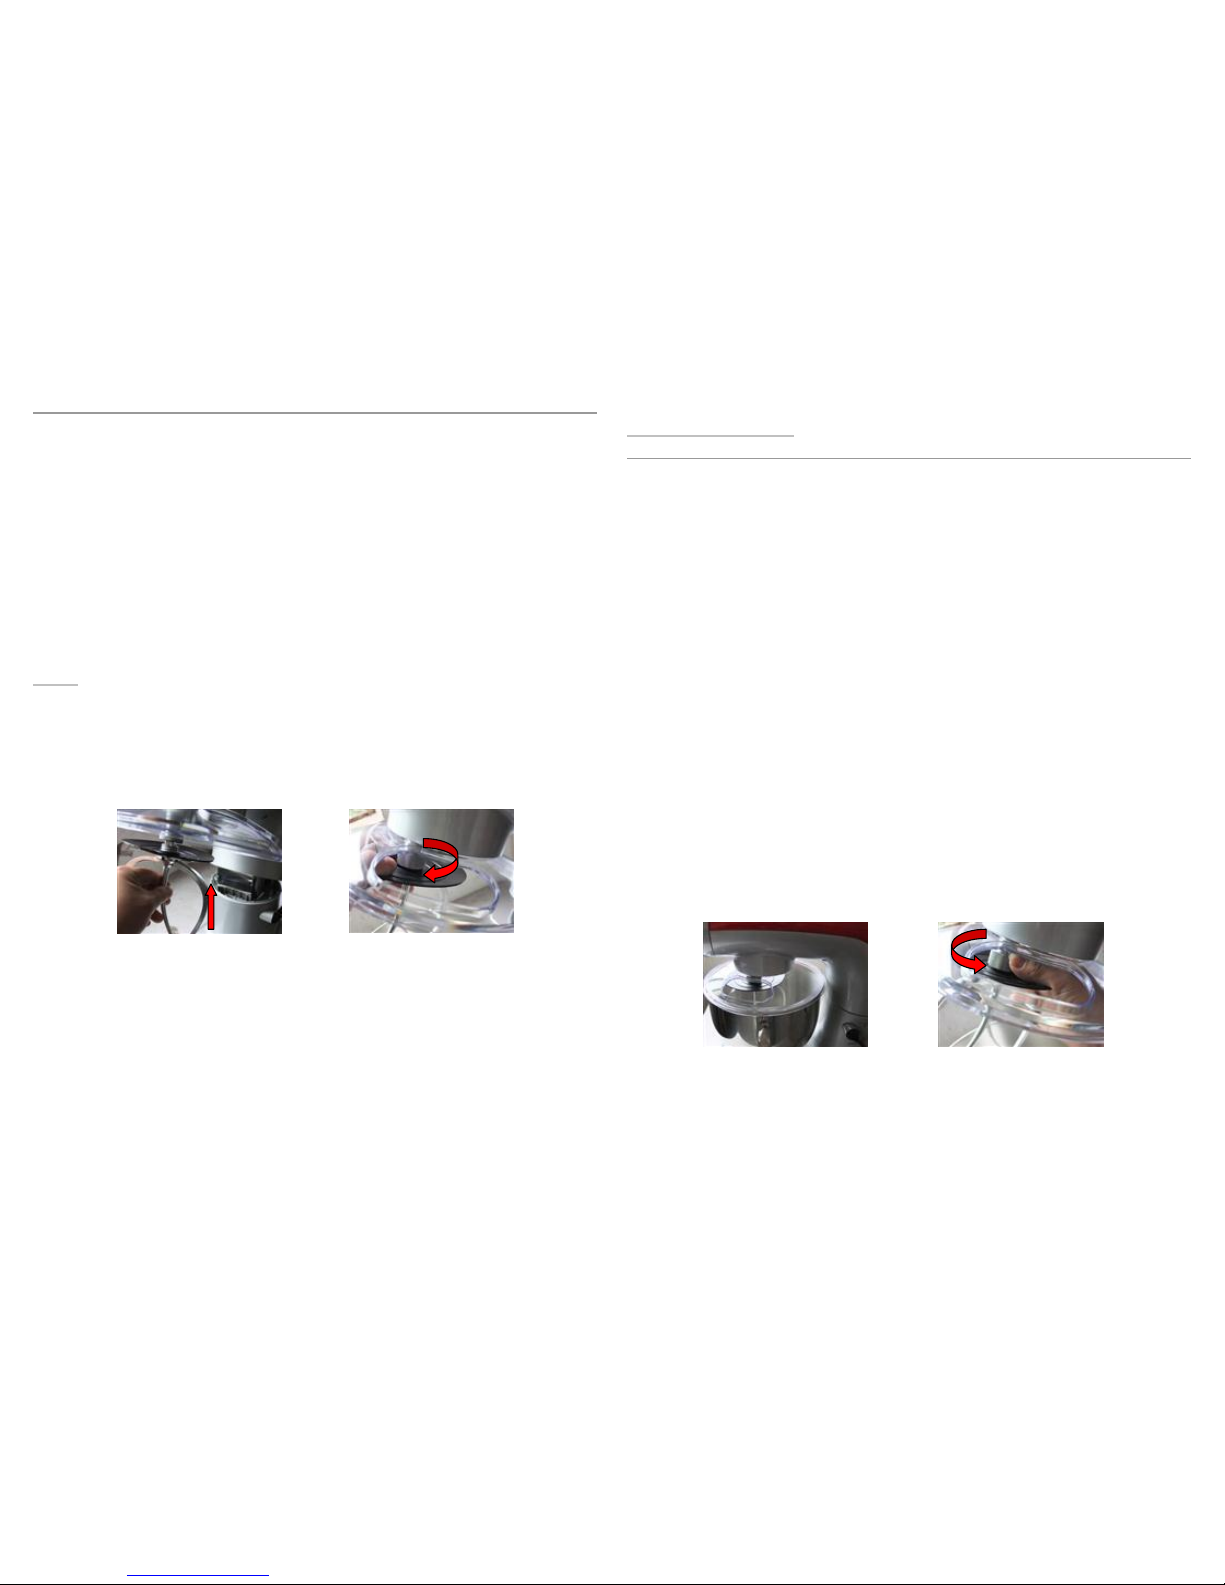
1.1 Assembly and operation of kneading machine
1. Cover the drive shaft of the mixing drive with the blender safety cover :
-Insert the safety cover of both hooks in the recesses on the appliance
-Turn the cover in the direction of LOCK arrow and press the safety cover down at the same
time.
-Release the cover. The safety cover is tightly attached to the appliance.
2. Cover the worm casing connector with cover:
-Set the lock ring (3) to OPEN position.
-Attach the cover to the connector ring.
-Turn the connector ring with the cover towards LOCK position.
3. Press the lever knob with your right hand in the direction of the arrow. The swiveling arm moves
up. Move the swiveling arm with your left hand at the same time to limit stop. The swiveling arm
must audibly lock in place. The lever knob moves back to its initial position.
4. Place the mixing bowl in such way in its support that the handle stands above the arrow. Turn
the mixing bowl at the handle in the direction of the arrow to the limit stop (LOCK).
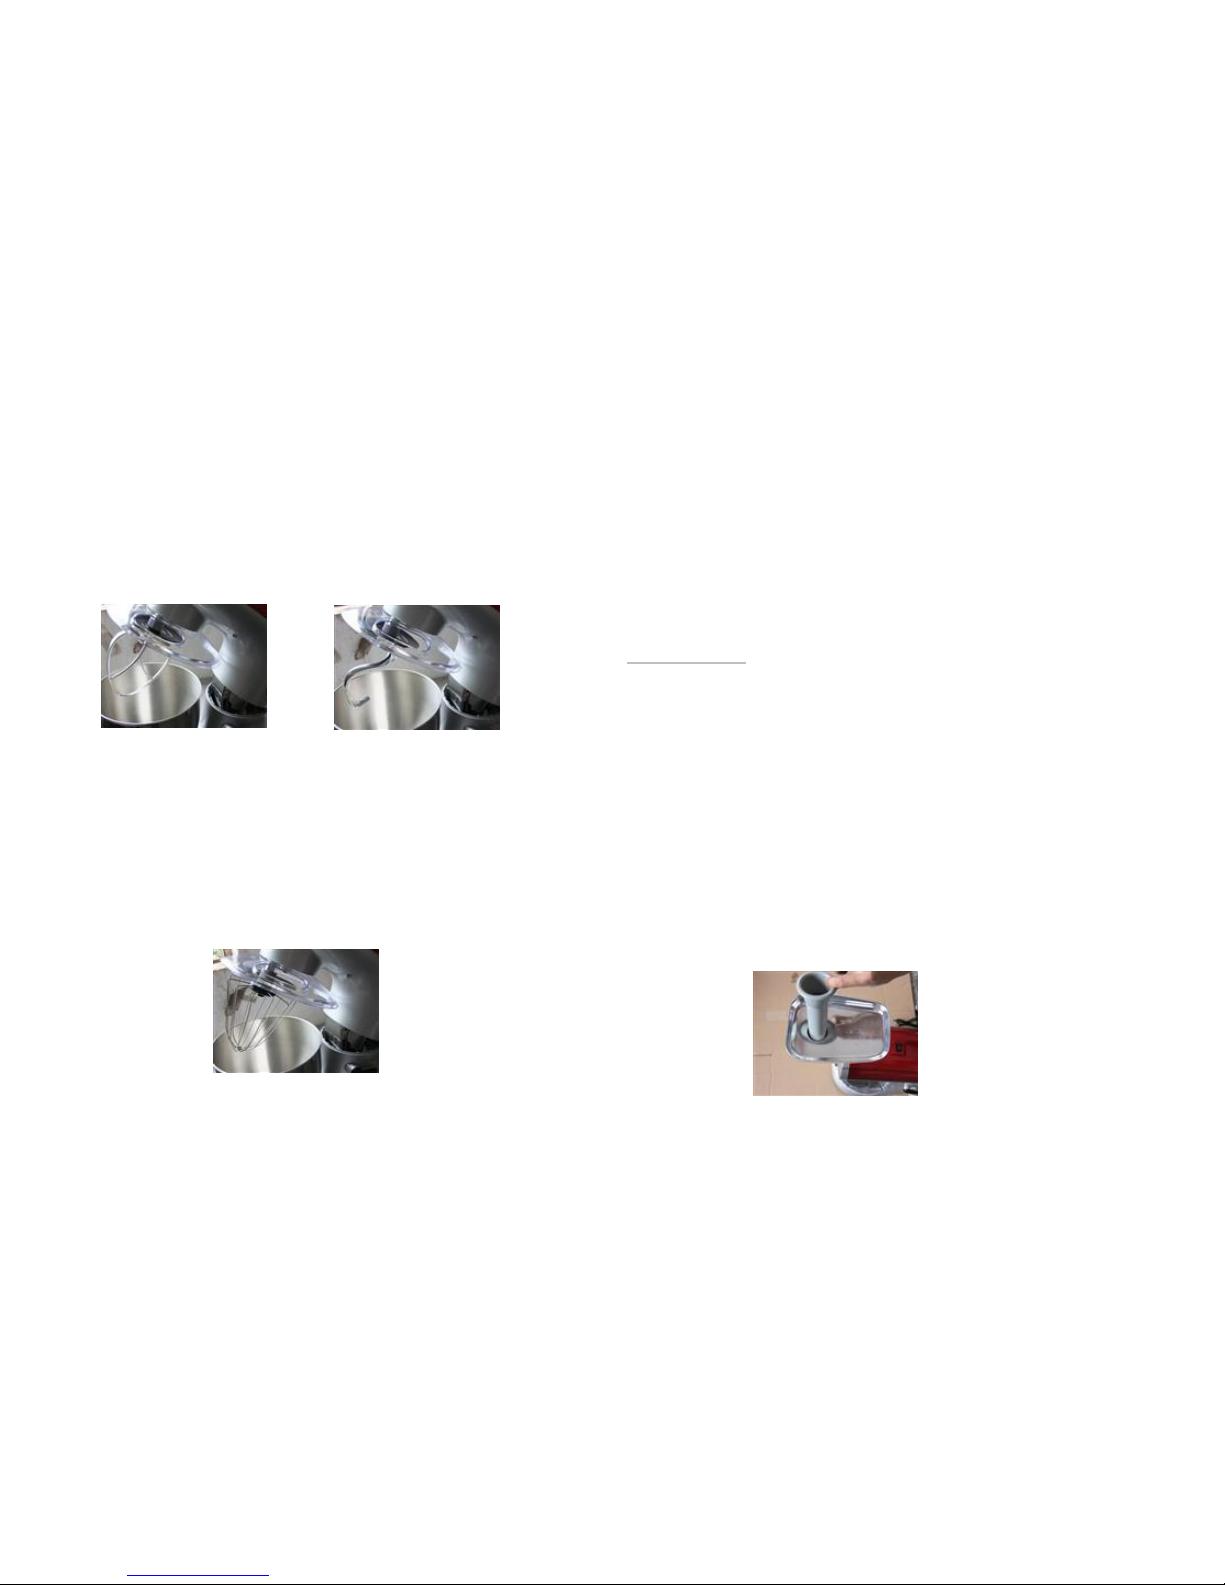
5. When using the egg whisk or the mixing hook, please first attach the splashguard (5): Hold the
splashguard with the collar up. NOTE: • You can see two recesses left and right at the bottom of
the arm. • The splashguard is marked with the words OPEN and LOCK. Attach the splashguard in
such way to the arm that the word OPEN is under the arrow (see illustration). Move the
splashguard with its guide tabs into the recesses and lock it towards LOCK.
6. Attach the protective disc to the tool to prevent from contamination of the drive shaft with
dough.
7. Now fill your ingredients into the mixing bowl. CAUTION: Do not overfill the appliance and the
max. amount of flour is 1,5 kg and 1.5 liter liquids.
8. Press the lever knob in the direction of the arrow and move the swiveling arm with your other
hand slowly down. The swiveling arm must audibly lock in place.
INSERT
LOCK
OPEN
1. 2 Application instruction of meat grinder
1.2.1 Mixing or kneading dough
1. Our suggestion of proportional mixture: flour and water at a ratio of 5:3. Fill the mixing bowl
maximal 3/4 full of ingredients.
2. When filling the mixing bowl, please ensure that the maximum quality of 1500g is not exceeded.
3. When you use kneading hook or mixing hook, turn on the speed control button to run firstly 30
seconds at Speed 1, then 30 seconds at Speed 2, finally 3 minutes at Speed 3.
4. Use the appliance for kneading for no longer than 5 minutes continuously at a time.
1.2.2 Whipping egg whites or cream
1. Switch on the speed control button 4 to 6, whip the egg whites without stopping for ca. 5
minutes, according to the size of the eggs, until they are stiff.
2. Maximum quantity to whisk is 24 egg whites.
3. For whipped cream, whip 250 ml fresh cream at high speed of 4 to 6 for ca. 5 minutes.
4. When filling the mixing bowl with fresh milk, cream or other ingredients, please ensure that the
maximum quality is not exceeded.
5. Use no more than 10 minutes continuously at a time.
1.2.3 Mixing shakes, cocktails or other liquids
1. Mix the ingredients according to the available recipe, at speed from 1 to 6 for ca. 5 minutes.
2. Do not exceed the maximum quantity for the mixing bowls.
3. The egg whisk should be used.
4. Use the machine no more than 10 minutes continuously at a time.
1. 3 End Operation and Remove Bowl
1. Turn the appliance off.
2. Disconnect from mains power supply.
3. Press the lever knob down; the swiveling arm moves up.
4. Remove the tool. Screw the quick release chuck out anticlockwise.
5. Turn the mixing bowl clockwise and remove it.
6. Loosen the dough with a spatula and take it out from the mixing bowl.
7. Clean all used components as instructed under “Cleaning”
2. The Meat Grinder
2. 1 Assembly and operation of meat grinder
2.1.1 Meat grinder assembly (see Fig. 2 & 3, Part A)
1. Remove the protection cover, place the meat grinder tube with worm casing filler (3) upwards
into housing and lock it.
2. Montage the filler tray (2) on the worm housing filler, which is used to locate the tray above the
motor block.
3. Put the worm (5) in the worm housing (3) and assemble the blade (6) with sharpened edges
outward to the axis of the worm shaft.
4. Select a drilled disc (7). Observe the recesses on the worm housing while inserting the disc.
5. Screw the lock ring (10) clockwise in the worm housing (3).
6. Turn on the appliance and press I/R switch on Button "I" (19) , then place the speed control
button at the higher speed..
7. Insert the meat into the filler tray with meat plunger (1).
8. After use, turn the unit off and unplug it from the power supply.
9. Use the meat grinder no longer than 10 minute continuously at a time.
2.1.2 Sausage attachment assembly (see Fig. 2 & 3, Part B)

Follow the steps in chapter “Preparation, Meat Grinder Assembly” as described in Point 1 and 2.
Follow the steps below, if you use a readymade sausage mixture:
3. Place the adaptor (9) on the worm shaft. Observe the recesses on the worm casing.
4. Insert the sausage attachment (11) in the lock ring (10).
5. Turn the lock ring with the sausage attachment clockwise onto the worm casing.
Assemble first a blade (6) and a drilled disc (7) as described under points 3 and 4 under “Meat
Grinder Assembly”, if you want to grind meat and produce sausages in a single operation. Turn
the lock ring with the sausage attachment.
2.1.3 Cookie attachment assembly (see Fig. 2 & 3, Part C)
Follow the steps in chapter “Preparation, Meat Grinder Assembly”, Point 1 and 2
3. Place the adaptor (9) on the worm shaft. Observe the recesses on the worm casing.
4. Place the cookie attachment (12) on the adaptor. Observe the recesses on the cookie
attachment.
5. Turn the lock ring clockwise onto the worm casing.
2.1.4 Pasta attachment assembly (see Fig. 2 & 3, Part D)
Follow the steps in chapter “Preparation, Meat Grinder Assembly” Point 1 and 2..
3Do the same as preparation for meat grinder with the difference in selecting a pasta
attachment (8).
4Place the attachment on the worm shaft. Observe the recesses on the worm casing.
5Turn the lock ring clockwise onto the worm casing.
2.1. 5 Reverse Function
1. In case of any jamming when switching off the appliance, convert it by pressing I/R Switch on
Button "R".
2. The appliance rotates itself in the opposite direction and the head will become empty.
3. If the appliance doesn't work, switch it off and clean it.
2.2 Application instruction for the meat grinder
2.2.1 Mincing meat
1. Do not chop hard objects such as bones or shells.
2. Cut the meat into small pieces about 2.5 cm (sinewless, boneless), so they are easily minced in
the mincer housing.
2.2.2 Making sausage
1. You can use natural as well as artificial sausage skins.
2. If you decide to use natural sausage skins, first soften them in water for a while. Knot one end of
the sausage skin.
3. Push the sausage skin over the sausage attachment.
4. The sausage meat is pushed through the sausage attachment and the sausage skin is filled.
5. Make sure that the sausage skin is filled with slack, since the sausage expands during boiling or
frying and the skin may rupture.
6. If the first sausage reaches the required length, press the sausage together at the end of the
sausage attachment with your fingers.
7. Rotate the sausage once or twice.
8. Until you have developed a routine, you can turn the appliance off after each sausage length.
2.2.3 Shaping cookies
1. Prepare an area to spread the cookies afterwards.
2. Use the rail (Fig.2&3, 13) to form your prepared cookie dough into different shapes.
3. Slide the rail into the cookie attachment after attaching the worm casing with cookie
attachment (Fig.2&3, 12) on the appliance.
4. Set it to the desired cookie shape.
.
3 The Blender
3. 1 Check before blender assembly
Please see Fig. 4
Check the pre-assembly! Safety ring (1c), sealing ring (1d), blade block (1e) and cup base (1f) must
be assembled in correct order.
1Never forget to place the sealing ring on the blade assembly; otherwise the mixing container will
leak.
2Do not attach the cup base askew.
3The open side of the safety ring is locked with the cup base.
.
3. 2 Assembly and operation of meat grinder
1. Attach the mixing bowl without tool.

2. Cover the worm casing connector with protection cover :
- Set the connector ring (4) to OPEN position.
- Attach the cover to the connector ring.
- Turn the connector ring with the cove towards LOCK position.
3. Remove the blender safety cover (21) from the mixing drive shaft: Press the cover in the
direction of LOCK arrowhead and lift the blender safety cover at the same time.
4. Cut all ingredients in small pieces.
5. Fill the ingredients into the mixing jar. Observe the maximum capacity.
6. Press the lid (Fig 2 & 3, 1b) down on the mixing jar. The mixing jar must be perfectly sealed.
7. Close the lid with the measure cup (1a). Observe the recesses on the inner side of the lid. Turn
the measure cup clockwise to tighten.
8. Place the mixing jar on the mixing drive shaft. Incorrect assembly will prevent blender from
operation.
9. Connect the mains cable to a properly installed and earthed 220 –240 V~ 50/60 Hz wall outlet.
10. Speed Control Adjustment Application
Speed "3-4" for easy mixing of liquids
Speed "5-6" for firmer consistency - for mixing liquids and solid foods
"P" for ice-crushing or for short, strong but durable pulses in "P" . You must hold the
control knob at "P" or press it repeatedly in the "P" setting
3.3 Application instruction for blender
3.3.1 WARNING: The blade in the blender is sharp!
1. Never reach with your hands into the assembled mixing jar!
2. Handle it with great care! Risk of injury, especially when removing the blade from the mixing
container, or emptying and cleaning the mixing jar
3. Do not pour liquid ingredients hotter than 60°C into the mixing container! Danger of burns!
3.3.2 WARNING: Risk of injury!!
1. The drive shaft of the kneading machine starts turning, when the appliance is switched on. Do
not touch the rotating drive shaft during operation!
2. For your own safety always attach the mixing bowl.
3.3.3 CAUTION:
1. Never operate the lever knob if the mixing jar is attached! Otherwise the mixing jar will tip
over.
2. Do not place hard ingredients such as nuts or coffee beans in the mixing jar.
3. The blade in the mixing jar is not suitable for crushing ice cubes.
4. Do not use the blender without ingredients!
3.3.4 RECOMMENDATION:
1. When preparing drinks with crushed ice only add the ice cubes during mixing. The ice cubes will
be crushed during mixing.
2. Place the mixing jar on a stable and solid surface during filling. In this way it is easier to attach
the lid.
3. Do not exceed the maximum capacity (1500 ml) as indicated into the mixing jar.
4. Attach the lid in such way that the round tab seals the connection link of the mixing jar.
5. Only take the appliance into operation after attaching lid and fastening the measuring cup!
6. Do not remove the lid during operation!
IMPORTANT NOTE: Do not store citrus juices or acidic foodstuffs in metal containers.
3.4 Refill Ingredients
1. Switch the appliance off.
2. Fill in ingredients or spices through opening the measuring cup
3. Close lid and measuring cup again.
4. Continue operation.
3.5 Stop Operation
1. Switch the appliance off.

2. Disconnect from mains power supply.
3. Remove the mixing jar.
4. Remove the lid before pouring out the contents.
5. Clean all used parts as described under “Cleaning”.
6. Cover the mixing drive shaft with the blender safety cover.
Cleaning
1. Before cleaning, place the speed control knob at the position of “0” and disconnect the
appliance from mains power supply.
2. Do not submerge the appliance into water. This may lead to electric shock or fire.
3. Do not use a wire brush or other abrasive utensils for cleaning and do not use aggressive or
abrasive cleaning agents.
4. Cleaning of motor housing: Clean the housing only with a damp cloth and a squirt of
washing-up liquid. Dry with a cloth.
5. The kneading hook, mixing hook, worm casing filler, filler tray, worm and lock ring are not
dishwasher safe. These accessories should be cleaned only with warm water and detergent.
6. Plastic accessories, egg whisk, mixing bowl mixing jar, blades and drilled discs can be cleaned
with warm water and detergent or in a dishwasher. Do not use abrasive cleaners
7. Brush some vegetable oil on the meat grinder sieves after drying.
Packing list
Housing 1 set
Mixing bowl 1 piece
Stainless Steel blade 1 set
Dough hook 1 set
Egg whisk 1 set
Sausage holder 1 piece
Sausage tube 1 piece
Meat grinder 1 set
Mixing jar 1 set
Instruction manual 1 piece
Manufacturer Warranty
1Coverage of Warranty
1.1 This warranty confers upon you specific rights and remedies against our products. By making a
claim under this warranty, you will be deemed to have understood and accepted its terms.
1.2 We grant a warranty of 24 months beginning from the purchasing date for European customers.
Prerequisite of our warranty claim is the purchase of our appliance in Germany offered by us or
by one of our authorized dealers as well as sending us a copy of the purchasing voucher and
warranty sheet. If the appliance is abroad at the time of warranty claim, the warranty service is
rendered at the buyer`s expenses for to and fro transport.
1.3 The warranty period cannot be prolonged due to warranty reparation. There is no right to claim
for a new warranty period. This warranty is a voluntary service provided by us as the
manufacturer of the appliance. The statutory warranty rights (such as rectification, cancellation,
compensation and reduction) are not affected by this warranty.
1.4 Defects must be reported to us in a written form within 14 days after discovering the defects. In
case of a warranty right, we will decide what kind of defect should be dealt with and whether
to repair it or to replace a similar one.
2Exclusions and Limitations
The warranty does not extend to:
2.1 Any product not manufactured by or for us, or the product originally sold with its warranty to an
end-user in a country outside Germany.
2.2 Defects based on the non-compliance with instructions for use, improper handling or normal
abrasion of the device,
2.3 For fragile parts, such as glass or plastic part, warranty claims are excluded. Finally, warranty
claims are excluded, when the repairing work for the appliance is not done by our authorized
service.
3Warranty Claim Procedure
3.1 For all complaints and / or warranty claims please contact our service department by e-mail at
3.2 After reviewing your warranty claim, we will send you a RMA form to fill out per e-mail. Please fill
out this RMA form with your name, domicile (street, house number, postcode and place),
telephone number and e-mail address. In addition, we need a copy of you proof of purchase
(receipt, invoice, delivery note) and a brief description of the defect reasons with the model
number, purchasing date, dealer who sold you the appliance,. Without the warranty proof, your
complaint cannot be processed free of charge.
3.3 Upon your information, we will issue a RMA-No. for the retour of the defect appliance and
arrange the forwarder to pick itup. What you need to do now is only to get prepared for your

well packed product with your original purchase proof, ideally in the original package, to pass
to the appointed forwarder.
3.4 The delivery takes place free of charge for the buyer within Germany. The transport charge
back and forth is obliged for the buyer outside Germany. Please do not use a non-free delivery
to return the appliance to us. Should you use the non-free delivery, your warranty claim will be
inapplicable.
3.5 RMA Retour address:
Herdsking Europe GmbH.
Von-Ketteler-Straße 13
D-47906 Kempen
Germany
Environmental Protection: Disposal –Meaning of the “Wheelie Bin” Symbol
Information for (private householders) the environmentally responsible disposal of Waste Electrical
and Electronic Equipment (WEEE)
1. Take care of our environment, do not dispose of electrical appliances via the household waste.
2. Dispose of obsolete or defective electrical appliances via municipal collection points.
3. Please help to avoid potential environmental and health impacts through improper waste
disposal.
4. You contribute to recycling and other forms of utilization of old electric and electronic
appliances.
5. Your municipality provides you with information about collecting points.


