MSI K8N SLI-F User manual

i
K8NSLISeries
MS-7185(v1.X)ATXMainboard
English/German/FrenchVersion
G52-M7185X3
7185v1.1-Preface.p65 2005/7/25, 午 11:351

ii
CopyrightNotice
The materialinthisdocumentistheintellectual propertyof MICRO-STAR
INTERNATIONAL.Wetakeeverycareinthe preparationof thisdocument, butno
guaranteeisgivenastothecorrectnessofitscontents.Ourproductsareunder
continualimprovementand wereservetherighttomakechangeswithoutnotice.
Trademarks
Alltrademarksarethepropertiesoftheirrespectiveowners.
NVIDIA,theNVIDIAlogo,DualNet, and nForceareregisteredtrademarksortrade-
marksofNVIDIACorporationin theUnitedStatesand/orothercountries.
AMD,Athlon ,Athlon XP,Thoroughbred ,andDuron areregisteredtrade-
marksofAMDCorporation.
Intel®andPentium®areregisteredtrademarksofIntelCorporation.
PS/2and OS®/2areregisteredtrademarksofInternationalBusiness Machines
Corporation.
Windows®95/98/2000/NT/XPareregisteredtrademarksofMicrosoftCorporation.
Netware®isaregisteredtrademarkofNovell,Inc.
Award®isaregisteredtrademarkofPhoenixTechnologiesLtd.
AMI®isaregisteredtrademarkofAmericanMegatrendsInc.
RevisionHistory
Revision RevisionHistory Date
V1.1 FirstreleaseforEuropeanversion July2005
TechnicalSupport
Ifaproblemariseswithyoursystemandnosolutioncanbeobtainedfromtheuser’s
manual,pleasecontactyourplaceofpurchaseorlocaldistributor.Alternatively,
pleasetrythefollowing helpresourcesforfurtherguidance.
Visit theMSI websiteforFAQ,technical guide,BIOSupdates,driverupdates,
andotherinformation: http://www.msi.com.tw/program/service/faq/
faq/esc_faq_list.php
Contactourtechnicalstaff at: support@msi.com.tw
7185v1.1-Preface.p65 2005/7/25, 午 11:352

iii
SafetyInstructions
CAUTION: Dangerofexplosionifbatteryisincorrectlyreplaced.
Replaceonlywiththe sameorequivalenttype recommendedbythe
manufacturer.
1. Alwaysread thesafetyinstructionscarefully.
2. KeepthisUser’sManualforfuturereference.
3. Keepthisequipmentawayfromhumidity.
4. Laythisequipmentonareliableflatsurfacebeforesetting itup.
5. Theopeningsontheenclosureareforairconvectionhenceprotectstheequip-
ment fromoverheating.DONOTCOVERTHEOPENINGS.
6. Makesurethevoltageofthe powersourceandadjustproperly110/220Vbe-
foreconnectingtheequipmenttothepowerinlet.
7. Placethe powercordsuchawaythatpeoplecannotstepon it. Donotplace
anythingoverthepowercord.
8. AlwaysUnplug thePowerCordbeforeinsertinganyadd-oncardormodule.
9. All cautionsand warningsontheequipmentshouldbenoted.
10. Neverpouranyliquidintotheopeningthatcoulddamage orcauseelectrical
shock.
11. If anyof thefollowing situationsarises, gettheequipmentcheckedbyaservice
personnel:
†Thepowercordorplugisdamaged.
†Liquid haspenetratedintotheequipment.
†Theequipmenthasbeen exposedtomoisture.
†Theequipmenthasnotworkwelloryoucannotgetitworkaccording to
User’sManual.
†Theequipmenthasdroppedand damaged.
†Theequipmenthasobvioussign of breakage.
12.DONOTLEAVETHISEQUIPMENTINANENVIRONMENTUNCONDITIONED,STOR-
AGETEMPERATUREABOVE600C(1400F),IT MAYDAMAGETHEEQUIPMENT.
7185v1.1-Preface.p65 2005/7/25, 午 11:353

iv
FCC-BRadio Frequency Interference Statement
Thisequipmenthasbeen
tested and found tocomply
withthe limitsforaClassB
digitaldevice,pursuanttoPart
15of the FCCRules.Theselimitsaredesignedtoprovidereasonable protection
againstharmful interferenceinaresidentialinstallation.Thisequipmentgenerates,
usesand canradiateradiofrequencyenergyand,ifnotinstalledand used in accor-
dancewiththeinstructions,maycauseharmful interferencetoradiocommunications.
However,thereisno guarantee thatinterferencewill notoccurin aparticular
installation.Ifthisequipmentdoescauseharmful interferencetoradioortelevision
reception,whichcanbedeterminedbyturning theequipmentoff and on,the useris
encouragedtotrytocorrecttheinterferencebyone ormoreof themeasureslisted
below.
†Reorientorrelocatethereceiving antenna.
†Increasetheseparationbetweentheequipmentand receiver.
†Connecttheequipmentintoanoutleton acircuitdifferentfromthatto
whichthereceiverisconnected.
†Consultthedealeroranexperiencedradio/televisiontechnicianforhelp.
Notice1
Thechangesormodificationsnotexpresslyapprovedbythepartyresponsible for
compliancecould void theuser’sauthoritytooperatetheequipment.
Notice2
Shieldedinterfacecablesand A.C.powercord,ifany,mustbeusedinorderto
complywiththeemissionlimits.
VOIRLANOTICED’INSTALLATIONAVANTDERACCORDERAURESEAU.
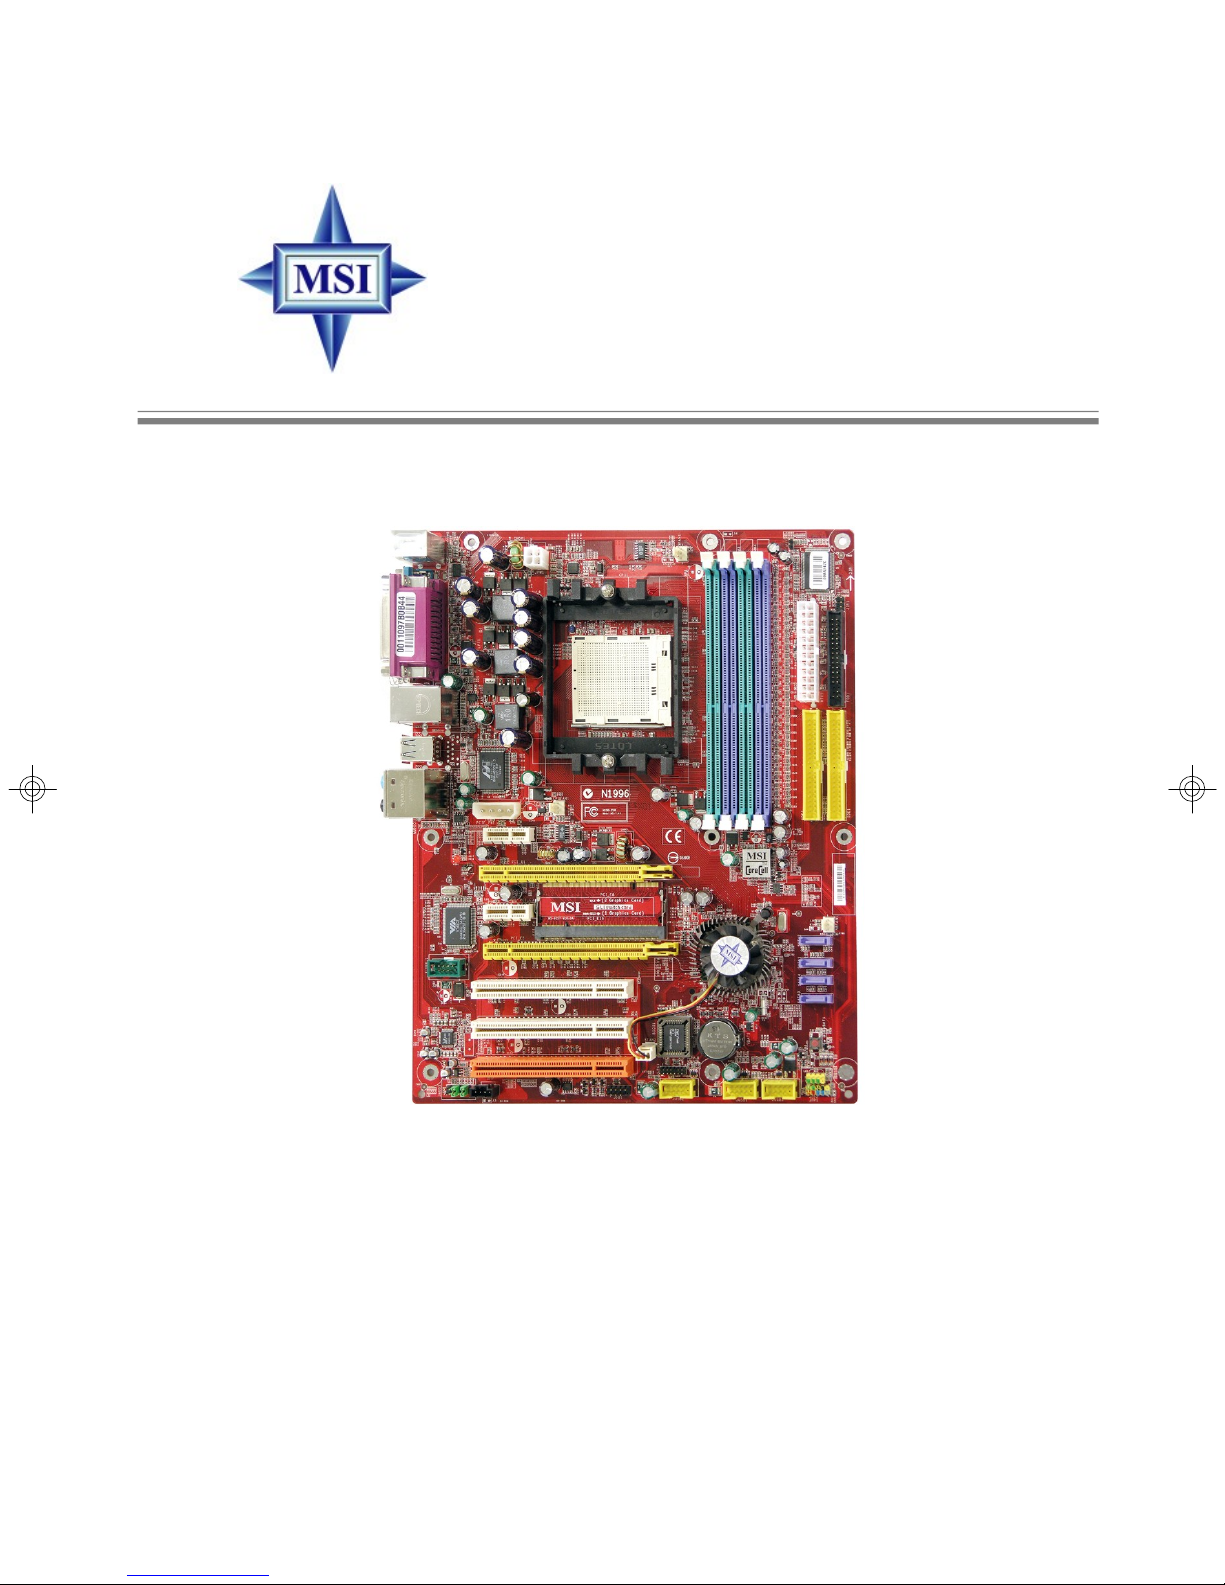
Micro-StarInternational
MS-7185
ThisdevicecomplieswithPart15oftheFCCRules.Operationissubjecttothe
followingtwoconditions:
(1)thisdevicemaynotcauseharmfulinterference,and
(2)thisdevicemustaccept anyinterferencereceived,includinginterferencethat
maycauseundesiredoperation.
7185v1.1-Preface.p65 2005/7/25, 午 11:354

v
WEEE (WasteElectricaland ElectronicEquipment) Statement
7185v1.1-Preface.p65 2005/7/25, 午 11:355

vi
7185v1.1-Preface.p65 2005/7/25, 午 11:356

vii
7185v1.1-Preface.p65 2005/7/25, 午 11:357

viii
CONTENTS
CopyrightNotice...............................................................................................................ii
Trademarks.......................................................................................................................ii
RevisionHistory...............................................................................................................ii
TechnicalSupport............................................................................................................ii
SafetyInstructions..........................................................................................................iii
FCC-B RadioFrequencyInterferenceStatement........................................................iv
WEEE(WasteElectricalandElectronicEquipment)Statement....................................v
English........................................................................................................................E-1
Deutsch......................................................................................................................D-1
Fran ais......................................................................................................................F-1
7185v1.1-Preface.p65 2005/7/25, 午 11:358

E-1
QuickUser sGuide
K8NSLISeries
(MS-7185 v1.X)
ATXMainboard
English

E-2
MS-7185ATX Mainboard

E-3
QuickUser sGuide
MS-7185(v1.X)
QuickUser sGuide
Thankyouforpurchasing theK8NSLISeries(MS-7185 v1.X),an
excellentATXmainboardfromMSI.
Basedontheinnovative nVIDIA®nForceTM4SLI chipsetforoptimal
systemefficiency,theK8NSLISeriesmainboardsaccommodatethe
advanced AMDK8AthlonTM 64X2Dual-Core/AthlonTM 64FX/
AthlonTM 64 processorsin Socket939andsupportup tofour144-bit
DDRDIMMs (at200,266,333,and400MHz)toprovide the maximum
of 4GBmemorycapacity.
MSIRemindsYou...
1.Pleasenotethatthecompanion MSI Driver/UtilityCDsupports
thismainboardwith Windows2000/XP systemdriversONLY.
2.TocreateabootableRAIDvolumeforaWindows2000
environment, Microsoft sWindows2000ServicePack4
(SP4)isrequired.Asthe endusercannotbootwithoutSP4,
acombination installationCDmustbecreatedbefore
attemptingtoinstallthe operating systemontothebootable
RAIDvolume.
TocreatethecombinationinstallationCD,pleasereferto
thefollowing website:
http://www.microsoft.com/windows2000/downloads/
servicepacks/sp4/HFdeploy.htm

E-4
MS-7185ATX Mainboard
MainboardSpecifications
CPU
†SupportsSocket939 forAMDK8AthlonTM 64X2Dual-Core/ AthlonTM 64FX/
AthlonTM 64processors
†Supportsup toAthlon64 4200+ orhigherCPU
(ForthelatestinformationaboutCPU,pleasevisit http://www.msi.com.tw/pro-
gram/products/mainboard/mbd/pro_mbd_cpu_support.php)
Chipset
†nVIDIAnForce4SLI
-HyperTransportlinktoAMDK8AthlonTM 64X2Dual-Core/AthlonTM 64FX/
AthlonTM 64CPU
-HyperTransportsupportingspeedup to1GHz(2000MT/s)
-Supports2PCIExpress x16/x1interface
-TwoindependentSATAcontrollers,forfourdrives
-DualUltraATA133/100/66 IDEcontrollers
-Supportshigh-speedUSB2.0ports
-IEEE802.3nVIDIAMACfor1000BASE-T
Main Memory
†Supportsdual channel,eight memorybanks DDR266/333/400,usingfour184-pin
DDRDIMMs
†Supportsamaximummemorysizeupto4GB
†Supports2.5vDDR SDRAMDIMM
(Fortheupdatedsupporting memorymodules,pleasevisit http://www.msi.com.
tw/program/products/mainboard/mbd/pro_mbd_trp_list.php.)
Slots
†Three 32-bit/33MHzMasterPCIBusslots,including oneorangeslotwhichsup-
ports2masterforMSIspecialPCI functioncard(ex. wirelessLANandbluetooth
combocard)
†TwoPCIExpress x1slots(PCIExpressBusspecificationv1.0acompliant)
†TwoPCIExpressx16 slotssupportnormalorSLImodebyautodetectionor
softwareconfiguration(PCIExpress Busspecification v1.0a compliant)
SLImode-PrimaryPCI_EslotiscompatiblewithPCIExpressx8
SecondaryPCI_Eslot iscompatiblewithPCIExpressx8
non-SLImode-PrimaryPCI_Eslotiscompatible withPCI Express x16
SecondaryPCI_Eslotiscompatible withPCIExpressx1
HDDInterface
†Dual IDEcontrollersonthe nVIDIA®nForceTM4SLIchipset
-ProvidesIDEHDD/CD-ROMwithPIO, BusMasterand UltraDMA133/100/66
operationmodes
-Canconnectupto4IDEdevices
†TwoindependentSATAcontrollersonthenVIDIA®nForceTM4SLI chipset
-NVRAIDsupports4SATAII portswithupto300MB/stransferrate

E-5
QuickUser sGuide
NVRAID(Software)
†Supportsup to4SATAand 4PATA133 Harddrives
-RAID0or1, 0+1, JBODsupported
-RAIDfunctionavailableforPATA133+SATAH/Dor4SATAH/Ddrives
OnboardPeripherals
†1floppyportsupports1FDDwith360KB, 720KB,1.2MB, 1.44MB,and2.88MB
†1PS/2keyboardport
†1PS/2mouseport
†1serialport
†1parallelportsupportsSPP/EPP/ECPmode
†1RJ-45LANjack(withLEDs)
†10 USB ports(6onthefrontand 4ontherear)
†2IEEE 1394 ports(1onfrontand 1onrear
†1Audiojack(5-in-1),coaxial/fiberSPDIF out
†1IrDApinheader
†1D-Bracket2pinheader
†1CD-Inpinheader
OnboardLAN
†nVIDIAMACfor1000BASE-T
†MarvellPHY88E111110/100/1000 FastEthernet
OnboardAudio
†RealtekALC850 8-channelcodec
-8-chDAconnectorwith48 KHzrate
-Compliant withAC97 2.3specifications
-MeetsperfomacerequirementforaudioonPC97/2001 system
-MeetsMicrosoftWHQL/ WLP2.0audiorequirement
OnboardIEEE1394
†VIAVT6307IEEE1394controller
BIOS
†The mainboardBIOSprovides Plug&Play”BIOSwhichdetectstheperipheral
devicesandexpansioncardsoftheboardautomatically
†ThemainboardprovidesaDesktopManagementInterface(DMI)functionwhich
recordsyourmainboardspecifications
†Supportsboot fromLAN, USBDevice1.1&2.0, and SATAHDD
Dimension
†ATXFormFactor(30.5cmX24.5cm)
Mounting
†9mounting holes

E-6
MS-7185ATX Mainboard
Quick ComponentsGuide
I/OPorts,
p.E-14
DDR DIMMs, p.E-10
SFAN2, p.E-16
NBFAN1,
p.E-16
CPUFAN1,
SFAN1, p.E-12
JIR1, p.E-17
PCIE_PW1,
JPW1, p.E-12
SW1, p.E-19
JCI1, p.E-15
JDB1, p.E-18
IDE1/2,
p.E-16
JAUD1, p.E-17
FDD1, p.E-15
JUSB1/2/3, p.E-19
PCIExpress
Slots, p.E-20
J1394_1,
p.E-18 SATA1/2/
3/4, p.E-15
JFP2, p.E-17
JCD1, p.E-15
PCISlots,
p.E-20
JFP1, p.E-17
ATX1, p.E-12

E-7
QuickUser sGuide
Central ProcessingUnit:CPU
OpenLever
90 degree
Sliding
Plate
Goldarrow
GoldArrow
GoldArrow
CorrectCPUplacement
O
Incorrect CPU placement
Pressdown
theCPU Closethelever
CPUInstallation ProceduresforSocket939
1.Pleaseturnoffthepowerand
unplug thepowercordbefore
installing the CPU.
2.Pulltheleversidewaysaway
fromthe socket. Makesureto
raisetheleverup toa90-de-
greeangle.
3.Lookforthegold arrowonthe
CPU.Thegold arrowshould point
asshownin thepicture.TheCPU
canonlyfitinthecorrect
orientation.
4.If theCPUiscorrectlyinstalled,
thepinsshould becompletely
embeddedintothesocketand
cannotbeseen.Pleasenote
thatanyviolation ofthe correct
installationproceduresmay
causepermanentdamagesto
yourmainboard.
5.Press theCPUdownfirmlyinto
thesocketandclosethelever.
AstheCPUislikelytomovewhile
theleverisbeingclosed,al-
waysclosetheleverwithyour
fingerspressingtightlyon top of
the CPUtomakesurethe CPUis
properlyand completelyembed-
dedintothesocket.

E-8
MS-7185ATX Mainboard
Installing AMDAthlon64 CPUCoolerSet
When youareinstalling theCPU, make suretheCPUhasaheatsinkanda
coolingfanattachedonthetoptopreventoverheating. If you do nothave
theheatsinkand cooling fan, contactyourdealertopurchaseand install them
beforeturning onthecomputer.
1.Detachtheshield off the
backplate’spaster.
2.Turnoverthemainboard,and install
thebackplatetotheproperposition.
3.Turnoverthemainboardagain,and
placethemainboardontheflat
surface.Locatethe twoscrew
holesofthemainboard.
4.Align theretentionmechanismand
thebackplate.
Fixtheretentionmechanismand
the backplatewithtwoscrews.
retentionmechanism
MSIRemindsYou...
Mainboardphotosshowninthissectionarefordemonstration ofthe
coolerinstallation forSocket939CPUsonly.Theappearanceof
yourmainboardmayvarydepending on the modelyoupurchase.

E-9
QuickUser sGuide
6.LocatetheFixLever,SafetyHook
and theFixedBolt.
Liftup theintensivefixedlever.
5.Positionthecooling setontothe
retentionmechanism.
Hookoneend oftheclip tohook
first,andthenpressdownthe
otherend oftheclip tofasten the
cooling setonthetopof the
retentionmechanism.
7.Fastendownthe lever.
8.Makesurethesafetyhookcom-
pletelyclaspsthefixedboltofthe
retentionmechanism.
SafetyHook
Fixed Bolt
Fixed Lever
9.Attachthe CPUFancabletotheCPU
fanconnectoronthemainboard.
MSIRemindsYou...
While disconnecting theSafetyHookfromthe fixed bolt,itisneces-
sarytokeep an eyeon yourfingers,becauseoncethe SafetyHook
isdisconnectedfromthefixed bolt,thefixed leverwill springback
instantly.

E-10
MS-7185ATX Mainboard
Memory
The mainboardprovides4slotsfor184-pin DDR DIMM (DoubleIn-LineMemoryModule)
modulesandsupportsthememorysizeup to4GB. Youcan installDDR 266/333/400
moduleson theDDR DIMMslots(DIMM 1~4).
Fortheupdatedsupporting memorymodules,pleasevisit http://www.msi.com.tw/
program/products/mainboard/mbd/pro_mbd_trp_list.php.
DIMM ModuleCombination
Install atleast oneDIMM moduleontheslots. EachDIMMslotsupportsup toamaximum
sizeof1GB.Userscaninstall eithersingle-ordouble-sidedmodulestomeettheir
ownneeds.Usersmayinstall memorymodulesofdifferenttypeand densityon
different-channelDDR DIMMs. However, memorymodules ofthesametypeand
density arerequiredwhileusing dual-channelDDR,orinstabilitymayhappen.
MSIRemindsYou...
-ThesystemoperatesONLYwhentheDDR modulesareinstalled in
accordancewiththe above-mentioned memorypopulation rules.
-Indual-channelmode,makesurethatyou installmemorymodules
of thesametypeand density on DDR DIMMs.
-Toenablesuccessfulsystemboot-up, always insertthememory
modulesintothe ChannelAslots(DIMM1orDIMM3)first.
-ThismainboardDONOTsupportthememorymoduleinstalled
withmorethan 18piecesofIC(integratedcircuit).
-Donotsupportthree memorymodules.
DIMM1~DIMM4
(fromlefttoright)
DIMM1(CH A) DIMM2(CH B) DIMM3(CH A)DIMM4(CH B) Mode
128MB~1GB SingleChannel
128MB~1GB 128MB~1GB SingleChannel
128MB~1GB 128MB~1GB DualChannel
128MB~1GB 128MB~1GB 128MB~1GB 128MB~1GB DualChannel

E-11
QuickUser sGuide
InstallingDDRModules
1. The DDRDIMM hasonlyonenotchon thecenterof module.Themodule will
onlyfitin therightorientation.
2. Insertthe DIMMmemorymoduleverticallyintotheDIMMslot.Thenpushitin
until thegoldenfingeronthememorymodule isdeeplyinsertedinthesocket.
3. Theplasticclip ateachsideof theDIMM slotwill automaticallyclose.
Volt Notch
RecommendedMemory Combination List
S:SingleSide D:DoubleSide
DDR400
DIMM2 DIMM3 DIMM4
S
DIMMSlots
MaxSpeed
- -
S
-
D-
-
D
-
-
S
-
S
DDR400
DDR400
DDR400
DDR333
DDR400
DDR400
DDR400
DDR400
DDR333
DDR400
DIMM1 -
--
--
-
S
SSS
D
DD
D
S-S-
D-D-
D D - -
- - DD
Green Green
Purple Purple

E-12
MS-7185ATX Mainboard
PowerSupply
The mainboardsupportsATXpowersupplyforthepowersystem.Beforeinserting
the powersupplyconnector,alwaysmakesurethatall componentsareinstalled
properlytoensurethatnodamagewill becaused.
ATX24-Pin System Power Connector:ATX1
ThisconnectorallowsyoutoconnecttoanATXpowersupply. Toconnect totheATX
powersupply,makesurethe plug ofthepowersupplyisinserted in theproper
orientation andthepinsarealigned. Thenpushdownthepowersupplyfirmlyintothe
connector.
ATX4-Pin CPUPower Connector:JPW1
Thisconnectorprovides12Vpoweroutputtothe CPUs.
ATX4-Pin VGAPowerConnector:PCIE_PW1
Thisconnectorisdesignedtoconnect 12Vpowersupplyforadd-on PCIExpress
graphicscard(s).If usersfailtoconnectthisconnectorwithan adequatepower
supply,thealertLED(LED1)willglow.
PIN SIGNAL
13 +3.3V
14 -12V
15 GND
16 PS-ON#
17 GND
18 GND
19 GND
20 3VSB
21 +5V
22 +5V
23 +5V
24 GND
PIN SIGNAL
1+3.3V
2+3.3V
3GND
4+5V
5GND
6+5V
7GND
8PWROK
95VSB
10 +12V
11 +12V
12 +3.3V
ATX1PinDefinition
PIN SIGNAL
1GND
2GND
312V
4 12V
JPW1 PinDefinition
MSIRemindsYou...
1.Makersurethatallthree connectorsareconnectedtoadequate
ATXpowersuppliestoensurestableoperation ofthe mainboard.
2.Powersupplyof 450watts (and above)ishighlyrecommended
forsystemstability.
3. ATX12Vpowerconnectionshouldbe greaterthan 20A.
PCIE_PW1
12
34
ATX1
12
113
24
JPW1
1
3 4
2
LED1
PIN SIGNAL
15V
2GND
3GND
4+12V
PCIE_PW1PinDefinition
This manual suits for next models
3
Table of contents
Languages:
Other MSI Motherboard manuals

MSI
MSI Z490-A PRO User manual

MSI
MSI FUZZY CX700 User manual

MSI
MSI MAG B550 TOMAHAWK User manual

MSI
MSI MS-6340M User manual

MSI
MSI G31P Neo2 Series User manual

MSI
MSI MS-7646M1 User manual

MSI
MSI MS-5153 User manual

MSI
MSI MS-7270 User manual

MSI
MSI B450I GAMING PLUS AC User manual

MSI
MSI 890FXA-GD65 series User manual

MSI
MSI 890GXM-G65 MS-7642 User manual

MSI
MSI MS-7015 User manual

MSI
MSI MS-6189 User manual

MSI
MSI H310M PRO-VL User manual

MSI
MSI MPG Z390 GAMING EDGE AC User manual

MSI
MSI X79A-GD65 (8D) Series User manual

MSI
MSI H67MA-ED55 series User manual

MSI
MSI MPG Z690 EDGE WIFI DDR4 User manual

MSI
MSI B250M PRO-VH User manual

MSI
MSI MS-6528LE User manual