manuals.online logo
Brands
  1. Home
  2. •
  3. Brands
  4. •
  5. MTD Vanities
  6. •
  7. Indoor Furnishing
  8. •
  9. MTD Vanities Bathroom Vanity Set User manual

MTD Vanities Bathroom Vanity Set User manual

Bathroom Vanity Set
Installation Guide
PLEASE NOTE
• Licensed Professional installation recommended
• Prior to installation please check items received & report any
missing items to your retailer immediately.
• Protect all surfaces from sharp objects, high heat sources,
direct prolonged sunlight & chemical hazards.
Required Tools - Not In Box
Tape Measure
Pencil
Electric Drill
Phillips Screwdriver
Adjustable Wrench
Spirit Level
Silicone Sealant
How to handle your counter top
1
Li the counter (using two people for
counters 50” or larger) from the front side,
leaving the back side on the bottom of the
box. Bring to a vertical position
2
Remove counter from the box while maintaining it's vertical position. It
is acceptable to use the sink openings as grasp locations, but highly preferable
to also support it from the bottom. The vertical position must be maintained
during the entire moving process.
How to adjust hinges
Adjust height Adjust laterally Adjust depth Remove Install
Installation Guide Page 1
How to remove & install drawers
Removal Installation
1
2
3
1
2
3
How to install mirrors
1
Measure the space where
you wish to install the mirror.
Mark the location of the screws
to be drill in.
W
a
l
l
2
Using the screws provided,
drill into marked spots, leaving
about ¼” to ½” from the wall.
W
a
l
l
3
Carefully place the
mirror back hinges onto the
screws.
Packing List & Receiving Verification
Most MTD’s vanities are pre-assembled & therefore have very few parts. Your package should include the following:
Base Cabinet Counter Top Sink(s) Mirror(s) Faucet(s) Pop-up Drain(s)
& Hoses
PLEASE NOTE
Plumbing parts are not included. We recommend consulting with a license plumber prior to installation. All
plumbing parts (not including the vanity & items in the packing list) showen in the diagrams can be purchased at
any hardware store. Your items may appear slightly different from illustrations.
In most cases your sinks are going to be pre-attached to the counter top, however, many models come with sep-
arate sink/s to be attached to counter top. If so, please read the following instructions as indicated below:
Installation Guide Page 2


-
 
 

7.
 




  

 

 


 
 

 

  


I 0 0
D' □
 !

 
Vessel/Over-Mount Installation
2
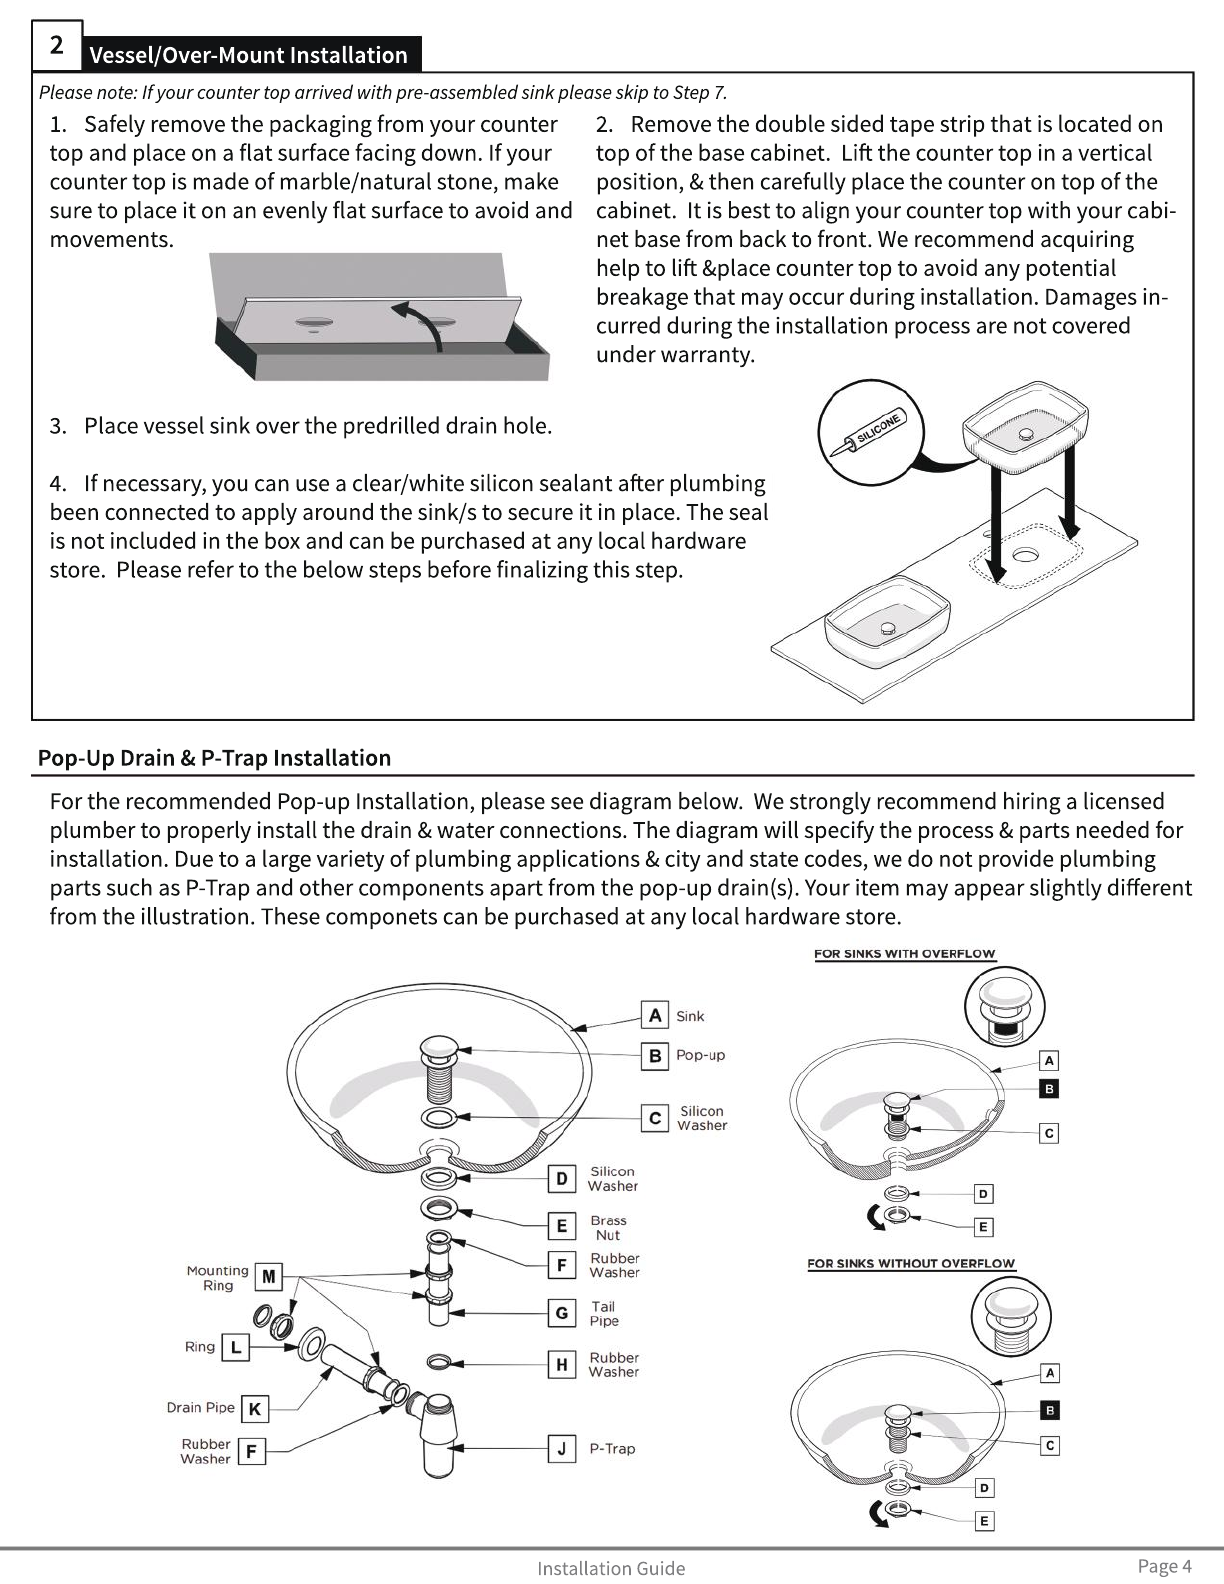
For the recommended Pop-up Installation, please see diagram below. We strongly recommend hiring a licensed
plumber to properly install the drain & water connections. The diagram will specify the process & parts needed for
installation. Due to a large variety of plumbing applications & city and state codes, we do not provide plumbing
parts such as P-Trap and other components apart from the pop-up drain(s). Your item may appear slightly different
from the illustration. These componets can be purchased at any local hardware store.
Please note: If your counter top arrived with pre-assembled sink please skip to Step 7.
1. Safely remove the packaging from your counter
top and place on a flat surface facing down. If your
counter top is made of marble/natural stone, make
sure to place it on an evenly flat surface to avoid and
movements.
2. Remove the double sided tape strip that is located on
top of the base cabinet. Li the counter top in a vertical
position, & then carefully place the counter on top of the
cabinet. It is best to align your counter top with your cabi-
net base from back to front. We recommend acquiring
help to li &place counter top to avoid any potential
breakage that may occur during installation. Damages in-
curred during the installation process are not covered
under warranty.
3. Place vessel sink over the predrilled drain hole.
4. If necessary, you can use a clear/white silicon sealant aer plumbing has
been connected to apply around the sink/s to secure it in place. The sealant
is not included in the box and can be purchased at any local hardware
store. Please refer to the below steps before finalizing this step.
Installation Guide Page 4
Pop-Up Drain & P-Trap Installation

Popular Indoor Furnishing manuals by other brands

IKEA PERFEKT manual

IKEA

IKEA PERFEKT manual

Coaster VANITY 935923 Assembly instructions

Coaster

Coaster VANITY 935923 Assembly instructions

Ostermann REDOCOL e-Desk Pro 90 Assembly & operation manual

Ostermann

Ostermann REDOCOL e-Desk Pro 90 Assembly & operation manual

Astonica 50102306 instruction manual

Astonica

Astonica 50102306 instruction manual

Furniture of America CM2906-VN Assembly instructions

Furniture of America

Furniture of America CM2906-VN Assembly instructions

Clou match me CL/07.56.006.50 installation instructions

Clou

Clou match me CL/07.56.006.50 installation instructions

Ubique ZG-075-GY-GG Assembly instructions

Ubique

Ubique ZG-075-GY-GG Assembly instructions

Vanico Maronyx FUZION installation guide

Vanico Maronyx

Vanico Maronyx FUZION installation guide

Kerkmann Move 3 instruction manual

Kerkmann

Kerkmann Move 3 instruction manual

ALFRA AMT 150 Assembly instructions

ALFRA

ALFRA AMT 150 Assembly instructions

Stompa Highsleeper Assembly instructions

Stompa

Stompa Highsleeper Assembly instructions

BENE T-Meeting Safety and operating instructions

BENE

BENE T-Meeting Safety and operating instructions

Next BARLOW 824328 Assembly instructions

Next

Next BARLOW 824328 Assembly instructions

Costway HW66651-12-22 user manual

Costway

Costway HW66651-12-22 user manual

Armadillo PREMIER JUMBO Assembly instructions

Armadillo

Armadillo PREMIER JUMBO Assembly instructions

Allen + Roth 1652VA-18-200 manual

Allen + Roth

Allen + Roth 1652VA-18-200 manual

TONIN CASA gracia 6430 Assembly instructions

TONIN CASA

TONIN CASA gracia 6430 Assembly instructions

Habitat Blyth 801279 manual

Habitat

Habitat Blyth 801279 manual

manuals.online logo
manuals.online logoBrands
  • About & Mission
  • Contact us
  • Privacy Policy
  • Terms and Conditions

Copyright 2025 Manuals.Online. All Rights Reserved.