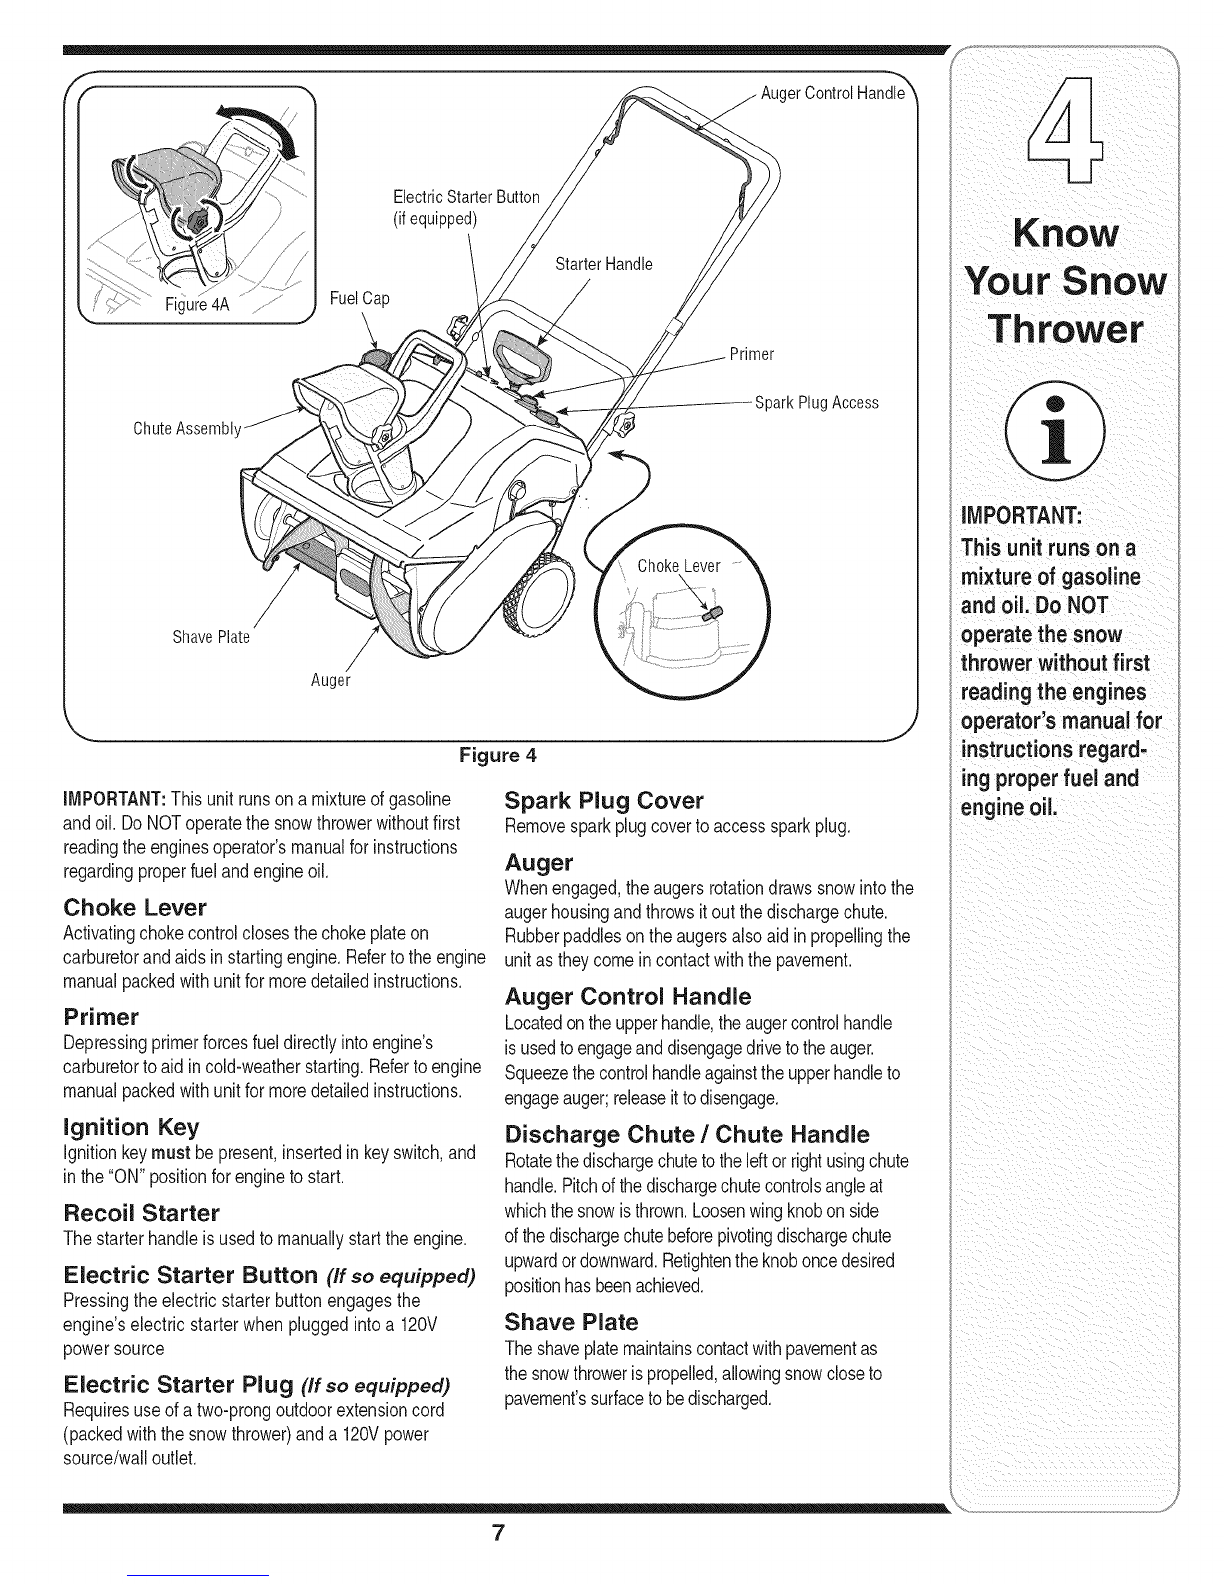
MTD S230 User manual

Safety ,, Set-Up ,,Operation ,,Adjustments ,, Maintenance ,,Troubleshooting ,, Parts Lists ,,Warranty
OF AOA AL
ingle-Sta!e now Thrower
Model 230, $230
Model 240, S240
Model 250, S250
Model 260, S260
Model 261, S261
iMPORTANT
READ SAFETY RULES AND iNSTRUCTiONS CAREFULLY BEFORE OPERATION
Warning: Thisunitisequippedwithaninternalcombustionengineandshouldnotbeusedon or nearanyunimprovedforest-covered,brush-
coveredor grass-coveredlandunlesstheengine'sexhaustsystemisequippedwitha sparkarrestermeetingapplicablelocalor statelaws(if any).
If a sparkarresterisused,it shouldbemaintainedineffectiveworkingorderbytheoperator.IntheStateofCaliforniatheaboveisrequiredbylaw
(Section4442oftheCaliforniaPublicResourcesCode).Otherstatesmayhavesimilarlaws.Federallawsapplyonfederallands.A sparkarrester
forthemufflerisavailablethroughyournearestengineauthorizedservicedealeror contacttheservicedepartment,RO.Box361131Cleveland,
Ohio44136-0019.
PRINTEDIN U.S.A. ForUSCustomers: MTDLLC,P.O.BOX361131CLEVELAND,OHiO44136-0019 FORMNO.769-00805C
ForCanadianCustomers:MTDProducts Ltd.,P.O.BOX1386,KiTCHENER,ONTARION2G4J1 05/17/06

This Operator's Manual is an important part of your new snow thrower, it will help you assemble,
prepare and maintain the unit for best performance. Please read and understand what it says.
Table of
Safety Labels ...................................................... 3
Safe Operation Practices ................................... 4
Set Up & Adjustment .......................................... 6
Know Your Snow Thrower .................................. 7
Operation ............................................................. 8
Contents
Adjustments & Maintenance ........................... 10
Off-Season Storage .......................................... 12
Trouble Shooting .............................................. 13
illustrated Parts Lists ....................................... 14
Warranty ............................................................ 18
Finding and Recording Model Number
BEFOREYOU STARTASSEMBLING
YOURNEW EQUIPMENT,
please locatethe modelplate onthe equipmentand copythe
the modelnumber andthe serialnumber tothe sample model
plate providedto the right.You can locatethe modelplate by
standing atthe operatingposition and looking down atthe
frame.
Model Number Serial Number
Num#ro de module Num#ro de s#rier
XXXXXXXXXXX XXXXXXXXXXX
MTD LLC
CLEVELAND, OH 44136
MTD PRODUCTSLIMITED
KITCHENER, ON N2G 4J1
USA-www.mtdproducts.com 1-800=800-7310
CAN=www.mtdcanada.com 1=800=668=1238
Customer Support
Please do NOTreturn the unit to the retailer from which it was purchased,
without first contacting Customer Support.
Ifyou havedifficultyassembling this productor haveany questionsregardingthe controls,operationor maintenanceof this unit,
youcan seek helpfrom the experts. Choose fromthe options below:
1.Visit www.mtdcanada.cafor manyusefulsuggestions,click on CustomerSupportbutton.
2. Calla CustomerSupport Representative:For US Customers: 1-330-220-4MTD (4683)or 1-800-800-7310
For Canadian Customers" 1-800-668-1238
3. The enginemanufactureris responsiblefor all enigne-relatedissueswith regardsto performance, power-rating,specifica-
tions, warrantyand service. Pleaserefer tothe engine manufacturer'sOwner's/Operator'sManual, packedseparatelywith
your unit,for more information.
Please haveyour unit's modelnumber and serialnumber readywhenyou call. See previoussection to locate this information.
Youwill be asked to entertheserial number in orderto processyour call.
2

• NEVERPUTHANDiN CHUTE.CAN
AMPUTATEHANDSANDFINGERS.
•STOPENGINEANDAUGERBEFOREUSING
CLEAN-OUTTOOLORSTICK.
3
i i l_I ii_ _ i _iii_!i _ _ii_ ii
WARNING
Thissymbolpoints
out importantsafety
instructionswhich,if
notfollowed,could
endangerthepersonal
safetyand/or property
of yourselfand others.
Readand followall
instructionsinthis
manualbeforeat-
temptingto operate
this machine.Failure
to complywith these
instructionsmay result
in personalinjury.When
youseethis symbol.
HEED ITS WARNING!
Your Responsibility
Restrictthe use
ofthis power machine
to persons who read,
understand
and follow the warnings
and instructions
in this manual
and onthe machine.

WARNING
Thissymbolpoints
outimportantsafety
instructionswhich,ifnot
followed,could endanger
the personalsafetyand/
i or propertyofyourself
andothers. Readand
followallinstructions
inthis manualbefore
attemptingtooperate
this machine.Failure
to complywiththese
instructionsmay result
in personalinjury.When
youseethis symbol.
i HEED iTS WARNING!
Your Responsibility
i Restrictthe useof
this powermachine
i to personswho read,
understandandfollow
the warningsand
instructionsin this
manualand on
the machine.
WARNING: EngineExhaust,some of itsconstituents,andcertain vehiclecompo-
nentscontain or emit chemicals knownto Stateof Californiato cause cancerand
birth defectsor other reproductiveharm.
DANGER: Thismachinewas builtto beoperatedaccordingto the rulesfor safe operationin this
manual.As with anytypeof powerequipment,carelessnessor erroronthe part ofthe operatorcan
result in seriousinjury.This machine is capableof amputatinghands andfeet andthrowing objects.
Failureto observethe followingsafety instructionscould resultinserious injuryordeath.
Training
1. Read,understand,andfollowall instructionsonthe 1.
machineandin themanual(s)beforeattemptingto
assembleandoperate.Keepthismanualina safe place
forfutureandregularreferenceandfor ordering
replacementparts. 2.
2. Befamiliarwithall controlsandtheirproperoperation.
Knowhowto stopthe machineanddisengagethemquickly.
3. Neverallowchildrenunder14yearsoldto operatethis
machine.Children14yearsoldandovershouldread
andunderstandtheoperationinstructionsandsafety 3.
rulesin thismanualandshouldbetrainedand supervised
bya parent.
4. Neverallowadultsto operatethis machinewithout
properinstruction.
5. Thrownobjectscancauseseriouspersonalinjury.Plan 4.
yoursnow-throwingpatternto avoiddischargeof material
towardroads,bystandersandthe like.
6. Keepbystanders,helpers,petsandchildrenatleast75feet 5.
fromthe machinewhileit isin operation.Stopmachineif
anyoneentersthe area. 6.
7. Exercisecautiontoavoidslippingor falling,especially 7.
whenoperatingin reverse.
8,
9.
Preparation
Thoroughlyinspectthe areawherethe equipmentisto be
used.Removealldoormats,newspapers,sleds,boards,
wiresandotherforeignobjects,whichcouldbetripped over
orthrownbythe auger/impeller.
Alwayswearsafetyglassesor eyeshieldsduringoperation
andwhile performinganadjustmentorrepairto protectyour
eyes.Thrownobjectswhichricochetcancauseserious
injurytothe eyes.
Do notoperatewithoutwearingadequatewinterouter
garments.Do notwearjewelry,longscarvesorother
looseclothing,whichcould becomeentangledin moving
parts.Wearfootwearwhich willimprovefootingon
slipperysurfaces.
Useagroundedthree-wireextensioncordandreceptacle
forall unitswithelectric startengines.
Adjustcollectorhousingheighttocleargravelorcrushed
rocksurfaces.
Disengageallcontrolleversbeforestartingthe engine.
Neverattemptto makeanyadjustmentswhileengineis
running,exceptwherespecificallyrecommendedinthe
operator'smanual.
Letengineandmachineadjusttooutdoortemperature
beforestartingtoclearsnow.
Toavoidpersonalinjuryor propertydamageuse
extremecare in handlinggasoline.Gasolineisextremely
flammableand thevaporsareexplosive.Seriouspersonal
injurycanoccurwhengasolineisspilledon yourselfor
yourclothes,whichcanignite.Washyourskin andchange
clothesimmediately.
a. Useonlyanapprovedgasolinecontainer.
b. Extinguishallcigarettes,cigars,pipesandothersources
ofignition.
c. Neverfuel machineindoors.
d. Neverremovegascap oradd fuelwhilethe engineis
hotor running.
e. Allowengineto coolat leasttwo minutesbefore
refueling.
f. Neveroverfillfueltank. Filltankto nomorethan
Y2inchbelowbottomoffiller neckto providespace
forfuel expansion.
g. Replacegasolinecap andtightensecurely.
h. If gasolineis spilled,wipe itoff theengineand
equipment.Movemachineto anotherarea.Wait5
minutesbeforestartingthe engine.
i. Neverstorethe machineorfuel containerinsidewhere
there isan openflame,sparkor pilotlight(e.g.furnace,
waterheater,spaceheater,clothesdryeretc.).
j. Allowmachinetocoolat least5 minutesbeforestoring.
4

Operation
1. Do notput handsor feet nearrotatingparts,inthe
auger/impellerhousingorchuteassembly.Contactwiththe
rotatingpartscanamputatehandsandfeet.
2. Theauger/impellercontrolleverisa safetydevice.Never
bypassits operation.Doingso makesthe machineunsafe
andmaycausepersonalinjury.
3. Thecontrolleversmustoperateeasily in bothdirections
and automaticallyreturntothe disengagedpositionwhen
released.
4. Neveroperatewith amissingordamagedchuteassembly.
Keepallsafetydevicesin placeandworking.
5. Neverrunanengineindoorsor ina poorlyventilatedarea.
Engineexhaustcontainscarbonmonoxide,an odorlessand
deadlygas.
6. Do notoperatemachinewhileunderthe influenceofalcohol
or drugs.
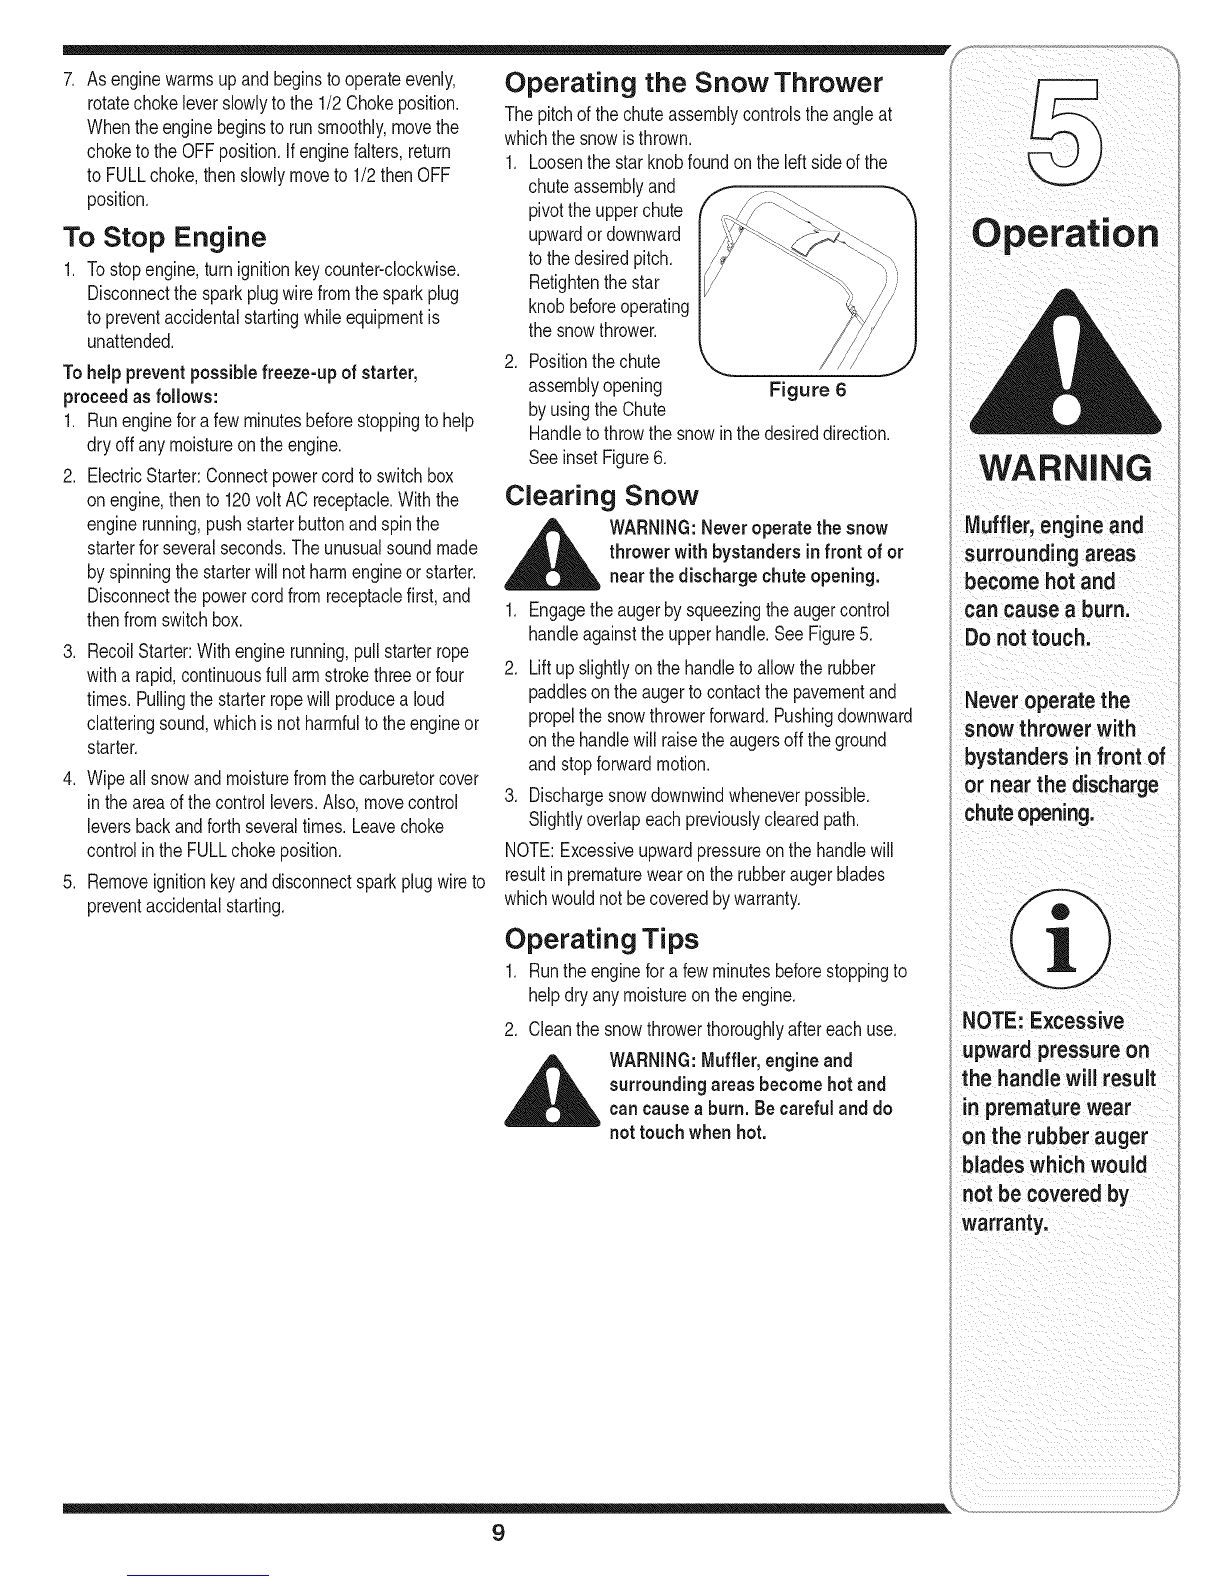
7. Mufflerandenginebecomehotandcancausea burn.Do
nottouch.
8. Exerciseextremecautionwhenoperatingonor crossing
gravelsurfaces.Stayalertforhiddenhazardsor traffic.
9. Exercisecautionwhenchangingdirectionandwhile
operatingonslopes.
10.Planyoursnow-throwingpatternto avoiddischargetowards
windows,walls,carsetc.Thus,avoidingpossibleproperty
damageor personalinjurycausedbyaricochet.
11.Neverdirectdischargeatchildren,bystandersandpetsor
allowanyoneinfront ofthe machine.
12.Do notoverloadmachinecapacityby attemptingto clear
snowattoofastof a rate.
13.Neveroperatethis machinewithoutgoodvisibilityor light.
Alwaysbesureofyourfootingand keepafirmhold onthe
handles.Walk,neverrun.
14.Disengagepowerto theauger/impellerwhentransporting
or not inuse.
15.Neveroperatemachineathightransportspeedsonslippery
surfaces.Lookdownand behindandusecarewhen
backingup.
16.Ifthe machineshouldstarttovibrateabnormally,stopthe
engine,disconnectthesparkplugwireandgroundit against
the engine.Inspectthoroughlyfor damage.Repairany
damagebeforestartingandoperating.
17.Disengageall controlleversandstopenginebeforeyou
leavetheoperatingposition(behindthe handles).Wait
untilthe auger/impellercomestoacompletestopbefore
uncloggingthechuteassembly,makinganyadjustments,or
inspections.
18.Neverput yourhandinthe dischargeorcollectoropenings.
Alwaysusetheclean-outtool providedto unclogthe
dischargeopening.Do notunclogchuteassemblywhile
engineis running.Shutoffengineand remainbehind
handlesuntilallmovingpartshavestoppedbefore
unclogging.
19.Use onlyattachmentsand accessoriesapprovedbythe
manufacturer(e.g.wheelweights,tire chains,cabsetc.).
20. Ifsituationsoccurwhicharenotcoveredinthis manual,
usecareand goodjudgment.Contactyourdealerorcall
(800) 800-7310for assistanceandthe nameofyournearest
servicingdealer..
Maintenance & Storage
1. Nevertamperwithsafetydevices.Checktheirproper
operationregularly.Refertothe maintenanceand
adjustmentsectionsofthismanual.
2. Beforecleaning,repairing,or inspectingmachine
disengageall controlleversandstopthe engine.Wait until
theauger/impellercometoacompletestop.Disconnectthe
sparkplugwireandgroundagainstthe engineto prevent
unintendedstarting.
3. Checkboltsand screwsforpropertightnessatfrequent
intervalsto keepthe machinein safeworkingcondition.
Also,visuallyinspectmachineforanydamage.
4. Do notchangethe enginegovernorsettingor over-speed
theengine.Thegovernorcontrolsthemaximumsafe
operatingspeedoftheengine.
5. Snowthrowershaveplatesandskidshoesaresubjectto
wearanddamage.Foryoursafetyprotection,frequently
checkallcomponentsand replacewith originalequipment
manufacturer's(OEM)partsonly."Useof partswhichdo
notmeetthe originalequipmentspecificationsmayleadto
improperperformanceandcompromisesafety!"
6. Checkcontrolsperiodicallytoverify theyengageand
disengageproperlyandadjust,if necessary.Referto the
adjustmentsectioninthisoperator'smanualfor instructions.
7. Maintainor replacesafetyandinstructionlabels,as
necessary.
8. Observeproperdisposallawsandregulationsforgas,oil,
etc.toprotectthe environment.
9. Priorto storing,runmachinea few minutestoclearsnow
frommachineandpreventfreezeupof auger/impeller.
10.Neverstorethe machineorfuel containerinsidewhere
thereisan openflame,sparkor pilotlightsuchas a water
heater,furnace,clothesdryeretc.
11.Alwaysreferto theoperator'smanualfor properinstructions
onoff-seasonstorage.
Do not modify engine
Toavoidseriousinjuryordeath,donot modifyengineinany
way.Tamperingwiththegovernorsettingcan leadto arunaway
engineandcauseit tooperateatunsafespeeds.Nevertamper
withfactorysettingofenginegovernor.
Notice regarding Emissions
Engineswhicharecertifiedto complywithCaliforniaandfederal
EPAemissionregulationsfor SORE(SmallOff RoadEquipment)
arecertifiedtooperateonregularunleadedgasoline,and
mayincludethefollowingemissioncontrolsystems:Engine
Modification(EM)andThreeWayCatalyst(TWO)ifso equipped.
Your Responsibility
Restrictthe useofthispowermachineto personswhoread,
understandandfollowthe warningsandinstructionsinthis
manualandonthe machine.
WARNING
Thissymbolpoints
outimportantsafety
instructionswhich,ifnot
followed,couldendanger
the personalsafetyand/
orpropertyof yourself
and others.Readand
followall instructions
in this manualbefore
attemptingtooperate
this machine.Failure
to complywiththese
instructionsmayresult
in personalinjury.When
youseethissymbol.
HEED iTS WARNING!
Your Responsibility
Restrictthe useof
this powermachine
to personswho read,
understandand follow
the warningsand
instructions inthis
manualand on
the machine.
5

NOTE: This Operator's
Manual coversseveral
models.Snow thrower
featuresvary by
model.Not all features
discussed inthis
manualare applicable
to allsnowthrower
models.
NOTE: All references
i to leftor right sideof
thesnowthrower is
i fromtheoperating
positiononly.
IMPORTANT:
Do not usethe chute
handleto lift thesnow
thrower.
Figure 1
/
Contents of Carton
Cartoncontentsare listedbelowwithpartnumbersin
parentheses,
1. TwoignitionKeys(725-0201)
2, 2,6ozBottleof2 CycleOil (737-04037)
3, ExtensionCord(if soequipped)(629-0236)
__IL ARNING: Disconnectthe sparkplug
wireand grounditagainst the engineto
preventunintended starting.
Positioning the Upper Handle
1. Removepackingmaterial,if present.
2. Makingsurenottopinchthecableintheprocess,
pivottheupperhandleintotheoperatingpositionas
illustratedin Figure1 untilit clicksintoplace.
3. Tightenthestarknobstosecurethehandlein place
asin Figure1.
Assembling the Discharge Chute
Forshippingreasons,thesnowthrowerhasbeen
packagedwiththeupperchutepivotedall thewaydown.
Topivotitupward,proceedasfollows:
,
,
Turnthechuteuntilthechuteopeningisfacing
straightahead. Removethewingknob,flatwasher
andcarriageboltfromthe lowerchute. See Figure2.
Pivottheupperchuteupwardoverthelip onthelower
chutesothatthereisNOgap betweentheupper
chuteandthelowerchute.
3. Resecurewiththe hardwarejust removed.If installed
correctly,yoursnowthrowershouldlooklikeFigure3.
IMPORTANT:Donotusethechutehandleto liftthe
snowthrower.
Figure 2
Figure 3
6

AugerControlHandle_
ElectricStarterButton
(ifequipped)
Figure4A FuelCap
ChuteAssembl
ShavePlate /
Auger
/
Primer
SparkPlugAccess
Figure 4
IMPORTANT:Thisunitrunson a mixtureofgasoline
andoil. DoNOToperatethesnowthrowerwithoutfirst
readingtheenginesoperator'smanualforinstructions
regardingproperfuelandengineoil.
Choke Lever
Activatingchokecontrolclosesthechokeplateon
carburetorandaidsin startingengine.Refertotheengine
manualpackedwithunitformoredetailedinstructions.
Primer
Depressingprimerforcesfueldirectlyintoengine's
carburetortoaid incold-weatherstarting.Refertoengine
manualpackedwithunitformoredetailedinstructions.
Ignition Key
Ignitionkeymust be present,insertedinkeyswitch,and
inthe"ON"positionforengineto start.
Recoil Starter
Thestarterhandleisusedtomanuallystarttheengine.
Electric Starter Button (If so equipped)
Pressingthe electricstarterbuttonengagesthe
engine'selectricstarterwhenpluggedintoa 120V
powersouroe
Electric Starter Plug (If so equipped)
Requiresuseofa two-prongoutdoorextensioncord
(packedwiththesnowthrower)anda 120Vpower
source/walloutlet.
Spark Plug Cover
Removesparkplugcovertoaccesssparkplug.
Auger
Whenengaged,theaugersrotationdrawssnowintothe
augerhousingandthrowsitoutthedischargechute.
Rubberpaddleson theaugersalsoaidin propellingthe
unitastheycomeincontactwiththe pavement.
Auger Control Handle
Locatedontheupperhandle,theaugercontrolhandle
isusedtoengageanddisengagedrivetotheauger.
Squeezethecontrolhandleagainsttheupperhandleto
engageauger;releaseittodisengage.
Discharge Chute /Chute Handle
Rotatethedischargechutetotheleftor rightusingchute
handle.Pitchofthedischargechutecontrolsangleat
whichthesnowisthrown.Loosenwingknobonside
ofthedischargechutebeforepivotingdischargechute
upwardordownward.Retightentheknoboncedesired
positionhasbeenachieved.
Shave Plate
Theshaveplatemaintainscontactwithpavementas
thesnowthrowerispropelled,allowingsnowcloseto
pavement'ssurfacetobedischarged.
7
YourSnOw
IMPORTANT:
This unit runs on a
mixture of gasoline
and oil. Do NOT
operate the snow
thrower without first
reading !,heengines
operator s manual for
instructionsregard-
ing proper fuel and
engine oil.

Before Starti ng Electric Starter(if equipped)
I _ WARNING:Beforestartingthe _ WARNING:Theelectric starter must
engine,read, understand,and follow ALL be used witha properly grounded
all instructionsand warnings on the three-prong receptacleat all times to
machine and inthis manual, avoid the possibilityof electric shock.
1. Thesparkplugwirewasdisconnectedforsafety. Follow all instructionscarefully prior to
Attachsparkplugwireto sparkplugbeforestarting, operatingtheelectric starter.
iIMPORTANT:Forcompleteanddetailedengine 1. Theelectricstarterisequippedwitha groundedthree-
starting,stoppingand storinginstructions,it isrecom- wirepowercordandplug,and isdesignedtooperate
mendedthatyoureadtheenginemanualalsoincluded on 120voltAC householdcurrent.
i withthisunit. 2. Determinethatyourhousewiringisa three-wire
Fuel And Oil Mixture groundedsystem.Aska licensedelectricianifyouare
notcertain.
_ WARNING:Useextremecare when
handling gasoline. Gasolineis 3. Ifyour homewiring system isnot a three-wire
extremelyflammableand the vapors grounded system, do notusethiselectricstarter
are explosive.Neverfuel machine underanyconditions.
indoorsor while the engineishot or 4. Ifyour homeelectricalsystem isgrounded, but
Read, understand, running.Extinguish cigarettes, cigars, a three-holereceptacleisnotavailable,oneshould
and follow all instruc- pipesand other sourcesof ignition, beinstalledbya licensedelectricianbeforeusingthe
tions and warnings IMPORTANT:Thisunitrunson a mixtureofgasoline electricstarter.
on the machine and andoil. DoNOToperatethesnowthrowerwithout 5. Ifyou havea grounded three-prong receptacle,
in this manual before firstreadingtheenginesoperator'smanualfordetailed proceedasfollows.
operating, instructionsregardingproperfuelandengineoil. 6. MoveChokeControltothe"Full"position.
DoNOToperatethesnowthrowerwithoutthefuelcap
securelyin placeonthefueltank. 7. PushPrimerthree(3)times,makingsuretocover
ventholewhenpushing.
Use extreme care Positioni ng the Discharge 8. Connectpowercordtoswitchboxondashpanel.
when handling Chute Plugtheotherendof powercordintoa three-prong
gasoline. Gasoline is 1. Loosenthestar 120-volt,grounded,ACreceptacle.
extremely flammable knobfoundon 9. Pushstarterbuttontocrankengine.
and the vapors are theleftsideofthe
explosive. Never fuel dischargechute 10.Whenenginestarts,releasestarterbutton,andmove
andpivotthe up- chokegraduallyto 1/2Chokeuntiltheengineruns
the machine indoors perchuteupward smoothly.NextmoveChoketoOFF.If enginefalters,
ior while the engine movechokeimmediatelytoFULLandthengradually
is hot or running, ordownwardtothedesiredpitch, to1/2thento OFE
i Extinguish cigarettes, Retightenthe 11.Disconnectthepowercord.Always unplug from the
i cigars, pipes and starknobbefore outlet first, and then from thesnow thrower.
other sources of operatingthesnow
thrower. Recoil Starter
ignition. 2. Rotatethedischargechutetotheleftor rightusing 1. Movechokeleverto FULLchokeposition(coldengine
thechutehandle.SeeFigure5. start).
i The electric starter TO Start Engine 2. Ifengineiswarm,placechokein OFFpositioninstead
must be used with a ofFULL.
'properly grounded 1. Insertignitionkeyintoslot. 3. PushPrimerthree(3)times,makingsuretocover
three-prong recep- 2. Nowfollowtheinstructionsbelowasitpertainsto ventholewhenpushing.
tacle at all times to yourunit.SeeFigure5forlocationofcontrols. 4. If engineiswarm,pushprimerbuttononlyonce.
avoid the possibility NOTE:Alwayscoverventholein primerbuttonwhen
of electric shock. Fol- pushing.Additionalprimingmaybe necessaryforfirst
startiftemperatureisbelow15degreesFahrenheit.
low all instructions
i carefully prior to 5. Graspstarterhandleandpullropeoutslowly,untilit
pullsslightlyharder.Letroperewindslowly.
operatingthe electric 6. Pullstarterhandlerapidly.Donotallowhandleto snap
starter, back.Allowitto rewindslowlywhilekeepinga firm
holdonthestarterhandle.
Figure 5
WARNING
8

Operating the Snow Thrower
7. Asenginewarmsupand beginstooperateevenly,
rotatechokeleverslowlytothe 1/2Chokeposition.
Whentheenginebeginstorunsmoothly,movethe
choketo theOFFposition.Ifenginefalters,return
to FULLchoke,thenslowlymoveto1/2thenOFF
position.
To Stop Engine
1. Tostopengine,turnignitionkeycounter-clockwise.
Disconnectthesparkplugwirefromthesparkplug
to preventaccidentalstartingwhileequipmentis
unattended.
Tohelp preventpossiblefreeze-upofstarter,
proceedas follows:
1. Runengineforafew minutesbeforestoppingtohelp
dryoff anymoistureon theengine.
2. ElectricStarter:Connectpowercordtoswitchbox
on engine,thento 120voltACreceptacle.Withthe
enginerunning,pushstarterbuttonandspinthe
starterforseveralseconds.Theunusualsoundmade
byspinningthestarterwillnotharmengineorstarter.
Disconnectthepowercordfromreceptaclefirst,and
thenfromswitchbox.
RecoilStarter:Withenginerunning,pullstarterrope
witha rapid,continuousfullarmstrokethreeorfour
times.Pullingthestarterropewillproducea loud
clatteringsound,whichisnotharmfultotheengineor
starter.
.
4. Wipeall snowand moisturefromthecarburetorcover
in theareaof thecontrollevers.Also,movecontrol
leversbackandforthseveraltimes.Leavechoke
controlintheFULLchokeposition.
5. Removeignitionkeyanddisconnectsparkplugwireto
preventaccidentalstarting.
Thepitchofthechuteassemblycontrolstheangleat
whichthesnowisthrown.
1. Loosenthestarknobfoundon theleftsideof the
chuteassemblyand
pivottheupperchute
upwardor downward
tothedesiredpitch.
Retightenthestar
knobbeforeoperating
thesnowthrower.
.Positionthechute
assemblyopening Figure 6
byusingtheChute
Handletothrowthesnowinthedesireddirection.
SeeinsetFigure6.
Clearing Snow
_ARNING:Neveroperatethesnow
thrower with bystandersin front of or
nearthe dischargechuteopening.
1. Engagetheaugerbysqueezingtheaugercontrol
handleagainsttheupperhandle.SeeFigure5.
2. Liftup slightlyonthehandletoallowtherubber
paddlesontheaugertocontactthepavementand
propelthesnowthrowerforward.Pushingdownward
onthehandlewillraisetheaugersoff theground
andstopforwardmotion.
3. Dischargesnowdownwindwheneverpossible.
Slightlyoverlapeachpreviouslyclearedpath.
NOTE:Excessiveupwardpressureon thehandlewill
resultinprematurewearontherubberaugerblades
whichwouldnotbecoveredbywarranty.
Operating Tips
1. Runtheenginefora fewminutesbeforestoppingto
helpdryanymoistureon theengine.
2. Cleanthesnowthrowerthoroughlyaftereachuse.
__i= ARNING:Muffler, engineand
surroundingareasbecomehotand
cancauseaburn.Becarefuland do
nottouch when hot.
tm
Opera ion
WARNING
Muffler'engineand
surroundingareas
become hot
can cause a burn,
Do not touch;
Neveroperate the
snow thrower with
bystanders in front of
or near the discharge
NOTE: Excessive
upward pressure on
the handlewill result
in premature wear
on the rubber auger
blades which would
not be covered by
warranty.
9

WARNING
Disconnectthe
spark plugwire
and ground itagainst
the engineto prevent
unintended starting.
NEVERattempt to
make any adjust-
ments while
the engine is run-
ning, except where
specified in
the operator's
manual.
Before servicing,
repairing, or inspect-
ing,disengagethe
control bail and
stop engine. Wait
untilall moving
parts have cometo a
complete stop.
Figure 7
Shave Plate
1. Tochecktheadjustmentoftheshaveplate,placethe
uniton a levelsurface.Thewheels,shaveplateand
augersshouldallcontactlevelsurface.Notethatif the
shaveplateisadjustedtoohigh,snowmayblowunder
thehousing.Iftheshaveplatewearsoutexcessively,
ortheunitdoesnotself-propel,theshaveplatemay
betoolowand needstobeadjusted.
NOTE:On newunitsorunitswitha newshaveplate
installed,theaugersmaybeslightlyoff theground.
2. Toadjust,tipthesnowthrowerbacksothat itrests
onthehandle.Loosenthelocknutsandboltswhich
securetheshaveplatetothehousing.See Figure7.
Movetheshaveplatetodesiredpositionand retighten
thenutsandboltssecurely.
Replacing Shave Plate
Theshaveplateisattachedtothebottomof theauger
housingandis subjecttowear.It shouldbechecked
periodically.Therearetwo wearingedgesandtheshave
platecanbereversed.RefertoFigure7.
1. Removethecarriageboltsand hexlocknutswhich
attachittothesnowthrowerhousing.
2. Installnewshaveplate,makingsuretheheadsofthe
carriageboltsareonthe insideofthehousing.
3. Adjusttheshaveplateaccordingtoinstructions
above.Tightenthenutssecurelybeforeoperatingthe
snowthrower.
NOTE:Forinformationregardingthepriceandavailability
ofShavePlateKitrefertocustomersupportonpage2.
Figure 8
_ARNING:Disconnectthe sparkplug
wire and grounditagainst the engine
to preventunintended starting.
__k ARNING:NEVERattempt to make
any adjustmentswhile the engineis
running, exceptwherespecifiedinthe
operator's manual.
Control Cable
Asa resultofboththecontrolcableandthedrivebelt
stretchingduetowear,periodicadjustmentsmaybe
necessary.
If theaugerseemsto hesitatewhenrotatingwhilethe
enginemaintainsa constantspeed,an adjustmentis
necessary.Proceedasfollows:
Theupperholeinthecontrolhandleprovidesforan
adjustmentincabletension.Toadjust,disconnectthe
endofcontrolcablefromthebottomholeinthecontrol
handleand reinsertitintheupperhole.Insertthecable
fromtheoutsideas showninFigure8.Testthe snow
throwerto seeifthereisa noticeabledifference.
Carburetor
,_ WARNING:If any adjustments needto
be madeto the enginewhile the engine
isrunning(e.g. carburetor), keep
clear of all moving parts.Becareful of
muffler, engine and other surrounding
heatedsurfaces.
1. Refertotheseparateenginemanual,packedwith
yourunit,forcarburetoradjustmentinformation.
10

Replacing Belt
AARNING:Beforeservicing,repairing,
or inspecting,disengagethe control
bail and stop engine.Waituntil all
moving partshavecome to a complete
stop. Disconnect spark plug wire and
ground itagainst the engine to prevent
unintended starting.
Removethebeltcoverbyremovingfivehexscrews.See
Figure9. Thensimplypullthebeltoffbygraspingitfromthe
bottomoftheaugerpulleyandpullingoff. Onceyouremove
thebeltfromthepulleys,youcanpushdownontheidler
pulleytoreleasethebeltfromunderthebeltkeeper.
Toreplacethebeltfollowtheseinstructionsandreferto
Figure10:
1. Pushdownon theIdlerpulley.
2. Putbelton topoftheaugerpulley,underbeltkeeper.
3. Threadbeltaroundenginepulley.
4. Pushbeltoverbottomofaugerpulley.
Reinstallthebeltcoverremovedearlier.
Engine
1. Refertotheseparateenginemanualforall engine
maintenanceprocedures.
2. Checkengineand snowthrowerfrequentlyforloose
hardware,andtightenasneeded.
Lubrication
Lubricatepivotpointsonthecontrolhandleandthe
extensionspringattheendofthecontrolcable witha
lightoilonceeveryseasonandbeforestorageofthe
snowthrowerattheendoftheseason.
Replacing Auger Paddles
Thesnowthrowerauger'srubberpaddlesaresubjectto
wearandshouldbe replacedifanysignsofexcessive
wearispresent.
iMPORTANT:DoNOTallowtheauger'srubberpaddles
towearto thepointwhereportionsofthemetalauger
itselfcancomeincontactwiththepavement.Doingso
canresultinseriousdamagetoyoursnowthrower.
NOTE:Forinformationregardingthepriceandavailability
ofAugerKit referto customersupporton page2.
Tochangetherubberpaddles,proceedasfollows:
1. Removetheexistingrubberpaddlesbyunscrewingthe
self-tappingscrewswhichsecurethemtotheauger.
SeeFigure11.
2. Securethereplacementrubberpaddlestotheauger
usingthehardwareremovedearlier.
Jo remove,pullbelt off here J
Figure 9
J
Figure 10
f
Figure 11
intenal
WARNING
Before servicing;
repairing, or inspecting,
disengagethe control
stopengine:
lall moving
partshavecometoa
complete stop: Discon'
nect spark plugwire
gioun i
prevent
unintendedstarting.
PORTANT:
DoNOT,ow
auger!s
padd es
to the pointwhere
portions of the metal
auger itself can come
incontact with the
pavement: Doing SO
can result inserious
damagetoyoursnow
thrower,
11

WARNING
Never store snow
i thrower with fuel
in tank indoorsor
in poorly ventilated
areas, where fuel
fumes may reach an
open flame, spark
or pilotlight as on a
furnace, water heater,
i clothes dryer or gas
,appliance.
Drain fuel intoan
approved container
outdoors,away from
any open flame. Be
certain engine is
i cool. Do not smoke.
Fuel left in engine
during warm weather
deteriorates and
will cause serious
starting problems.
Do not drain
carburetor if using
fuel stabilizer.
Never use engine or
carburetor cleaning
iproducts inthe fuel
tank or permanent
damage may occur.
Observethefollowing,whenpreparingyoursnow
throwerforoff-seasonstorage:
• Drainfuelintoanapprovedcontaineroutdoors,away
fromanyopenflame.Allowenginetocool.Extin-
guishcigarettes,cigars,pipesandothersources
ofignitionpriortodrainingfuel. Fuelleft inengine
duringwarmweatherdeterioratesandwillcause
seriousstartingproblems.
If unitis tobestoredover30 days,preparefor
storageasinstructedinthe separateenginemanual
packedwithyourunit.
Runengineuntilfueltankis emptyandenginestops
duetolackoffuel.
Removegasolinefromcarburetorandfueltankto
preventgumdepositsfromformingon theseparts
andcausingpossiblemalfunctionofengine.
Draincarburetorbypressingupwardon bowldrain,
locatedbelowthecarburetorcover.
• Fuelstabilizers,suchasSTA-BIL®,arean accept-
ablealternativein minimizingtheformationoffuel
gumdepositsduringstorage.Donotdraincarburetor
ifusinga fuelstabilizer.
• Wipeequipmentwithanoiled ragto preventrust.
• Removesparkplugandpouroneounceofengine
oilthroughsparkplugholeintocylinder.Coverspark
plugholewithrag.Crankengineseveraltimesto
distributeoil.Replacesparkplug.
• Followthelubricationrecommendationsfoundin the
MaintenanceSection.
Alwaysstorethe snowthrowerina clean,dryarea.
12

Problem Cause Remedy
Fnh n_f_ _m I ChOkenotinON position: MoveChoketoONpost on
_ " " "!" "_" Sparkplugwiredisconnected. 21 Connectwiretosparkplug.
Fue!tankemptyor stalefuel. &Fill tankwithclean,freShgaSeiinel
Enginenotprimed. Primeengineasinstructedin
Ope[atingY°U[Sniw Th[°_ei Trouhie:
5 FaultySparkplug 5; Clean,adjustgap,or replace:
& Blockedfuellinei 6. Cleanfuel!inel Shooting
Safetykeynotin ignition0n keyfU!yint° !heswito!i
8. Fue Shut-offvavecosed.(f 8, Openfue shut-offvave:
Engineruns erratic 1. Unitrunningon CHOKE.
2. Blockedfuellineor stalefuel.
3. Wateror dirtin fuelsystem.
4. Carburetoroutofadjustment.
1. Movechokeleverto OFFposition.
2. Cleanfuelline;filltankwithclean,
freshgasoline.
3. Drainfueltank.Refillwith
freshfuel.
4. ContactServiceCenter.
Engne overheats 1 Carburetornotadjustedpropery 1 ContactServceCenter
Excessive 1. Loosepartsor damagedauger. 1. Stopengineimmediatelyand
Vibration disconnectsparkplugwire.Tighten
all boltsand nuts.Ifvibration
continues,haveunitservicedbya
ServiceCenter.
Lossof power 1. Sparkplugwireloose. 1. Connectandtightensparkplug
wire.
2. Gascapventholeplugged. 2. Removeiceandsnowfromgas
I cap.Becertanventholeisclear.
• 3 Exhaustportplugged _. 3 ContactServiceCenter
Unit fails 1. Drivecontrolcablein needof adjust- 1. Adjustdrivecontrolcable.Referto
to propel itself merit. "Adjustments".
2. Drivebeltlooseordamaged. 2. Replacedrivebelt.
Unit fails 1. Chuteassemblyclogged. 1. Stopengineimmediatelyand
to dscharge snow disconnectsparkplugwire.Clean
chuteassemblyandinsideof
augerhousingwithclean-outtool
ora stick.
2. Foreignobjectlodgedinauger. 2. Stopengineimmediatelyand
disconnectsparkplugwire.
Removeobjectfromauger.
3. Augerbeltlooseor damaged. 3. RefertoMaintenancesection
NOTEi ThiSsection
addressesminor
service issues: For
further details,contact
customerassistancel
ii i _iI_ ii
13

iVlodels/iVlodeles 230-260
@
14

iVlodels/iVlodeles 230-260
REF
NO.
N° DE
REF
1
2
3
4
5
6
7
8
10
11
12
13
14
15
16
17
18
19
2O
21
22
23
24
25
26
27
28
29
30
31
32
33
34
35
36
37
38
39
40
41
42
43
44
45
46
47
48
49
5O
"51
*52
PART
NO.
N° DE
PIECE
629-0236
710-0627
710-1003
710-3025
712-04063
725-0157
726-0154
726-0205
736-0242
747-04150
7511825510
751-0535
751-10023
751-10278
754-0101A
754-0367
756-0416B
756-04232
756-04243
790-00225
734-04225
684-04228
710-0106
710-0642
710-0653
710-0896
710-0352
710-3008
712-04064
726-0299
732-0357A
736-0176
790-00249
736-0329
741-04188
684-04168
748-0234
712-0896
750-04571
790-00283
790-00045A
756-0625
735-04033
735-04032
684-04202
7510009636
7512B1476
738-0924A
684-04227
721-04006
722-3022
750-0589
750-0716A
DESCRIPTION
Cord-Extension 110V3M 2 Prong
Hex L-Bolt 5/16-24 x .75 Gr. 5
Hex Wash B-Tapp Scr #10 x .62" Lg.
Screw-Hex Cap
Flange Locknut 5/16-18 Gr. F, Nylon
Cable Tie
Push Mount Tie
Hose Clamp
Cupped Washer .340 ID x .872 OD x .06
Gas Tank Support Wire
Choke Lever Knob
Fuel Line
Fuel Tank 2 Quart
Cap-Fuel
V-Belt 1/2 x 35.0" Lg.
V-Belt (3.5 HP Tec. only)
Pulley Half .625 ID x 2.25 OD
V-Pulley 1/2 x 6,0" OD ( 5.0 Tec. HP only)
Pulley (3.5 HP Tec. only)
2-cycle Mounting Bracket
Wheel, 7 x 1.50 dia. Lug
Auger Assembly
Hex Screw 1/4-20 x 1.25 Gr. 5
Thd Forming Scr. 1/4-20 x .75 Lg.
Hex Wash HD Tapp Scr 1/4-20 x .375
Hex B-Tap Scr 1/4-28 x .25" Lg
Hex Tap Scr. 1/4-14 x .375" Lg.
Hex Bolt 5/16-18 x .75" Lg. Gr. 5
Flange Locknut 1/4-20 Gr. F, Nylon
Push Cap x 1/2" Rod
Extension Spring .33 OD x 1.12 Lg.
Flat Washer .25 ID x .93 OD x .125
Bearing Cup
L-Wash 1/4 ID
Ball Bearing .625 x 37 x 12.63
Idler Pulley (1/4" hole)
Shoulder Spacer .25 Thk.
Hex Ins Jam L-Nut 1/4-28
Shoulder Spacer
Idler Bracket
Belt Cover
Cable Guide Roller
Rubber Paddle
Rubber Spiral-Crescent
Auger Ass'y 21" w/Solid Shaft
(w/o rubber paddels)
Recoil Handle, Mitten
Primer
Hex Shld.Scr.1/4-28 x .375
Auger Assembly Housing
Fuel Tank Gasket
Tape
Spacer .325 ID x .625 OD x .88
Spacer .630 x .88 x .747
DESCRIPTION
Corde
Boulon hex 5/16-24 x 0,75 Qual. 5
Vis taraudee nO. 10 x 0,62 po de Ig.
Vis & t6te hex
Contre-ecrou & embase 5/16-18 Qual. F, nylon
Attache-c&ble
Tige de poussoir
Collier
Rondelle creuse 0,340 Dt x 0,872 DE x 0,06
Fil de support - reservoir & carburant
Manette du volet de depart
Ligne d'essence
Reservoir de carburant de 2 quarts
Capuchon d'essence
Courroie trapezoidale 1/2 x 35,0 po de Ig
Courroie trapezoidale (Tec. 3,5 HP seulement)
Moitie poulie 0,625 DI x 2,25 DE
Poulie, 1/2 x 6,0" DE (Tec. 5,0 HP seulement)
Poulie (Tec. 3,5 HP seulement)
Support de montage
Roue, 7 x 1,50 diam. Lug
Ensemble de la tariere
Visa t6te hexagonale 1/4-20 x 1,25 Qual 5
Vis taraudee 1/4-20 x 0,75 Ig.
Vis auto-taraudeuse hexagonale 1/4-20 x 0,375
Vis taraudee a t6te hexagonale 1/4-28 x 0,25
Vis taraudee 1/4-14 x 0,375 po de Ig.
Boulon hex. 5/16-18 x 0,75 po de Ig. Qual. 5
Contre-ecrou a embase 1/4-20 Qual. F, nylon
Ecrou pour tige de 1/2 po
Ressort d'extension 0,33 DE x 1,12 po de Ig
Rondelle plate 0,25 DI x 0,93 DE x 0,125
Roulement a cuvette
Rondelle frein 1/4 Dt
Roulement a billes 0,625 x 37,0 x 12,63
Poulie du tendeur (trou 1/4 po)
Entretoise epaul6e
Contre-ecrou de blocage 1/4-28
Entretoise
Support du tendeur
Couvercle de courroie
Guide du c&ble
Pale en caoutchouc
Spirale en caoutchouc - croissant
Ensemble de la tari@e de 21 po avec arbre solide
(sans pale en caoutchouc)
Poignee du demarreur
Amorgeur
Vis a epaulement 1/4-28 x 0,375
Logement de la tari@e
Joint
Bande
Entretoise 0,325 DI x 0,625 DE x 0,88
Entretoise 0,630 Dt x 0,88 DE x 0,747
* 3.5 HP Tec. only/3,5 HP Tec. seulement 31A-2501
5.17.06
NOTE:Snowthrowerfeatures/componentsvarybymodel.NOTall partslistedaboveandpicturedontheprevious
pageare standardequipment.
15
For parts and/or
accessories refer to
customer support on
page2.
Adressez-vous au
,,Service apr_s-vente_>
la page2pource qui
;oncerne les pi_ces
et/ou accessoires.

iVlodels/iVlodeles 230-260
/
16

REF PART
NO. NO.
N° DE N° DE
REF PII_CE
1 684-04127
2 710-04071
3 710-0451
4 712-04063
5 720-0284
6 731-04388A
7 731-04354A
8 736-0159
9 710-04532
10 720-04072
11 725-0157
13 747-04165
14 749-1092A
15 684-04144
684-04145
16 710-04187
17 710-1003
18 710-1882
19 712-0252
20 725-2018
21 736-0225
22 736-0400
24 736-0362
25 710-0134
26 710-3008
27 712-04064
28 731-1033
29 736-0176
30 746-04237
31 749-04114
32 725-0201
33 731-1133C
34 731-04127
35 731-04353
36 731-04886
37 732-04111
DESCRiPTiON
Lower Chute Ass'y (Incl. #5-7 and 10)
Carriage Screw 5/16-18 x 1.0
Carriage Bolt 5/16-18 x .75
Flange Locknut 5/16-18 Gr. F, Nylon
Handle Knob Assembly
Chute Handle
Upper Chute
Flat Washer .349 ID x .879 OD x .063
Carriage Bolt 5/16-18 x 2.0 Gr. 5
Handle Knob Assembly
Cable Tie
Gull Wing Bail
Upper Handle
Shroud Ass'y (3.5 HP)
Shroud Ass'y (4.5 HP)
Hi-Lo Screw 1/4-15 x .50
Hex Wash B-Tapp Scr #10 x.62" Lg.
Hex Scr. 5/16-18 x 1.50 Gr. 5
Hex Nut 5/8-32 x .12 Special
Key Switch-Electric Start
L-Washer Internal
Flat Washer .218" ID x .62" OD
Flat Washer .22 ID x 1.25
Carriage Bolt 1/4-20 x .62
Hex Bolt 5/16-18 x .75" Lg. Gr. 5
Hex L-Flanged Nut 1/4-20 Gr. F Nylon
Shave Plate
Flat Washer .25 ID x .93 ODx.125
Control Cable
Lower Handle
Ignition Key
Spark Plug Cover
Lower Chute 5" Dia
Ring-Lower Chute
Chute Adapter 5" Dia
Chute Adjustment Spring
DESCRiPTiON
Ens. de la goulotte inf. comp. les nos. 5-7 et 10
Vis ordinaire 5/16-18 x 1,0
Boulon ordinaire 5/16-18 x 0,75
Contre-ecrou a embase 5/16-18 Qual. F, nylon
Bouton
Poignee - goulotte d'ejection
Goulotte superieur
Rondelle plate 0,349 DI x 0,879 DE x 0,063
Boulon ordinaire 5/16-18 x 2,0 Qual. 5
Bouton
Attache-c&ble
Etier de suspension
Guidon superieur
Capot (3,5 HP)
Capot (4,5 HP)
Vis 1/4-15 x 0,50
Vis taraudee no. 10 x 0,62 po de Ig.
Vis hexagonal 5/16-18 x 1,50 Qual. 5
Ecrou b.six pans 5/8-32 x 0,12 speciale
Contacteur d'allumage - demarreur electrique
Rondelle frein interne
Rondelle plate 0,218" DI x 0,62" DE
Rondelle plate 0,22 DI x 1,25
Boulon ordinaire 1/4-20 x 0,62
Boulon hex. 5/16-18 x 0,75 po de Ig. Qual. 5
Contre-ecrou a embase 1/4-20 Qual. F nylon
Grattoir
Rondelle plate 0,25 DI x 0,93 DE x 0,125
C&ble de la commande
Guidon inferieur
Clavette
Couvercle de la bougie
Goulotte d'ejection inferieur dia. 5 po
Bague - goulotte d'ejection inferieur
Adaptateur de la goulotte 5 po de dia.
Ressort d'ajustement - goulotte d'ejection
31A-2502
5.17.06
For parts and/or
accessories refer to
customer support on
page2.
Adressez-vous au
<<Serviceaprbs-vente>,
la page2pource qui
concerne les pi_ces
et/ou accessoires.
17

Failureto comply
with suggested
maintenance
andlubrication
specificationswill
void warranty.
TWO YEAR LiMiTED WARRANTY
The limited warranty setforth belowis given by MTD LLCwith respect to new merchandisepurchased andused in the United
Statesand/or its territories and possessions, and by MTD Products Limitedwith respect to newmerchandise purchased and
usedin Canadaand/or itsterritories and possessions (eitherentity respectively,"MTD").
MTDwarrantsthis product (excludingits normalwear parts as described below)against defects in materialand workman-
shipfor a periodof two (2) yearscommencing on the date oforiginal purchase and will, at its option, repairor replace,free
ofcharge, any partfound to be defective in materialsor workmanship. This limited warrantyshall onlyapply if this product
has beenoperated and maintained in accordance with the Operator's Manual furnished with the product,and hasnot been
subjectto misuse,abuse, commercialuse, neglect, accident, impropermaintenance,alteration, vandalism,theft, fire,water,
or damage because ofother perilor natural disaster. Damageresulting from the installationor use of anypart, accessory
or attachmentnot approvedby MTD foruse with the product(s) covered bythis manualwill voidyourwarranty asto any
resulting damage.
Normalwear partsare warranted to befree from defects in material and workmanship for a period of thirty (30) days from the
dateof purchase. Normalwearparts include, but are notlimited to items such as: batteries,belts, blades,blade adapters,
grass bags,rider deck wheels,seats, snowthrowerskid shoes,friction wheels, shaveplates,augerspiral rubber and tires.
HOWTO OBTAIN SERVICE: Warranty service isavailable, WITHPROOFOF PURCHASE,throughyour localauthorized
service dealer.Tolocate the dealer inyour area;
In the U,S,A,: Check yourYellowPages,or contact MTD LLCat RO. Box361131,Cleveland,Ohio 44136-0019,or call
1-800-800-7310or
1-330-220-4683 orlog on toour Websiteat www.mtdproducts.com.
In Canada: ContactMTD ProductsLimited, Kitchener,ON N2G4J1,or call 1-800-668-1238or log on to ourWebsite at
www.mtdcanada.com.
This limited warrantydoes not provide coveragein the following cases:
a. The engineor component parts thereof.These items maycarry a separate manufacturer'swarranty. Refer toapplicable
manufacturer'swarrantyfor terms and conditions.
b. Log splitter pumps, valves,and cylinders have a separate one-yearwarranty.
c. Routinemaintenance itemssuch as lubricants, filters, bladesharpening,tune-ups, brakeadjustments, clutch adjust-
ments,deck adjustments,and normaldeteriorationof the exteriorfinish due to use or exposure.
d. Service completedby someoneother than an authorizedservice dealer.
e. MTD doesnot extend any warrantyfor productssold or exported outside ofthe United Statesand/or Canada,and their
respectivepossessions and territories,except thosesold through MTD'sauthorized channels of export distribution.
f. Replacement partsthat arenot genuine MTD parts.
g. Transportationchargesand service calls.
h. If Productsareused commercially. (MTD may separatelyoffer LimitedCommercialWarrantieson certain select
products. Ask yourdealer or retailer for details or contact MTD Service for more information.)
No impliedwarranty, includingany impliedwarranty of merchantability offitness for a particularpurpose, ap-
plies after the applicable periodof express written warranty above as to the parts as identified. No other express
warranty, whetherwritten or oral, except as mentioned above, given by any personor entity, includingadealer or
retailer, with respect to any product, shall bind IVITD.Duringthe period of the warranty,the exclusive remedy is
repair or replacement of the productas set forth above,
The provisionsas set forth in this warranty providethe sole and exclusive remedy arising from the sale. MTD shall
not be liable for incidental or consequential loss or damage including,without limitation, expenses incurred for
substitute or replacement lawn care services or for rental expenses to temporarily replace a warranted product,
Somejurisdictions do notallow the exclusionor limitationof incidental or consequential damages,or limitationson how long
an implied warranty lasts,so theabove exclusionsor limitations maynot apply to you.
In noevent shall recoveryof any kind begreaterthan the amountof the purchase priceof the product sold.Alteration of
safety features of the productshall voidthis warranty. Youassume the riskand liability for loss,damage, or injury to you
andyour property and/or to others and their property arising out of the misuse or inability to usethe product.
This limited warrantyshall not extend toanyoneother than the original purchaseror tothe personforwhom it was purchased
asa gift.
HOWLOCALLAWSRELATE TO THIS WARRANTY: This limited warrantygives youspecific legal rights, and you may also
have other rightsthat vary in different jurisdictions.
IMPORTANT:Owner must presentOriginal Proof of Purchasetoobtain warrantycoverage.
MTDLLC, P.O.BOX361131CLEVELAND, OHiO 44136-0019; Phone: 1-800-800-7310, 1-330-220-4683
MTDProducts Ltd., P.O. BOX 1386, KITCHENER,ON N2G4J1; Phone: 1-800-668-1238
18
Other manuals for S230
1
This manual suits for next models
9
Other MTD Snow Blower manuals

MTD
MTD PPN 31A-040-401 User manual

MTD
MTD 500 Series User manual

MTD
MTD 31A-32AD762 User manual

MTD
MTD OEM-190-032 User manual

MTD
MTD 2N1 User manual

MTD
MTD 310-430A User manual

MTD
MTD 31AM62EE000 User manual

MTD
MTD 31A-6ACE700 User manual

MTD
MTD Yard-Man 7L3 User manual

MTD
MTD Wolf Garten Select SF Series User manual