Mueller DuraBlend CB-560 User manual

DuraBlend
10-Speed
Professional Series Blender
USER MANUAL
Model No: CB-560

Your satisfaction is guaranteed. If you are not completely
satisfied with our DuraBlend 10-Speed Professional Series
Blender and the results it brings, we insist that you let us
know. We’ll help you make the DuraBlend work for you, or
we’ll refund your money.

IMPORTANT SAFEGUARDS
When using electrical appliances, basic safety precautions should always be
followed to reduce the risk of fire, electric hazard, and injury to persons, including the
following:
• Read all instructions before assembling and using.
• Keep all packaging materials, including any plastics, out of reach of children.
• Wash and thoroughly dry all parts before first use using according to ‘Cleaning’
instructions later in this manual.
• Make sure that the voltage indicated on the rating plate of the appliance corre-
sponds to your outlet voltage.
• Do not operate the appliance if the cord or plug is damaged or should the appli-
ance malfunction or is dropped or damaged in any manner, including the Blending
Jar. Contact Mueller Customer Support for assistance.
• Ensure to turn the appliance OFF and unplug before assembling or disassembling
parts, when not in use, and before cleaning.
• To unplug, grasp the plug and pull from the outlet. Never yank the cord to discon-
nect.
• Do not let the power cord hang over the edge of a table or counter or touch hot
surfaces.
• To protect against electrical shock, do not place, or submerge this unit including
the cord and plug, in water or other liquid. Any liquid entering the motor housing may
damage the unit.
• Do not place on or near a hot gas flame, an electric burner, or a heated oven. Not
microwave-safe.
• Do not place on top of any other appliance.
• This blender is not intended to be operated by means of an external timer or sepa-
rate remote-control system.
• To reduce the risk of injury, do not use any other container or accessory attach-
ments not recommended by the manufacturer. Other jars may break or loosen during
processing.
• Do not blend hot liquids in ‘mini blender’ jars.
• Always place the Blending Jar on the Mount firmly. Uneven placement may cause
the Jar to rotate and leave rotating blades exposed, creating a risk of injury.
• Check the bowl for presence of foreign objects before operating.
• Do not fill the Blending Jar above the MAX line to prevent overflow when blending.
• Be sure the lid is securely locked in place before operating this blender. Always
hold the lid while operating in case of unexpected pressure, especially from hard-
er-to-blend ingredients.
1

2
• Do not leave the blender unattended while operating.
• The chopping blades are extremely sharp. Handle carefully and keep out of reach
of children.
• Keep hands, fingers, as well as spatulas and other utensils, away from moving
blades while blending to prevent the possibility of severe personal injury or damage
to the blender. Use the Tamper provided only. A plastic spatula may be used, but only
when the blender motor is turned off.
• To prevent overheating, do not run this Blender for more than 5 minutes at a time.
Allow 15 minutes for the Blender to cool down between uses.
• Make sure the motor has completely stopped before removing the lid.
• Do not attempt to remove the Blending Jar from the Motor Base or replace it until
the motor has come to a complete stop and the blades have stopped moving, other-
wise, blender parts can be damaged.
• To reduce the risk of damage to the product or possible injury, do not remove the
jar’s blade assembly. Using inappropriate tools to remove the assembly may
damage the blades and prevent safe future use.
• To avoid fire hazards, do not operate in the presence of explosive or flammable
fumes.
• Do not use this appliance for any other purpose than for its intended use.
• Do not use outdoors or while standing in a damp area.
• Keep this Blender in a dry and cool place.
• Do not operate this, or any other motor-driven appliance, while under the influence
of alcohol or other substances that affect your reaction time or perception.
• This appliance is not intended for use by persons (including children) with reduced
physical, sensory, or mental capabilities, or lack of experience and knowledge
unless they are provided with supervision and instructions concerning use of the
appliance by a person responsible for their safety.
• For household use only.
• Save these instructions.

3
PARTS
Feeder
Cap
Lid 2
Blade 5
Blending
Jar 4
Silicone
Mount 6
Motor
Base 8
Power Switch On/Off
9
Speed Dial
10 Pulse Mode Off/On
Tamper
Cleaning
Brush 13
11
3
1
Drink
Bottle 12
Blade
Connector 7

4
HOW TO USE
BEFORE FIRST USE, wash and thoroughly dry all parts in accordance with the
CLEANING INSTRUCTIONS detailed in this manual.
CAUTION: The following steps must be followed for proper assembly and use
of the Blender. Not following these instructions may lead to possible damage
of the product and risk of injury.
Set up your Blender on a clean and
dry surface.
After the initial cleaning, reattach
the dry Silicone Mount (6) to the top
of the Motor Base (8) by lining up
the holes with the Blade Connector
(7) and node on the base. Push
down fully to secure.
Add ingredients to the Blending Jar
(4) and be sure not to fill above the
MAX line. To avoid splashing the
Motor Base, we recommend adding
ingredients to the Blending Jar
when not attached to the Mount (6).
Put on the Lid (2) by aligning the
large tab with the Blending Jar
handle.
Insert the Feeder Cap (1) into the top
of the Lid by aligning the nodes and
rotating to secure.
Position the Blending Jar (4) onto
the nodes of the Silicone Mount (6).
Note: The Blending Jar can be
positioned on the Silicone Mount
according to your preferred handle
direction.
4
3
2
1
5
6
FRONT

5
Ensure the Speed Dial is at position 1. It is always recommended to start at a
lower setting before increasing speed as needed.
Use one hand to hold down the Lid of the Blending Jar. Turn on the Blender using
either the Power ON/OFF switch (9) or the Pulse OFF/ON switch (10).
7
8
FOR SAFETY, THE MOTOR CAN NOT BE TURNED ON UNLESS THE BLENDING
JAR IS ATTACHED TO THE MOTOR BASE.
POWER SWITCH –Use together with the variable
SPEED DIAL and/or PULSE MODE.
SPEED DIAL - Rotate to adjust the speed from
Low to High (1-10) during operation.
PULSE MODE - Press and hold down the switch
for a few seconds at a time to immediately alter-
nate to maximum speed. Release to stop. Can be
used with or without the POWER SWITCH.
Increase the speed of the Speed Dial as needed. Start on low and work your way
up to medium, then high. This reduces wear and tear on the motor, and blends
everything better. Refer to BLENDING TIPS for examples of foods you can
prepare at different speeds.
9
10
Warning: In general, to prevent your Blender
from overheating, process in short intervals and
do not operate for longer than 5 minutes at a
time. Allow the Blender to cool for 15 minutes
between uses.
Before turning off, we recommend rotating the
Speed Dial back to position 1. When you have
finished blending, turn off and disconnect the
Blender from the power supply.
11
12
Thicker or more challenging foods may need a
little help to blend. Remove the Feeder Cap (1)
and insert the Tamper (3) and rotate in a circular
motion. This will help remove air pockets and
create a vortex, so your mix will blend more
evenly.

6
ESSENTIAL BLENDING TIPS
Your appliance is equipped with a THERMAL PROTECTION that automatically
switches the motor off if it has been running for too long or is overloaded. If this
happens, turn your Blender off and wait for at least 30 minutes for it to cool down
completely before switching back on again.
Lift up the Blending Jar to remove from the Mount. Take off the Lid and pour out
mixture from the spout as desired. Use the provided Drink Bottle (12) to drink
smoothie blends on-the-go or to store in the refrigerator.
13
The DuraBlend, 10-Speed Professional Series Blender can be used to blend a wide
variety of different food items. The following table provides an overview of some of
these items together with the recommended speed for blending.
LOW (1-3) MEDIUM (4-7) HIGH (8-10) PULSE
• Pureeing Fruit and
Vegetables
• Baby food
• Omelet Mix
• Citrus Peel (frozen)
• Poppy Seeds
• Sesame Seeds
• Frozen Cocktails
• Cake Batters
• Pancake Batter
• Waffle Batter
• Mayonnaise
• Salad Dressings
• Smoothies
• Milkshakes
• Fruit Sorbet
• Almond Milk
• Butter
• Nut Butter
• Hummus
• Pesto
• Soups
• Gravy
• Sauces
• Ice Cubes
• Chunky Salsas
• Thick Vegetable Soup
• Bread
• Cookies
• Oats (Flour)
• Popcorn Kernels (Cornmeal)
• Sugar (Icing Sugar)
• Nuts
• Coffee Beans
• Peppercorns
• Chocolate
• Self-Cleaning the Unit
Always ensure stones are removed from fruit and
bones from meat as these can harm the blades.
Ensure the highest liquid level is less than 74 fl. oz.
(2200ml) to allow room for expansion, and the
lowest level is more than 8 fl. oz. (200 ml).
When blending very liquid substances, do not fill
the Jar above 50 fl. oz. (1500ml) to avoid spillage.
For hot ingredients such as cooked vegetables and
broth, allow to cool before pouring into the Blend-
ing Jar for processing. Do not fill the Jar more than
34 fl. oz. (1000ml) and remove the Feeder Cap (1)
from the Lid (2) to reduce steam build-up and avoid
spurting. Use a hot pad while holding down the lid
during operation. Always start blending at the
lowest speed setting.
Remove the Feeder Cap (1) to pour in additional
ingredients while the Blender is operating, e.g.,
olive oil for mayonnaise. Or for a quick dice, drop in
ingredients like onion and garlic into the spinning
blades.
To dislodge food or ice stuck under the blade, use
the Pulse Mode (10) or add liquid.
To ensure efficient mixing, it may be necessary to stop the Blender and push
ingredients down the sides of the Blending Jar with a spatula. Alternatively, use
the Tamper while the Blender is operating.
If the motor sounds like it is straining when processing, rotate the Speed Dial to
a higher setting to prevent the motor from overloading. If the problem continues
turn OFF and reduce the ingredient amount.

7
DO:
For even blending, always add liquid ingredients
into the Blending Jar before solid ingredients (light-
est to heaviest) unless recipe instructions specify
otherwise. Combining ingredients in the wrong
order can cause some produce and ice to get
caught in the Blender's blades.
When using frozen ingredients, it is always best to
use a mixture of fresh and frozen ingredients to
ensure a smoother blend. Too many frozen ingredi-
ents can clog up the blades.
Cut all firm fruits and vegetables, cooked meats,
seafoods, etc., into pieces no larger than 3/4-1”
(2-2.5cm). Cut all kinds of cheeses into pieces no
larger than 3/4" (2 cm).
4
5
3
2
1
6
7
8
9
Always ensure stones are removed from fruit and
bones from meat as these can harm the blades.
Ensure the highest liquid level is less than 74 fl. oz.
(2200ml) to allow room for expansion, and the
lowest level is more than 8 fl. oz. (200 ml).
When blending very liquid substances, do not fill
the Jar above 50 fl. oz. (1500ml) to avoid spillage.
For hot ingredients such as cooked vegetables and
broth, allow to cool before pouring into the Blend-
ing Jar for processing. Do not fill the Jar more than
34 fl. oz. (1000ml) and remove the Feeder Cap (1)
from the Lid (2) to reduce steam build-up and avoid
spurting. Use a hot pad while holding down the lid
during operation. Always start blending at the
lowest speed setting.
Remove the Feeder Cap (1) to pour in additional
ingredients while the Blender is operating, e.g.,
olive oil for mayonnaise. Or for a quick dice, drop in
ingredients like onion and garlic into the spinning
blades.
To dislodge food or ice stuck under the blade, use
the Pulse Mode (10) or add liquid.
To ensure efficient mixing, it may be necessary to stop the Blender and push
ingredients down the sides of the Blending Jar with a spatula. Alternatively, use
the Tamper while the Blender is operating.
If the motor sounds like it is straining when processing, rotate the Speed Dial to
a higher setting to prevent the motor from overloading. If the problem continues
turn OFF and reduce the ingredient amount.
3
2
1
REMOVE FEEDER
CAP FOR
Steam
Release
Quick
Chop Tamper
Pour in
Liquid
Measure Dry
Ingredients
with Feeder Cap
ADDING ORDER
MATTERS

8
10
DON’T:
DON'T expect your Blender to replace your other kitchen appliances. It cannot:
whip egg whites, knead or mix tough dough, or extract juice from fruits and vege-
tables.
DON'T process any food for too long. Remember, the Blender performs its tasks
in seconds and not minutes. It is better to stop and check the consistency after
a few seconds rather than over blend, resulting in a mushy or too finely ground
blend. Alternatively, use the Pulse Mode for short bursts.
DON'T overload the motor with extra-heavy or extra-large loads. If the motor
stalls, switch off immediately, unplug the power cord from the outlet and let cool.
Remove a portion of the load from the Blender before starting again.
DON'T use the Blending Jar for processing whole spices (except peppercorns)
hard cheeses, nutshells, tough seeds, or anything else extremely hard as this will
affect the service life of your Blender and may cause damage or injury.
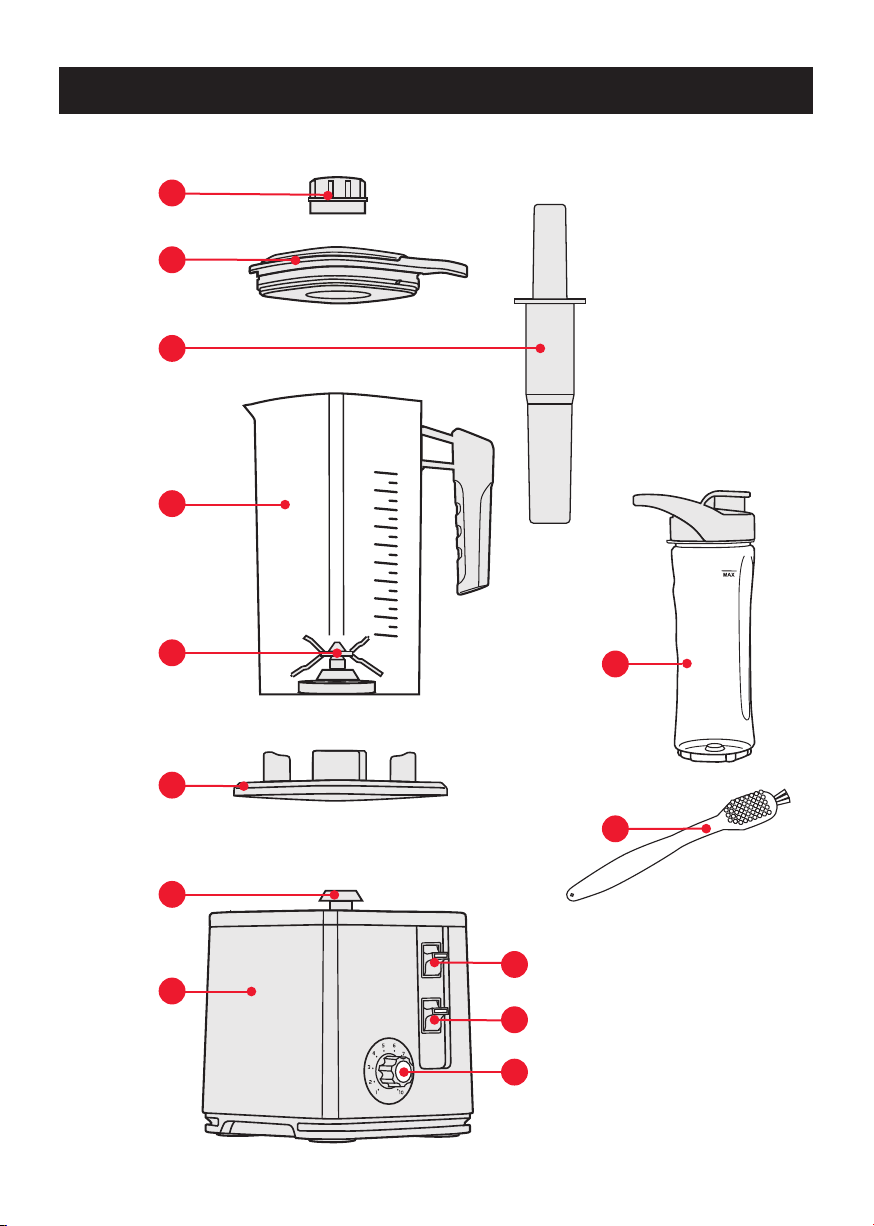
3
2
1
4
Always ensure stones are removed from fruit and
bones from meat as these can harm the blades.
Ensure the highest liquid level is less than 74 fl. oz.
(2200ml) to allow room for expansion, and the
lowest level is more than 8 fl. oz. (200 ml).
When blending very liquid substances, do not fill
the Jar above 50 fl. oz. (1500ml) to avoid spillage.
For hot ingredients such as cooked vegetables and
broth, allow to cool before pouring into the Blend-
ing Jar for processing. Do not fill the Jar more than
34 fl. oz. (1000ml) and remove the Feeder Cap (1)
from the Lid (2) to reduce steam build-up and avoid
spurting. Use a hot pad while holding down the lid
during operation. Always start blending at the
lowest speed setting.
Remove the Feeder Cap (1) to pour in additional
ingredients while the Blender is operating, e.g.,
olive oil for mayonnaise. Or for a quick dice, drop in
ingredients like onion and garlic into the spinning
blades.
To dislodge food or ice stuck under the blade, use
the Pulse Mode (10) or add liquid.
To ensure efficient mixing, it may be necessary to stop the Blender and push
ingredients down the sides of the Blending Jar with a spatula. Alternatively, use
the Tamper while the Blender is operating.
If the motor sounds like it is straining when processing, rotate the Speed Dial to
a higher setting to prevent the motor from overloading. If the problem continues
turn OFF and reduce the ingredient amount.
11

9
CLEANING
Prior to first use and after each use, you can follow these steps to clean and maintain
your Blender.
• Always turn the Blender OFF and unplug the unit before cleaning.
• Once the ingredients have been removed from the Blending Jar, is it recommended
to wash as soon as possible for easier wash-up and to avoid possible staining and
transfer of oils from certain produce.
Half fill the Blender with warm water and a squeeze of mild detergent. Close the
Lid.
Press and hold the PULSE switch for 10-20 seconds.
Pour out the solution and repeat if necessary, especially for strong-smelling or
staining ingredients such as garlic, fish, or carrots.
Use the Cleaning Brush (13) to clean around the blade’s rotary.
WARNING: The blades are sharp, use caution when cleaning.
Rinse the Blending Jar under running water. Dry thoroughly.
Wash the Lid, Feeder Cap, Tamper and Drinking Bottle in warm water with a mild
detergent.
If soiled, remove the Silicon Mount (6) and wash with warm soapy water. Dry
thoroughly.
Use a damp cloth to wipe the housing of the Motor Base (8). Wipe clean any food
residue on the Speed Dial and Power and Pulse switches. Left unclean, residue
can potentially dry up and interfere with proper operation. Dry thoroughly.
Do not use abrasive scouring pads or cleansers to avoid scratching the Blender
parts.
Store Blender assembled and in an upright position, leaving the lid slightly ajar
for air circulation.
Keep out of reach of children.
• The Tamper (3) and Drinking Bottle (12) are Dishwasher Safe. All other parts are
not to be washed in the Dishwasher to prolong the life of your Blender.
• Do not disassemble the Blade assembly.
• Do not open the Motor Base (8) housing. The motor is lubricated, and no additional
lubrication is required.
4
5
6
3
2
1
7
8
9
10
11
Always ensure stones are removed from fruit and
bones from meat as these can harm the blades.
Ensure the highest liquid level is less than 74 fl. oz.
(2200ml) to allow room for expansion, and the
lowest level is more than 8 fl. oz. (200 ml).
When blending very liquid substances, do not fill
the Jar above 50 fl. oz. (1500ml) to avoid spillage.
For hot ingredients such as cooked vegetables and
broth, allow to cool before pouring into the Blend-
ing Jar for processing. Do not fill the Jar more than
34 fl. oz. (1000ml) and remove the Feeder Cap (1)
from the Lid (2) to reduce steam build-up and avoid
spurting. Use a hot pad while holding down the lid
during operation. Always start blending at the
lowest speed setting.
Remove the Feeder Cap (1) to pour in additional
ingredients while the Blender is operating, e.g.,
olive oil for mayonnaise. Or for a quick dice, drop in
ingredients like onion and garlic into the spinning
blades.
To dislodge food or ice stuck under the blade, use
the Pulse Mode (10) or add liquid.
To ensure efficient mixing, it may be necessary to stop the Blender and push
ingredients down the sides of the Blending Jar with a spatula. Alternatively, use
the Tamper while the Blender is operating.
If the motor sounds like it is straining when processing, rotate the Speed Dial to
a higher setting to prevent the motor from overloading. If the problem continues
turn OFF and reduce the ingredient amount.

10
RECIPE TIPS
MAYONNAISE
If mayonnaise curdles (separates) while blending, empty the contents from the
Blender, blend another egg and ¼ cup (50 ml) of liquid or curdled mayonnaise until
they are mixed well on MEDIUM speed. Remove the Feeder Cap and pour the remain-
ing mayonnaise instead of oil into the Blending Jar. Use a spatula to thoroughly blend
the mixture.
GRAVY OR WHITE SAUCE
To remove lumps from gravy or white sauce, allow to cool slightly and pour about
½ cup (125 ml) into the Blender. Close the Lid and start processing on MEDIUM to
HIGH. Remove the Feeder Cap while the motor is running, and gradually add the
remaining gravy or sauce. Continue to process until the gravy or sauce is smooth.
CHOPPING GIBLETS
To chop giblets for a gravy, cook the giblets in broth, then cool to room tempera-
ture. Cut the giblets into 1" (2.5 cm) pieces. Place in the Blender and cover with
cooled broth. Close the Lid and run the Blender for two 30-second cycles at HIGH
speed. (If giblets are not chopped finely enough, process for one or two additional
cycles.)
MAKING BUTTER
Pour heavy sweet or sour cream used to make butter into the Blender with a dash
of salt. Close the Lid and run the Blender at HIGH speed, until the butter is churned.
Strain the churned butter to drain off any liquid, put the butter into a small bowl, and
press with a spatula to remove as much liquid as possible. Add 1 Tablespoon (15 g)
of dried herbs (parsley, tarragon, garlic, or clove) per cup (250 ml) of cream, to make
delectable herb butter.
BREADCRUMBS
When making breadcrumbs, use 2-to-3-day old bread, leaving crusts on, to
minimize the possibility of clumping. If only fresh bread is available, dry it out for a
few minutes in a low heated oven. Tear bread pieces and add to Blender. PULSE until
you achieve the desired consistency.
PEANUT BUTTER SMOOTHIE
Serves 2
1 Cup Fresh Unsweetened Coconut Milk
½ Cup Frozen Mango Pieces
1 Banana, Roughly Chopped
2 Tablespoons Natural Peanut Butter
6 Ice Cubes
STRAWBERRY BANANA FRUIT SORBET
Serves 4
1 ½ Cups Frozen Strawberries
1 ½ Bananas (fresh)
¼ Cup Lemon Juice
Cup Maple Syrup
TOMATO SALSA
Makes 2 cups
½ Red Onion, peeled
1 Large Clove of Garlic
1 Fresh Jalapeño or 2 Serrano
Chiles, seeds removed
2-3 Medium-Sized Ripe Tomatoes
½ Cup Roughly Chopped Cilantro
1 Tablespoon Balsamic Vinegar
2 Tablespoon Extra-Virgin Olive Oil
Salt and Pepper to taste
OATMEAL AND CORNMEAL
Make your own oatmeal or cornmeal by easily grinding oats or popcorn kernels on
the PULSE MODE until they become powdery. The same can be achieved with sugar
to make icing-sugar.
GRINDING POPPY SEEDS
To grind poppy seeds for fillings, place ½ cup (125ml) poppy seeds in the Blending
Jar and process at LOW speed until the seeds are crushed and moist. If needed, stop,
and scrape down the sides with a spatula for consistent blending.
GRATING COCONUT
To grate fresh coconut, turn the Blender to HIGH, remove the Feeder Cap, and drop
coconut pieces into the Blender. After grating ½ cups ( 375ml) of coconut, empty the
Blending Jar and repeat the process until all the coconut is grated.
HARD AND DRY CHEESE
Cheddar or processed cheese that has become hard and dry after being stored for
a long time in the refrigerator can be cut into pieces and grated in the Blender.
Process at HIGH speed until it is finely grated. Use for meal toppings in sauces, etc.
DO NOT process extra hard cheeses.
TRADITIONAL VANILLA MILKSHAKE
Serves 3-4 (34 fl. oz)
2 Cups Milk
4 Scoops (6 oz) Vanilla Ice Cream
2 Teaspoons Vanilla Extract
HUMMUS DIP
Makes 1½ cups
15 oz Can of Chickpeas, drained, rinsed
1 Small Garlic Clove, crushed
2 Tablespoons Lemon Juice
½ Teaspoon Sesame Oil
Cup Olive Oil
½ Teaspoon Ground Cumin
Salt and Pepper, to taste
CHICKEN STRIPS WITH PECAN CRUST
2-3 Day Old Dry Bread
Cup Shelled Pecans
1 ½ Cups Cornflakes
1 Tablespoon Dried Parsley Flakes
1 Teaspoon Salt
½ Teaspoon Garlic Powder
½ Teaspoon Pepper
¼ Cup Milk
1 ½ Pounds Skinless Chicken Breasts, cut
into 1-inch strips
Cooking Spray

Add ingredients into the Blender in
the order of the recipe. Hold down
then Lid and turn on the Blender with
setting at 1 before increasing to a
HIGH setting until blended. Pour and
serve immediately.
11
PEANUT BUTTER SMOOTHIE
Serves 2
1 Cup Fresh Unsweetened Coconut Milk
½ Cup Frozen Mango Pieces
1 Banana, Roughly Chopped
2 Tablespoons Natural Peanut Butter
6 Ice Cubes
STRAWBERRY BANANA FRUIT SORBET
Serves 4
1 ½ Cups Frozen Strawberries
1 ½ Bananas (fresh)
¼ Cup Lemon Juice
Cup Maple Syrup
TOMATO SALSA
Makes 2 cups
½ Red Onion, peeled
1 Large Clove of Garlic
1 Fresh Jalapeño or 2 Serrano
Chiles, seeds removed
2-3 Medium-Sized Ripe Tomatoes
½ Cup Roughly Chopped Cilantro
1 Tablespoon Balsamic Vinegar
2 Tablespoon Extra-Virgin Olive Oil
Salt and Pepper to taste
OATMEAL AND CORNMEAL
Make your own oatmeal or cornmeal by easily grinding oats or popcorn kernels on
the PULSE MODE until they become powdery. The same can be achieved with sugar
to make icing-sugar.
GRINDING POPPY SEEDS
To grind poppy seeds for fillings, place ½ cup (125ml) poppy seeds in the Blending
Jar and process at LOW speed until the seeds are crushed and moist. If needed, stop,
and scrape down the sides with a spatula for consistent blending.
GRATING COCONUT
To grate fresh coconut, turn the Blender to HIGH, remove the Feeder Cap, and drop
coconut pieces into the Blender. After grating ½ cups ( 375ml) of coconut, empty the
Blending Jar and repeat the process until all the coconut is grated.
HARD AND DRY CHEESE
Cheddar or processed cheese that has become hard and dry after being stored for
a long time in the refrigerator can be cut into pieces and grated in the Blender.
Process at HIGH speed until it is finely grated. Use for meal toppings in sauces, etc.
DO NOT process extra hard cheeses.
TRADITIONAL VANILLA MILKSHAKE
Serves 3-4 (34 fl. oz)
2 Cups Milk
4 Scoops (6 oz) Vanilla Ice Cream
2 Teaspoons Vanilla Extract
HUMMUS DIP
Makes 1½ cups
15 oz Can of Chickpeas, drained, rinsed
1 Small Garlic Clove, crushed
2 Tablespoons Lemon Juice
½ Teaspoon Sesame Oil
Cup Olive Oil
½ Teaspoon Ground Cumin
Salt and Pepper, to taste
CHICKEN STRIPS WITH PECAN CRUST
2-3 Day Old Dry Bread
Cup Shelled Pecans
1 ½ Cups Cornflakes
1 Tablespoon Dried Parsley Flakes
1 Teaspoon Salt
½ Teaspoon Garlic Powder
½ Teaspoon Pepper
¼ Cup Milk
1 ½ Pounds Skinless Chicken Breasts, cut
into 1-inch strips
Cooking Spray

Add all ingredients to the Blender in
order of the recipe. Place the Lid
securely onto the Blending Jar.
Blend on HIGH until smooth and
frothy. Pour and serve immediately.
Slightly thaw frozen fruit for easier
blending. Add all ingredients to the
Blender. Blend at HIGH speed until
smooth. Do not over blend or melt
the mixture. Pour into a freezer-safe
container and freeze until firm, then
serve.
Place the onions, garlic, chili, toma-
toes, and cilantro into the Blender in
the order listed. Using the PULSE
MODE, pulse to a small chop. Pour
the ingredients into a serving bowl.
Dress with combined balsamic and
olive oil and season with salt and
pepper.
12
PEANUT BUTTER SMOOTHIE
Serves 2
1 Cup Fresh Unsweetened Coconut Milk
½ Cup Frozen Mango Pieces
1 Banana, Roughly Chopped
2 Tablespoons Natural Peanut Butter
6 Ice Cubes
STRAWBERRY BANANA FRUIT SORBET
Serves 4
1 ½ Cups Frozen Strawberries
1 ½ Bananas (fresh)
¼ Cup Lemon Juice
Cup Maple Syrup
TOMATO SALSA
Makes 2 cups
½ Red Onion, peeled
1 Large Clove of Garlic
1 Fresh Jalapeño or 2 Serrano
Chiles, seeds removed
2-3 Medium-Sized Ripe Tomatoes
½ Cup Roughly Chopped Cilantro
1 Tablespoon Balsamic Vinegar
2 Tablespoon Extra-Virgin Olive Oil
Salt and Pepper to taste
OATMEAL AND CORNMEAL
Make your own oatmeal or cornmeal by easily grinding oats or popcorn kernels on
the PULSE MODE until they become powdery. The same can be achieved with sugar
to make icing-sugar.
GRINDING POPPY SEEDS
To grind poppy seeds for fillings, place ½ cup (125ml) poppy seeds in the Blending
Jar and process at LOW speed until the seeds are crushed and moist. If needed, stop,
and scrape down the sides with a spatula for consistent blending.
GRATING COCONUT
To grate fresh coconut, turn the Blender to HIGH, remove the Feeder Cap, and drop
coconut pieces into the Blender. After grating ½ cups ( 375ml) of coconut, empty the
Blending Jar and repeat the process until all the coconut is grated.
HARD AND DRY CHEESE
Cheddar or processed cheese that has become hard and dry after being stored for
a long time in the refrigerator can be cut into pieces and grated in the Blender.
Process at HIGH speed until it is finely grated. Use for meal toppings in sauces, etc.
DO NOT process extra hard cheeses.
TRADITIONAL VANILLA MILKSHAKE
Serves 3-4 (34 fl. oz)
2 Cups Milk
4 Scoops (6 oz) Vanilla Ice Cream
2 Teaspoons Vanilla Extract
HUMMUS DIP
Makes 1½ cups
15 oz Can of Chickpeas, drained, rinsed
1 Small Garlic Clove, crushed
2 Tablespoons Lemon Juice
½ Teaspoon Sesame Oil
Cup Olive Oil
½ Teaspoon Ground Cumin
Salt and Pepper, to taste
CHICKEN STRIPS WITH PECAN CRUST
2-3 Day Old Dry Bread
Cup Shelled Pecans
1 ½ Cups Cornflakes
1 Tablespoon Dried Parsley Flakes
1 Teaspoon Salt
½ Teaspoon Garlic Powder
½ Teaspoon Pepper
¼ Cup Milk
1 ½ Pounds Skinless Chicken Breasts, cut
into 1-inch strips
Cooking Spray

Place all ingredients in the Blender
and secure the Lid. Blend on HIGH
speed for 30-40 seconds, or until
smooth. Season to taste. Store in a
clean, covered container in the
refrigerator for up to one week.
Preheat oven to 400°F. Roughly tear
slices of Dry Old Bread, crusts on,
and add to the Blender. Use the
PULSE MODE until you have at least
1 cup of Breadcrumbs in the consis-
tency of Panko Breadcrumbs.
Transfer to a large shallow bowl.
Add Shelled Pecans to Blender and
use PULSE MODE to finely chop.
Add pecans to the breadcrumbs.
Add cornflakes, parsley, salt, garlic
powder and pepper to the Blender
and PULSE until finely ground. Stir
in with the breadcrumbs and
pecans.
Pour milk into a separate shallow
bowl. Dip chicken in the milk, then
coat in the Pecan Crust. Place
chicken on a greased baking sheet.
Lightly spray the chicken with cook-
ing spray. Bake for 15-20 mins or
until the chicken is cooked through.
Turn once during baking.
13
PEANUT BUTTER SMOOTHIE
Serves 2
1 Cup Fresh Unsweetened Coconut Milk
½ Cup Frozen Mango Pieces
1 Banana, Roughly Chopped
2 Tablespoons Natural Peanut Butter
6 Ice Cubes
STRAWBERRY BANANA FRUIT SORBET
Serves 4
1 ½ Cups Frozen Strawberries
1 ½ Bananas (fresh)
¼ Cup Lemon Juice
Cup Maple Syrup
TOMATO SALSA
Makes 2 cups
½ Red Onion, peeled
1 Large Clove of Garlic
1 Fresh Jalapeño or 2 Serrano
Chiles, seeds removed
2-3 Medium-Sized Ripe Tomatoes
½ Cup Roughly Chopped Cilantro
1 Tablespoon Balsamic Vinegar
2 Tablespoon Extra-Virgin Olive Oil
Salt and Pepper to taste
OATMEAL AND CORNMEAL
Make your own oatmeal or cornmeal by easily grinding oats or popcorn kernels on
the PULSE MODE until they become powdery. The same can be achieved with sugar
to make icing-sugar.
GRINDING POPPY SEEDS
To grind poppy seeds for fillings, place ½ cup (125ml) poppy seeds in the Blending
Jar and process at LOW speed until the seeds are crushed and moist. If needed, stop,
and scrape down the sides with a spatula for consistent blending.
GRATING COCONUT
To grate fresh coconut, turn the Blender to HIGH, remove the Feeder Cap, and drop
coconut pieces into the Blender. After grating ½ cups ( 375ml) of coconut, empty the
Blending Jar and repeat the process until all the coconut is grated.
HARD AND DRY CHEESE
Cheddar or processed cheese that has become hard and dry after being stored for
a long time in the refrigerator can be cut into pieces and grated in the Blender.
Process at HIGH speed until it is finely grated. Use for meal toppings in sauces, etc.
DO NOT process extra hard cheeses.
TRADITIONAL VANILLA MILKSHAKE
Serves 3-4 (34 fl. oz)
2 Cups Milk
4 Scoops (6 oz) Vanilla Ice Cream
2 Teaspoons Vanilla Extract
HUMMUS DIP
Makes 1½ cups
15 oz Can of Chickpeas, drained, rinsed
1 Small Garlic Clove, crushed
2 Tablespoons Lemon Juice
½ Teaspoon Sesame Oil
Cup Olive Oil
½ Teaspoon Ground Cumin
Salt and Pepper, to taste
CHICKEN STRIPS WITH PECAN CRUST
2-3 Day Old Dry Bread
Cup Shelled Pecans
1 ½ Cups Cornflakes
1 Tablespoon Dried Parsley Flakes
1 Teaspoon Salt
½ Teaspoon Garlic Powder
½ Teaspoon Pepper
¼ Cup Milk
1 ½ Pounds Skinless Chicken Breasts, cut
into 1-inch strips
Cooking Spray

SPECIFICATIONS
• Voltage: 120 V 60 Hz
• Power: 1800W
• ETL Certified
• BPA-Free
2720 Pellissier Place, Ste 73D
City of Industry, CA 90601
Telephone: (888) 632-9981
E-mail: [email protected]
Web: www.muellerdirect.com
Müeller USA
If you are not happy with the product for any reason, please
with your feedback or questions, and we will do our best to
make things right for you!
Your purchase comes with a 100%
satisfaction guarantee from Müeller
Table of contents
Other Mueller Blender manuals