Mueller VS-22A User manual

MANUAL MLR010564N
EXTEND FOOD STORAGE LIFE

IMPORTANT SAFETY INSTRUCTIONS | 32 |TABLE OF CONTENTS
3IMPORTANT SAFETY INSTRUCTIONS
7
9
10
18
19
20
21
22
OVERVIEW OF PARTS
FOOD STORAGE GUIDE
CLEANING AND MAINTENANCE
VACUUM SEALER TIPS AND BEST PRACTICES
CONTROL PANEL FUNCTIONS
BEFORE FIRST USE
POWER SUPPLY
MAKING VACUUM BAGS
TABLE OF CONTENTS
SPECIFICATIONS
TROUBLESHOOTING
10 Making and Sealing Vacuum Bags
11 Vacuum-Packing Vacuum Containers
and Bags (with Valve)
12 How to Use Vacuum Containers
13 How to Use Vacuum Bags with Valves
14 Sealing Bags without Valves –
Make Your Own Bag
15 Vacuum-Packing and Sealing Bags
without Valves
17 Using the “WET” Mode
17 Using the “SOFT” Mode
18 Advantages of Vacuum-Packed Foods
18 Food Storage
18 Storing Other Household Goods
19 Sous-Vide
19 Marinating Meats and Vegetables
21 Cleaning the Drip Tray
21 Cleaning the Sealing Ring
When using electrical appliances, basic safety precautions
should always be followed to reduce the risk of fire, electric
shock, and/or injury to persons.
–Read all instructions thoroughly before use.
–Do not use the appliance if the appliance or the Power Cord has any
visible damage, or if the appliance has previously been dropped or
damaged in any manner. Contact Customer Service immediately
for assistance.
–Use the appliance exclusively for the bag sealing or
vacuum-packing of food.
–Do not use any accessory attachment that is not recommended by
the manufacturer. Doing so may result in fire, electrical shock,
or personal injury.
–This appliance is not intended to be operated using an external
timer clock or separate remote-control system.
–Do not use this appliance outdoors.
–Place the appliance on a flat surface.
–Do not open the Lid while the “SEAL” or “VAC+SEAL” functions are
working. Wait for the button LED lights to switch off.
Risk of Electric Shock
–Do not hang the Power Cord over the edge of a table or counter.
–If the supply cord is damaged, it must be replaced by the
manufacturer or similarly qualified persons to avoid hazards.
–This appliance has a polarized plug (one blade is wider than the
other). To reduce the risk of electric shock, this plug is intended to
fit in a polarized outlet only one way. If the plug does not fit fully in
the outlet, reverse the plug. If it still does not fit, contact a qualified
electrician. Do not attempt to defeat this safety feature.
CAUTION!
Risk of material damage. Only use special plastic film or plastic
bags suited for use with vacuum sealers. Comply with the
notes on the packaging of the plastic bags.
–Do not touch hot surfaces.
–Unplug the appliance before cleaning it.
IMPORTANT SAFETY
INSTRUCTIONS
23 WARRANTY | FCC DETAILS

IMPORTANT SAFETY INSTRUCTIONS | 54 |IMPORTANT SAFETY INSTRUCTIONS
–Pay close attention to placement of the Power Cord.
Lay it so no one can step on it, get caught on it, or trip over it.
–Only connect the power plug to a properly installed and easily
accessible wall socket whose voltage corresponds to the
specifications on the rating plate. The wall socket must continue
to be easily accessible after the device is
plugged in.
–Ensure that the Power Cord cannot be
damaged by sharp edges or hot points.
Do not wrap the Power Cord around the device.
Use the cable spool at the bottom of the device.
–Let the device cool down completely before winding up the Power
Cord or before you clean
it or before you put it away.
–Ensure that the Power Cord cannot be trapped or crushed.
–Do not use an extension cord with this appliance.
–Ensure the Power Cord does not touch the hot surface of the appliance.
–Always grasp the power plug to remove it from the wall outlet.
Do not pull on the Power Cord itself.
–Never leave the appliance unattended while it is plugged in.
Always unplug it after use.
Risk for Babies and Children
–To avoid the danger of suffocation, keep plastic film and plastic bags
away from babies and children. Do not use the plastic film or plastic
bags in cribs, beds, carriages, or playpens.
–Sealing bags are not a toy. Do not allow children to play with bags.
–This appliance is not intended for use by persons (including children)
with reduced physical, sensory or mental capabilities, or lack of
experience and knowledge unless they have been given supervision
and instruction concerning use of the appliance by a person
responsible for their safety.
Risk Of Electric Shock Due To Moisture
–Protect the device from moisture, water droplets and water splashes.
–The device, the Power Cord and the power plug must not be
immersed in water or any other liquids.
–If liquid gets into the device, pull out the power plug immediately.
Have the device checked before reusing.
–If the device has fallen into water, pull out the power plug immediately,
and only then remove the device from the water. Do not use the
device again. Contact Customer Service immediately for assistance.
–Never touch the device with wet hands.
DANGER!
Risk of cable
damage!
Risk Caused By Insufficient Hygiene. Always Comply With These
–During the preparation and packaging of food, make sure the
equipment is perfectly clean.
–After use, thoroughly clean the bag sealer and the entire equipment
as soon as possible.
–Immediately freeze or refrigerate perishable food after sealing.
–After thawing or heating perishable food, the food must be
consumed immediately.
Risk for Pets and Livestock
–Electrical devices can represent a hazard to pets and livestock. In
addition, animals can cause damage to the appliance. Keep animals
away from this appliance.
CAUTION! RISK OF MATERIAL DAMAGE
Observe the specified operating time of the device. Only use
special plastic films/bags suited for use with vacuum sealers.
Never place the device on hot surfaces (e.g., hot plates) or
near to heat sources or open fire. Ensure that no liquid is
sucked in during the extraction of air. The device is fitted
with non-slip silicon feet. Place a non-slip mat under the
device. When cleaning, do not use any astringent or abrasive
cleaning agents.
Fire Hazard
–Never cover the device when plugged in due to possible
overheating and fire hazard!
–Do not use the device in the vicinity of flammable materials
or flammable gas.
Risk of Injury Through Burning
–The Heating Strip becomes very hot during operation.
Do not touch the hot Heating Strip.
–Cleaning and user maintenance should not be performed by
children or those with reduced physical, sensory or mental abilities.

OVERVIEW OF PARTS | 76 |IMPORTANT SAFETY INSTRUCTIONS
Meaning of the Symbols & Terminology
The following symbols and warnings will be used in this instruction
manual.
The terminology in this instruction manual may include the following
words, which can relate to general information, safety information,
safety messages, and warnings:
–MAY – This word is understood to be permissive.
–SHALL – This word is understood to be mandatory.
–SHOULD – This word is understood to be advisory.
Symbol Description
Safety Alert Symbol is used to alert you to potential
personal injury hazards. Obey all safety messages that
follow this symbol to avoid possible injury and death.
DANGER! DANGER indicates a hazardous situation that, if not
avoided, could result in death or serious injury.
WARNING! WARNING indicates a hazardous situation that, if not
avoided, could result in death or serious injury.
CAUTION! CAUTION indicates a hazardous situation that, if not
avoided, could result in minor or moderate injury.
NOTE NOTE indicates a situation which could lead to
property damage.
TIP TIP indicates specifics that should be observed or
followed when handling the device.
SAVE THESE INSTRUCTIONS
–This appliance is intended for personal home use and similar
applications. Not intended for commercial use. Do not use the
appliance for anything other than its intended use.
–If you pass the device on to someone else, please include these
operating instructions. The operating instructions are a part of
the product.
OVERVIEW OF PARTS
1WET Mode
2ADAPTER Vacuum Function
3SEAL Only Function (no vacuum)
4VAC + SEAL Function
5SOFT Mode
15 Release Buttons
16 Vacuum Tube Port
17 Power Cord with Plug
18 Cord Opening
1
16
15
18
17
2 3 4 5
1 × Vacuum Sealer
2 × Vacuum
Tubes
(for containers
or bags with
avalve)
1 × Adapter A
for use with
Ernesto containers
and FoodSaver
Lunchboxes
1 × Adapter B
for use with
FoodSaver
freshness
containers
1 × Adapter C
for use with CASO
containers and
FoodSaver storage
boxes
1 × Vacuum Bag Roll
Width: 11 inches (28 cm)
Length 9.84 ft (300 cm)
1 × Drip Tray
(pre-inserted)
1 × Spare Sealing Ring
15

CONTROL PANEL FUNCTIONS | 98 | OVERVIEW OF PARTS
11 Side Reference Ridge
12 Lower Sealing Ring
(to airproof the vacuum area)
13 Heating Strip
14 Drip Tray (removable)
6Sealing Strip
7Lid
8Upper Sealing Ring
9Suction Hole
(for Vacuum + Seal Function)
10 Rear Reference Ridge
6
14
2019
A B C
21 22 23 18
13
12
11
7
8
9
10
Tubes and Adapters Bottom View
19 Vacuum Tubes
20 Adapter A
21 Adapter B
22 Adapter C
18 Cord Opening
23 Cable Spool
See Page 14
to Use Adapters
NOTE:Other manufacturer’s containers and storage boxes are not included.
Adapters are included to use the Mueller Vacuum Sealer with those products.
CASO is a registered brand of CASO Holding GmbH
FoodSaver is a registered brand of Sunbeam Products, Inc.
–Remove all packing material.
–Check that the device is undamaged.
–Place the appliance on a dry, level, and heat-resistant surface.
You can cancel functions earlier than the automated time by pressing the function
button again for functions 2 , 3 , and 4 .
Use the 1“WET” and 5“SOFT” modes prior to vacuum packing and/or
sealing. Press the button to activate then press the button again to deactivate the
function.
CONTROL PANEL FUNCTIONS
BEFORE FIRST USE
Symbol Function Button
Description
Auto
Stop
1. WET
Use the “WET” mode to seal moist
or wet food. Not intended for sealing
a bag of soup or liquids
2. ADAPTER
Start/cancel vacuum packing with
the connection, a Vacuum Tube,
Adapters (A, B, C)
Stops
when
complete
3. SEAL
Use to create a light seal.
This button will add a seal
(no vacuum) to a bag OR you can
start making abag from a roll of film
(See Page 12 for more detail)
Stops
when
complete
4. VAC + SEAL Start/cancel vacuum-packing and
sealing a bag
Stops
when
complete
5. SOFT
Activate/deactivate the “SOFT” mode
for pressure-sensitive food (berries,
cakes, etc.) Use the “SOFT” mode in
combination with “VAC+SEAL
(See Page 18 for more detail)
NOTE:Instructions on the following pages are separated by bag type or
use of adapters. Find the one suitable to your needs.
NOTE:The “WET” mode is not designed for liquids. It adds more time to
seal moist foods.

MAKING VACUUM BAGS | 1110 | POWER SUPPLY
POWER SUPPLY
Only connect the Power Plug to a properly installed and easily accessible wall
socket whose voltage corresponds to the specifications on the rating plate. The
wall socket must continue to be easily accessible after the device is plugged in for
safety reasons.
1Unwind the required length of Power Cord from the Cable Spool
(See “Bottom View” image on Page 9).
2Lead the Power Cord through the Cable Opening on the underside of the device.
3Connect the Power Plug into an appropriate wall socket.
MAKING VACUUM BAGS
Requirements
Refer to these requirements when buying replacement or additional film bags
or film bag rolls.
–Accepts tubular film or complete bags designed for vacuum sealing.
–Width of bag film should not exceed 11 inches (28 cm).
–Film must have dots/knobs or grooves on one side.
–Smooth films are NOT suitable for sealing.
–Thickness should be between 0.007 and 0.011 inches (170–290 μ).
–Check the temperature range of the film when buying it.
–The ideal range is between -4ºF (-20ºC) and +230ºF (110ºC). Films with these
tolerances can be deep-frozen or boiled. The film included with this Vacuum
Sealer is suited for both applications.
NOTE:If you use a premade or finished bag, the steps below do not apply.
MAKING AND SEALING VACUUM BAGS
2.5 inches
(6.3cm)
3 inches
(7.6 cm)
QUICK STEPS TO MAKE A BAG
VACUUMPACKING VACUUM CONTAINERS AND BAGS WITH VALVE
Use this Vacuum Sealer to vacuum-pack containers from various manufacturers
using the “ADAPTER” button. This function works in combination with the
included Vacuum Tubes and Adapters, which have different valve shapes
(See below and “Tubes and Adapters” image on Page 9), and the various
containers (not included).
Unroll the vacuum film, then cut
the length of film you require
Open Lid and
insert bag
Seal the bottom
of the bag
NOTE:Film tube rolls can be used to make your own vacuum bag.
CAUTION!
RISK OF MATERIAL DAMAGE!
After 5 sealing and/or vacuum-packing
processes, the appliance must cool down
for at least 60 seconds.
CAUTION!
Risk of electric shock due to moisture. Ensure that no liquid is
sucked in during the extraction of air. If this occurs, immediately
interrupt the vacuum process by pressing the active “ADAPTER”
button again. Please comply with the manufacturer’s
instructions regarding fill levels for containers and bags.
Adapter
Designed for... Ernesto, FoodSaver
Lunchboxes
FoodSaver
freshness
containers
CASO, FoodSaver
storage boxes
You will need to cut rolled film with scissors to the bag size you require.
Bag length should include the size of the item you are storing, plus a space
of about 2.5 inches (6.35 cm) near the top after you fill the bag. This allows the
Vacuum Sealer to seal the bag.
Top Seal – Leave about 2.5 inches (6.3cm)
from the top of the bag after you fill it.
Bottom Seal – Start your seal about 3 inches
(7.6 cm) from the end of the bag.
NOTE: To prevent overheating and melting of the bag, wait for 30–60
seconds to cool down the heating part after every sealing operation.
NOTE:Refer to film or bag packaging for more details about each product.

MAKING VACUUM BAGS | 1312 | MAKING VACUUM BAGS
HOW TO USE VACUUM CONTAINERS
1Fill your vacuum-pack container
with food to the maximum level,
then close the container Lid.
2Press the appropriate Adapter (A, B,
or C) onto the container Lid valve.
NOTE:Leave about 1 inch (2.5 cm)
of space at top of the container.
NOTE:
Example
shows
Adapter B.
3Connect one end of a Vacuum Tube
to the appliance, the other to the
Adapter.
4While holding the Adapter firmly
in place with one hand, press the
“ADAPTER” button with the
other. An LED light will appear, and
the vacuum-packing process will
start.
5The LED will turn off when the
vacuum-packing process is
complete. Wait for the LED light to
turn off before opening the Lid.
6Remove the Vacuum Tube and
Adapter from the Lid.
Repeat the process, if necessary,
with another container OR remove
the Tube and Adapter to store
them.
2Carefully close the vacuum bag.
Place the vacuum bag flat on
a level surface with the valve
pointing upwards.
3Press Adapter (A/B/C) onto the
vacuum bag valve. Connect one
end of a Vacuum Tube to the
appliance, the other to the Adapter. 4Hold the Adapter firmly in place.
5Press the “ADAPTER” button.
An LED light will appear, and the
vacuum-packing process will start.
The LED will turn off when the
vacuum-packing process is
complete. Wait for the LED light to
turn off before opening the Lid.
6Remove the Vacuum Tube and
Adapter from the bag.
Repeat the process, if necessary,
with another bag OR remove the
Tube and Adapter to store them.
1Fill your vacuum-pack bag with
food to the maximum level. Ensure
there is no food under the valve.
HOW TO USE VACUUM BAGS WITH VALVES

MAKING VACUUM BAGS | 1514 | MAKING VACUUM BAGS
SEALING BAGS WITHOUT VALVES MAKE YOUR OWN BAG
1Unroll the vacuum film, then cut
the length of film you require.
2Open the Lid with the “Release”
button. Smooth the bag, then
gently push the bag into place.
The end of the bag must be before
the Reference Ridges (Rear and
Side), as shown by the arrows.
TIP:Ensure there are no creases
in the bag, especially near the
Heating Strip (See Page 9).
3Close the Lid. Use both hands to
press firmly on the edges of the
Lid. You will hear an audible CLICK
when it is fully closed.
TIP:Vacuum Sealer will run, but
will not seal the bag if the Lid is
not completely closed.
NOTE:You can heat seal a potato chip bag or most thermoplastic plastic
bags, including polyethylene, polypropylene (PP), polystyrene (PS), and
polyvinyl chloride (PVC). However, this technique ONLY HEAT SEALS
apotato chip bag. You cannot vacuum seal that type of bag.
4Press the “SEAL” button. An LED
light will appear, and the sealing
process will start.
VACUUMPACKING AND SEALING BAGS WITHOUT VALVES
5After about 5–7 seconds the LED
will turn off when the sealing
process is complete.
6Press the “Release” button to open
the Lid. Remove the bag. Check the
welding seam. It should produce
asmooth, creaseless seam.
TIP:If you have activated the
“WET” mode, the sealing will
last a few seconds longer.
WARNING!
Risk of electric shock due to moisture. For vacuum-packing, no
liquids must be inside the bag. Ensure that no liquid is sucked in
during the extraction of air. If this occurs, immediately interrupt
the vacuum process by pressing the active “VAC+SEAL”
button again. Please comply with the manufacturer’s
instructions regarding filling levels for containers and bags.
TIP:When vacuum-packing film bags, there must be no vacuum tubes
attached to the machine.
NOTE: No food or beverage shall be present at the top edge of the bag,
where you want to seal it. That area must be clean and dry. If not, it is
impossible to produce a proper seam weld. We recommend filling the
bag only to about 2.5 inches (6.35 cm) from the top edge.

MAKING VACUUM BAGS | 1716 | MAKING VACUUM BAGS
1Push the “Release” button, then lift
the Lid. After inserting the food into
the bag, smooth the bag where it is
to be sealed.
2Gently push the bag into place. The
end of the bag must be before the
reference ridges (rear and side), as
shown by the arrows.
3Close the Lid. Use both hands to
press firmly on the edges of the
Lid. You will hear an audible CLICK
when it is closed fully. 4Press the “VAC+SEAL” button.
An LED light will appear, and the
sealing process will start. The film
bag is first vacuum-packed, then
sealed.
TIP:Ensure there are no creases
in the bag, especially near the
Heating Strip (See Page 9).
TIP:If the LED does not turn
off– and the noise of the
vacuum pump does not stop,
even though no further air is
being sucked out of the film
bag – cancel the process. Check
(1) the film bag for leaks; and
(2) the film bag’s position on
the device.
5The LED will turn off when the
sealing process is complete.
Normally, it takes 15–20 seconds
based on the sealing mode
selected.
USING THE “SOFT” MODE
USING THE “WET” MODE
IMPORTANT NOTE:
The “WET” mode should
be actived before start the
“VAC+SEAL” function.
IMPORTANT NOTE:
Use the “SOFT” mode
before starting the
“VAC+SEAL” function.
TIP:The “WET” mode will not vacuum-packing liquids. Soups or other
liquids should be frozen prior to vacuum-packing.
WARNING!
Risk of electric shock due to liquid from bag. For vacuum-
packing, liquids should not be inside the bag. Ensure that no
liquid is sucked in the machine during the extraction of air.
If this occurs, immediately interrupt the process by pressing
the active function button.
6Wait for the LED light to turn off
before opening the Lid. Press
the Release button to open the
Lid. Remove the bag. Check the
welding seam. It should produce a
smooth, creaseless seam.
TIP:If the seam is questionable,
seal the bag again about ¼ inch
above the first seal.
If the bag contains moist food, such as
marinated meat/fish, ready-to-use cut
vegetables/fruit, this can result in an incomplete
seal. Activating the “WET” mode can increase
the sealing time to obtain a better seal weld.
1Press the “WET” button. The LED will light up. To deactivate, press the
“WET” button again.
2Press the “VAC+SEAL” button to start the sealing process.
3The LED will automatically turn off when the vacuum-packing/sealing
process has been completed or canceled.
4During the vacuum-packing/sealing process, the “WET” mode cannot
be activated or deactivated. This function MUST be done prior to vacuum-
packing/sealing.
The “SOFT” mode reduces the vacuum
pressure slightly. This helps when packaging
pressure-sensitive foods, such as berries, cakes,
and breads so they do not compress flat.

FOOD STORAGE GUIDE | 1918 | VACUUM SEALER TIPS & BEST PRACTICES
Advantages of Vacuum-Packed Foods
Vacuum-packing keeps food fresh for a longer timeframe. The process of vacuum
packing removes the air, which can cause the food to spoil in non-vacuum sealed
packaging. Using a Vacuum Sealer can also help protect against freezer burn that
often occurs when storing foods in a freezer.
Food Storage
–Soups or other liquids should be frozen prior to vacuum-packing.
–Never overfill your bag.
–Label your bags with the contents and the date.
–You can cuff the bag before filling it to help keep the top edge clean.
–Blanch any fresh vegetables before vacuum sealing them.
–Pre-freeze any fruits for best results.
–Wipe the top of the bag to remove any moisture or excess food prior to sealing
the bag.
–When sealing sharp items (such as dried pasta, pencils, silverware, etc.), consider
adding waxed paper or paper towels or a small towel to help prevent punctures.
–Be sure to leave about 2.5–3 inches (6.3–7.6cm) of space at the top of any food
containers prior to sealing them.
–Some people find success by filling the bag, then partially freezing the food
prior to sealing.
–Another trick for reducing moisture seepage is to fold a paper towel, then insert
it above any moist meats or ingredients prior to sealing.
–Allow the device to cool down completely before you clean it or put it away.
Storing Other Household Goods
Vacuum sealers can be used for more than food. You can store polished silverware,
craft supplies (beads, buttons, etc.), and more for long-term storage. We do not
recommend storing anything breakable, plant seeds, or something that cannot be
compressed safely.
VACUUM SEALER TIPS & BEST PRACTICES
NOTE:Not recommended for storing soft cheeses, mushrooms, garlic,
onions, and butter or margarine.
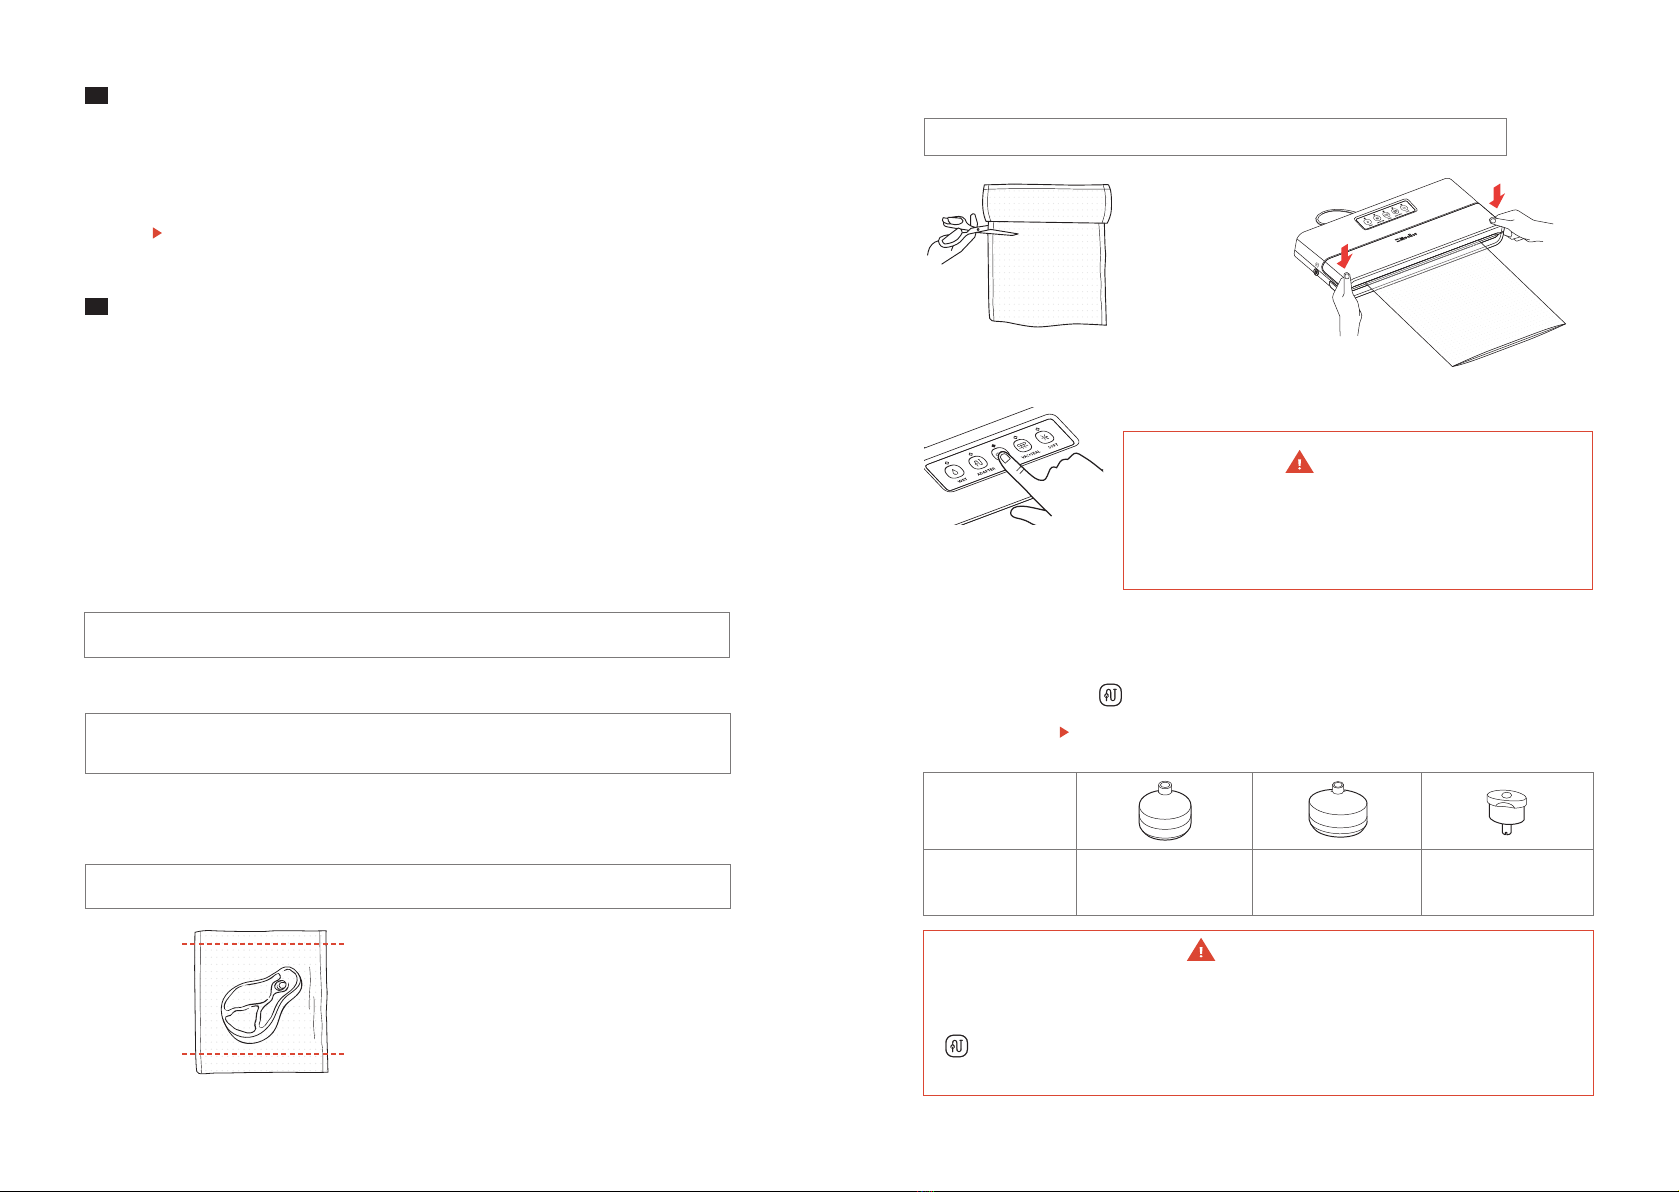
1Press the “SOFT” button. The LED will light up. To deactivate, press the
“SOFT” button again.
2Press the “VAC+SEAL” button to start the sealing process.
3The LED will automatically turn off when the vacuum-packing/sealing
process has been completed or canceled.
4During the vacuum-packing/sealing process, the “SOFT” button cannot
be activated or deactivated. This function MUST be done prior to vacuum-
packing/sealing.
FOOD STORAGE GUIDE
Sous-Vide
A popular method to cook meat is called sous-vide where you gently cook meat
inside a vacuum bag. The home cook and foodie can now recreate their favorite
sous-vide recipes at home with the help of our Vacuum Sealer.
Marinating Meats and Vegetables
Enhance the flavor when you vacuum-seal meat or vegetables with marinade or
spices inside the bag. Following recipe instructions and safe food practices, rest
the food for a few hours or overnight in a refrigerator to lock in the flavor.
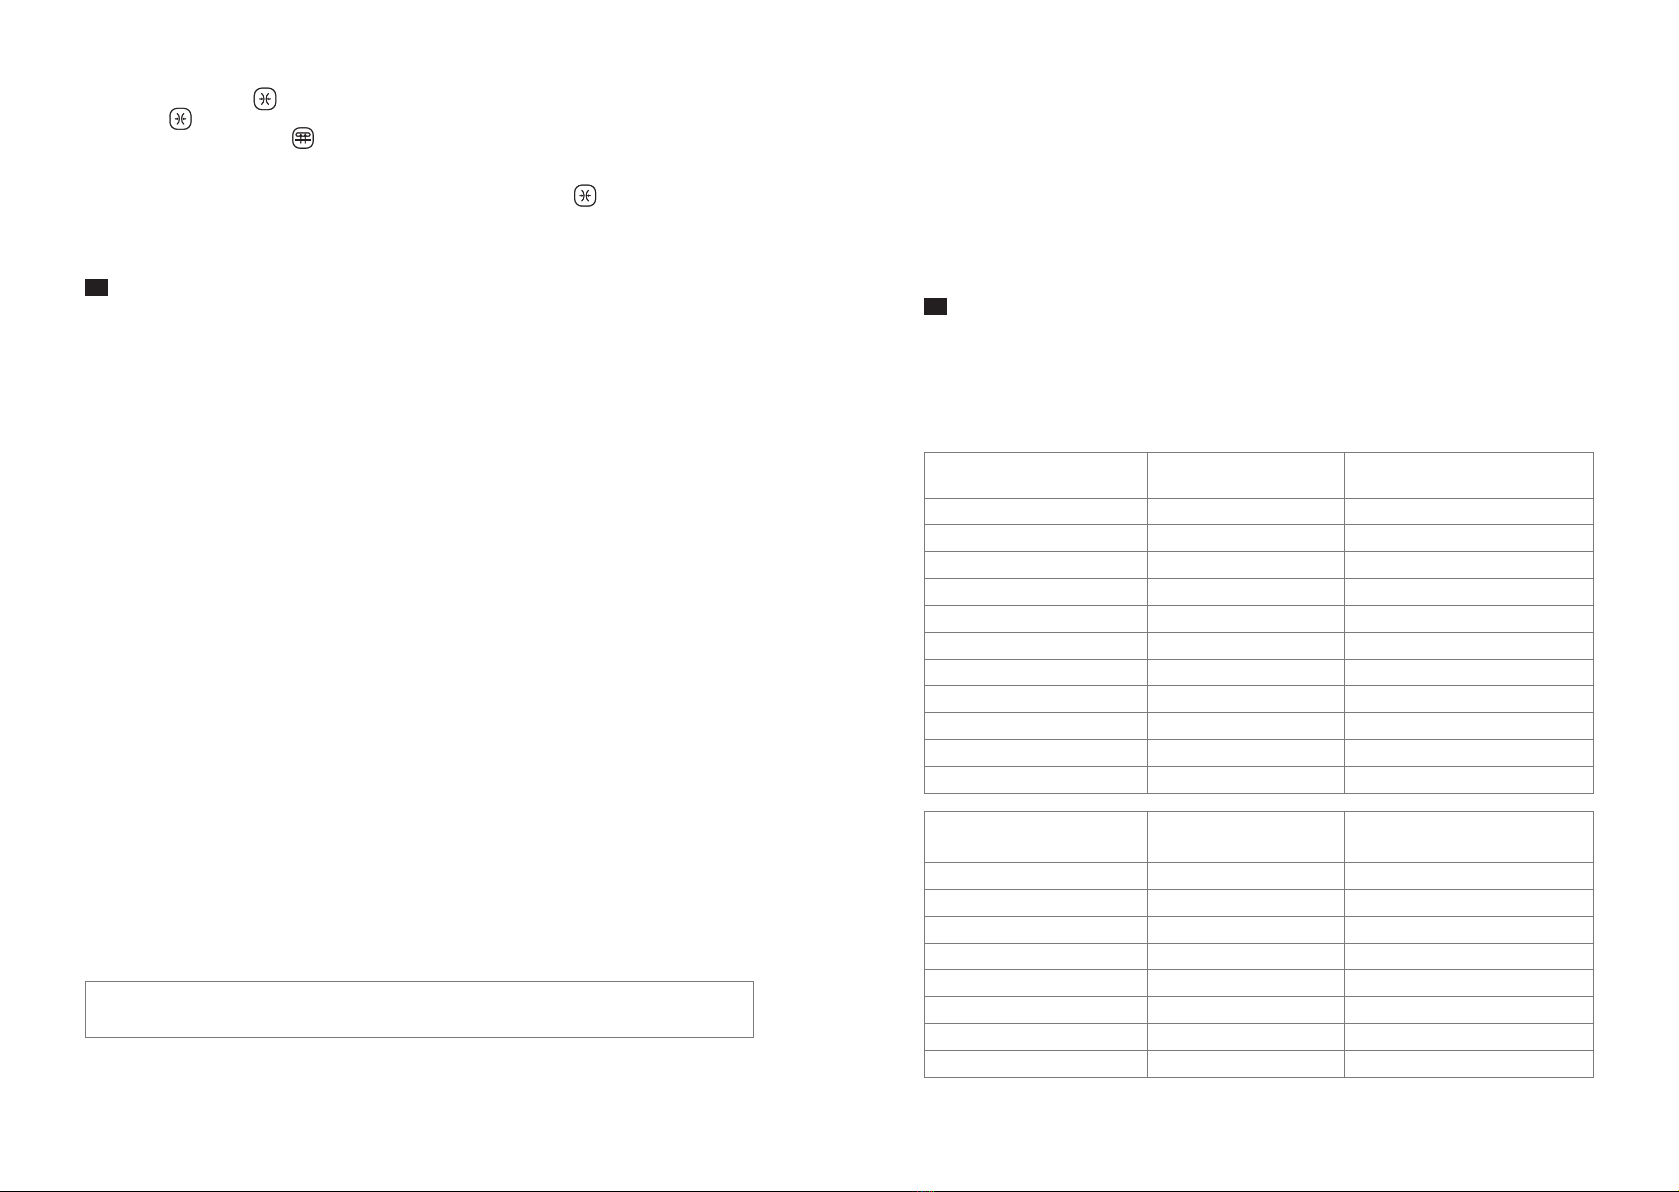
Refrigerated (5 ± 2ºC) No Vacuum Seal Mueller Vacuum Sealer
Red Meat 3–4 Days 8–9 Days
White Meat 2–3 Days 6–8 Days
Fish 1–3 Days 4–5 Days
Cooked Meat 3–5 Days 10–15 Days
Soft Cheese 5–7 Days 20 Days
Hard/Semi Hard Cheese 1–5 Days 60 Days
Fruits 5–7 Days 14–20 Days
Vegetables 1–3 Days 7–10 Days
Soup 2–3 Days 8–10 Days
Pasta/Rice Leftovers 2–3 Days 6–8 Days
Cream Desserts 2–3 Days 8 Days
Room Temperature
(25 ± 2ºC) No Vacuum Seal Mueller Vacuum Sealer
Fresh Bread 1–2 Days 8–10 Days
Biscuits 4–6 Months 12 Months
Uncooked Pasta/Rice 5–6 Months 12 Months
Flour 4–6 Months 12 Months
Dry Fruits 3–4 Months 12 Months
Ground Coffee 2–3 Months 12 Months
Loose Tea 5–6 Months 12 Months
Milk Tea 1–2 Months 12 Months
*The information in this table is for reference only. Actual storage time will depend
upon the food’s freshness, storage conditions, etc. Please always check food
before cooking (review package expiration or use by dates, examine color, smell,
etc.). For your health and safety, please never eat or cook any food when its quality
has changed.

SPECIFICATIONS | 2120 | CLEANING AND MAINTENANCE
In Freezer
(-18 ± 2ºC) No Vacuum Seal Mueller Vacuum Sealer
Meat 4–6 Months 15–20 Months
Fish 3–4 Months 10–12 Months
Vegetables 8–10 Months 8–24 Months
CLEANING AND MAINTENANCE
WARNING!
Risk of injury through burning/scalding. Allow the appliance
to cool down completely before you clean it or store it. The
Heating Strip becomes very hot during operation. Do NOT
touch the hot Heating Strip.
WARNING!
Risk of electric shock. Prior to cleaning, disconnect the Power
Plug from the device.
WARNING!
Risk of electric shock due to moisture. The appliance, Power
Cord and plug must not be immersed in water or any other
liquid.
WARNING!
Risk of material damage. Do not use any astringent or abrasive
cleaning agents.
We recommend you clean the device regularly to ensure the proper function
of your appliance. Do not submerge the Vacuum Sealer.
1After unplugging the appliance, wipe down the housing of the device
with a damp cloth or sponge. Use mild soap, if necessary.
2Remove the Drip Tray and empty it. Wash with mild soap and water.
3Prior to the next use, thoroughly dry the appliance.
SPECIFICATIONS
Model
Number Voltage Power 2 Pressure Level
(for whole unit)
VS-22A 120 V, 60 Hz 125 W 550 mBar (for normal setting) (-5%)
150 mBar (for soft setting) (+/-5%)
Sealing Time Max Width of Bag
Dry Sealing Wet Sealing
15 s 19 s 11.8 inches (30 cm)
Product Size Product Weight
L 14.96 × W 5.67 × H 2.13 inches
(L 38 × W 14.4 × H 5.4 cm) 2.14 Ib (0.97 kg)
Cleaning the Drip Tray
1Grasp both outer ridges with your
fingers, then carefully lift the Drip
Tray upwards and out.
2Drain the liquid.
3Rinse the Drip Tray under warm
dishwater or place it in the dishwasher.
4Make sure it is dry before re-inserting it.
5Insert the Drip Tray into the Vacuum
Sealer from above.
Cleaning the Sealing Ring
1Grasp the Sealing Ring with two
fingers and lift it upwards and out.
2Rinse the Sealing Ring under warm
dishwater. Make sure it is dry before
re-inserting it.
3Replace the Sealing Ring. Ensure
that it is not wavy, but rests in
smooth contact inside the
Vacuum Sealer.
TIP:The Sealing Ring can lose
its shape over time due to the
high contact pressure. When
necessary, replace it with the
Spare Sealing Ring included in
the items supplied.

22 | TROUBLESHOOTING
This equipment has been tested and found to comply with the limits for a Class
B digital device, pursuant to part 15 of the FCC Rules. These limits are designed
to provide reasonable protection against harmful interference in a residential
installation. This equipment generates, uses and can radiate radio frequency
energy and, if not installed and used in accordance with the instructions, may
cause harmful interference to radio communications. However, there is no
guarantee that interference will not occur in a particular installation. If this
equipment does cause harmful interference to radio or television reception, which
can be determined by turning the equipment off and on, the user is encouraged
to try to correct the interference by one or more of the following measures:
–Reorient or relocate the receiving antenna.
–Increase the separation between the equipment and receiver.
–Connect the equipment into an outlet on a circuit different from that to which
the receiver is connected.
–Consult the dealer or an experienced radio/TV technician for help.
MODIFICATION: Any changes or modifications not expressly approved by the
grantee of this device could void the user‘s authority to operate the device.
FCC DETAILS | WARRANTY | 23
FCC DETAILS
1YEAR LIMITED WARRANTY
This product is warranted to be free from defects in material and workmanship
under normal use and service for one year from the date of the original purchase
with the receipt. The manufacturer’s obligation shall be limited to repairing
or replacing any part of the product that is defective. Such warranty shall
not apply to damages resulting from accidents, abuse, or misuse.
If there is any problem with Mueller Vacuum
Sealer, please contact Customer Service.
MUELLERDIRECT.COM
SUPPORTMUELLERDIRECT.COM
CAUTION!
To comply with the limits of the Class B digital device, pursuant
to Part 15 of the FCC Rules, this device is to comply with Class
B limits. All peripherals must be shielded and grounded.
Operation with non-certified peripherals or non-shielded
cables may result in interference to radio or reception.
TROUBLESHOOTING
Problem Possible Cause Solution
The Vacuum
Sealer doesn’t
seal well, or it
doesn’t seal
at all.
Is the Vacuum Bag
or pouch sealed
correctly?
Check if the pouch or bag has any ridges.
If it does, reseal the bag by folding the top
of the bag so you can form a straight line.
The line should run perpendicular to the
strip with the smooth end facing upwards.
Examine the bag for leaks. After sealing
the bag, submerge it in water and apply
pressure. Bubbles indicate a leak.
Use a new bag if bubbles appear.
A wrinkle in the bag along the seal may
cause leakage and allow air to re-enter.
Just cut bag and reseal. To avoid wrinkles,
make sure you stretch the material until
it’s flat.
Sometimes moisture or food (such as
juices, grease, crumbs, powders, etc.)
along the seal can prevent the bag from
sealing properly. Cut the bag, wipe inside
top of the bag and reseal.
Did you
overfill the bag
or pouch?
Make sure there are 2.5 inches (6.3 cm)
of extra space between the sealer
and food content.
Does the Sealing
Ring need to be
cleaned or
replaced?
Check the Sealing Ring for debris.
If present, you can clean them with a
damp cloth and then reinsert them into
the Vacuum Sealer. Make sure that the seal
is not wet during the sealing process.
My Vacuum
Sealer won’t
turn on.
Does outlet work? Check the outlet. Unplug the cord then
plug it back again. If nothing happens, try
plugging a different appliance into the
same outlet to check if it works.
Check the Cord. You should check the Cord for loose wires
or gnaw marks made by pets or mice.
If there is damage to the Cord, please
contact Customer Service.
Bag melts.
Have you allowed
enough time for
the appliance to
cool down
between
consecutive
sealings?
The Vacuum Sealer may have become
too hot for use. We recommend a 30–60
second cool-down period between sets
or sealing processes.
Accessory
Tubes won’t
latch.
Do the accessories
match?
Make sure the Vacuum Sealer can support
accessories that are not of Mueller.
The bag gets
melted and breaks
at the sealing line,
or sealing well but
no air vacuum
exhaust.
Overheating of the
heating parts. Please always wait for 30–60
seconds for cooling down
after each sealing operation.

EXTEND FOOD STORAGE LIFE
350 SPRINGFIELD AVENUE,
SUITE #200, SUMMIT, NJ 07901
MUELLERDIRECT.COM
SUPPORT@MUELLERDIRECT.COM
SKU: MLR010564N MADE IN CHINA
Table of contents
Other Mueller Food Saver manuals