MUGEN 75300-XNCF-K0S0 User manual

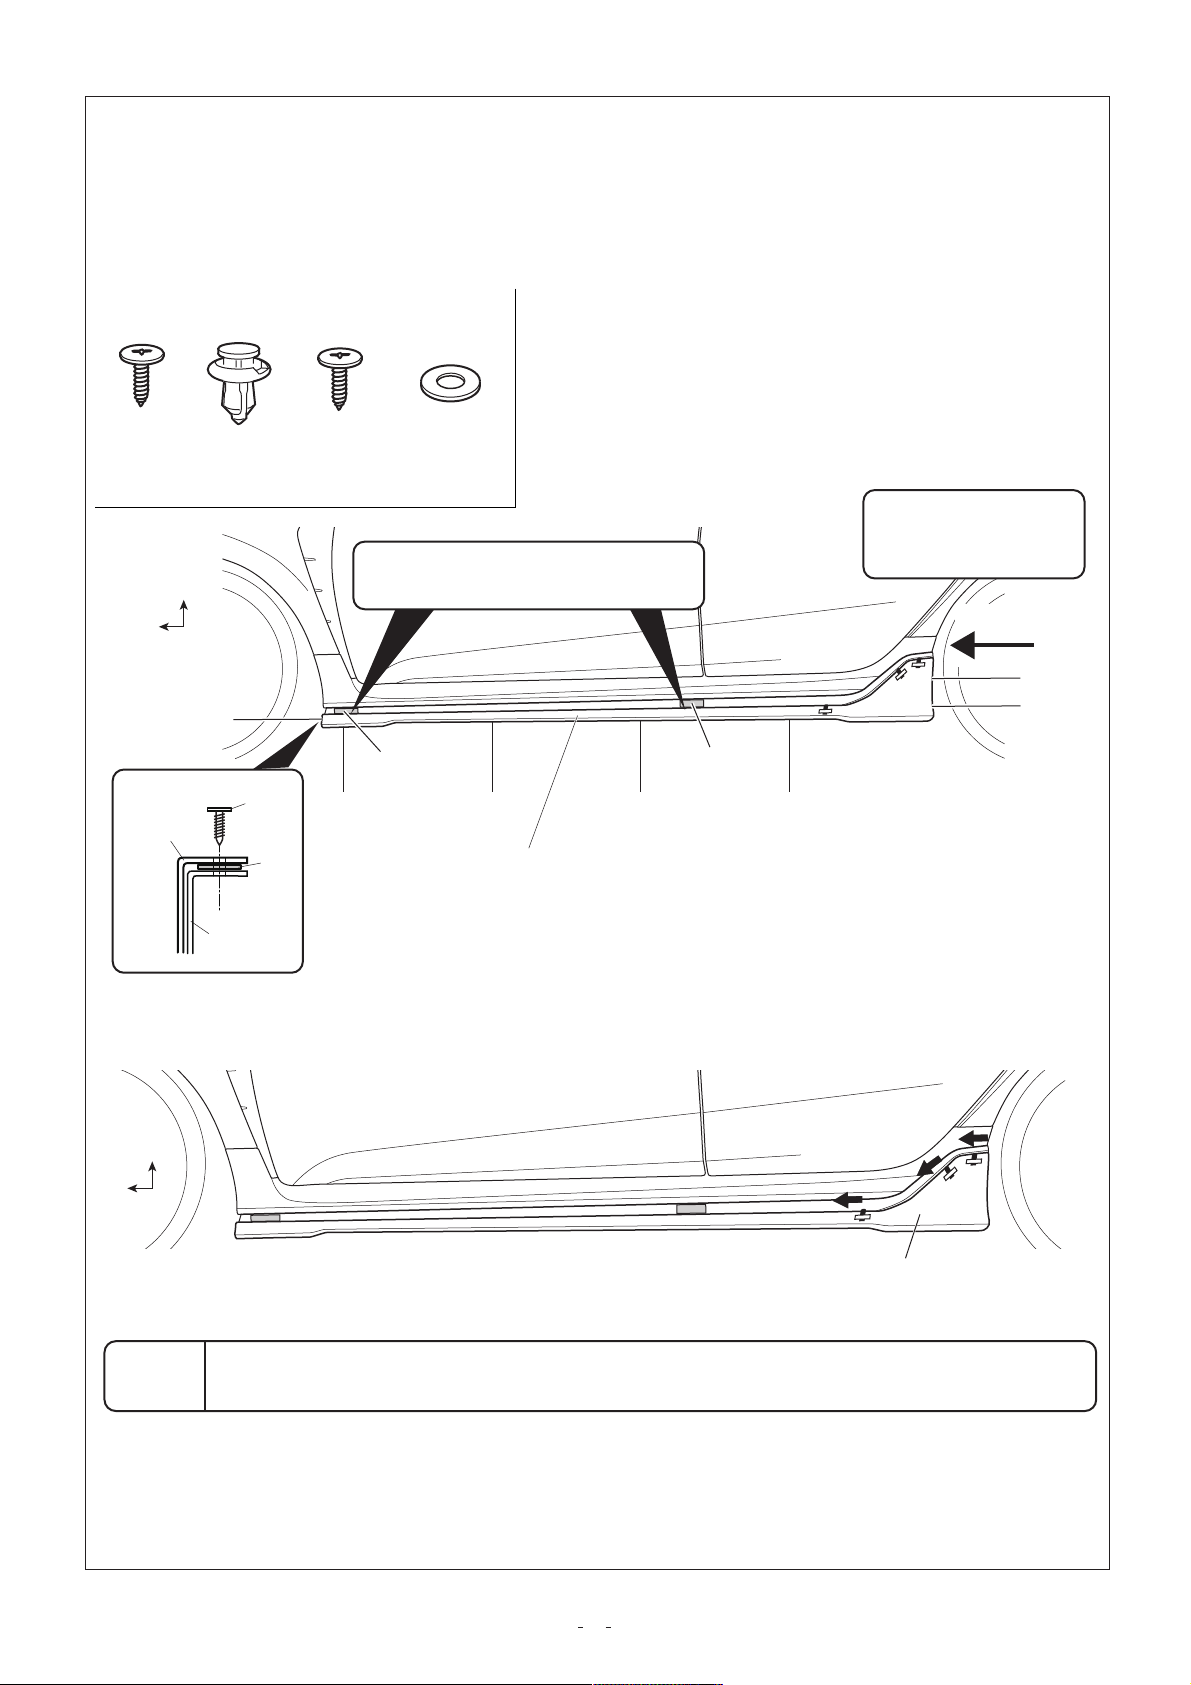
75300-XNCF-K0S0 CIVIC TYPE R SIDE GARNISH
Installation / handling explanation
Thank you for purchasing the MUGEN product.
Please be sure to understand the following precautions before installing.
Please be sure to give this manual to the customer after installation.
please note
1. Immediately after opening, check that the contents of the package (see the component list) are not missing or damaged.
2. Check the model, vehicle color and product color of the vehicle to be installed before installation.
[Compatible model] CIVIC TYPE R DBA-FK8
[Color symbol] Infinite colors
CW
CB
BT
FR
ZZ
Honda color symbol
NH0
NH731P
B593M
R513
---
Color name
Championship White
Crystal Black Pearl
Brilliant Sporty Blue Metallic
Frame red
Unpainted
* Please check the color code on the service information plate.
3. When installing or removing genuine parts, follow the service manual.
4. We are not responsible for any modifications, improper assembly, malfunctions or accidents caused by misuse of this product.
Please note that we do not bear any responsibility.
If you have any questions, please contact us at the following.
2-15-11 Hizaoricho, Asaka City, Saitama Prefecture 351-8586
Domestic Sales Division, Product Division, M-TEC Co., Ltd.
[Business hours 10: 00-17: 00 (excluding Saturdays, Sundays, national holidays, and our designated holidays)]
TEL. 048-462-3131 FAX. 048-462-3121
To customers
1. 1. If the side garnish is damaged or deformed due to an accident or contact, repair or remove it immediately.
Driving as it is is very dangerous because it may cause an accident.
2. By installing the side garnish, the ground clearance of the side garnish installation part becomes low, and it passes through steps etc.
Please be careful when driving as there is a risk of rubbing the side garnish.
3. 3. Please avoid car washing with an automatic car wash machine. Unreasonable force may be applied to the side garnish, causing damage.
There is.
4. Be sure to check the clearance with the side garnish when jacking up and lifting up.
5. Periodically check for loose bolts and nuts, looseness, etc., and check the mounting condition.
1 2019.5.31 1/8

[Component list]
No.
①
②
③
④
⑤
⑥
⑦
⑧
Side garnish (R / L)
clip
Low head tapping screw
Speed nut
Washer
spacer
Patterns a, b, c, d, e, f, g
PAC Primer K-500
② ③ ④
PARTS NAME. QTY.
1 each
8
2
2
6
4
1
2
①
R
L
⑤⑥⑦ ⑧
Pattern
a, b, c
d, e, f
g
3M
PAC primer
K-500
Adhesion promoter
Internal weight: 3.5g
No fires
Moisture and moisture are strictly prohibited
Flammable Solid Hazard Class III
Expiration date / LOT No: Described outside the frame
Unpainted products only Unmounted products
No.
⑨ Mall (black)
⑩ Cushion
PARTS NAME. QTY.
2
2
⑨⑩
[Necessary tools]
・ Driver + ・ Clip remover ・ Drill φ3, φ6, φ10 ・ Cutter ・ Scissors ・ Isopropyl alcohol ・ Waste ・
Masking tape
◇ ◆ Precautions for painting work ◇ ◆
1. 1. For drying, we recommend normal temperature drying. The upper limit of baking temperature for forced drying is 60 ° C. Deforms when heated to 60 ° C or higher
Please note that it may be done.
2. For other items, follow the instruction manual of the paint manufacturer to prevent risks such as organic solvent poisoning and ignition accidents.
Please make an effort and work.
3. 3. Please stop spot drying with a far infrared machine.
Recommended product Paint: Two-component acrylic urethane resin paint (normal temperature drying type)
[Unpainted product]
* For painted products, start from "I. Preparation for installation" on page 4.
Separate painting Recommended painting: Matte black
[Folded back end of side spoiler]
Parting position for painting
SECTION AA'
Body color Matte black Matte
black
AA'
Parting position
(R stop)
Body color
FR
LH * Same for R side
FR
Side spoiler * Same for R side
22019.5.31 2/8

① Paste the molding on the side garnish.
At this time, degrease the sticking surface.
Side garnish
Up to the step
Paste the mall
Mall cross section
the mall
* Same for R side
There is no float
Be careful Side garnish
Up to the step
Paste the mall
Painted surface
the mall
* Same for R side
Degreasing cleaning
Side garnish (L) * Same for R side
(2) Attach the cushion to the back side of the folded part at the front end of the side garnish.
At this time, degrease the sticking surface.
[Enlarged view of the back of the front end]
Butt cushion
UP
FR Terminal matching
* In the mounting hole
Do not cover
Side garnish (L) * Same for R side
3 2019.5.31 3/8

I. Preparation for installation
<< Caution >> ・ Be careful not to damage the side garnish and the car body.
・ Work while having another person hold it.
・ Work in the same way on the left and right.
(1) Attach the patterns g and f to the positions shown below on the side of the side sill garnish with masking tape or the like.
UP
FR
Pattern f Pattern g Side sill garnish
[Enlarged view] UP Front door
UP
FR R stop
Match
FR R stop
Match
Pattern f Pattern g
Front door
Rear terminal alignment
15mm
(Reference dimensions)
* Same for R side
② Remove the side sill garnish from the vehicle. (Refer to the service manual)
Be careful not to lose or damage the screws and clips that you removed at that time, as they will be reused.
③ Using paper pattern e, φ6 (φ3) on the folded part of the rear wheel house of the side sill garnish
→ Make one hole on each side of φ6).
After drilling, remove the pattern e and remove burrs around the holes.
△ (2) [Back view]
Garnish the shaded area of each paper
Fit to the terminal
Pattern e
△
Drill
φ3 → φ6
UP
LH
Side sill
Garnish
* Same for R side
42019.5.31 4/8

④ Side sill garnish rear wheel house Speed nut to match the φ6 hole of the folded part
Attach (A) to one on each side.
[Back view]
A (1)
Mounting cross section
UP
Garnish
LH A
A
Side sill
Garnish
speed
nut
* Same for R side
⑤ Attach the patterns a, b, c, and d to the underside of the side sill garnish with masking tape or the like.
[Bottom view] Pattern a Pattern b Pattern c Pattern d
LH
FR
Side sill
Garnish
[Enlarged view]
The shaded area of each pattern
Garnish terminal
To match
* Same for R side
⑥ Temporarily apply the side garnish to the side sill garnish, and fold back the front and rear wheel houses.
The tapping screw (B reused) removed in I-② and the rear wheel house fold
Temporarily tighten the upper hole of the return part with a low-head tapping screw (C).
When it is necessary to adjust the circumference, install a washer (D) on the front side according to the adjustment width (1 to 3 on one side).
Align the spacer (E) on the rear side with the hole position of the side garnish folding part.
paste.
B (4) C (4) D (0-6) E (4)
B BC
side
Garnish
side
Garnish
D E Rear end abutt
Front-back direction by reference
Positioning
To.
Tapping
Screw tapping washer spacer (reused) screw
Low head
Side sill
Garnish
Side sill
Garnish Butt
[Side view] Side sill garnish
C
B
UP
FR B
Pattern f Side garnish on the shaded area of the pattern
Align the top of the molding.
Pattern g Side garnish (L)
* Same for R side
52019.5.31 5/8

⑦ Align the holes in the side garnish lower bracket with the holes in the patterns a, b, c, and d.
Mark the drilling positions in 4 places on each side.
[Bottom view] By the rear end abutting standard
Positioning in the front-back direction
To do.
LH Side garnish (L)
FR marking marking marking marking
Butt
Pattern a
Pattern b Pattern c Pattern d Side sill garnish
[Enlarged view]
■ Hole alignment and marking
bracket 1. 1. Drill holes in the bracket
Align with the center of the line.
2. Center of the hole in the bracket and the paper pattern
According to the drilling line of
-King.
marking
Drilling line
Bracket hole
Centering
Pattern * Same as 4 bottom brackets
* Same for R side
⑧ Side sill garnish (see the figure below) to match the top of the side garnish molding
Stick the king tape.
[Side view]
Side sill garnish
UP
FR
Masking tape Side garnish (L) * Same for R side
⑨ Remove the side garnish.
⑩ Side sill Garnish bottom pattern According to the drilling position markings a, b, c, d
Make four holes of φ10 (φ3 → φ6 → φ10) on one side. After drilling, use the patterns a, b, c, d
Remove and remove burrs around the hole.
△
△ (8) △△△
Pattern a Pattern b Pattern c Pattern d
Drill
φ3 → φ6
→ φ10
LH
FR Side sill
Garnish * Same for R side
⑪ Restore the side sill garnish to the vehicle. (Refer to the service manual)
At that time, do not attach the tapping screw (B reuse) of the front and rear wheel house folding part.
That's right.
62019.5.31 6/8

II. Installation of side garnish
<< Caution >> ・ Be careful not to damage the side garnish and the car body.
・ Work while having another person hold it.
・ Work in the same way on the left and right.
・ To prevent poor adhesion of double-sided tape, do not allow it to get wet for at least one day after installation.
To do.
① Degrease and clean the shaded area on the side of the vehicle with isopropyl alcohol.
UP
FR
Degreasing cleaning
* Same for R side
② The figure below
Please note.
Also, handle the PAC primer K-500 according to the attached instructions.
Apply PAC primer K-500 to the part. At that time, do not stick out on the painted surface
UP
FR
Application range
* Same for R side
③ Remove the masking tape. At that time, do not peel off the patterns f and g.
④ Peel off the release paper of the double-sided tape of the side garnish by about 30 mm, fold it back to the front side, and mass.
Secure with king tape.
[▼ part] Paper pattern
Masking tape
Side garnish (L)
* Same for R side
72019.5.31 7/8

⑤ Temporarily apply the side garnish to the vehicle according to the mounting height of the pattern paper f and the pattern paper g, and lower the bra.
Fix the ket part with a clip (F), and tap the folded part of the front wheel house.
-(B reuse), tapping screw on the rear wheel house folding part (B reuse) and
Temporarily tighten with a low-head tapping screw (C).
When it is necessary to adjust the circumference, install a washer (D) on the front side according to the adjustment width (1 to 3 on one side).
Sheet) Use.
B (4) F (8) C (2) D (0-6)
Tapping
screw
(Reuse)
Low head
Tapping
screw
clip Washer
By the rear end abutting standard
Positioning in the front-back direction
To do.
Side garnish on the shaded area of the pattern
Align the top of the molding.
UP
FR Butt
C
B
B
Pattern f Pattern g
BFFFF
side
Garnish
DSide garnish (L)
Side sill
Garnish
* Same for R side
⑥ Check the mounting position and the gaps in each part, and pull the double-sided tape release paper in the direction of the arrow in the following order.
Peel off and crimp as if pulling out.
①
UP ②
FR ③
Side garnish (L)
* Thoroughly crimp the double-sided tape.
Insufficient crimping will cause the side garnish to come off.
* Same for R side
In order to improve the adhesive strength, the work environment should be 20 ° C or higher when attaching the double-sided tape.
When the temperature is low, warm the double-sided tape with a dryer before starting work.
Note
⑦ Peel off the patterns f and g, tapping screw (B reused), low head tapping screw
Fully tighten (C) and check if the mounting condition is perfect.
82019.5.31 8/8

Other MUGEN Automobile Accessories manuals
Popular Automobile Accessories manuals by other brands

KEKO
KEKO KC088FX Assembly manual

Kargo Master
Kargo Master PRO-III Assembly instructions

Cruz
Cruz N+ Series Assembly instructions

Scosche
Scosche HY1600 Installation instructions manual

Torklift
Torklift C2205 Important owner-operator installation instructions

DRAKE
DRAKE JP-190001-LKCONV installation instructions