Multiform LS4195 MultiBar User manual

User Manual: LS4195 DMX-controlled RGB LED 4-Spot T-Bar
V1.00 (01-2010) © Multiform Lighting 16
■Maintenance
This unit does not need regular maintenance. The internal circuit is protected by a
250V/2A slow-blow fuse 5x20mm fuse. If this fuse fails, this usually indicates an
internal fault requiring servicing by a qualified engineer. The fuse shall only be replaced
by a fuse of same specification, and the replacement has to be made by qualified
personnel obeying applicable safety rules.
■Technical data LS4195 MultiBar DMX-controlled RGB LED 4-Spot T-Bar
LED.…………....788pcs.x5mm 0.06W LEDs [4 panels with each 49red/96green/52blue]
Mains Input….…………………………………………………………. AC90-250V~ 50/60Hz
Power supply type………………………………………………………….……..switch mode
Power Consumption………….……………………………………………………max. 55.2W
Fuse………………………………………………….250V 2A T (slow blow, 5x20mm glass)
Sound control………………...…internal microphone with Automatic Gain Control (AGC)
DMX connections…………………………………………………3 pin XLR (Male / Female)
Modulation Type…………………….…………….Advanced Bit Angle Modulation (ABAM)
Control protocol.......................................................................................DMX 512 (1990)
Dimensions …………………………………………..………L 916.0 x H 297.4 x D 62.5mm
Weight ……………………………………………………………………………………..7,2 kg
■Standards
This product complies with the following standards:
EU safety................................................................EN60598-1:2008, EN60598-2-1:1989
EU EMC.......................................EN55015: 2006 + A1:2007, EN61547:1995 + A1:2000
EU Harmonics ...................................................................................EN61000-3-2:2006
EU Flicker ………………………………………………………………….EN61000-3-3:2008
US safety ………….…………..………………………………………………………UL60065
US EMC………………………..…………………………………………………..FCC Part 15
This product meets both the EMC Directive 2004/108/EC and the Low Voltage Directive
2006/95/EC.
USER MANUAL
LS4195 MultiBar
DMX-controlled RGB LED 4-Spot T-Bar
ENGLISH Page 2-16
RevA 01/2010 Order code: 12-010-0353-80100-1-01

User Manual: LS4195 DMX-controlled RGB LED 4-Spot T-Bar
V1.00 (01-2010) © Multiform Lighting 2
■Introduction
Dear customer,
congratulations on the purchase of a Multiform-branded item and the trust having been
put in us with this decision. Multiform is one of the leading global manufacturers of
professional equipment and has decades of experience in design, production and
quality assurance.
To meet your requirements, this unit has been designed and built to the highest
standards, so that we can assure you that you have made a good and satisfying
investment. To take full advantage of all possibilities and for your own safety and the
safety of your environment, please read these operating instructions carefully before
you start using the unit.
■Product description
The LS4195 MultiBar DMX-controlled RGB LED 4-Spot T-Bar is a plug-and-play
multichannel lighting fixture designed for any purpose which requires a multi-
spot/multicolour chase light to be set up in minutes – perfect for mobile DJ’s, small
bands and rental applications. Considering these applications, the LS4195 is delivered
in a flight case for immediate deployment on the road. For ultimate performance
control, it can be combined with Multiform’s LC400F foot switch and/or Multiform’s
LC300H handheld RGB LED controller.
■Security advice before use
Warning: Read this section carefully before installing, powering,
operating, cleaning or servicing this product!
The following symbols are used to identify important safety information in this manual:
DANGER!
Safety hazard. Risk
of injury or death.
WARNING!
Hazardous voltage.
Risk of severe or
fatal electric shock.
WARNING!
Fire hazard.
WARNING!
Read manual before
installation and
operation.
User Manual: LS4195 DMX-controlled RGB LED 4-Spot T-Bar
V1.00 (01-2010) © Multiform Lighting 15
■Display on/off
If you wish the display to be lit only when a change in operation is made, the DIP switch
#8 (9) should be in the position off. Now if any of the buttons is not pressed for more
than approximately 25 seconds the display is switched off. As soon as one of the
buttons is pressed again, the display switches on immediately. In this case the first
touch of the button is ignored in respect to the normal function of that button.
■Key lock
Pressing the MODE button (5) for longer than 3 seconds locks all the buttons (5-7) and
the rotary control (1). The display shows “LOC” in alteration to the mode (changing
every 2 seconds). Pressing the MODE button again for more than 3 seconds unlocks
the button- and rotary control-functions. Please note: If the display is in OFF-mode it
will take approximately 25 seconds before the display switches off. It will be switched
on again if any key is touched and will switch off again after 25 seconds if the keys are
not unlocked by the procedure mentioned above.
■Termination
To avoid interference the last unit of a DMX-chain should be terminated. Therefore the
DIP switch #3 (9) of the last unit in the DMX-chain must be switched ON.
■Software Maintenance (Boot loader)
The Maintenance (boot loader) function enables the unit to receive firmware updates
via the DMX connectors. This function is activated by DIP switch #2 (9). Please note
that use of this function and installation of a firmware update must be expedited by an
authorized service centre, please contact your dealer for details.
■Switch on condition
The unit always returns to the last mode before it was switched off. In DMX Slave “SLA”
or DMX Mode “d” or DMX Preset Mode “P” all DMX values are cleared if power is
switched off.
■DMX signal drop condition
The device will retain the status that it was in before the DMX signal got lost, but
potential tact settings will be automatically cleared.

User Manual: LS4195 DMX-controlled RGB LED 4-Spot T-Bar
V1.00 (01-2010) © Multiform Lighting 14
Dynamic Configuration – chasers (CH3 ≥50)
CH1: Pattern, with following mapping:
DMX from DMX to Mapping DMX from DMX to Mapping
000 013 Pat1 switch 122 134 Pat1 fade
014 026 Pat2 switch 135 148 Pat2 fade
027 040 Pat3 switch 149 161 Pat3 fade
041 053 Pat4 switch 162 175 Pat4 fade
054 067 Pat5 switch 176 188 Pat5 fade
068 080 Pat6 switch 189 202 Pat6 fade
081 094 Pat7 switch 203 215 Pat7 fade
095 107 Pat8 switch 216 229 Pat8 fade
108 121 Pat9 switch 230 242 Pat9 fade
243 255 Pat10 fade
CH2: Brightness
CH3: Speed
CH4: Strobe speed
CH5: Strobe pattern, with the following mapping:
DMX from DMX to Mapping DMX from DMX to Mapping
000 042 All on 128 170 Run right
043 085 in / out 171 213 Run left
086 127 left / right 214 255 Random
■Foot switch operation
Some of the main functions of the LS4195 MultiBar DMX-controlled RGB LED 4-Spot
T-Bar can be remotely operated by means of the Multiform LC400F Foot switch. Please
note that ONLY THIS footswitch is compatible with the LS4195 MultiBar DMX-
controlled RGB LED 4-Spot T-Bar – do not use other footswitches, this may damage
the unit. The 4 foot pads on the LC400F control the LS4195 MultiBar DMX-controlled
RGB LED 4-Spot T-Bar as follows:
BLACKOUT: A single tap on this pad switches off all LEDs (blackout). A second tap
switches the unit back to previous operative status.
RUN/ALL-ON: Consecutive steps on this pad changes the mode of the LS4195
MultiBar DMX-controlled RGB LED 4-Spot T-Bar in y cycle from A to C to CP to F and
then back to A.
FUNCTION: Stepping on the this pad activates the strobe mode for as long as the pad
is pushed down.
TAP/MOOD: Stepping on the this pad switches the colour mood to the next preset.
Consecutive steps cycle through all available colour moods.
User Manual: LS4195 DMX-controlled RGB LED 4-Spot T-Bar
V1.00 (01-2010) © Multiform Lighting 3
General advice:
1. Read this manual completely before using the product.
2. Keep this manual in your records for future reference.
3. Follow all instruction printed in this manual, otherwise warranty
may be void.
4. Follow all printed security advice on the product itself. The lighting
flash with arrowhead within an equilateral triangle makes you
aware of non-insulated AC mains voltage inside the unit. The
exclamation mark within an equilateral triangle makes you aware of
important operating and maintenance instructions in the literature
attached to this product.
5. Take care of enough distance between this product and sources of
hum and noise like electric motors and transformers.
6. Carry this product with greatest care. Punches, big forces and
heavy vibration may damage this product mechanically.
7. The manufacturer takes no responsibility for injury or damage
caused by not following the safety precautions and instructions
printed in this manual.
Warning! Class 1M LED product.
1. Do not look into the beam from a distance of less than 40 cm (16
inches).
2. Do not stare into the beam for extended periods at a short
distance.
3. Do not view the beam directly with optical instruments such as
magnifiers.
Protection from electric shock:
1. Do not connect the AC power plug to the unit before assembly has
been completed.
2. Only connect this unit to a mains socket outlet with protective earth
connection, ground-fault (earth-fault) protection and overload
protection.
3. Where the mains plug or an appliance coupler is used as a dis-
connect device, the disconnect device shall remain readily
operable.
4. To pull the AC Cord out of the wall outlet or the unit’s AC socket,
never pull the cable itself, but only the AC plug.
5. Disconnect the unit from AC supply by pulling the AC plug out of
the wall outlet or the unit’s AC socket before any kind of cleaning
on the product. Use smooth and dry cloth only for cleaning. Check
all connection cables before reconnecting the unit.
6. Do not expose this unit to any dripping or splashing liquids, and do
not place objects filled with liquids, such as vases, on the unit. Do
not operate this unit near to open water or in high humidity.
7. Choose the position of the AC cord according to the lowest risk of

User Manual: LS4195 DMX-controlled RGB LED 4-Spot T-Bar
V1.00 (01-2010) © Multiform Lighting 4
damage by foot steps or by squeezing it. Take especially care of
the AC cord outlet on the unit as well as the AC plug and wall outlet
at the other end of the cable.
8. Do not open the unit for service purpose, as there are no user-
serviceable parts inside. Warranty will be void in any case of
unauthorized service by the user or other not authorized persons.
Protection from fire:
1. Take care of not placing the unit near sources of heat (e.g.
powerful amplifiers, fog machines).
2. Allow at least about 6” (15cm) between this unit and other devices
or a wall to allow for proper cooling.
3. Be sure this fixture is kept at least 0.5m away from any flammable
materials (decoration etc.).
4. Do not stick filters, masks or other materials directly on the LEDs or
the LED cover screen.
5. Take always care of sufficient air convection in the unit’s
environment to avoid overheating, especially when mounting in a
closed environment. Make sure air convection slots are not
blocked. Do not operate this unit in environmental temperatures
exceeding 35 degrees Celsius.
6. Check the total maximum power of your AC wall outlet if you
connect several units to one wall outlet and avoid any overloading.
Protection from injury and damage:
1. Never use any accessories or modifications not authorized by the
manufacturer of this unit.
2. Choose a location for operation where the unit is protected from
vibration and where a fixed mounting position is provided. In case
of overhead-mounting, follow appropriate rigging rules and your
country’s regulations for rigging safety. See appendixes if any.
3. Before plugging the AC cord in the wall outlet, check whether the
AC mains voltage and frequency is the same as this product is
specified for. Whenever your AC plug should not match the wall
outlet, contact you dealer immediately.
4. If fluids have spilled into the unit or small parts have intruded the
unit, immediately switch off the unit and hand it over to the
authorized service for a security check.
5. Disconnect the unit from AC supply by pulling the AC plug out of
the wall outlet or the unit’s AC socket during a thunder-storm in
order to avoid any damage on the unit due to AC voltage peaks.
6. In cause of not correct function of this unit or damaged AC cord or
other damaged parts, pull immediately the AC plug out of the wall
outlet and hand the unit over to the authorized service for a
security check.
7. To meet all aspects of functionality and security during mainte-
User Manual: LS4195 DMX-controlled RGB LED 4-Spot T-Bar
V1.00 (01-2010) © Multiform Lighting 13
Addressing has to be done as follows:
001 first device (CH1-16)
017 second device (CH17-32)
033 third device (CH33-48) and so on.
The DMX channel setting is stored even when the device is switched off.
“P” Mode (DMX Preset Mode)
Press the MODE button (5) until the display shows “P”, indicating that the unit is on “P”
(DMX Preset) mode. This mode allows you to remotely control the internal presets by
an external DMX controller. In this mode, the unit receives DMX values on a packet of
five channels, and mirrors the received data on the DMX output. Depending on whether
CH3 is set to <50 or ≥50, the five channels control the unit either in static or dynamic
(chaser) configuration as follows:
Static Configuration – fixed colours (CH3 < 50)
CH1: colour / colour pattern with following mapping:
DMX from DMX to Mapping DMX from DMX to Mapping
000 008 C01 133 141 C16
009 017 C02 142 150 C17
018 026 C03 151 158 C18
027 035 C04 159 167 C19
036 044 C05 168 176 CP0
045 052 C06 177 185 CP1
053 061 C07 186 194 CP2
062 070 C08 195 203 CP3
071 079 C09 204 211 CP4
080 088 C10 212 220 CP5
089 097 C11 221 229 CP6
098 105 C12 230 238 CP7
106 114 C13 239 247 CP8
115 123 C14 248 255 CP9
124 132 C15
CH2: Brightness
CH3: <50, unused
CH4: Strobe speed
CH5: Strobe pattern, with following mapping:
DMX from DMX to Mapping DMX from DMX to Mapping
000 042 All on 128 170 Run right
043 085 in /out 171 213 Run left
086 127 left / right 214 255 Random

User Manual: LS4195 DMX-controlled RGB LED 4-Spot T-Bar
V1.00 (01-2010) © Multiform Lighting 12
“d” Mode (DMX Mode)
Press the MODE button (5) until the display shows “dxx”, indicating that the unit is on
“d” (DMX) mode. In this mode, the unit receives DMX values on a packet of sixteen
channels starting from a chosen start address, and mirrors the received data on the
DMX output. The display, alternating with “d”, will show the chosen DMX start address
which can be adjusted by means of the UP and DOWN buttons (5/6). The sixteen
channels control the unit as follows:
CH1: Spot 1/Red intensity
Ch2: Spot 1/Green Intensity
CH3: Spot 1/Blue intensity
CH4: Spot 1/ values
000-127 = Master dimmer (overall weighting to the values received on
CH1/2/3), Strobe off
128-227 = Strobe (128= slow / 227= max. speed 23 Hz)
228-255 = Master dimmer full on, Strobe off
CH5: Spot 2/Red intensity
Ch6: Spot 2/Green Intensity
CH7: Spot 2/Blue intensity
CH8: Spot 2/ values
000-127 = Master dimmer (overall weighting to the values received on
CH5/6/7), Strobe off
128-227 = Strobe (128= slow / 227= max. speed 23 Hz)
228-255 = Master dimmer full on, Strobe off
CH9: Spot 3/Red intensity
Ch10: Spot 3/Green Intensity
CH11: Spot 3/Blue intensity
CH12: Spot 3/ values
000-127 = Master dimmer (overall weighting to the values received on
CH9/10/11), Strobe off
128-227 = Strobe (128= slow / 227= max. speed 23 Hz)
228-255 = Master dimmer full on, Strobe off
CH13: Spot 4/Red intensity
Ch14: Spot 4/Green Intensity
CH15: Spot 4/Blue intensity
CH16: Spot 4/ values
000-127 = Master dimmer (overall weighting to the values received on
CH13/14/15), Strobe off
128-227 = Strobe (128= slow / 227= max. speed 23 Hz)
228-255 = Master dimmer full on, Strobe off
Activating DIP switch #4 (9) allows to reverse the DMX channel assignment to the
spots, so that Spot 4 is controlled by CH1-4, Spot 3 by CH5-8, Spot 2 by CH9-12 and
Spot 1 by CH13-16.
In this mode, the rotary control (1) is disabled. Also the settings of the DIP switches
5/6/7 (9) are disabled. To indicate that the unit is controlled by an external DMX signal,
the DMX/CH LED is lit.
User Manual: LS4195 DMX-controlled RGB LED 4-Spot T-Bar
V1.00 (01-2010) © Multiform Lighting 5
nance work to be preformed on this unit, all parts should be
replaced by genuine spare parts. Consequently, take care of your
dealer or maintenance company to be authorized by the
manufacturer.
■Health advice
This unit produces and absorbs electromagnetic radiation. The strength of radiation and
the sensitivity for disturbing interference matches the CE and FCC requirements. A
corresponding sign is printed on the backside of the unit. Any change or modification
may affect the behavior of the unit concerning electromagnetic radiation, with the CE
requirements eventually not to be met any more. The manufacturer takes no
responsibility in this case.
■Functional advice
This unit is immune to the presence of electromagnetic disturbances – both conducted
and radiated - up to a certain level. Under peak conditions, the unit is classified to show
a “class C” performance criteria and may encounter temporary degradation or loss of
function which may need manual help to recover. In such case, disconnect the AC
power from the unit and reconnect it again to recover.
■Environmental advice
This unit is build to conform to the ROHS standards and the WEEE
directive 2002/96/EC of the European Parliament and of the Council of
the European Union. Under these regulations, the product shall not be
discarded into regular garbage at the end of its life, but shall be returned
to authorized recycling stations.
■Unpacking
Please check that the box contains the following items:
Main parts: 1 pcs. LS4195 main unit
1 pcs. Flightcase
1 pcs. AC cord
1 pcs. operation manual
If any part is missing, please contact your dealer immediately for replacement.

User Manual: LS4195 DMX-controlled RGB LED 4-Spot T-Bar
V1.00 (01-2010) © Multiform Lighting 6
■Getting started: choosing a location
Risk of fire: The LS4195 MultiBar DMX-controlled RGB LED 4-Spot T-
Bar has been designed to work in dry indoor environments at
environmental temperatures up to 35 degrees Celsius. For proper
operation, the unit must be operated with unobstructed air convection to
its outside metal case.
Do not:
- Operate the LS4195 MultiBar DMX-controlled RGB LED 4-Spot T-Bar in
environments with more than 35 degrees environmental temperature or more
than 75% relative humidity.
- Operate the LS4195 MultiBar DMX-controlled RGB LED 4-Spot T-Bar in any
closed environment smaller than 10cbm, unless forced air convection is
provided.
■Getting started: secure mounting
Tripod Mounting
The LS4195 MultiBar DMX-controlled RGB LED 4-Spot T-Bar is mainly designed to be
mounted on a tripod with 35mm tube diameter. Make sure that the diameter of the
inserted tripod tube is not less than 35mm as otherwise secure mounting can not be
guaranteed. Slide the tripod adaptor over the tripod tube and secure the unit with the
provided screw handle. Further, make sure that:
•The tripod is erected to a height where the audience can neither accidently nor
intentionally touch the unit
•The working height is in enough distance to ceiling or other constructions on
top to avoid any heat accumulation
•The working load of the used tripod is sufficient to carry this unit. Do only use
safety-certified tripods.
•The tripod has a locking mechanism against unintentional tube retraction.
•The tripod stands on even and firm ground.
•Any cable running to and from the tripod is not obstructing pathways of the
audience. Make sure pull force on a cable can not make the tripod fall over.
•The tripod base is either out of audience reach or gated with a security fence
•The tripod is placed outside of any evacuation paths.
Risk of injury: Tripod mounting requires related knowledge and
experience, including among others correct positioning and securing,
and periodic safety inspection of all installation material and the tripod. If
you lack such qualifications, do not attempt a tripod installation yourself.
Improper installation can result in body injury. Be sure to complete all
rigging and installation procedures before applying power to the unit.
User Manual: LS4195 DMX-controlled RGB LED 4-Spot T-Bar
V1.00 (01-2010) © Multiform Lighting 11
“CP” Mode (Colour Pattern / DMX Master)
Press the MODE button (5) until the display shows “CPx”, indicating that the unit is on
“CP” (Colour Pattern) mode. In this mode, the unit does not receive any values from the
DMX input but generates its own combination of mixed colours (choice of 10
combinations), while being dimmable by the rotary control (1). The 4 panels show
different colours. The unit creates related DMX values on the output with channels
001 to 012 so that similar units can show the same colour if they are connected by
DMX and set to slave mode (see DMX channel assignment under “notes”). The actual
colour pattern can be chosen by means of the UP and DOWN buttons (5/6) from the
options in the below table; depending on the setting of DIP switch #5 (9), the changes
become effective immediately or with a soft fade-in.
Colour Pattern table
Display Spot 1 Spot 2 Spot 3 Spot 4
CP0 Blue Red Blue Red
CP1 Candy Lime Candy Lime
CP2 Blue Green Blue Green
CP3 Lime Turquoise Lime Turquoise
CP4 Orange Marine Orange Marine
CP5 Yellow Lavender Lavender Yellow
CP6 Frog Red Red Frog
CP7 Orange Purple Purple Orange
CP8 Yellow Marine Yellow Marine
CP9 Red Green Red Green
Switching into “CP” mode will recall the last chosen colour preset.
“SLA” Mode (DMX Slave)
Press the MODE button (5) until the display shows “SLA”, indicating operation in “SLA”
(SLAVE) mode. In this mode, the unit receives DMX values on a packet of twelve DMX
channels starting from 001, and mirrors the received data on the DMX output. Main
purpose is to receive a signal from a master-unit of the Multiform LS4195 being in
mode “F”, "A", "C" or “CP”. In this mode, the rotary control (1) and the DIP switches #5-
#8 (9) are disabled. To indicate that the unit is controlled by an external DMX signal,
the DMX LED (3) is lit. The assignment of the twelve channels is as follows:
CH 1 Spot1 /red intensity CH7 Spot3/red intensity
CH2 Spot1/green intensity CH8 Spot3/green intensity
CH3 Spot1/blue intensity CH9 Spot3/blue intensity
CH4 : Spot2/red intensity CH10 Spot4/red intensity
CH5 Spot2/green intensity CH11 Spot4/green intensity
CH6 Spot2/blue intensity CH12 Spot4/blue intensity

User Manual: LS4195 DMX-controlled RGB LED 4-Spot T-Bar
V1.00 (01-2010) © Multiform Lighting 10
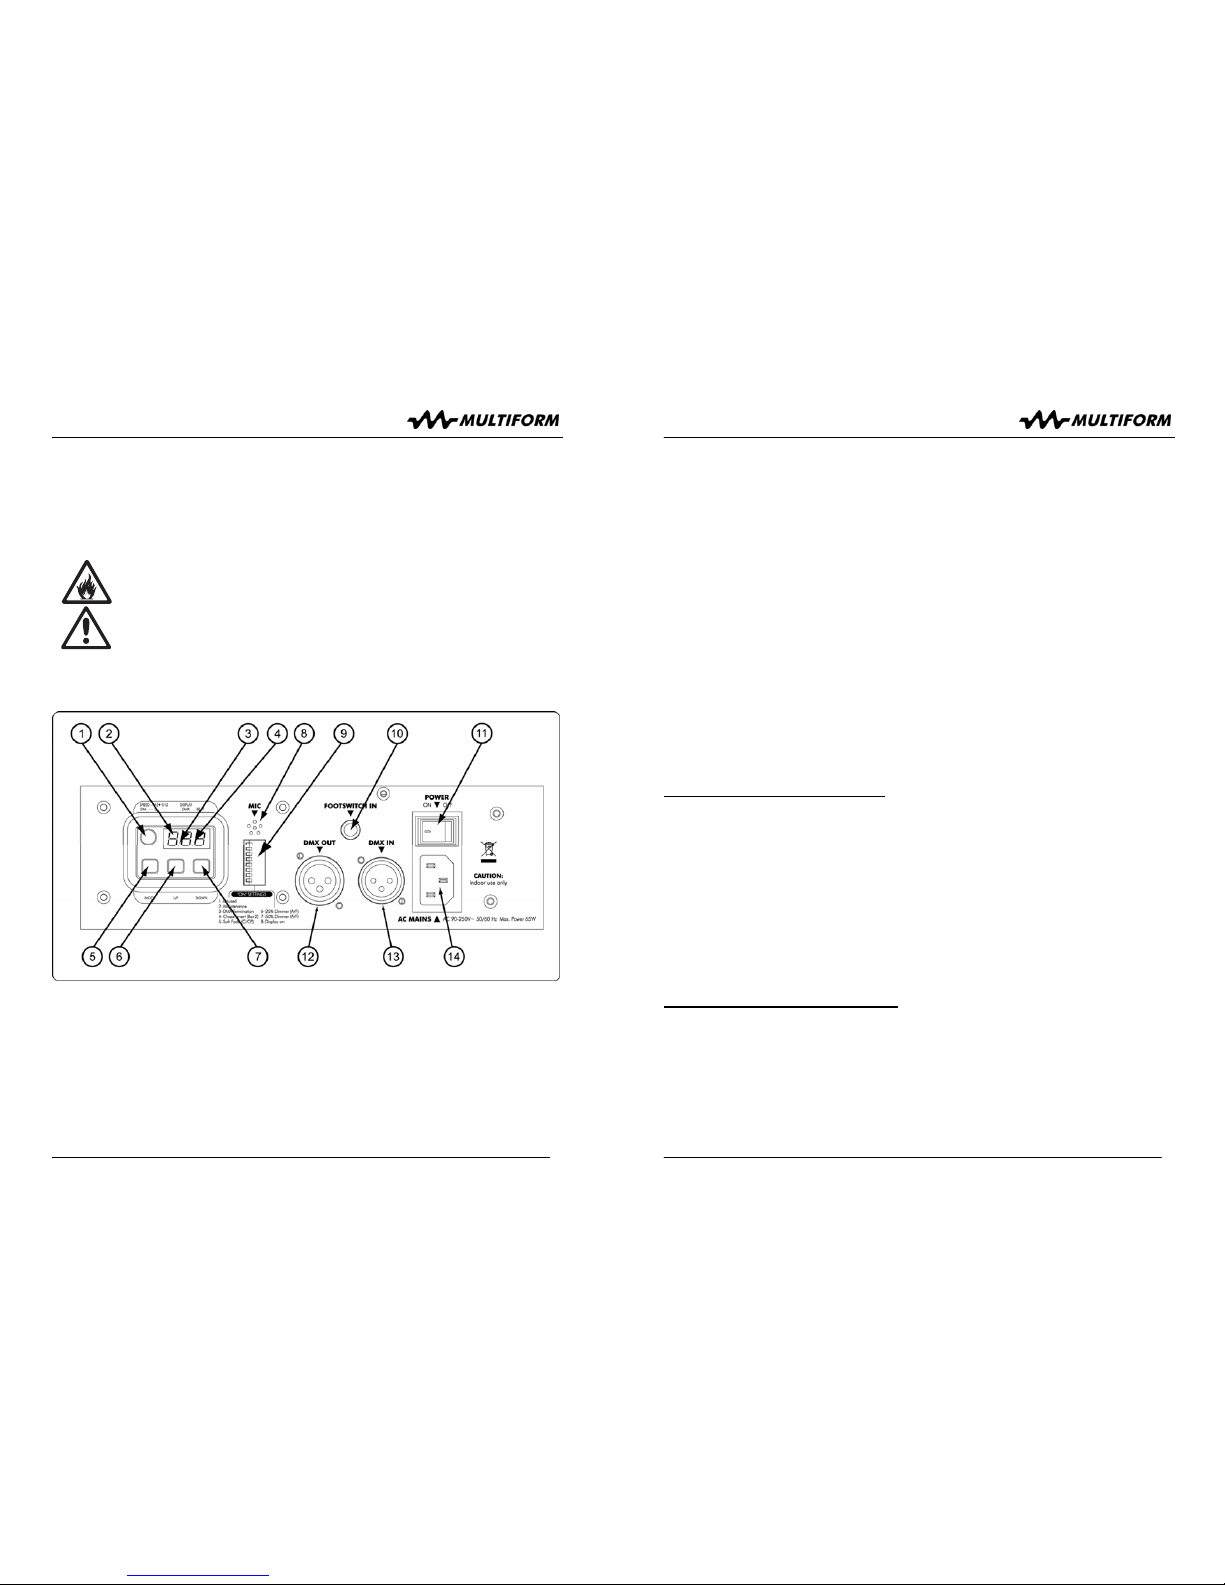
control (1). If the rotary control is set inside the left 10 degrees of its turning angle, the
unit operates in S2L (sound-to-light) mode and the pattern will progress based on the
audio signal picked up by the internal microphone (8); note that pattern 33 is excepted
from this. In this case, the middle decimal point LED (4) flashes with the beat of the
music. The actual pattern can be chosen by means of the UP and DOWN buttons (5/6)
from 33 available internal options (pattern 01-26: chase patterns, pattern 27-33 strobe
patterns).
Switching into “A” mode will recall the last chosen chase preset.
“C” Mode (Colour Preset / DMX Master)
Press the MODE button (5) until the display shows “Cxx”, indicating that the unit is on
“C” (Colour Preset) mode. In this mode, the unit does not receive any values from the
DMX input but generates its own mixed colours (choice of 19 + white), while being
dimmable by the rotary control (1). All 4 panels show the same colour. The unit creates
related DMX values on the output with channels 001 to 012 so that similar units can
show the same colour if they are connected by DMX and set to slave mode (see DMX
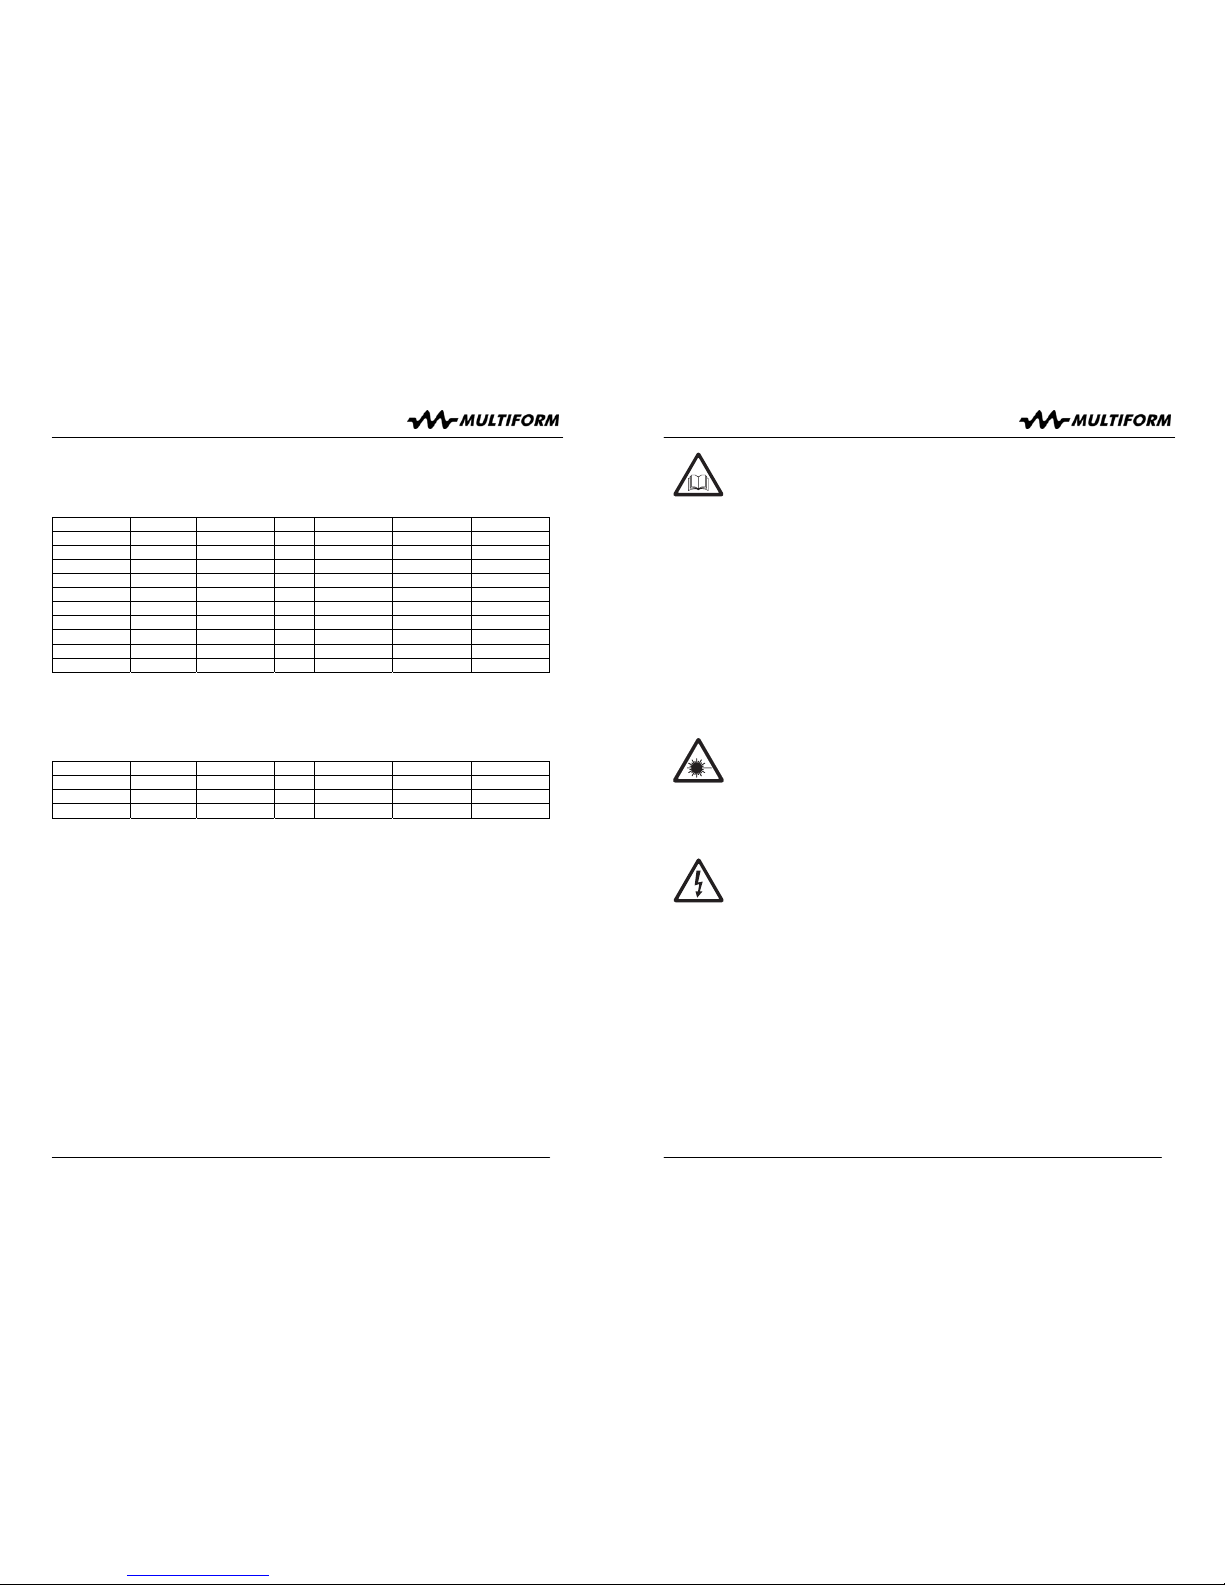
channel assignment under “notes”). The actual colour can be chosen by means of the
UP and DOWN buttons (5/6) from the options in the below table; depending on the
setting of DIP switch #5 (9), the changes become effective immediately or with a soft
fade-in.
Colour table
Display Spot 1 Spot 2 Spot 3 Spot 4
C00 OFF OFF OFF OFF
C01 Red Red Red Red
C02 Green Green Green Green
C03 Blue Blue Blue Blue
C04 Yellow Yellow Yellow Yellow
C05 Pink Pink Pink Pink
C06 Turquoise Turquoise Turquoise Turquoise
C07 Lime Lime Lime Lime
C08 Orange Orange Orange Orange
C09 Marine Marine Marine Marine
C10 Frog Frog Frog Frog
C11 Lavender Lavender Lavender Lavender
C12 Candy Candy Candy Candy
C13 Peach Peach Peach Peach
C14 Aqua Aqua Aqua Aqua
C15 Leaf Leaf Leaf Leaf
C16 Purple Purple Purple Purple
C17 Barbie Barbie Barbie Barbie
C18 Breeze Breeze Breeze Breeze
C19 White White White White
Switching into “C” mode will recall the last chosen colour preset.
User Manual: LS4195 DMX-controlled RGB LED 4-Spot T-Bar
V1.00 (01-2010) © Multiform Lighting 7
Hanging/Rigging, Truss Mounting
As an alternative to tripod mounting, the LS4195 MultiBar DMX-controlled RGB LED 4-
Spot T-Bar can be truss-mounted by means of two M10 mounting points which are
located on the top of the unit. In case of permanent use of these mounting points
instead of tripod-mounting, you may way to remove the tripod adaptor.
Risk of injury: Overhead mounting requires extensive experience,
including among others calculating working load limits, good knowledge
of the installation material being used, and periodic safety inspection of
all installation material and the unit. If you lack such qualifications, do
not attempt the installation yourself. Improper installation can result in
body injury. Be sure to complete all rigging and installation procedures
before applying power to the unit.
•Attach C-Hooks or other safety approved rigging equipment to the two M10
mounting points in top of the unit. Note that the M10 screws used are not allowed
to protrude more than 10mm into the inside of the unit.
•Install the unit to truss, ceiling, wall or wherever desired.
•The unit should be installed out of reach of people and outside areas where
persons may walk by or be seated.
•Make sure that the installation area can hold a minimum point load of 10 times the
device’s weight.
•In fixed installations, fix the unit with self-locking screws/nuts to the mounting point.
•When mounting the unit to truss be sure to secure an appropriately rated clamp to
the hanging yoke using a M10 screw fitted through the center hole of the hanging
yoke.
•It may be necessary to secure the installation with an appropriate safety cable,
fixed to an individual, separate mounting point. Be sure to only use a designated
rigging point for the safety cable - never secure a safety cable to any other point
like a carrying handle etc.
•Always use a certified safety cable that can hold 12 times the weight of the device
when installing the unit. This secondary safety attachment should be installed in a
way that no part of the installation can drop more than 20cm if the main attachment
fails.
•Never stand directly below the device when mounting, removing, or servicing the
fixture. Make sure the area below the installation place is free from unwanted
persons during rigging, de-rigging and servicing.
•The operator has to make sure that the safety-relating and machine-technical
installations are approved by an expert before using them for the first time. The
installations should be inspected every year by a skilled person to be sure that
safety is still granted.
•Make sure to comply with cooling requirements of the used power supply if any.

User Manual: LS4195 DMX-controlled RGB LED 4-Spot T-Bar
V1.00 (01-2010) © Multiform Lighting 8
■Getting started: making AC supply connections
Set up connections as follows:
•Make DMX connections to the required control equipment
•Connect the supplied mains cable to the AC inlet (7) of the unit and to an AC
wall outlet on the other side.
Risk of fire / Safety risk: The AC socket providing power to the
LS4195 MultiBar DMX-controlled RGB LED 4-Spot T-Bar must be
properly and separately earthed. Do not use any other AC cords than
the provided one or any other AC cord authorized by the manufacturer
■Operation
User interface overview:
1 Rotary Control:
In A- and F-Mode: Speed Control
In C- and CP-Mode: Dimming-Control
2 Display showing the Mode, DMX-address, LOC-function etc.
3 Indicates presence of a DMX signal
4 Indicates the sound-activated mode (internal microphone)
5 MODE selection button
User Manual: LS4195 DMX-controlled RGB LED 4-Spot T-Bar
V1.00 (01-2010) © Multiform Lighting 9
6 UP-button
7 DOWN-button
8 Internal microphone
9 DIP-Switches with following functions (from bottom):
1 * not used *
2 Maintenance Mode (for firmware upgrades)
3 DMX Termination
4 Chase Invert (for 2nd bar)
5 Soft Fade for program change in C/CP-Mode
6 Brightness reduction by 25% in A-/F-Modes
7 Brightness reduction by 50% in A-/F-Modes
8 Display on
10 Footswitch input for connecting LC400F
11 Power on/off switch
12 DMX-Output connector
13 DMX-Input connector
14 Power-Input 90-250V AC
Upon the user’s choice, the unit can work stand-alone or may be controlled by external
DMX-controllers. Available modes:
“F” Mode (Auto Fade / DMX Master)
Press the MODE button (5) until the display shows “Fxx”, indicating that the unit is on
“F” (Auto Fade) mode. In this mode, the unit does not receive any values from the DMX
input but generates its own chases and creates related DMX values on the output with
channels 001 to 012, so that similar units can show the same chase pattern if they are
connected by DMX and set to slave mode (see DMX channel assignment under
“notes”). The level at all programs is either 50%, 75% or 100% depending on the DIP
switch settings #6 and #7 (9). The speed of the program will depend on the setting of
the rotary control (1). The actual pattern can be chosen by means of the UP and
DOWN buttons (5/6) from 30 available internal options.
Switching into “F” mode will recall the last chosen chase preset.
“A” Mode (Auto Switch / DMX Master)
Press the MODE button (5) until the display shows “Axx”, indicating that the unit is on
“A” (Auto Switch) mode. In this mode, the unit does not receive any values from the
DMX input but generates its own chases and creates related DMX values on the output
with channels 001 to 012 so that similar units can show the same chase pattern if they
are connected by DMX and set to slave mode (see DMX channel assignment under
“notes”). The level at all programs is either 50%, 75% or 100% depending on the DIP
switch settings (No. 5+6). The speed level can be set by the potentiometer (see speed
table under “notes”). The speed of the program will depend on the setting of the rotary
Table of contents
Popular Lighting Equipment manuals by other brands

JB Systems
JB Systems LED Marvel Operation manual

Saxby Lighting
Saxby Lighting Louvre Photocell installation manual

Electus Distribution
Electus Distribution KJ-8910 Assembly and instruction manual

Larson Electronics
Larson Electronics HAL-16C-185LED-CPR-100 instruction manual

LIGMAN
LIGMAN KWH-50002 installation manual

Kampa
Kampa Groove Light Installation and operating manual