Ag/MIT/IGB-2413-10/16 Rev 1.0
2
MWI
Side Wall Inlet
Quick Installation Guide
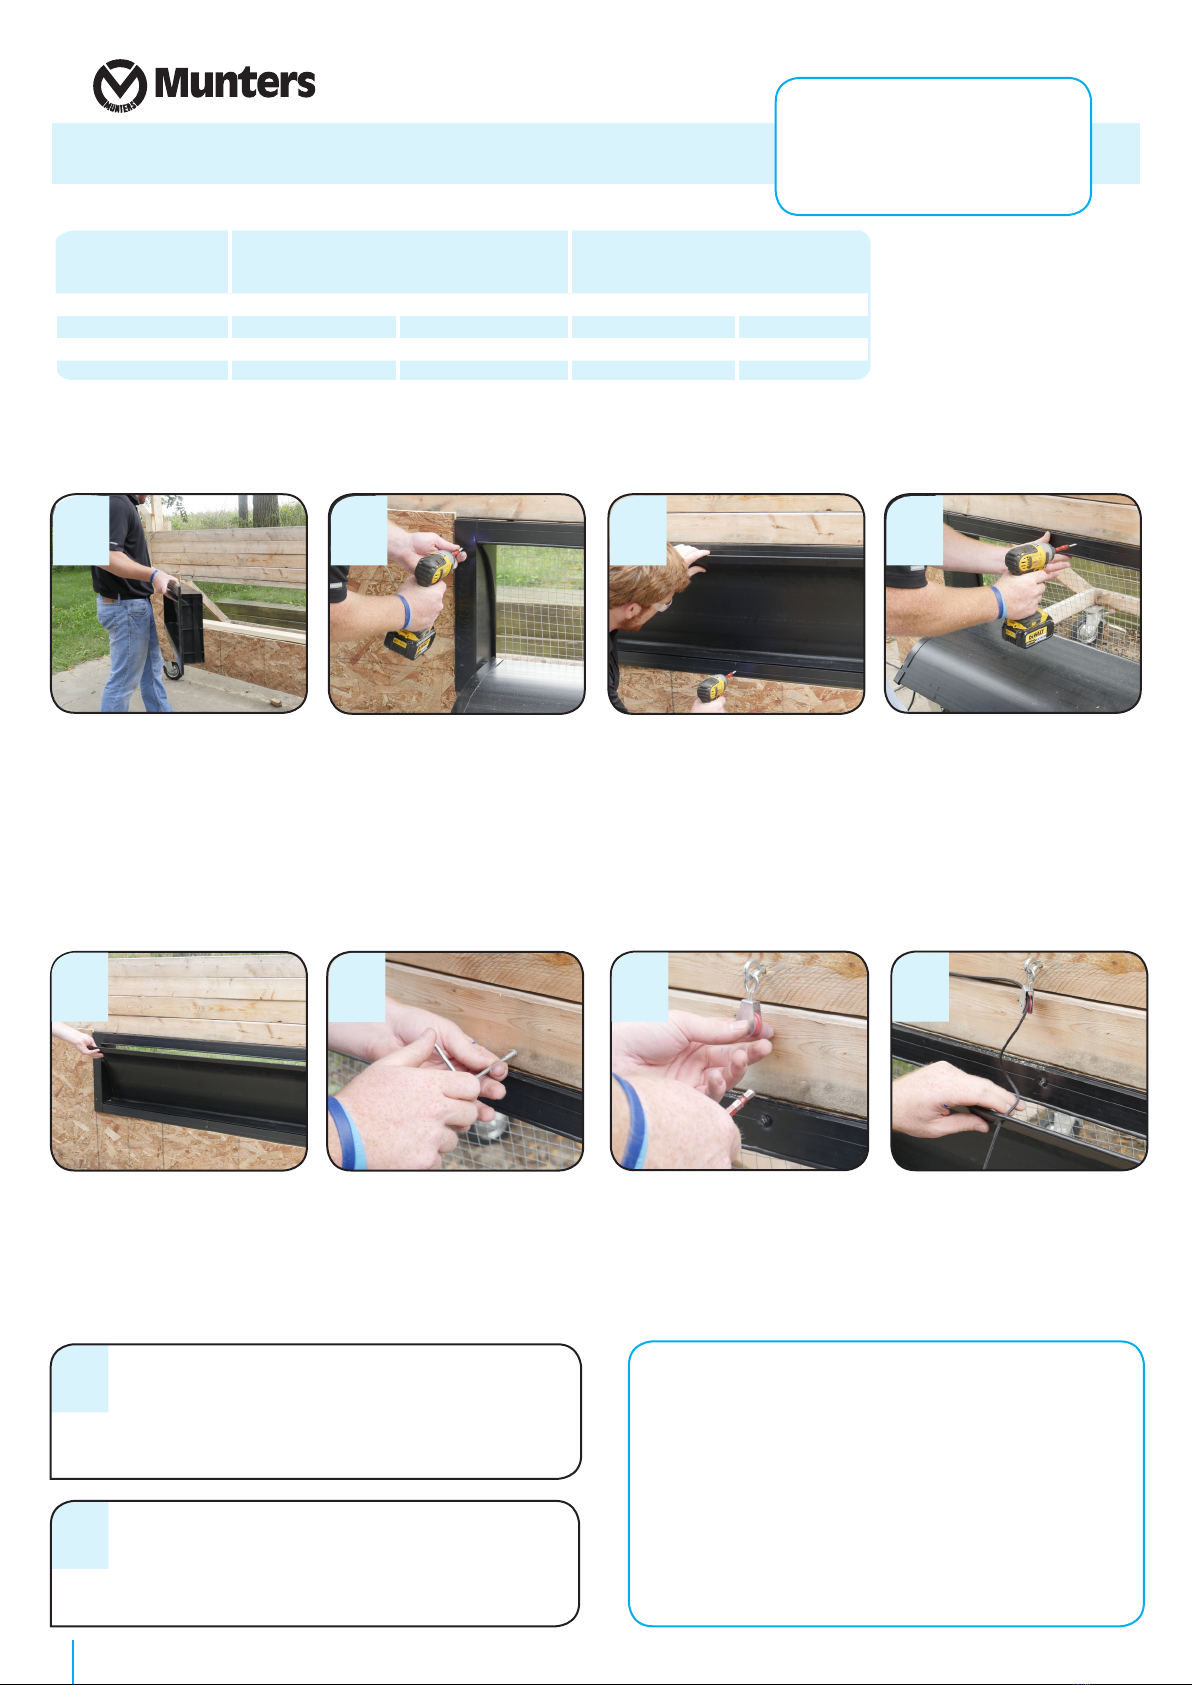
Place the inlet into framed
opening. NOTES: the opening size
is critical! Leave always a gap of
0.2inch or 5mm evenly distributed
around the unit.
Fasten the left and right lateral
side support using appropreite
screws (2-inch or 5 cm). NOTES:
Fastening points are marked on both
supports. Screws and fittings are
not included, Choose screws and
fittings that are suited to the material
in the wall and have sufficient
holding power. If uncertain, contact
Munters.
Fasten the bottom header
profile using appropriate screw.
NOTES: Fastening should be done in
the center, on the marked line. Make
sure the bottom header is straight
(linear) when fastening.
Push slightly up on the top
header center, 0.25 inch or 0.6
cm. needed difference.Fasten
the top header profile using
appropriate screw. NOTES:
Make sure the slight curvature of
approximately 0.25 inch or 0.6 cm is
achieved before fastening. Fastening
should be done in the center, on the
marked line.
Verify the correct movement,
opening and closing of the inlet.
Fasten the (2) L-Screw hooks
evenly spaced above header.
Place 0.5 inch or 1.2 cm above
the top header, opposite to the
direction of pull.
NOTES: Avoid interference with the
pulling cable or rod.
Install a small pulley at the top
of the inlet. NOTES: Pulley or fitting
are not included. Choose pulleys
that are suited to the type of system
or wall and have sufficient holding
power. If uncertain , contact Munters.
12 3 4
567
Pass the string through the
hole in the curved louver then
through the pulley, twords the
direction of pulling force. Fix
the string to the main pull cable
or rod using clamp.
8
Item Inlet Size Framed Opening Size
Should be 0.5inch or 1.2cm
larger than the inlet size
W x H x D W x H (±0.06inch or ±0.2cm)
Black inch cm inch cm
MWI 4413 B 44 x 13 x 4 111.8 x 33 x 10 44.5 x 13.5 113 x 34.3
MWI 4408 B 44 x 8.25 x 4 111.8 x 21 x 10 44.5 x 8.75 113 x 22.2
9
10 After the actuator & wire-rope or rod system are
installed, re-adjust all MWI properly to assure correct
opening and closing.
Caulk all sides four internal edges of the MWI after
installation using a caulk gun. NOTE: Mounting hardware,
silicone and caulk gun are not included.WARNING: Do not
use expandable foam to seal the edges of MWI! The use of
expandable foam can result in damage of MWI.
Australia Munters Pty Limited, Phone +61 2 6025 6422, Brazil Munters Bra-
sil Industria e Comercio Ltda, Phone +55 41 3317 5050, Canada/US Munters
Corporation Mason, MI Phone +1 517 676 7070, China Munters Air Treatment
Equipment (Beijing) Co. Ltd, Phone +86 10 80 481 121, Denmark Munters A/S,
Phone +45 9862 3311, India Munters India, Phone +91 20 3052 2520, Indone-
sia Munters, Phone +62 818 739 235, Italy Munters Italy S.p.A., Chiusavecchia,
Phone +39 0183 52 11, Japan Munters K.K., Phone +81 3 5970 0021, Korea
Munters Korea Co. Ltd., Phone +82 2 761 8701, Mexico Munters Mexico, Phone
+52 818 262 54 00, Russia Munters AB, Phone +7 812 448 5740, Singapore
Munters Pte Ltd., Phone +65 744 6828, South Africa and Sub-Sahara Countri-
es Munters (Pty) Ltd., Phone +27 11 997 2000, Spain Munters Spain S.A., Phone
+34 91 640 09 02, Sweden Munters AB, Phone +46 8 626 63 00, Thailand
Munters Co. Ltd., Phone +66 2 642 2670, Turkey Munters Form Endüstri Sistem-
leri A.Ş, Phone +90 322 231 1338, USA Munters Corporation Lansing, MI Phone
+1 517 676 7070, Vietnam Munters Vietnam, Phone +84 8 3825 6838, Export
& Other countries Munters Italy S.p.A., Chiusavecchia Phone +39 0183 52 11


