manuals.online logo
Brands
  1. Home
  2. •
  3. Brands
  4. •
  5. Muscle Rack
  6. •
  7. Indoor Furnishing
  8. •
  9. Muscle Rack CR3618 User manual

Muscle Rack CR3618 User manual

This manual suits for next models

3

Other Muscle Rack Indoor Furnishing manuals

Muscle Rack GRW60 - 4 Operator's manual

Muscle Rack

Muscle Rack GRW60 - 4 Operator's manual

Muscle Rack MR301260PB4 User manual

Muscle Rack

Muscle Rack MR301260PB4 User manual

Muscle Rack MR3600 User manual

Muscle Rack

Muscle Rack MR3600 User manual

Popular Indoor Furnishing manuals by other brands

Regency LWMS3015 Assembly instructions

Regency

Regency LWMS3015 Assembly instructions

Furniture of America CM7751C Assembly instructions

Furniture of America

Furniture of America CM7751C Assembly instructions

Safavieh Furniture Estella CNS5731 manual

Safavieh Furniture

Safavieh Furniture Estella CNS5731 manual

PLACES OF STYLE Ovalfuss Assembly instruction

PLACES OF STYLE

PLACES OF STYLE Ovalfuss Assembly instruction

Trasman 1138 Bo1 Assembly manual

Trasman

Trasman 1138 Bo1 Assembly manual

Costway JV10856 manual

Costway

Costway JV10856 manual

moss DESIGN Caisson Credenza Assembly instructions

moss DESIGN

moss DESIGN Caisson Credenza Assembly instructions

Aquaglide FULL DECK 15.0 owner's manual

Aquaglide

Aquaglide FULL DECK 15.0 owner's manual

AREBOS AR-HE-SW30 user manual

AREBOS

AREBOS AR-HE-SW30 user manual

Till-Hilft Fulda 87005.330 Assembly instructions

Till-Hilft

Till-Hilft Fulda 87005.330 Assembly instructions

Twoey Outside 2010 quick start guide

Twoey Outside

Twoey Outside 2010 quick start guide

Hettich Easys 200 operating instructions

Hettich

Hettich Easys 200 operating instructions

The bedboss RELAX 404 Series owner's manual

The bedboss

The bedboss RELAX 404 Series owner's manual

Oeseder Möbelindustrie Bern 991 720 Assembly instructions

Oeseder Möbelindustrie

Oeseder Möbelindustrie Bern 991 720 Assembly instructions

Costway HW68469 user manual

Costway

Costway HW68469 user manual

Next ALIX A27743 Assembly instructions

Next

Next ALIX A27743 Assembly instructions

BROSA Hans Assembly guide

BROSA

BROSA Hans Assembly guide

Prodigg MINIKA PBA015T-FUR installation manual

Prodigg

Prodigg MINIKA PBA015T-FUR installation manual

manuals.online logo
manuals.online logoBrands
  • About & Mission
  • Contact us
  • Privacy Policy
  • Terms and Conditions

Copyright 2025 Manuals.Online. All Rights Reserved.

Safety Instructions
Safety Instructions
Safety Instructions
These units should be placed on a level surface. Failure to do so can result in poor product performance or create a
possible safety hazard. This unit should be securely anchored to a wall or floor with suitable fasteners, which are not
included. Do not use this unit for anything other than the manufactures intended purpose. DO NOT STAND ON ANY
PART OF THE UNIT, OR USE IT AS A LADDER. Evenly distribute the weight on each level and always keep the
heavier loads on the bottom. Use care when working with metal parts.
Heavy Duty
Steel Shelving
MODEL NUMBER
CR3618 - CR4824
CR3618-BLK - CR4824-BLK
D - Wood Shelf
A - Beams
B - Braces
C - Post
CR3618 5 Shelf
CR3618 5 Shelf
CR3618 5 Shelf -
-
-72”h x 18”d x 36”w
72”h x 18”d x 36”w
72”h x 18”d x 36”w
Description
A - Beams
B - Braces
C - Post
D - Wood Shelf
Qty.
10
10
8
5
Part Number
CBE3503 G/B
CBE1703 G/B
UPT3602S G/B
RPB21836
Part Size
35 3/4”
17 3/4”
36”
35 29/32”
General Instructions
Assembly is done with the rivets of the beams and braces fitting into the slots of the post. A rubber mallet may be used
on the beams and braces to seat the rivets properly. A hammer can also be used, providing one uses a cloth or a block
of wood between the hammer head and the parts to prevent damage. Tap gently and be sure the rivets are straight and
fully engaged.
Should you have any comments, damage, missing parts, or problems with assembly of this unit please feel
free to contact our Muscle Rack manufacturing facility at, (773) 475-3137 and request customer service.
We can also be reached on the internet at the following email address : service@edsal.com.
To obtain replacement parts, please provide the following information :
- Model # - Color - Part # & Description - Location Purchased - Date Purchased
Consumer Products Division
Edsal Manufacturing Company
4400 South Packers Avenue
Chicago, IL 60609 www.edsal.com
REV 1.2-A
CR4824 5 Shelf
CR4824 5 Shelf
CR4824 5 Shelf -
-
-72”h x 24”d x 48”w
72”h x 24”d x 48”w
72”h x 24”d x 48”w
Description
A - Beams
B - Braces
C - Post
D - Wood Shelf
Qty.
10
10
8
5
Part Number
CBE4703 G/B
CBE2303 G/B
UPT3602S G/B
RPB22448 G/B
Part Size
47 3/4”
24 3/4”
36”
47 29/32”
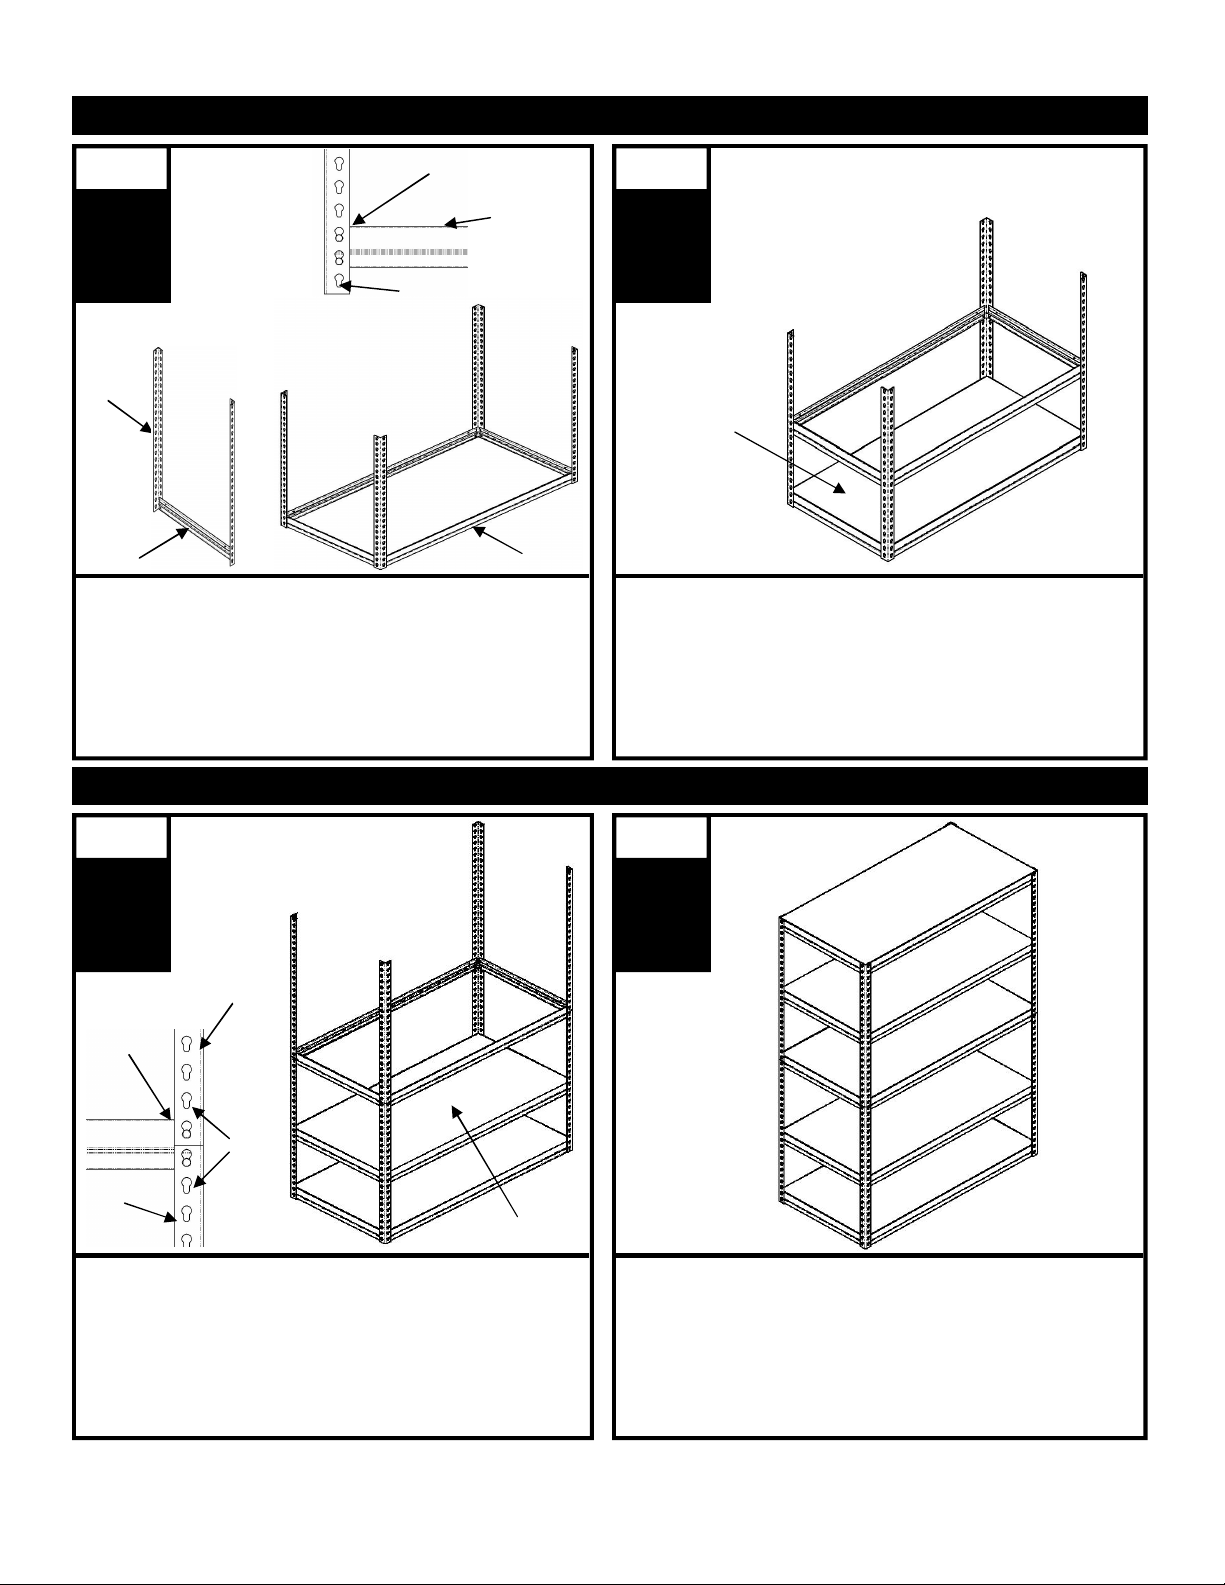
Assemble two (2) post with one (1) brace. Skipping one slot
from the bottom of the post (see figure A), place the rivets
into post with the slot pointing down, and with the shelf ledge
of the brace facing up (see figure B). Tap lightly to seat riv-
ets. Repeat with two (2) post and one (1) brace. Assemble
the two (2) post units with two (2) beams (see figure C). Skip
one hole from the bottom of post, tap lightly to seat rivets.
Assembly Instructions for CR3618 & CR4824
Start by adding a wood shelf to the level previously built,
then continue working by adding the second level using
two (2) beams and two (2) braces in the post slots of
your desired location. Again place the rivets of the
beams and braces into the post slots with the shelf
ledge facing up and tap lightly to seat the rivets.
IMPORTANT NOTE : Make sure all rivets are fully seated into the post slots.
Add a wood shelf to the previously built level, then as-
semble the top post to the bottom post by using two (2)
beams and two (2) braces. One (1) rivet from each beam
and brace must be placed in the top hole of the bottom
post, and the bottom hole of the top post (see figure D).
After all beams and braces are in place, tap lightly to
properly seat the rivets.
Add a wood shelf to the previously built level, then con-
tinue by adding the fourth and fifth level to the unit using
two (2) beams and two (2) braces per level. Tap lightly to
properly seat the rivets and add the final wood shelves to
the unit.
Step
1
Step
2
Step
3
Step
4
Figure A
Figure AFigure A
Figure A
Figure B
Figure BFigure B
Figure B
Figure C
Figure CFigure C
Figure C
Shelf Ledge
Brace
Post
Wood Shelf
Top
Post
Figure D
Figure DFigure D
Figure D
Tap Lightly
Beam
Figure C
Figure CFigure C
Figure C
Tap Lightly
Wood Shelf
Note:
Post are
directional.
The slot
must point
down. Post Slot Points Down
Note:
Post are directional. The slot
must point down.
Slot
Down
Bottom
Post