Unidad de almacenamiento de 5 estantes para servicio pesado
This unit should be placed on a level surface. Failure to do so can result in poor product performance or create a possible safety hazard. DO NOT CLIMB,
STAND or USE THIS UNIT AS A LADDER. TO PREVENT TIPPING, ALWAYS SECURE TO A WALL WITH SUITABLE FASTENERS, NOT INCLUDED. DO NOT USE THIS
UNIT TO STORE AQUARIUMS. CAUTION: CONTAINS SMALL PARTS, KEEP CHILDREN AWAY DURING INSTALLATION. Use two or more people to assemble and
move the unit to avoid injury. Do not use this unit for anything other than the manufacturer’s intended purpose. Use care when working with metal parts,
wear gloves for protecon. Do not exceed 1000 lbs per shelf of evenly distributed weight. Always store larger, heavier items on the boom levels and small
lighter items on the upper levels. Periodically inspect the unit to ensure beams are properly seated in post slots. Failure to follow these guidelines can result
in property damage or personal injuries. Keep this manual for future reference.
Esta unidad debe colocarse en una supercie nivelada. De lo contrario, puede provocar un rendimiento del producto deciente o crear un posible riesgo de seguridad. NO ESCALAR, SOPORTAR O UTILIZAR ESTA UNIDAD
COMO ESCALERA. PARA EVITAR VUELCO, SIEMPRE SEGURAR A UNA PARED O PISO CON SUJETADORES ADECUADOS (NO INCLUIDOS). NO LO USE PARA ALMACENAR ACUARIOS. PRECAUCIÓN: conene piezas pequeñas,
mantenga niños lejos durante la instalación. Use dos o más personas para armar y mover el unidad para evitar lesiones. El no usar esta unidad para otro n que no sea el previsto por el fabricante. Tenga cuidado al
trabajar con partes de metal, use guantes para su protección. No exceda 453 kg por nivel de peso distribuido uniformemente. Siempre almacene arculos más grandes y pesados en los niveles inferiores y arculos
pequeños más ligeros en los niveles superiores. Periódicamente inspeccione el rack para asegurarse de que las vigas estén correctamente asentadas y que los clips estén bien conectados. No seguir estos puntos puede
ocasionar daños a la propiedad o lesiones personales. Guarde este manual para referencia futura.
Warranty Garana
Contents Contenido
36"W x 18"D x 72"H
91cm Ancho x 46cm Profundo x 183cm Alto
5-Shelf Heavy-Duty Storage Unit
Important Informaon Información importante
C x10
#TRBM36-SVTP
Beam
viga
F x4
#CPOUT-SV
Post Coupler
Poste acoplador
E x5
#1836W-BLK
Wire Shelf
Estante de alambre
B x8
#URPS36-SV
Post
poste
A x4
#FP-HP
Post Foot
pie de poste
G x4
#RL-PC-B1.4
Post Cap
Tapa de poste
D x10
#TRBR18-SVTP
Brace
abrazadera
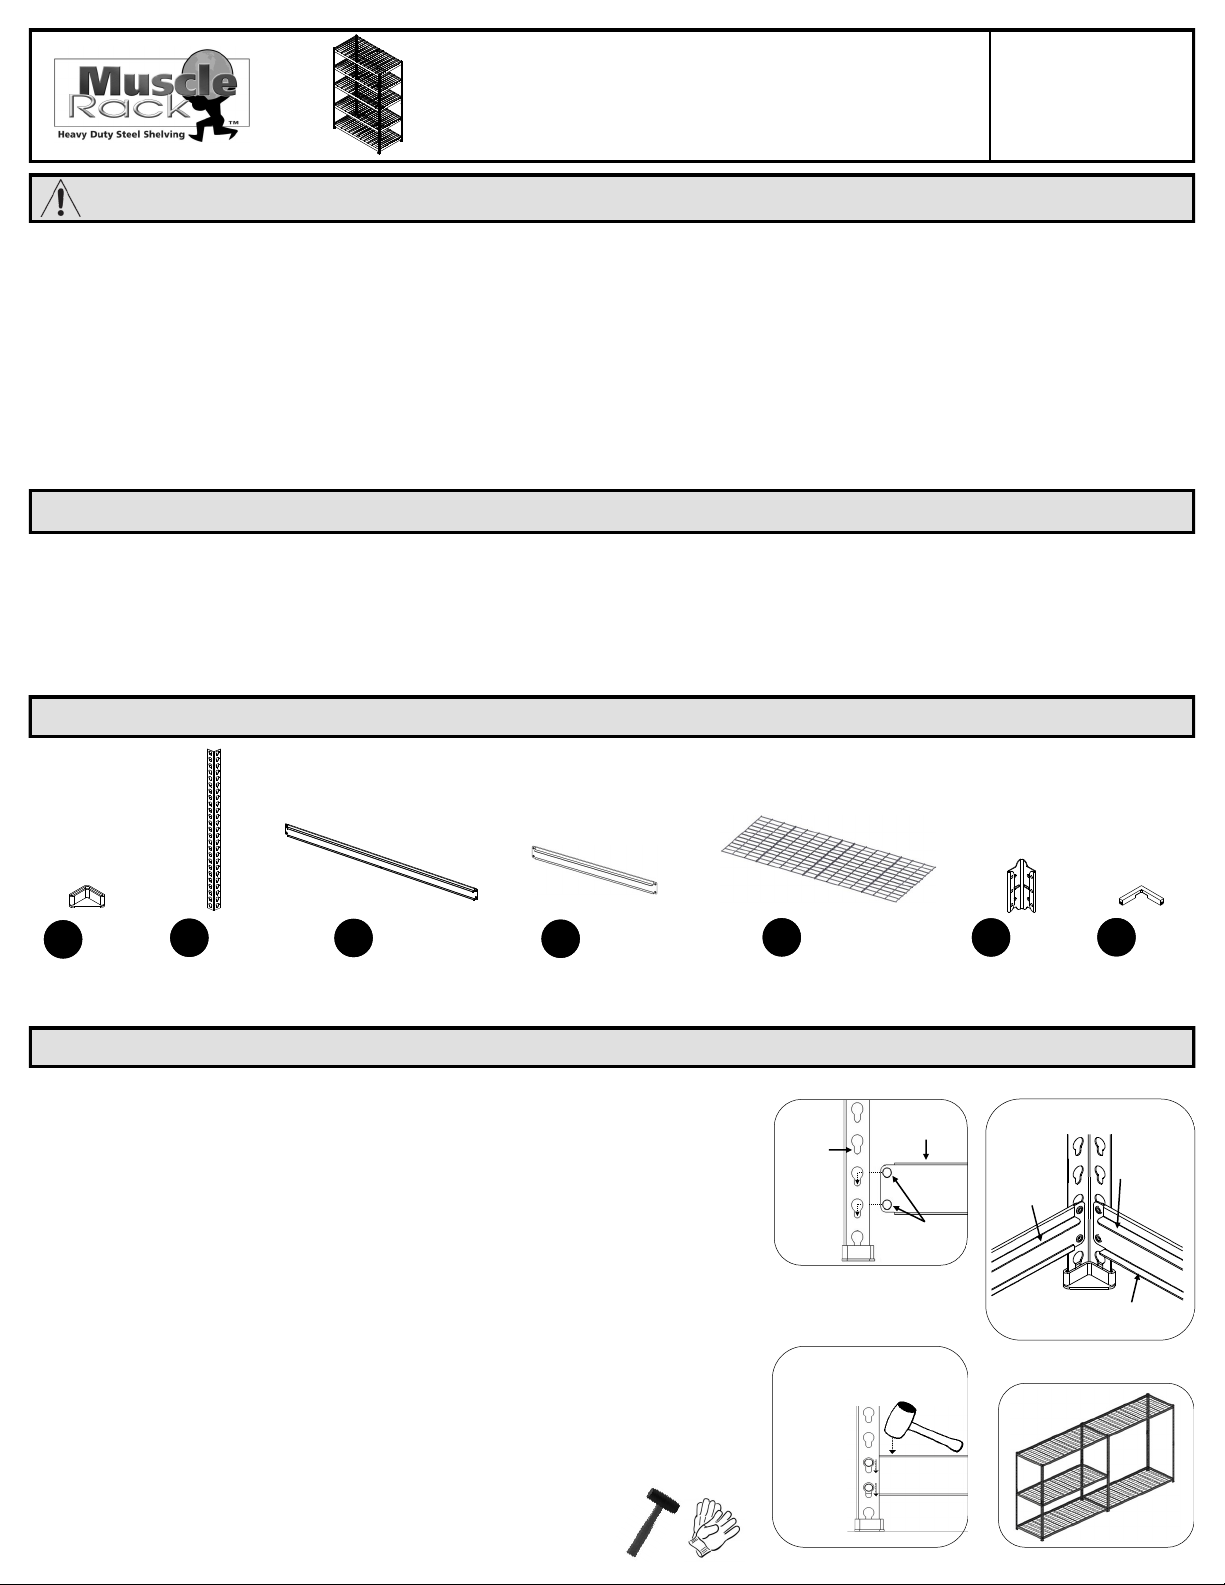
Before beginning assembly, read through the instrucons and make sure all parts are present.
Assembly of this unit is done by ng the rivets of the beams (C) and braces (D) into the keyhole
slots of the posts (B) (see 1-a). Beams (C) must be installed with the longer ledge on top and the
shorter ledge at the boom. Braces (D) must be installed with ledge on top (see 1-b). The boom
shelf assembly should be installed into the second keyhole slots at the boom of posts and the
top shelf assembly should be installed into the rst keyhole slots at the top of posts. A rubber
mallet may be used to tap down on the top of beams and braces to properly seat the rivets into
the narrow end of the keyhole slot (see 1-c). A visual inspecon should be made to ensure that
the rivets are properly engaged into the keyhole slot. Other opon: can be assembled horizontally
as two individual 39” high shelving units. One unit will have 3 shelves and the other will have 2
shelves (see 1-d). If choosing this opon, follow assembly steps 2 , 3, and 4 repeang unl all shelf
levels are completed for both units. Parts A, F and G will not be used for this setup.
Antes de comenzar el montaje, leer las instrucciones y asegúrese de que todas las partes estén presentes. El montaje de esta unidad se
realiza mediante la colocación de los remaches de las vigas (C) y abrazaderas (D) en las ranuras de los poste (B) (ver 1-a). Las vigas (C)
deben instalarse con el borde más largo en la parte superior y el borde más corto en la parte inferior. La abrazadera (D) debe instalarse
con el borde largo en la parte superior (ver 1-b). El ensamblaje del estante inferior debe instalarse en las segundas ranuras de bocallave
de los postes inferiores y el ensamblaje del estante superior debe instalarse en las primeras ranuras de bocallave de los postes superior-
es. Un mazo de caucho pueden ser ulizados en la parte superior de las vigas y rantes para asentar correctamente los remaches en la
ranura cónica del puesto (ver 1-c). Se debe realizar una inspección visual para asegurarse de que los remaches estén instalados correc-
tamente en la ranura. Otra opción: Se puede montar horizontalmente como dos unidades de estantería individuales de 39". Una unidad
tendrá 3 estantes y la otra tendrá 2 estantes (ver 1-d). Si elige esta opción, siga los pasos de montaje 2, 3 y 4 repiendo hasta que se
completen todos los niveles de estantería para ambas unidades. Las partes A, G y H no se usarán para esta conguración.
Pre-Installaon Pre-instalación
Items you might nd helpful (not included): rubber mallet, gloves, wall anchors
Arculos que pueden ser úles (no incluidos): mazo de goma, guantes, anclajes de pared
1-a
Narrow
end of
keyhole
slots face
down
Beam/Brace
viga/abrazadera
Extremo
angosto de
las ranuras
del poste
está abajo Rivets
remache
1-d
1-c
Rivets should be properly
seated into the narrow end
of the keyhole slots.
Los remaches
deben estar
correctamente
asentados en
el extremo
angosto de la
ranuras de
ojo de la
cerradura.
1-b
Brace (D)
ledge must
be on top.
Inside view
Beam shorter ledge on boom.
Beam (C)
longer ledge
must be on
top.
El borde más
largo del haz (C)
debe estar en la
parte superior.
El borde más corto de la viga está en la
parte inferior.
El borde de
Brace (D) debe
estar en la parte
superior.
Model/Modelo #:
TP361872W5SV
Edsal Manufacturing Company, Inc. products are guaranteed for a period of one (1) year from the date of purchase. The SOLE AND EXCLUSIVE REMEDY for such defects is the
repair or replacement of a defecve product or parts thereof by Edsal Manufacturing Company, Inc. or, at Edsal Manufacturing Company, Inc opon, refund of the purchase
price upon return of the item to Edsal Manufacturing Company, Inc.. This warranty shall not apply in the event the products are damaged as a result of misuse, neglect, acci-
dent, moisture, improper applicaon, improper assembly, or assembly not in conformity with the instrucons of Edsal Manufacturing Company, Inc., failure to abide by safety
precauons prescribed by Edsal Manufacturing Company, Inc or modicaon or repair by persons not authorized by Edsal Manufacturing Company, Inc..
Los productos de Edsal Manufacturing Company, Inc. están garanzados por un período de un (1) año a parr de la fecha de compra. El REMEDIO ÚNICO Y EXCLUSIVO para tales defectos es la reparación o el reemplazo de un producto
defectuoso o partes del mismo por Edsal Manufacturing Company, Inc. o, a opción de Edsal Manufacturing Company, Inc., el reembolso del precio de compra al devolver el arculo a Edsal Manufacturing Company, Inc.. Esta garana no
se aplicará en caso de que los productos se dañen como resultado de uso indebido, negligencia, accidente, humedad, aplicación incorrecta, ensamblaje incorrecto o ensamblaje que no esté en conformidad con las instrucciones de
Edsal Manufacturing Company, Inc. ., incumplimiento de las precauciones de seguridad prescritas por Edsal Manufacturing Company, Inc. o modicación o reparación por personas no autorizadas por Edsal Manufacturing Company, Inc.