Musway CSB4.2C User manual

CSB4.2C
COMPONENT SYSTEM FOR BMW VEHICLES

2
DEUTSCH
1. Mitteltöner CSB4.2C (2 x)
2. Hochtöner CSB4.2T (2 x)
3. Hochtöner-Adapterring (2 x)
4. Schraube M2,5 x 9 mm (8 x)
5. Fahrzeugspezische Anschlusskabel
6. Lautsprecher-Adapter aus Blech (2 x)
7. Lautsprecher-Dichtung aus Gummi (2 x)
8. Lautsprecher-Adapter aus Plastik (2 x)
9. Schaumdichtung 102 x 93 x 1,5 mm (2 x)
10.Schaumdichtung 102 x 93 x 4 mm (2 x)
11. Schaumdichtung 102 x 93 x 13 mm (2 x)
LIEFERUMFANG
4
2
1
3
6 7 8
11109
5

3
DEUTSCH
EINBAUVARIANTEN
Die Lautsprecher können in diesen 3 Varianten entsprechend in Ihrem Fahrzeug installiert werden.
Vergewissern Sie sich zuvor, welche Variante für Ihr Fahrzeug geeignet ist.
ANSCHLUSS
Anschlussbuchse
für Verstärker- oder
Originalstecker
VARIANTE A VARIANTE B VARIANTE C
1 1 1
8 8 6
4 4 4
10 7 9
11 10
5
1
2Hochtöner
Eingang
Mitteltöner

4
DEUTSCH
TECHNISCHE DATEN
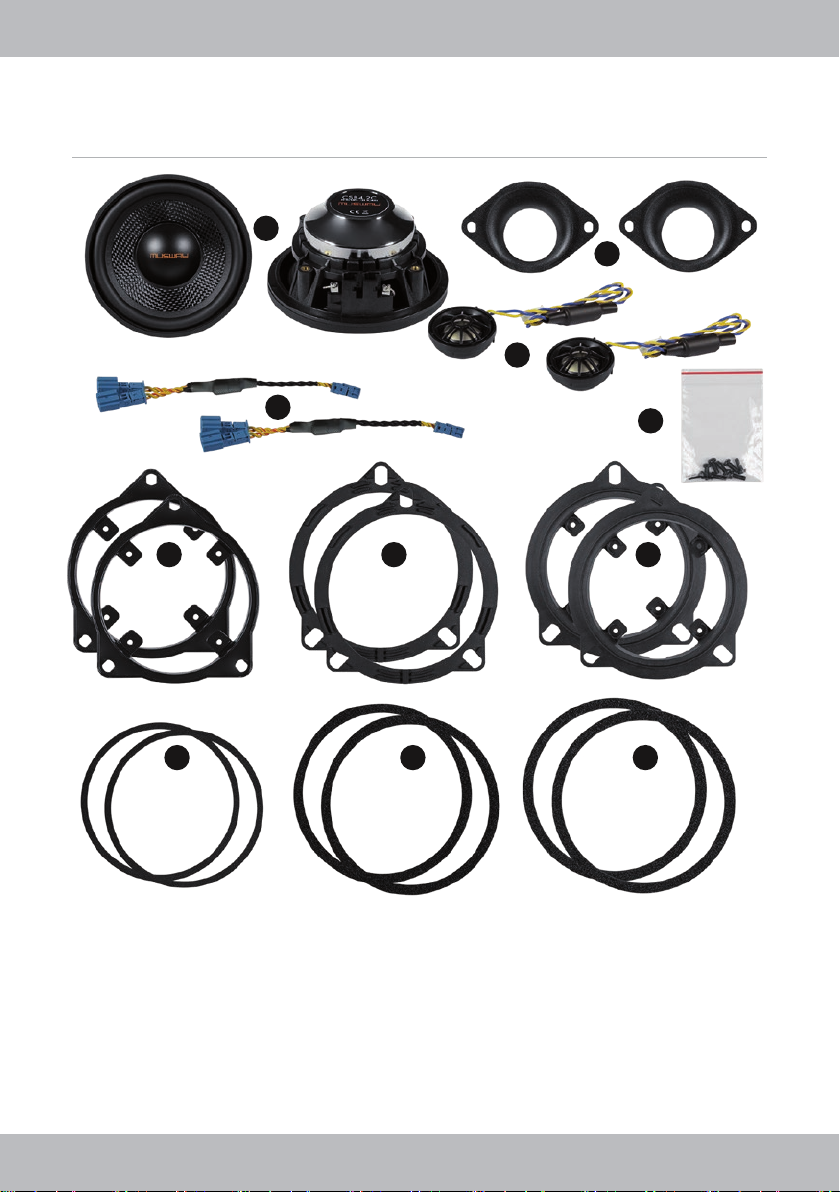
10 cm (4”) 2-Wege Komponenten-System
60 Watt/RMS, 120 Watt/MAX
Impedanz 4 Ohm
Frequenzbereich 75 - 22000 Hz
10 cm Mitteltöner, Glasfaser-Membran
Dual Neodym Magnet
25 mm Titan Hochtöner
Einbautiefe 43 mm
Einbauöffnung 91 mm
RECHTLICHER HINWEIS
• MUSWAY bzw. die Audio Design GmbH sind in keiner Weise mit der Bayerische Motoren Werke (BMW)
AG oder einer ihrer Tochtergesellschaften oder Partner-Unternehmen verbunden, oder handeln in deren
Auftrag oder mit deren Autorisierung.
• Alle geschützten Produktnamen und Markennamen sind das Eigentum ihrer jeweiligen Inhaber.
• Technische Änderungen und Irrtum vorbehalten.
KUNDENSERVICE
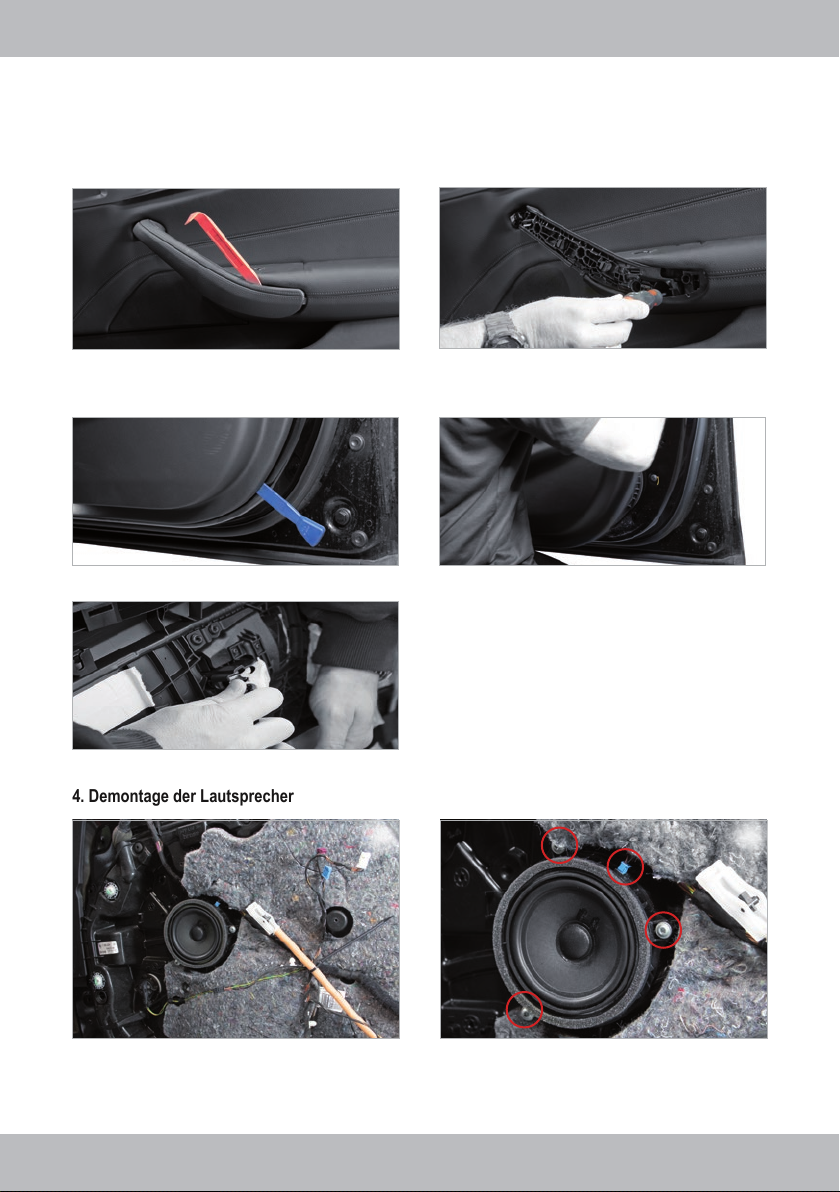
In der Regel ist die Montage und Installation des Soundsystems von einem geschultem und technisch ver-
sierten Spezialisten vorzunehmen. Sollten Sie sich dennoch für eine Selbstmontage entscheiden, wenden
Sie sich bei Problemen an Ihren Fachhändler oder an die Serviceabteilung von Audio Design unter Tel. +49
KOMPATIBILITÄT
Alle BMW E/F/G Modelle
Kompatibilität je nach Modell und Ausstattung. Angaben ohne Gewähr.
Stand der Kompatibilität: Juni 2019
WICHTIGE HINWEISE
Die Ihnen vorliegende Anleitung ist eine Einbauhilfe zur fachgerechten Montage des Soundsystems. Beach-
ten Sie dazu die folgenden Hinweise:
• Behandeln Sie bitte alle Teile des Soundsystems und die Komponenten Ihres Fahrzeugs grundsätzlich
mit Vorsicht.
• Beachten Sie unter allen Umständen die Vorschriften des Fahrzeugherstellers und nehmen Sie keine
Veränderungen am Fahrzeug vor, welche die Fahrsicherheit beeinträchtigen könnten.
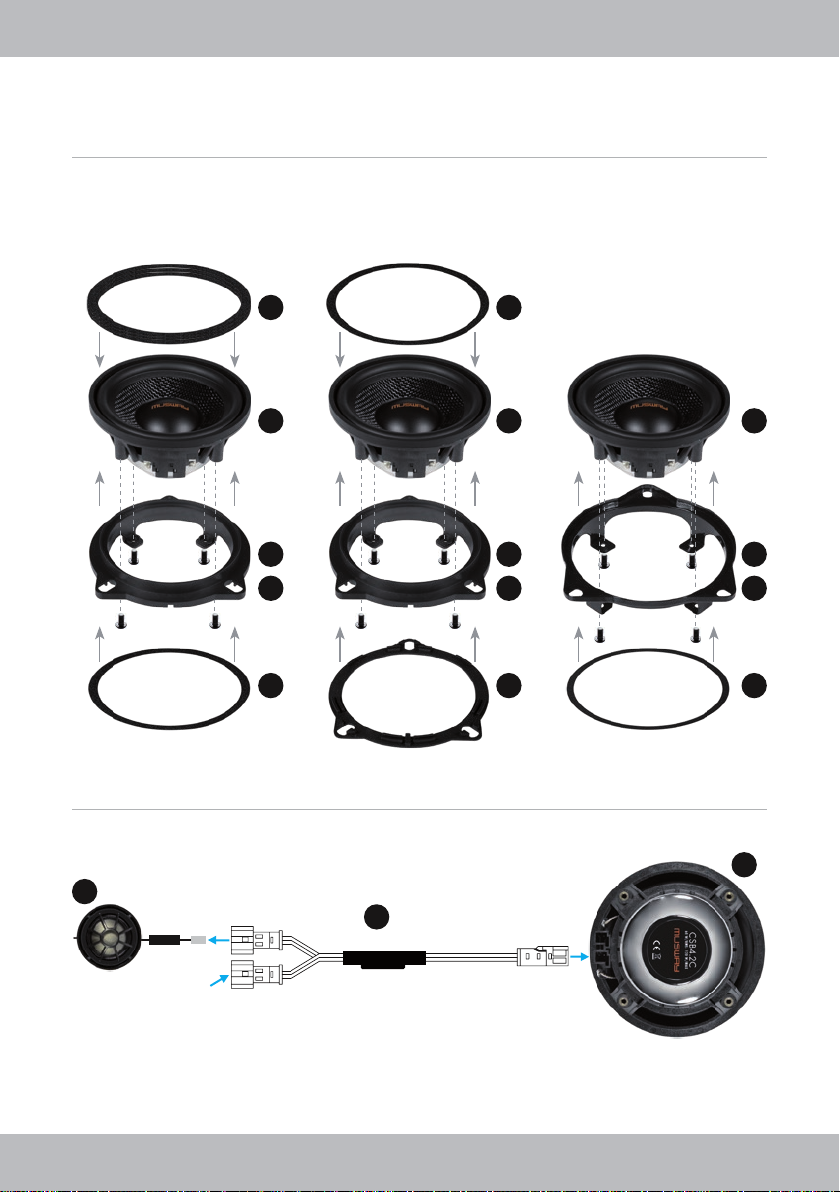
• Achten Sie unbedingt beim Anschließen auf die korrekte Polarität.

5
DEUTSCH
MONTAGEBEISPIEL BMW 5er
1. Leiste des Handgriffs entfernen 2. Schrauben des Handgriffs entfernen
3. Demontage der Türverkleidung
4. Demontage der Lautsprecher
Hebeln Sie die Griffschale des Türöffners heraus
Hebeln Sie die Türverkleidung vom Türblech
Nun lösen Sie alle Stecker, die mit der Türverkleidung verbunden sind
Nachdem Sie die Türverkleidung entfernt haben, ist der Lautsprecher frei zugänglich und kann nun ausgebaut werden.
Dafür entfernen Sie die drei Schrauben und stecken das Kabel ab.
Lösen Sie vorsichtig die Clipse und die Verkleidung
Lösen Sie die zwei freigelegten Schrauben
1.1.
3.1.
3.3.
4.1.
2.1.
3.2.
4.2.

6
DEUTSCH
5. Montage der Lautsprecher
Befestigen Sie mit den Schrauben den Rahmen an den Lautspre-
cher (im Lieferumfang enthalten)
Verbinden Sie alle Stecker mit dem Musway Lautsprecher
(Siehe Seite 3)
Montieren Sie den Musway Hochtöner in das Spiegeldreieck
5.1.
5.3.
5.5.
5.2.
5.4.
5.6.
6. Montieren Sie die Türverkleidung in umgekehrter Reihenfolge.
*Kann bei gewissen Modellen oder Ausstattungsvariationen abweichen. Angaben sind ohne Gewähr.
Montieren Sie das Dreieck wieder an die Tür und verbinden das
Kabel des Hochtöners (Siehe Seite 3 oder Abbildung 5.3.)
Nun montieren Sie den Musway Lautsprecher mit den Schrauben
Befestigen Sie den Gummiring auf den Rahmen (im Lieferum-
fang enthalten)

7
ENGLISH
1. Midwoofer CSB4.2C (2 x)
2. Tweeter CSB4.2T (2 x)
3. Tweeter adapter rings (2 x)
4. Screws M2,5 x 9 mm (8 x)
5. Vehicle specic connection cables
6. Speaker adapter made of sheet metal (2 x)
7. Speaker rubber gasket (2 x)
8. Speaker adapter made of plastic (2 x)
9. Foam ring 102 x 93 x 1,5 mm (2 x)
10.Foam ring 102 x 93 x 4 mm (2 x)
11. Foam ring 102 x 93 x 13 mm (2 x)
SCOPE OF DELIVERY
4
2
1
3
6 7 8
11109
5

8
ENGLISH
INSTALLATION OPTIONS
The speakers can be installed in these 3 variants according to your vehicle. Make sure which variant is
suitable for your vehicle.
INTERCONNECTION
VARIANT A VARIANT B VARIANT C
1 1 1
8 8 6
4 4 4
10 7 9
11 10
Connection socket
for amplier or
original plug
5
1
2Tweeter
Input
Midwoofer

9
ENGLISH
TECHNICAL SPECIFICATIONS
10 cm (4”) 2-Way Component System
60 Watts/RMS, 120 Watts/MAX
Impedance 4 Ohms
Frequency Response 75 - 22000 Hz
10 cm Woofer, Glass Fiber Cone
Dual Neodymium Magnet
25 mm Titanium Tweeters
Mounting Depth 43 mm
Mounting Diameter 91 mm
LEGAL NOTICE
• MUSWAY or Audio Design GmbH are in no way afliated with Bayerische Motoren Werke (BMW) AG or
any of its subsidiaries or afliates, or acting on their behalf or with their authorization.
• All registered product names and brand names are the property of their respective owners.
• Technical changes are subject to change.
CUSTOMER SERVICE
As a rule, the installation of the sound system must be carried out by a trained and technically skilled special-
ist. However, if you decide to do it yourself, contact your dealer or the Audio Design service department at
COMPATIBILITY
All BMW E/F/G models
Compatibility depending on model and equipment. No liability assumed.
State of compatibility: June 2019
IMPORTANT NOTE
This manual is an installation aid for professional installation of the sound system.
Please read the following notes:
• Please handle all parts of the sound system and the components of your vehicle with care.
• Under all circumstances observe the instructions of the vehicle manufacturer and do not make any
changes to the vehicle which could impair driving safety.
• Be sure to pay attention to the correct polarity when connecting.

10
ENGLISH
MOUNTING EXAMPLE BMW Series 5
1. Remove the handle bar 2. Remove the screws from the handle
3. Dismantling the door panel
4. Disassembly of the speakers
Pry out the handle of the door opener
Pry the door trim from the door panel
Now disconnect all the plugs that are connected to the door trim
After removing the door panel, the speaker is freely accessible and can now be removed.
To do this, remove the three screws and disconnect the cable.
Carefully remove the clips and trim
Remove the two exposed screws
1.1.
3.1.
3.3.
4.1.
2.1.
3.2.
4.2.

11
ENGLISH
5. Mounting the speakers
Use the screws to attach the frame to the speaker (included)
Connect the plugs to the Musway speaker (See page 8)
Plug the Musway tweeter into the mirror triangle
6. Mount the door trim in reverse order.
* May vary with specic models or equipment versions. Specications are without guarantee.
Attach the triangle to the door and connect the tweeter cable (See
page 3 or Figure 5.3.)
Now mount the Musway speaker with the screws
Attach the supplied rubber ring to the frame (included)
5.1.
5.3.
5.5.
5.2.
5.4.
5.6.

MUSWAY is a brand of Audio Design GmbH
Am Breilingsweg 3 · D-76709 Kronau
Tel. +49 7253 - 9465-0 · Fax +49 7253 - 946510
© Audio Design GmbH, All Rights Reserved
www.musway.de
Table of contents
Languages: