mylife PURA X User manual


Preface 32Intended useTM®Thank you for choosing the mylife Pura blood glucose monitoring system. Please read this manual thoroughly before testing. It provides all information you need to use the product. The TM®TM®mylife Pura blood glucose meter must only be used with mylife Pura blood glucose test TMstrips and mylife Control control solution. The use of other test strips or control solutions may lead to incorrect results.TM®It is recommended that blood glucose should be monitored regularly. The mylife Pura blood glucose monitoring system is accurate and easy to use, and is therefore your reliable assistant for diabetes management.TMTMThe mylife Softlance lancing device and the mylife Lancets lancets are intended for patient self-monitoring by an individual. They must not be used on more than one person due to the risk of cross-infection.TM®The mylife Pura blood glucose monitoring system is manufactured by Bionime Corporation and supported by Ypsomed Distribution AG. If you have any question or concerns, please contact your local Ypsomed customer service (see page 48).TM®The mylife Pura blood glucose monitoring system is intended for in vitro (outside the body) diagnostic use for self testing. Coding is automatically detected. The test result is achieved using fresh capillary whole blood samples from the fingertip, palm or forearm. You may consult your healthcare professional for instructions on how to use the system correctly. Our customer support staff is of course also available to assist you.®Healthcare professionals may use the mylife™ Pura for surveillance of the blood glucose levels of patients in medical facilities.TM®Hereinafter the mylife Pura blood glucose monitoring system will be referred to as TM®TM®BGMS; the mylife Pura blood glucose meter as meter; the mylife Pura blood glucose TMTM test strips as test strips; the mylife Softlance lancing device as lancing device; the mylifeTMLancets as lancets; and the mylife Control control solution as control solution, for short.

54About BGMSPackage of meter test stripTM®mylife PuraTM®mylife Pura BGMSTM®mylife PuraTM®Precautions for mylife Pura BGMSTM®mylife PuraTable of contentsTable of contents
Testing procedurePerforming a Alternative site testing (AST)View window appearanceTM®blood glucose test with mylife Pura BGMSTMQuality control test with mylife Control control solution3224283016182223681214Preparing for testSetting the date, time and volumeTM®Switching the mylife Pura meter on/offSwitching the backlight on/offMeter activation and battery changeSetting up your meter – Quality controlTM®"Lo" and "Hi" readings of mylife Pura meterError messages and trouble shootingCustomer serviceWarrantyMain partsTM®Specification of mylife Pura meterTM®Limitations of mylife Pura meterMeter data transmission management (optional)Description of used symbolsTM®Disposing of the mylife Pura meter, test strips and lancets404446Review Performing a quality control testCaring for your meterRecalling test results and averagesyour test memory34363731474848494950

76Package of BGMSTM®mylife Pura
1.meter (with 2 CR2032 batteries installed)2.test strips (10 pcs)3. getting started guide4. user manual5.6. lancing device7. clear adjustable 8. Disposable (10 pcs)9. 10. warranty card11. carrying caseTM® mylife Pura TM® mylife Pura TM®mylife PuraTM®mylife Pura BGMS TM® mylife Pura blood glucose test strip insertTM mylife SoftlanceTM®mylife Puracap ("AST")TMmylife Lancets lancetsTMInstructions for the mylife Softlance lancing deviceTM®mylife PuraTM®mylife Pura Package of BGMSTM®mylife Pura94325168 7 2017-10

98Left button ( )For operating the meter, please check details in following sections.Main button ( )For operating the meter, please check details in following sections.TM®mylife Pura meterTM®mylife Pura meterDisplay windowShows test result, messages and information.relevantTest strip portInsert test strip here until you hear a click.Right button ( )For operating the meter, please check details in following sections.Product nameBattery coverSlide cover to change batteries.Meter serial numberMeter batteryBacklight battery150HLA0076

1110Indicates a test result stored in meter memory (memory mode)Indicates a test the average function of this meterresult which is not included in Indicates the average result (average mode)Indicates a control solution test resultUnit of test result according to presettingTest resultWarns when the battery is low or must be replacedIndicates when to apply the blood sampleTest strip (internal calibration and autocoding)Warns if test strip is not inserted correctly or wrong test strip has been usedCurrent date (time mode)(memory mode) or testing date Indicates if environmental temperature exceeded during testingparameters areIndicates the time in 12h formatCurrent time or testing time (time mode) (memory mode)Manufacturing use onlyTM®mylife Pura meterTM®mylife Pura meter

1312
TM®Precautions for mylife Pura BGMSTM®Precautions for mylife Pura BGMS - The minimum blood sample size for testing is µL ( ).0.75Please take a minimum of to do the test on the BGMS. A blood sample size above 3.0 might contaminate the test strip port and the meter. repeat the test with a new test strip.0.75µLµLMake sure your blood sample covers the whole area of the view window to get an accurate test result. A sample size below 0.75 µL may lead to an error message "Error 4". (see page 40). If this occurs,Sample size example0.75µL1.0µL1.5µL 2.0 µL3.0µL- Before using the BGMS to test your blood glucose, please read the instructions for use carefully.TM®TM- The meter must only be used with mylife Pura test strips and mylife Control control solution. The use of other test strips or control solutions may lead to incorrect results.- The BGMS has not been validated for use on neonates. It should not be used on neonates.- The BGMS is not intended for arterial blood glucose testing.- If the meters and test strips are exposed to a considerable temperature variation, please wait 30 minutes before measurement.- Dispose of used batteries properly. - Please note the BGMS contains small parts (e.g. test strips) which are a potential choking hazard for children.- Do not allow water to enter the meter. Never immerse the meter or hold it under running water.

1514TM®mylife Pura test stripTM®mylife Pura test stripView windowThis window is yellow before applying blood sample. It gradually turns red with blood.as it fillsHand barGrip here to insert test strip into meter.Sample entryµL Apply a drop of blood or control solution here. The test only 0.75 of blood. requiresElectrode Sensing signal output terminals. contactsGold electrodesElectrochemical sensorIndication symbolInsert test strip with indication symbol upfront and down towards meter.TM®TM®The meter must only be used with mylife Pura test strips and mylife Control / Pura control solution.The use of other test strips or control solutions may lead to incorrect results.PRECAUTION- Recap the test strip vial immediately after taking out a test strip.- Do not reuse test - Do not use expired test strips.- Record the date of opening a new test strip vial for the first time. Discard the vial of test strips 6 months - Store the test strips in a cool (4-30℃ and dry location (<90% relative humidity). Do not expose - For detailed information, please refer to thetest strips package insert.strips. Test strips are intended to be used only once.after first opening. resp. 39-86°F)to heat or direct sunlight.TM® mylife Pura - If the meter and test strips are exposed to considerable temperature variation, please wait 30 minutes before measurement.

1716 Meter activation and battery change
1. Turn the meter over. Press and push battery cover to open.PRECAUTION- Please follow local and discard used battery properly.regulations4. The meter performs a self test.5. Press any button to exit the self test and enter setting mode.6. Set the time and date the batteries are replaced. See chapter "Setting up your meter – Test results are still in the memory.afterSetting the date, time and volume".retained3. Slide the battery cover back until it snaps into place.2. Install the battery. Be sure to put battery in correct way with the "+" symbol up. Meter activation and battery changeYour meter comes with two CR2032, 3 volt, batteries installed. Two new batteries will provide power to perform about 1,000 tests under normal use. Press the main button or insert a test strip to activate your meter.NOTE- When the meter backlight function, please change your backlight battery.- When the backlight battery runs out of power still work but without backlight ceases tothe meter willproperly,illumination.
150HLA0076
150HLA0076

1918NOTE- main button for 2 seconds, - main button for seconds - press main button allows . However, if you want to return to the time mode, you go through all the settings first by After pressing thethe screen backlight is activated. Press the main button for another 2 seconds and the backlight and display switch off.Continued pressure on thea further 3elicits a beep, and the meter enters setting mode.A quickof thesetting changesmustrepeated pressing of the main button. You can enter setting mode in two ways:1. Reload meter battery After removing the meter battery, press the main button several times until , then follow the battery installation steps to load batteries. The meter will self test. Press the main button to exit the self test and enter setting mode.2. With battery inserted the main button on the meter. Then press the main button seconds until you hear a beep, indicating successfully entered The display screen will show setting data.the screen is blankperform aFirst pressto switchagain for a
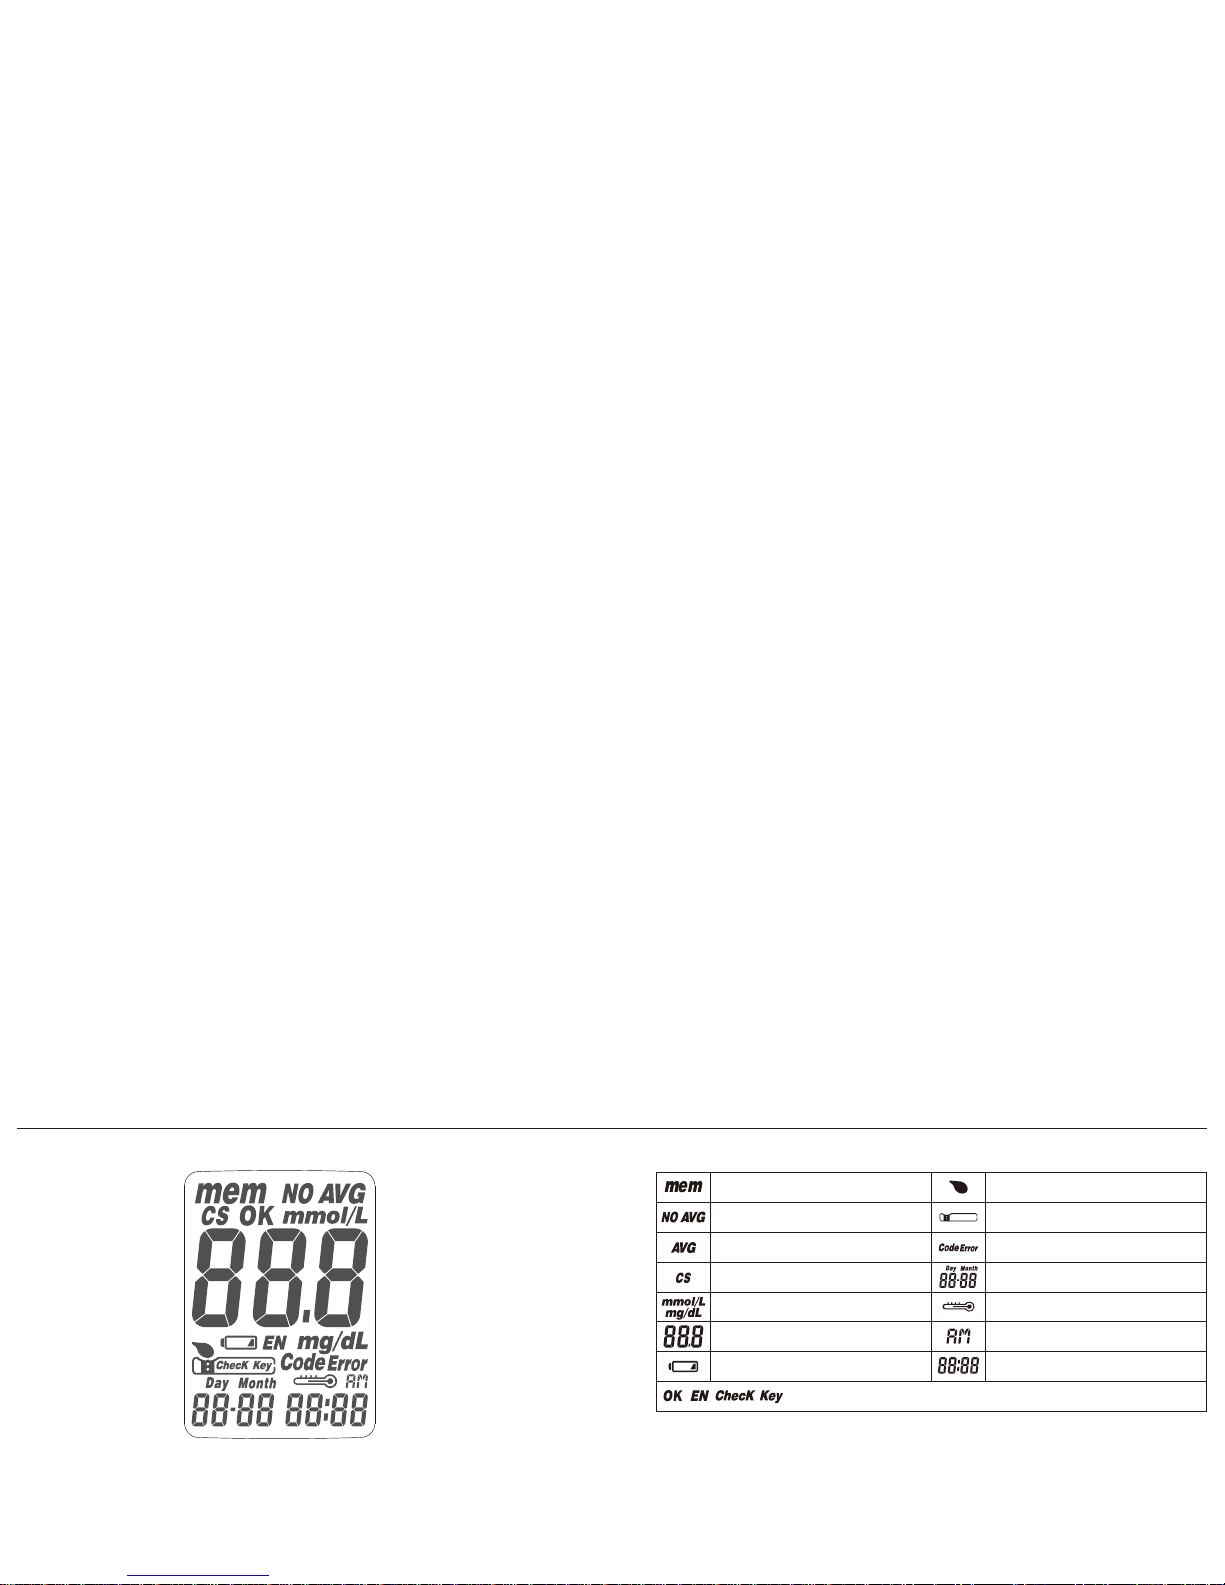
further 7that you havesetting mode.Setting up your meter –Setting the date, time and volumeSetting up your meter – Setting the date, time and volume1. Year setting With the year format , press the left or right button to adjust it. Then press the main button to confirm it. shift to next digit for setting. Repeat the above action until the year setting is completed to month setting.2. Month setting With the month , press the left or right button until the current month appears. Then press the main button to confirm it and to day setting.3. Day setting With the day , press the left or right button until the current day appears. Then press the main button to confirm it and to time format setting.flashingIt will then and it will moveflashingit will moveflashingit will move1)2)3)

21204. Time format 12/24h selection With the time format , press the left or right button to adjust it. Then press the main button to confirm it and to hours setting.flashingit will move5. Hour setting With the hour flashing, press the left or right button until the current hour appears. Then press the main button to confirm it and it will move to minute setting.6. Minute setting With the minute flashing, press the left or right button to adjust it. Then press the main button to confirm it. Then it will move to volume setting.7. Volume setting With the volume flashing, press the left or right button to switch it on or off. Then press the main button to confirm and finish the settings.NOTE- 2 minutes, - Your meter is now ready for use. The meter default will depend upon the units of measurement normally used in your country.If the meter is unused for more thanit will automatically exit setting mode and switch off.8. After volume settings, beep (if volume is on). All the settings are and will return to time volume is off, the display will return to time screen without Finishing setting upyou will hear a confirmationswitchedsaved,the displaymode (ifswitchedthe beep).4a)4b)5)6)7a)7b)Setting up your meter –Setting the date, time and volumeSetting up your meter – Setting the date, time and volume8)

2322Switching the backlight on/off1. How to on the meter Press the main button or insert a test strip.2. Manual power off button for 4 seconds.3. Auto power off switchPress the mainIf the meter is unused for more than 2 minutes, it will automatically switch off.TM®Switching the mylife Pura meter on/off1. How to on the backlight main button for 2 2. Manual backlight off the main button for another 2 seconds.switchPress theseconds after power is on.Press
3. Auto backlight off The meter backlight will automatically switch off if the meter is unused for more than 10 seconds.

2524HubLancet carrierPlungerRelease buttonDepth-adjustable capPerforming a TM®blood glucose test with mylife Pura BGMS1. Hold the cap in one hand and hold the hub in the other hand. Bend the cap 2. Pull off the cap.3. Insert a new disposable lancet firmly into lancet carrier.4. Twist off and set aside the protective cover of the disposable lancet.5. Replace the cap. depth-adjustableto one side.depth-adjustabledepth-adjustable12345TM®Performing a blood glucose test with mylife Pura BGMS7. Hold the hub in one hand and pull on the plunger the other hand. Release the plunger, automatically move back to its original position8. Wash your hands with warm soapy water and dry thoroughly.9. Take one from the vial. Recap the vial immediately.10. Insert the test strip into the strip port of the meter with the indication symbol facing down. The meter confirms the insertion of the strip with a beep (if volume is on). withThis cocks the lancing device.which will against the hub. The device is now ready to use.test striptest test switched676. Choose by rotating the top portion of the cap until the depth the window. Settings are basedpenetration depthdepth-adjustablerequired settingis indicated in on skin type " " for soft or thin skin; " " for average skin; " " for thick or calloused skin.8NOTEThe meter will automatically detect number on the codethe test strip.109Safety switch

272611. A blood drop symbol appears and is accompanied by a further beep (if volume is on). 12. Place the lancing device against your fingertip and press the release button. switchedThe blood sample must then be applied within the next two minutes.13. Touch and hold the drop on the edge of sample entry until you hear a beep (if volume is switched on) and the view window is totally filled with blood. If the view window is not completely filled, or the test does not start, please discard the test strip and repeat the test with a new test strip.14. You will see the countdown mode on the screen. After 5 seconds, the test result will appear.15. Pull off the Without touching the used disposable lancet, stick the lancet tip into protective cover.16. the release button one hand ee 16, step 1) and pulling on the plunger the other hand ee 16, step 2) will safely eject the used lancet.17. the used lancet into an appropriate puncture-proof or biohazard container.18. Replace the cap after finishing the test.depth-adjustable cap of the lancing device.itsPressingwith(sfigurewith(sfigureDisposedepth-adjustable17151216PRECAUTION- Do not your blood drop to the sample entry on the test strip until you see the " appear. The meter is performing an internal test and will display " " and "Errorif you apply blood too soon. repeat the test with a new test strip.- Record the date opening of a new test strip vial. Discard the 6 months opening.present" " If this occurs,of firsttest strip vial after first- Always keep the metal contact points of the test strip entry point clean. If any dust or impurities are present, please clean with a small soft brush, otherwise the meter may not work correctly when you insert a test strip.181211Performing a TM®blood glucose test with mylife Pura BGMSTM®Performing a blood glucose test with mylife Pura BGMSNOTEPlease dispose of the used test strip and/or the puncture-proof or biohazard container for your used lancets according to your local regulations.13a1413b13c2017-10

2928Alternative site testing (AST)Alternative site or forearm blood sampling testing: Palm
Pressing fora few seconds
1. clear and follow on pages 24 to 26. 2. Massage the puncture area of palm or forearm for a few seconds. 3. clear cap 4. Press the release button.5. Continue holding the lancing device against and gradually increase pressure for a few seconds until the blood sample size is sufficient. 6. to discard the used disposable lancet.Selectcap ("AST")steps 1 to 11Immediately after massaging the puncture area, press and hold the lancing device with the against it.the puncture site,Follow steps 13 to 14 on page 26 to complete the test.Follow steps 15 to 18 on page 277. PRECAUTION- The test results of blood samples taken from different sites might in certain such In these cases, only should be used.- DO NOT test on the palm or forearm if you are testing for hypoglycemia (low blood glucose)- Fingertip samples can show rapid of glucose faster than palm or forearm samples.- As the blood flow taken from is slower than , we recommend using the lancing device with for testing other than fingertip.blood glucosevaryconditions,rapid changes in glucose levels following a drink or a meal, an insulin dose, or exercise.the fingertip or hypoglycemia unawareness.changesforearm or palmfrom fingertip clear cap ("AST")at sitesAlternative site testing (AST)3a3b
Releasing button
45

30View window appearanceMake sure your blood sample covers the whole area of the view window to get an accurate test result. blood sample will the test with a new test strip.An insufficientresult in an error message ("Er4"). If this occurs, repeat Insufficient blood sampleSufficient blood samplePRECAUTION- Check the date printed on the vial every time you use a test strip. Do not use expired test strips.- Use each test strip immediately after removing from the vial.- Do not reuse test strips.- - the blood drop only to the sample entry of the test strip.- Please do not drip or inject the blood sample directly sample entry of test . Doing contaminate the meter or cause and is not recommended. expirytest stripIf the meters and test strips are exposed to a considerable temperature variation, please wait 30 minutes before measurement.Presentonto thestrip using a syringeso maydamage,Theeter displays results between 0.6 and 33.3 mmol/L. If your test result is below 0.6 mmol/L, "Lo" will appear on the screen. Please repeat your test a new test strip. If you still get a "Lo" result, you should immediately contact your healthcare If your test result is above the high end of the detection range "Hi" will appear on the screen. Please repeat your test a new test strip. If you still get a "Hi" result, you should immediately contact your healthcare musingprofessional or follow their instruction for therapy.BGMS(above 33.3 mmol/L),usingprofessional or follow their instruction for therapy.TM®"Lo" and "Hi" readings of mylife Pura meter31NOTE- If your blood glucose result is unusually high or low, or if you question your testing results, repeat the test using a new test strip function. You can also run a quality control test (see page 32) to check your meter and test strip. If the test result remains unusually high or low, contact your healthcare professional immediately or follow their instruction for therapy.- If you are experiencing symptoms that are not consistent with your blood glucose test results and you have followed all instructions in this manual, contact your healthcare professional immediately or follow their instruction for therapy.

If control solution results are out of range, your BGMS may not be working properly. Repeat the quality control test. If your control solution results do not use the BGMS. Ypsomed customer service (see page 48). are still outside the range,Contact your local3332TMQuality control test with mylife Control control solutionPRECAUTIONEach time you open a new bottle of control solution, write the discard date on the label. solution is good for 3 months after opening the bottle, or until the date printed on the label, whichever comes first.The controlexpiryPossible reasons- our control solution has expired or has been opened for more than 3 months.expired or has been opened for more than 6 months.- Your control solution is diluted.has been left openThe test procedure was not performed- Your control solution test has been performed out of normal temperature range (<10°C and >40°C resp. <50°F and >104°F). your control solution results are out of range:Y correctly. Malfunction of the meter or the test strip.- Your test strip has - The cap of the test strip vial or the control solution for a long time.- - Quality control TMtest with mylife Control control solutionPlease use control solution tested with BGMS under control solution mode. If the test result is within the control solution range printed on the strip vial label, the BGMS passes control test. That means your BGMS is working correctly.the qualityExample of control solution range printed on your test strip vial label.Control solution range mg/dL mmol/LLow 31-52 1,7-2,9Normal 83-113 4,6-6,3High 237-321 13,2-17,8Control solution range:When should a quality control test be performed?Whenever you want to check your BGMS is working Whenever you want to practice testing and check correct procedure.whether or notproperly.Example of date:expiryExp. date 2017-10NOTEControl solution test results do not represent your blood glucose level.2017-10

35
34
9. replace the cap on the control solution bottle.10. The control solution result appears. Compare your quality control test result to the control solution range printed on the test strip vial label.Clean the top of the cap and tightlyPerforming a quality control testCLOSE
1. Take one test strip from vial and recap immediately.2. Insert the test strip with into test strip port.3. While the blood drop symbol press and hold the main button for 3 seconds until the "CS" symbol appears.4. You will see " " and "CS" symbols on the screen, prompting you to apply solution.5. Open the bottle and the cap the table.6. Drip a drop of control solution on the top of the cap.7. Gently touch the sample entry of the test strip control solution on top of the cap.indication symbol upfront and downis flashing,more thanflashingthe controlBefore opening the cap, shake the bottle of control solution well.placeupright ononto the drop of8. When you hear a beep (if volume is switched on) please wait for the test result. You will see the countdown mode on the screen. After 5 seconds, the test result will appear.Performing a quality control test9PRECAUTION- Your control solution will not be average but be recalled. The control solution test result will be shown "CS" symbol on the screen.- Our for solution test is 15~40 - Before " " and "CS" appear, please do not the control solution to the sample entry on test strip because the meter is still an internal check. If you do so, the meter will show " " and "Error", accompanied by beeps (if volume is on). - Do not drip the control solution The reagent on be sucked into the bottle of control solution and cause the . Doing this contaminate the meter via the test strip port.- Do not touch the of the control solution bottle. If you have touched it, please clean with water.test resultsincluded inreading calculations,can stillwith thesuggested temperature rangethe control℃(59~104°F).presentperformingswitcheddirectly from the bottle onto the sample entry of the test strip.the test strip couldcouldsolution's degenerationcould potentionally nozzleit carefullyOPEN4562718

3736Recalling test results and averagesTheeter is able to store 500 test results with time and date automatically. If your meter has stored 500 results, which is the maximum memory, the newest test result will replace the oldest one. To recall your test memory, the meter without a test strip inserted. mswitch on
2. To press main button again, and you will enter the averages the button and the display shows "AVG" in the upper right corner and the average value for the day. By continually pressing the right button you will get to 7-day, 14-day, 30-day and 90-day of your blood glucose values. You will see the number of calculated days in the lower left corner and the number of calculated readings in the lower right corner.end review of tests in memory,mode. Pressright handhandthe 1-day,averages1. Press the main button to switch from the time mode to the memory First you will see the symbol in the upper left corner of the display. When you press the button, the latest result displayed. By pressing the right button continually test results will be shown in order. You will see the sequence number in the lower right corner and the year in the lower left corner of the followed by date and time of the measurement.mode."mem"right handishandpreviousdatedisplay,Caring for your meterMaintenanceKeep your meter and test strip free of dust, water or any other liquid. Store the meter in the carrying case If is dropped or damaged, perform a quality control test before doing a blood glucose testCleaning Clean the outside of the meter with a damp cloth and mild soap when not in use.the meter, to insure that the meter is still functioning correctly.the meter or detergent. Do not wet the test strip port.Always keep the metal contact points of the test strip entry point clean. If any dust or impurities are present, please clean with a small soft brush, otherwise the meter may not work correctly when you insert a test strip.NOTEThe right hand button is for reviewing the tests in ascending order, and the left hand button is for reviewing in descending order. The number "1" is the latest test result, while the number "500" is the oldest test result.

38Recalling test results and averages4. Quick searching: If you want to see all values automatically displayed in sequence, first enter the memory mode. Then the right or left button for 2 seconds. Anytime you want to just release the button. pressThe right hand button is for scrolling the most recent to oldest results; the left hand button scrolls from the oldest to the most recent.stop,The current value will be displayed. Any particular reading can thus be checked.5. Reading immediately after test: If you have just finished a test, press the main button to enter the "mem" (memory) mode and review this latest test result.NOTEYour control solution will be automatically but be recalled. CS symbol memory .test resultsnon-averaged,may stillThey will appear under the ""in themode3. Non-averaging set and canceled: You may select the unwanted or doubtful test exclude them from the average calculation, after After your you can exclude an unwanted the button pressed and press the main button simultaneously to confirm the value as "non-average". . This value flagged by the If you want to cancel this setting, stay in the test mode. the button until the "NO AVG" symbol changes to "AVG" in the upper corner of the screen. To confirm this original status you again simultaneously press the main . The value will stored as a regular value and included in the average values. results andeach test. After measurement, as long as the test strip is clicked in the meter it is called "test mode". After removing the test strip it is called "memory mode".finishingtest in the "test mode",result by pressing the right hand button until you see the symbol "NO AVG" in the top right hand corner of the screen. Keepright handAfter removing the test strip from the meter the measured test result will be stored in memory mode and cannot be amendedwill now remain"NO AVG" symbol.non-average""Pressright handright handbuttonnow beRecalling test results and averagesNOTE- The average function is related to the time setting. Time and date must be set correctly toPRECAUTION- - results, control solution results and test results out of normal temperature range ( are not in the Time and date must be set in order to activate the average function."Lo" and "Hi"recorded<10℃ and >40°C resp. <50°F and >104°F).includedaverages calculations.39 enable averages to show. For example, the 14-day average will show no figure if there have been no tests recorded in the 14 days prior to, and including, the current date.""have a resultmemory mode ("mem"), this action cannot be performed.- The non-averaging/re-averaging function only works in the test mode and when you . In the
Table of contents
Other mylife Blood Glucose Meter manuals