Myo Technologies Myotone User manual


TABLE OF CONTENTS
Introduction . . . . . . . . . . . . . . . . . . . . . . . . . . . . . . . . . . . . . . . . . . . . . . . .1
Your Myotone® Facial Toning System Device . . . . . . . . . . . . . . . . . . . . .2
Myotone® Conductive Gel . . . . . . . . . . . . . . . . . . . . . . . . . . . . . . . . . . . . 3
Additional Myotone® System Items . . . . . . . . . . . . . . . . . . . . . . .. . . . . . .4
Before Using Your Myotone® . . . . . . . . . . . . . . . . . . . . . . . . . .. . . . . . .5
Usage Instructions-- Personal Preparation. . . . . . . . . . . . . . . . . . . . . . . . . 6
Basic Techniques Face . . . . . . . . . . . . . . . . . . . .. . . . . . . . . . . . . . . . . . . .7
Basic Techniques Forehead . . . . . . . . . . . . . . . . . . . . . . . . . . . . . …… . 8
Advanced Techniques Eye and Temple…. . . . . . . . . . . . . . . . . . . . . …. . 9
Advanced Techniques Forehead . . . . . . . . . . . . . . . . . . . . . . . . . . . . . . . 10
Advanced Techniques Cheek Movement 1 . . . . . . . . . . . . . . . . . . . . . . . .11
Advanced Techniques Cheek Movement 2 . . . . . . . . . . . . . . . . . . . . . . . .12
Advanced Techniques Jaw and Chin Movements. . . . . . . . . . . . . . . . . . . 13
Advanced Techniques Neck Movement 1 . . . . . . . . . . . . . . . . . . . . . . . .. 14
Advanced Techniques Neck Movement 2 . . . . . . . . . . . . . . . . . . . . . . . . .15
Cleaning & Maintenance & Troubleshooting. . . . . . . . . . . . . . . . . . . . . . 16
Indications for Use & Warnings . . . . . . . . . . . . . . . . . . . . . . . . . . . . . . . . . 17
Precautions . . . . . . . . . . . . . . . . . . . . . . . . . . . . . . . . . . . . . . . . . . . . . .. . 18
Adverse Reactions . . . . . . . . . . . . . . . . . . . . . . . . . . . . . . . . . . . . . . . . . . . 19
Technical Specifications . . . . . . . . . . . . . . . . . . . . . . . . . . . . . . . . . . . . . . .20

USER MANUAL
Myotone® is a non-invasive cosmetic toning device that rejuvenates and
renews your facial appearance safely and effectively at home. This device
delivers low level microcurrent impulses to strategic locations on the face
and allows the user to adjust settings from 0 to 480 microamps for a
personalized comfort level. Our patented procedure for facial toning is on
the cutting edge of microcurrent technology. Regular use of your Myotone®
device will result in a more vibrant and youthful looking face.
In order for this device to work properly, it is important to first apply the
Myotone® Conductive Gel to the skin areas that are being treated. Gently
apply the Myotone® to strategic areas of your face as outlined in this
manual. The Myotone® has 3 toning settings to adjust to your comfort
level. Using your Myotone® for just 5-10 minutes a day will provide you
with a vibrant more youthful looking face!
The Myotone® System includes the following:
1. Myotone® Device
2. Myotone® Conductive Gel (4 fl. oz.)
3. Myotone® Charger (Power Adapter)
4. Myotone® Internal Battery Pack (Only replaceable by manufacturer)
5. Myotone® Instructional DVD
6. Myotone® User Manual
Indications for Use and Intended Use
The Myotone® Facial Toning Device is intended for facial stimulation and is
indicated for over-the-counter cosmetic use.
Page | 1

The Myotone®System
Myotone® General Specifications:
Measures approx. 7.5” L x 2.2” W x 2” H Device Net Weight is approx. 5.6 oz.
System Kit Gross Weight is approx. 1lb.8.6oz Made by Myo Technologies, Inc. in the USA
Dual Electrode Tips
On/Off Button and Toning Level Toggle Button
Toning Level and Charging Indicator Lights
A
B
C
B
C
A
1. Myotone® Device
Page | 2

2. Myotone Conductive Gel
x4 fl. oz. (Conductivity Gel)
xProduct Description: Clear gel for conductivity.
This product is water soluble.
xIngredients: Purified Water, EDTA Disodium, Propylene Glycol,
Diazolidinyl Urea, Iodopropynyl, Carbomer, Glycerin and
Triethanolamine.
Additional Myotone® Conductive Gel can be ordered from our online ordering
store at www.myotone.com or by calling us toll free at 1-877-969-2811.
Page | 3
Myotone Elite System

Additional Items Included:
3. Myotone Charger (Power Adapter) 4. Myotone Internal Battery Pack
Input : 100-240v Output 5v 2(3.7) V Rechargeable Lithium Ion batteries
Note: For use only with the Myotone Unit Note: Battery Pack is not replaceable by user.
and is not approved for any other device. Please call the manufacturer for replacement.
5. Myotone Instructional DVD 6. Myotone User Manual
Directions for use of your Myotone Directions for use and precautions
Page | 4

Before Using Your Myotone®
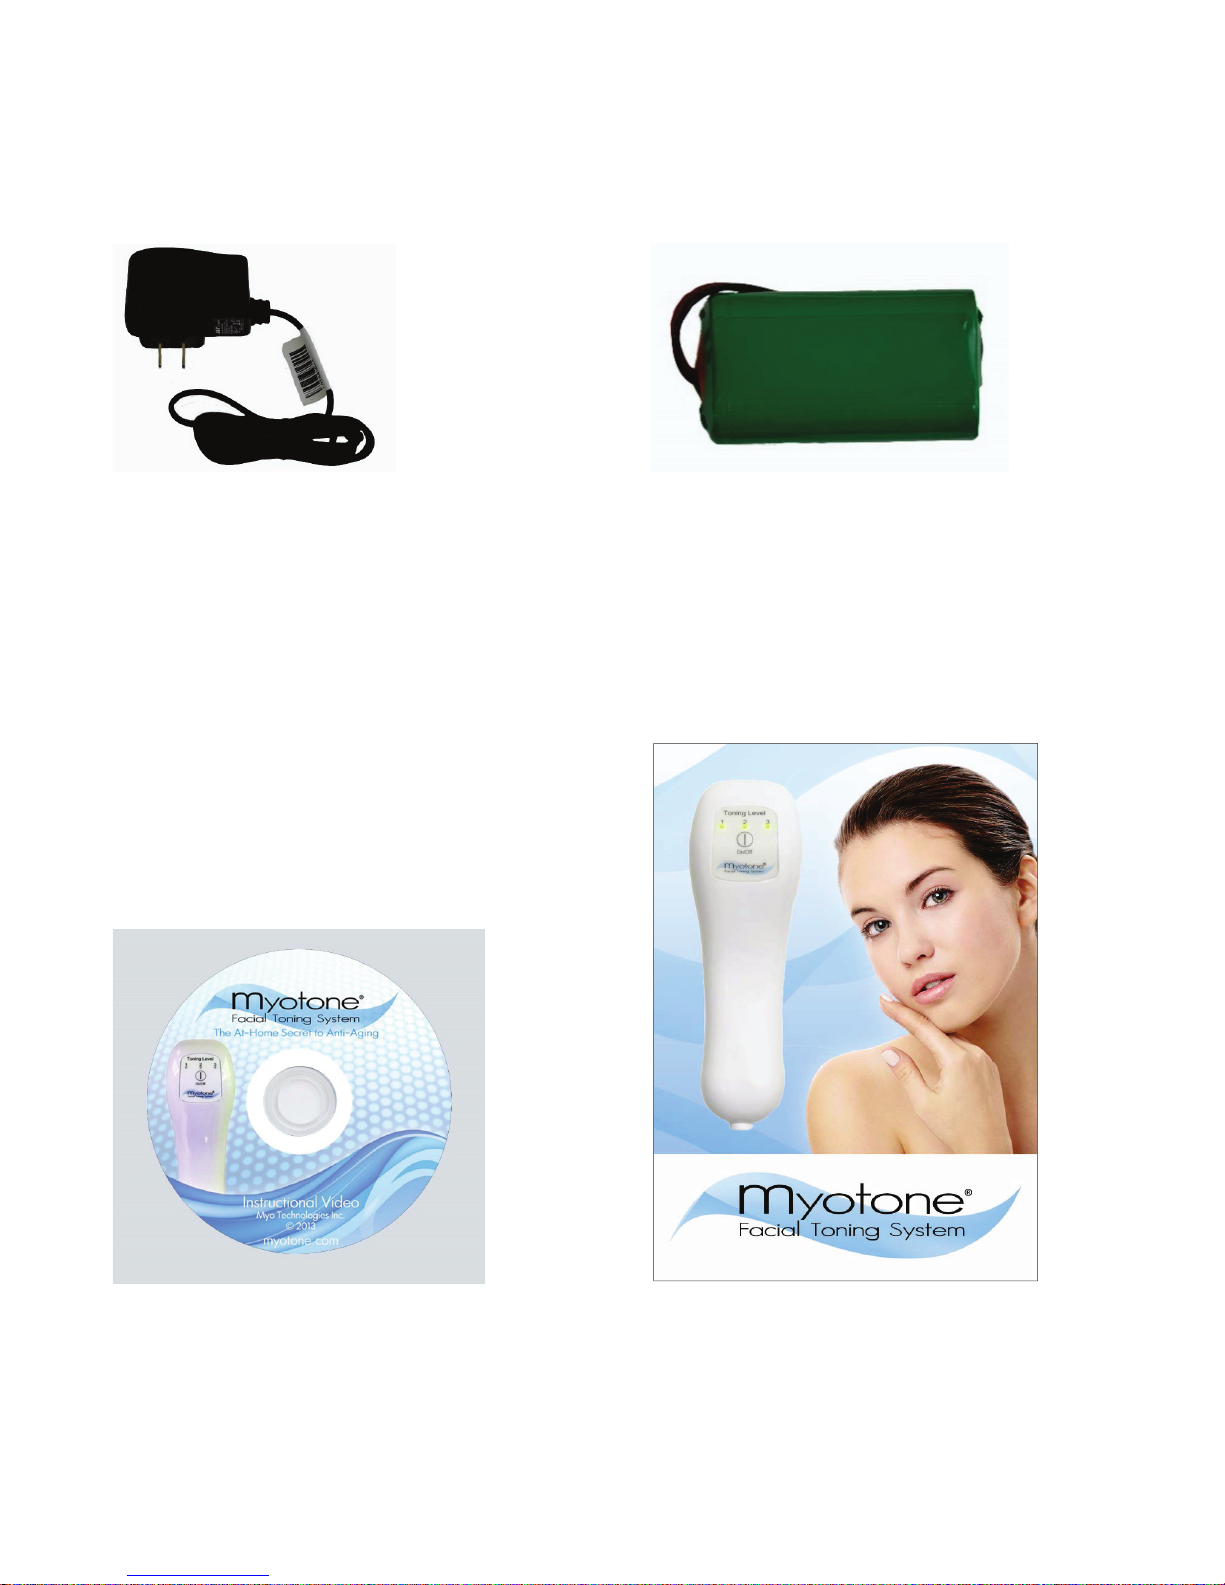
xRemove the Myotone® device and power adapter from the package.
xPlug your device into a working electrical outlet using your power
adapter. The Myotone® must be charged for 6 hours prior to your first
treatment. Following the initial charge, once every week to 2 weeks is
sufficient. Note: The green LED “Toning Level” light will flash if the
battery is getting low.
xWhen the provided charger is plugged into your Myotone®, the green LED
indicator lights on your Myotone® will flash and cycle through all three toning
levels one at a time, 1-2-3, indicating the device is charging. When the device
is fully charged, all three of the green LED lights will remain solid, at that point
your Myotone® is ready to use. Disconnect your device from the power
adapter and turn it on by pressing the On/Off button.
xDo not use your Myotone® while connected to the power adapter. The
Myotone® will not function while plugged into a power source.
xYou may adjust the toning level to your comfort by repeatedly pressing
the On/Off button. Each time you press the On/Off button your
Myotone® will advance through Toning Levels 1, 2, 3 and then turn off.
With the Myotone off press the On/Off button once for level 1, twice for
level 2, three times for level 3, and four times to turn your Myotone®
back off. Note: To turn your Myotone off from toning level 1, press the
On/Off button three times. From Toning Level 2, press On/Off button
twice. From Toning Level 3, press On/Off button once.
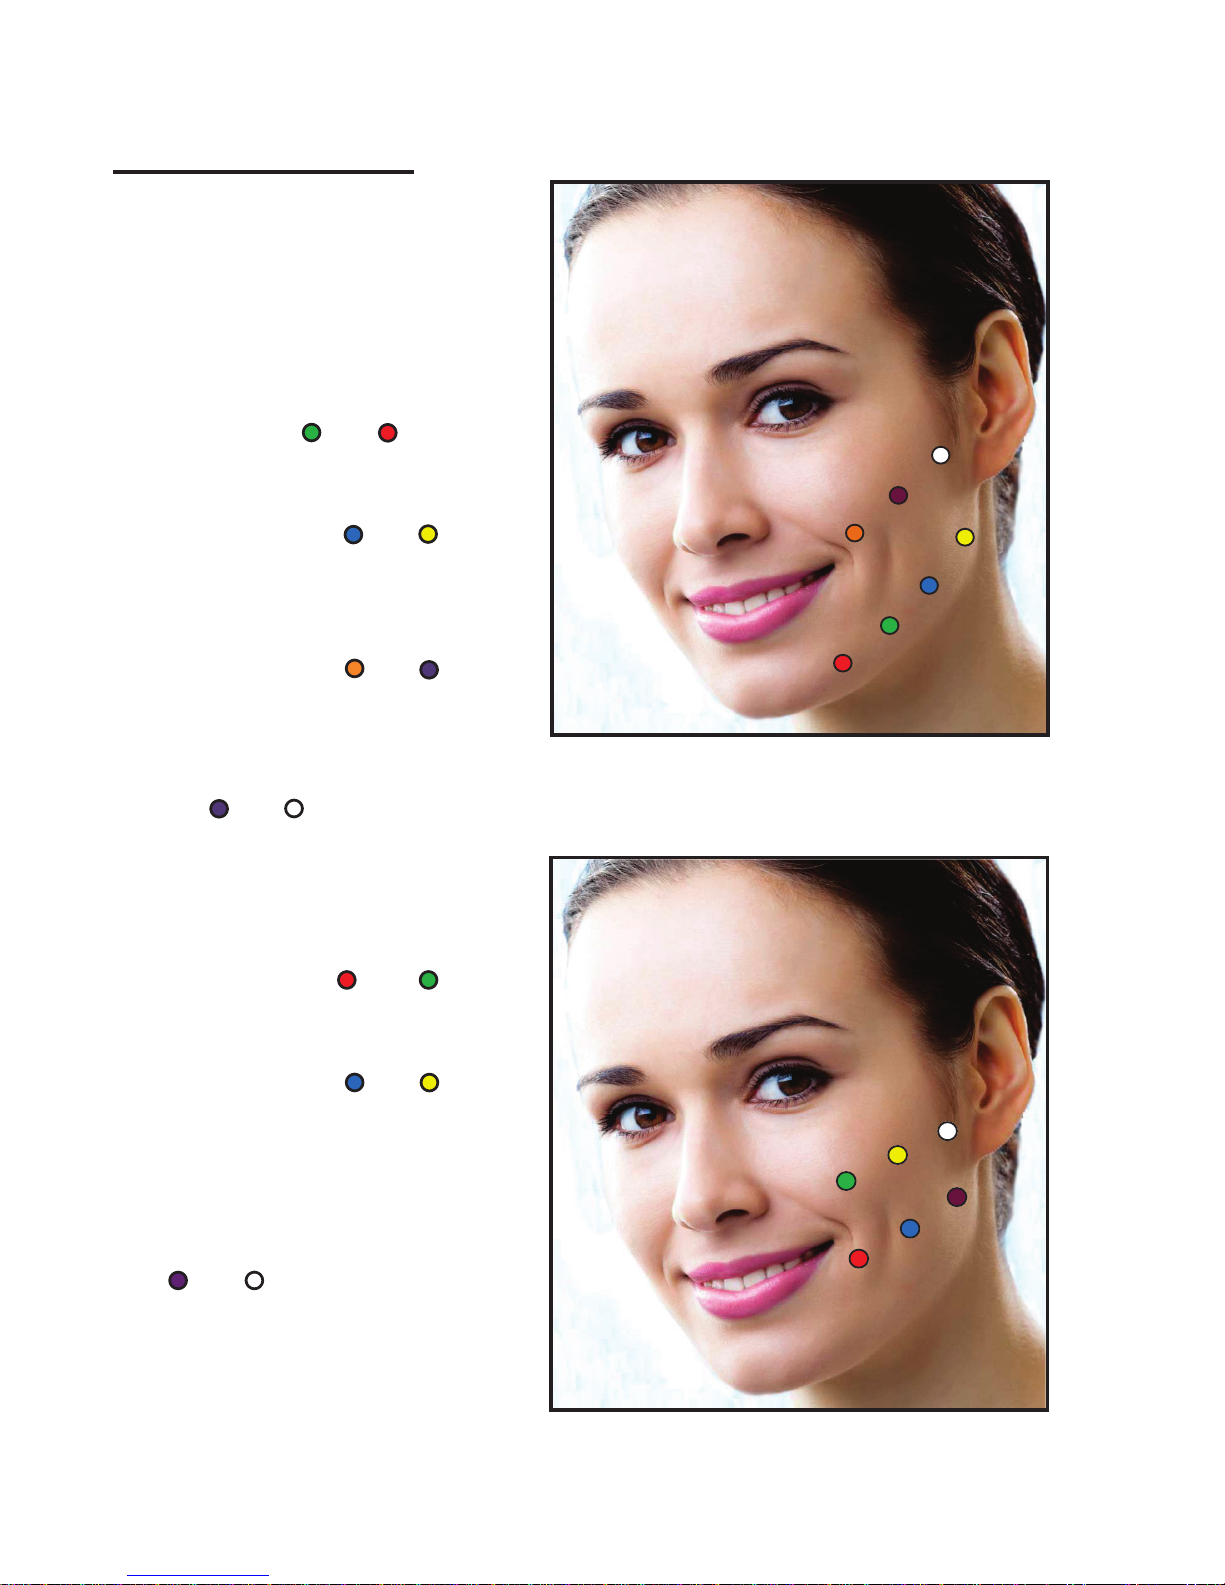
xAlways cover the area being treated with Myotone® Conductive Gel.
xWhen your device is turned on, an electrical current is emitted through
the electrode tips. For proper conductivity, make sure that both electrode
tips are always touching the skin at the same time.
xBegin your Myotone® treatment as described on page 8 of this manual.
Watch the Myotone® Instructional DVD for additional help.
xRemember to turn your Myotone® off after every treatment.
Note: Your Myotone® device will not contract your muscles nor cause them to
twitch. You may feel a slight tingling sensation, although some users will not feel
a sensation at all. The current can be sub-sensory because it mimics the brain’s
natural current and thus is very, very small. If you do not feel the current it is OK.
As long as the green LED light is on (matching the toning level you have
selected) your Myotone is functioning properly. However, if the sensation does
becomes unpleasant, lower the toning to level 1. When used correctly, the
current can be very soothing.
Page | 5

Myotone®Usage Instructions
Personal Preparation
To gain optimal results, start by cleansing your face with a non-oil based
cleanser. It is recommended that men cleanly shave any unnecessary hair
from their face before use. Exfoliating the areas to be treated 1 to 2 times
per week should allow for even better results.
Position yourself in front of a mirror in a well-lit room. Once you become
familiar with the proper placements of your Myotone® device, you may
choose to perform your treatments without the use of a mirror.
Apply the Myotone® Conductive Gel to only one side of your face at a time.
Apply a small amount of conductive gel to the dual probes of the Myotone®
device. Use just enough gel to completely cover the probes. If the gel
begins to dry during your treatment, reactivate the gel by applying a small
amount of water to the area being treated. For best results, the Myotone®
Conductive Gel is recommended. Aloe Vera or other water based gels with
enzymes may cause wearing to electrode tips.
For best results, use your Myotone® system 5-7 times per week for the
initial 5 weeks. Use the system 3 times per week for the next 2 weeks, and
then 2 times per week for the following two weeks. After that you only need
to use your Myotone® system once per week for maintenance or if you feel
you need a “Myo-boost”.
Do not use your Myotone® in any way other than directed in this
instruction manual.
Page | 6

Basic Techniques Figure 1
Directions- Face
1. Apply the Myotone®
Conductive Gel.
2. Position both probes just
above your jaw line on the
points marked, and .
Hold for 4 seconds. (Fig. 1)
3. Reposition the probes on
the points marked and .
Hold for 4 seconds. (Fig. 1)
4. Position both probes
under your cheek bone on
the points marked and .
Hold for 4 seconds. (Fig. 1)
5. Reposition the probes by
your hairline on the points
marked and . Hold for 4
seconds. (Fig. 1)
6. Position both probes
under your cheek bone, to
the side of your mouth on
the points marked and .
Hold for 4 seconds. (Fig. 2)
7. Reposition the probes on
the points marked and ,
in the center of the cheek
area. Hold for 4 seconds.
(Fig. 2)
8. Lastly, reposition the
probes on points marked
with and near the back
of your cheek. Hold for 4
seconds. (Fig 2)
Repeat each step 2 times.
Figure 2
Page | 7

Basic Techniques
Directions- Forehead
1. Apply the Myotone®
Conductive Gel.
2. Position the probes
above your temple on the
points marked and .
Hold for 4 seconds. (Fig 1)
3. Reposition the probes
above the center of your
eyebrow, on the points
marked and . Hold for
4 seconds. (Fig 1)
4. Be sure to keep the
probes just above your
eyebrow. Do not let the
probes touch the eyes or
eyelids.
Repeat each step a total
of 2 times. When
completed, repeat the
steps on the opposite
side of your face.
NOTE: The Myotone®
Instructional video mentions
lowering toning level to 1 during
this movement. This is not a
necessary change unless
discomfort occurs.
Figure 1
Page | 8

Advanced Techniques
Directions- Eye and Temple
1. Position the Myotone®
probes at the points marked
and . Hold for 4 seconds.
(Fig 1)
2. Then move the Myotone® in
a swooping “J” motion slowly
in the direction of the arrows
for a count of 4 seconds. Hold
at the end of the move near
your temple for 2 seconds.
(Fig 1)
3. Reposition the probes on
your temple on the points
marked and . Hold for 4
seconds then move the
Myotone® slowly in the
direction of the arrows up to
your hairline. (Fig 2)
4. Reposition the probes on
the points marked and .
Hold for 4 seconds then move
the Myotone® slowly in the
direction of the arrows up to
your hairline. (Fig 2)
Repeat each step 2 times
on both sides of face.
*Note: We do recommend
only using settings 1 or 2
around the eye area.
Figure 1
Figure 2
Figure 2
Page | 9

Advanced Techniques
Directions- Forehead
1. Position the probes at the
points marked and . Hold for
4 seconds then move the
Myotone® slowly in the direction
of the arrows towards your scalp
for a count of 4. (Fig 1)
2. Reposition the probes at the
points marked and . Hold
for 4 seconds then move the
Myotone® slowly in the direction
of the arrows towards your scalp
for a count of 4. (Fig 1)
3. Reposition the probes at the
points marked and . Hold for
4 seconds then move the
Myotone® slowly in the direction
of the arrows towards your scalp
for a count of 4. (Fig 1)
4. Reposition the probes at the
points marked and . Hold for
4 seconds then move the
Myotone® slowly in the direction
of the arrows towards your scalp
for a count of 4. (Fig 1)
Repeat 2 times on both sides of
your forehead.
Figure 1
Page | 10

Advanced Techniques
Directions- Cheek Movement 1
1. Position the probes at the
points marked and . Hold for
4 seconds then move the
Myotone® slowly in the direction
of the arrows towards your ear
for a count of 4. (Fig 1)
2. Reposition the probes at the
points marked and . Hold for
4 seconds then move the
Myotone® slowly in the direction
of the arrows towards your ear
for a count of 4. (Fig 1)
3. Reposition the probes at the
points marked and . Hold for
4 seconds then move the
Myotone® slowly in the direction
of the arrows towards your ear
for a count of 4. (Fig 1)
4. Finally, reposition the probes
at the points marked and .
Hold for 4 seconds then move
the Myotone® slowly in the
direction of the arrows towards
your ear for a count of 4. (Fig 1)
5. Repeat 2 times on both sides
of your face. Do not allow the
probes to touch your lips.
Figure 1
Figure 1
Page | 11

Advanced Techniques
Directions- Cheek Movement 2
1. Position the probes at the
points marked and , along
the jaw line. Hold for 4 seconds,
then move the Myotone® slowly
in the direction of the arrows
towards your eye bone for a
count of 4. (Fig 1)
2. Reposition the probes at the
points marked and , along
the jaw line. Hold for 4 seconds,
then move the Myotone® slowly
in the direction of the arrows
towards your eye bone for a
count of 4. (Fig 1)
3. Reposition the probes at the
points marked and , along
the jaw line. Hold for 4 seconds,
then move the Myotone® slowly
in the direction of the arrows
towards your eye bone for a
count of 4. (Fig 1)
4. Finally, reposition the probes
at the points marked and ,
along the jaw line. Hold for 4
seconds, then move the
Myotone® slowly in the
direction of the arrows towards
your eye bone for a count of 4.
(Fig 1)
Repeat each step 2 times on both
sides of your face.
Figure 1
Page | 12

Advanced Techniques
Directions- Chin Movement 1
1. Position the probes at the
points marked and .
Straddle your jawbone in the
center of your chin with each
electrode. Hold for 4 seconds
then move the Myotone®
slowly in the direction of the
arrows towards your ear for a
count of 4 seconds. (Fig 1)
Directions- Chin Movement 2
2. Reposition the probes at the
points marked and . Probes
should only be placed directly
centered under your chin in the
tissue there, do not place the
probes over trachea or midline
of the neck. Hold for 4 seconds
then move the Myotone® slowly
up in the direction of the arrows.
(Fig 2)
3. Reposition the probes at the
points marked and . Hold for
4 seconds then move the
Myotone® slowly up in the
direction of the arrows. (Fig 2)
4. Repeat each step 2 times on
both sides of the face.
Figure 1
Figure 2
Page | 13

Advanced Techniques
Directions- Neck Movement 1
1. Position the probes at the
points marked and , just
above the collarbone. Move
the Myotone® in the direction
of the arrows for a slow count
of 4, stopping just under the
jaw line. (Fig1)
2. Reposition the probes at the
points marked and . Move
the Myotone® in the direction
of the arrows for a slow count
of 4, stopping just under the
jaw line. (Fig1)
3. Reposition the probes at the
points marked and . Move
the Myotone® in the direction
of the arrows for a slow count
of 4, stopping just under the
jaw line. (Fig1)
4. Reposition the probes at the
points marked and . Move
the Myotone® in the direction
of the arrows for a slow count
of 4, stopping just under the
ear and jaw line. (Fig1)
5. Repeat each step 2 times on
both sides of the neck.
Figure 1
Page | 14

Advanced Techniques
Directions- Neck Movement 2
1. Position the probes at the
points marked and (just
above the collarbone) then
move the Myotone® in the
direction of the arrows for a
slow count of 4, stopping just
before the back of the neck.
(Fig1)
2. Reposition the probes at
the points marked and ,
then move the Myotone® in
the direction of the arrows for
a slow count of 4, stopping
just before the back of the
neck. (Fig1)
3. Reposition the probes at
the points marked and ,
then move the Myotone® in
the direction of the arrows for
a slow count of 4, stopping
just before the back of the
neck. (Fig1)
4. Reposition the probes at
the points marked and ,
then move the Myotone® in
the direction of the arrows for
a slow count of 4, stopping
just under the ear before the
back of the neck . (Fig1)
5. Repeat each step 2 times on
both sides of the neck.
Note: Keep the probes away
from the midline of the neck. Do
not rest them near or on the
trachea. Be sure to position
them in the muscle just outside
of the area.
Figure 1
Page | 15

Areas To Avoid
WARNING:
Do not use your Myotone® on:
xMid-line of neck
(avoid area near or on
the trachea for risk of
potential problems with
thyroid gland)
xMouth Area (on top of
the lips or touching the
lips-if they happen to
brush or briefly touch
that is fine. Constant
use on lips is not
recommended)
xEye Area (eyelid over
the eye ball or eye ball
itself)
Troubleshooting
If you are experiencing any problems
with the performance or functionality
of your Myotone® device, please
make sure that the device is being
charged from a working electrical
outlet, and that the toning level is set
properly. You may not feel the
current but as long as the green LED
light is lit on the toning level you have
selected, your Myotone® should be
functioning correctly. If problem
persists please call our toll free
number: 1-877-969-2811.
Cleaning & Maintenance
After each treatment, wipe all
application areas with a soft damp
cloth. Do not use any other cleaning
agents except water. To facilitate
better conductivity, take special care
when cleaning around the base of
the metal probes to prevent product
build-up. To insure the probes are
cleaned properly, you should use a
slightly damp Q-tip around the
probes. Do not submerge your
device in water or any other liquid.
Page | 16

Indications for Use
Over-the-counter cosmetic use
Contraindication for Use
Do not use this device if you have a cardiac pacemaker, implanted defibrillator, or other
implanted metallic or electronic device. Such use could cause electric shock, burns,
electrical interference, or death.
Warnings
xIf you are in the care of a physician, consult with your physician before using this
device;
xDo not apply stimulation around your mouth, eyes or vertical center of face and
neck;
xDo not apply stimulation across your chest because the introduction of electrical
current into the chest may cause rhythm disturbances to your heart, which could
be lethal;
xDo not apply stimulation near the thorax which may increase the risk of cardiac
fibrillation;
xDo not apply stimulation over painful areas. If you have painful areas, you should
consult with your physician before using this device;
xDo not apply stimulation in the presence of electronic monitoring equipment (e.g.,
cardiac monitors, ECG alarms), which may not operate properly when the
electrical stimulation device is in use;
xDo not use this device in close proximity to short-wave or microwave equipment;
xDo not apply stimulation when in the bath or shower;
xDo not apply stimulation while sleeping;
xDo not apply stimulation while driving, operating machinery, or during any activity
in which electrical stimulation can put you at risk of injury;
xDo not use the device on children, if it has not been evaluated for pediatric use.
xConsult with your physician before using this device, because the device may
cause lethal rhythm disturbances to the heart in susceptible individuals; and
xApply stimulation only to normal, intact, clean, healthy skin.
Myotone® should not be used by:
xChildren
xPregnant Women
xPeople subject to seizures
xPeople with cancer/tumors
xPeople with cardiac pacemakers
xPeople with implanted defibrillators/stimulators
xPeople with electronic implanted devices
Page | 17
Table of contents
Popular Personal Care Product manuals by other brands

LR
LR ZeitGard instruction manual

Electric Mirror
Electric Mirror Sales Demo Kit Assembly and operating instructions

Bradley
Bradley S19-210BF Installation

Panasonic
Panasonic ER-416 operating instructions

Coopers of Stortford
Coopers of Stortford vivadia H912 Instructions for use

ConvaTec
ConvaTec ESTEEM + manual