Nabtesco CONPAL NCB-8C-SR User manual

81-SS30095-1
-1 -
NCB-8C-SR
User’s Manual
Unit
Speed Control

81-SS30095-1
- 2 -
[For Users]
1Safety Precautions for Users......................................................................................3
1.1
Precautions............................................................................................................... 3
1.2
Prior to Use............................................................................................................... 3
1.3
Places (situations) .................................................................................................... 4
1.4
During Use................................................................................................................ 4
1.5
During Repair and Inspection................................................................................... 5
1.6
During Storage ......................................................................................................... 5
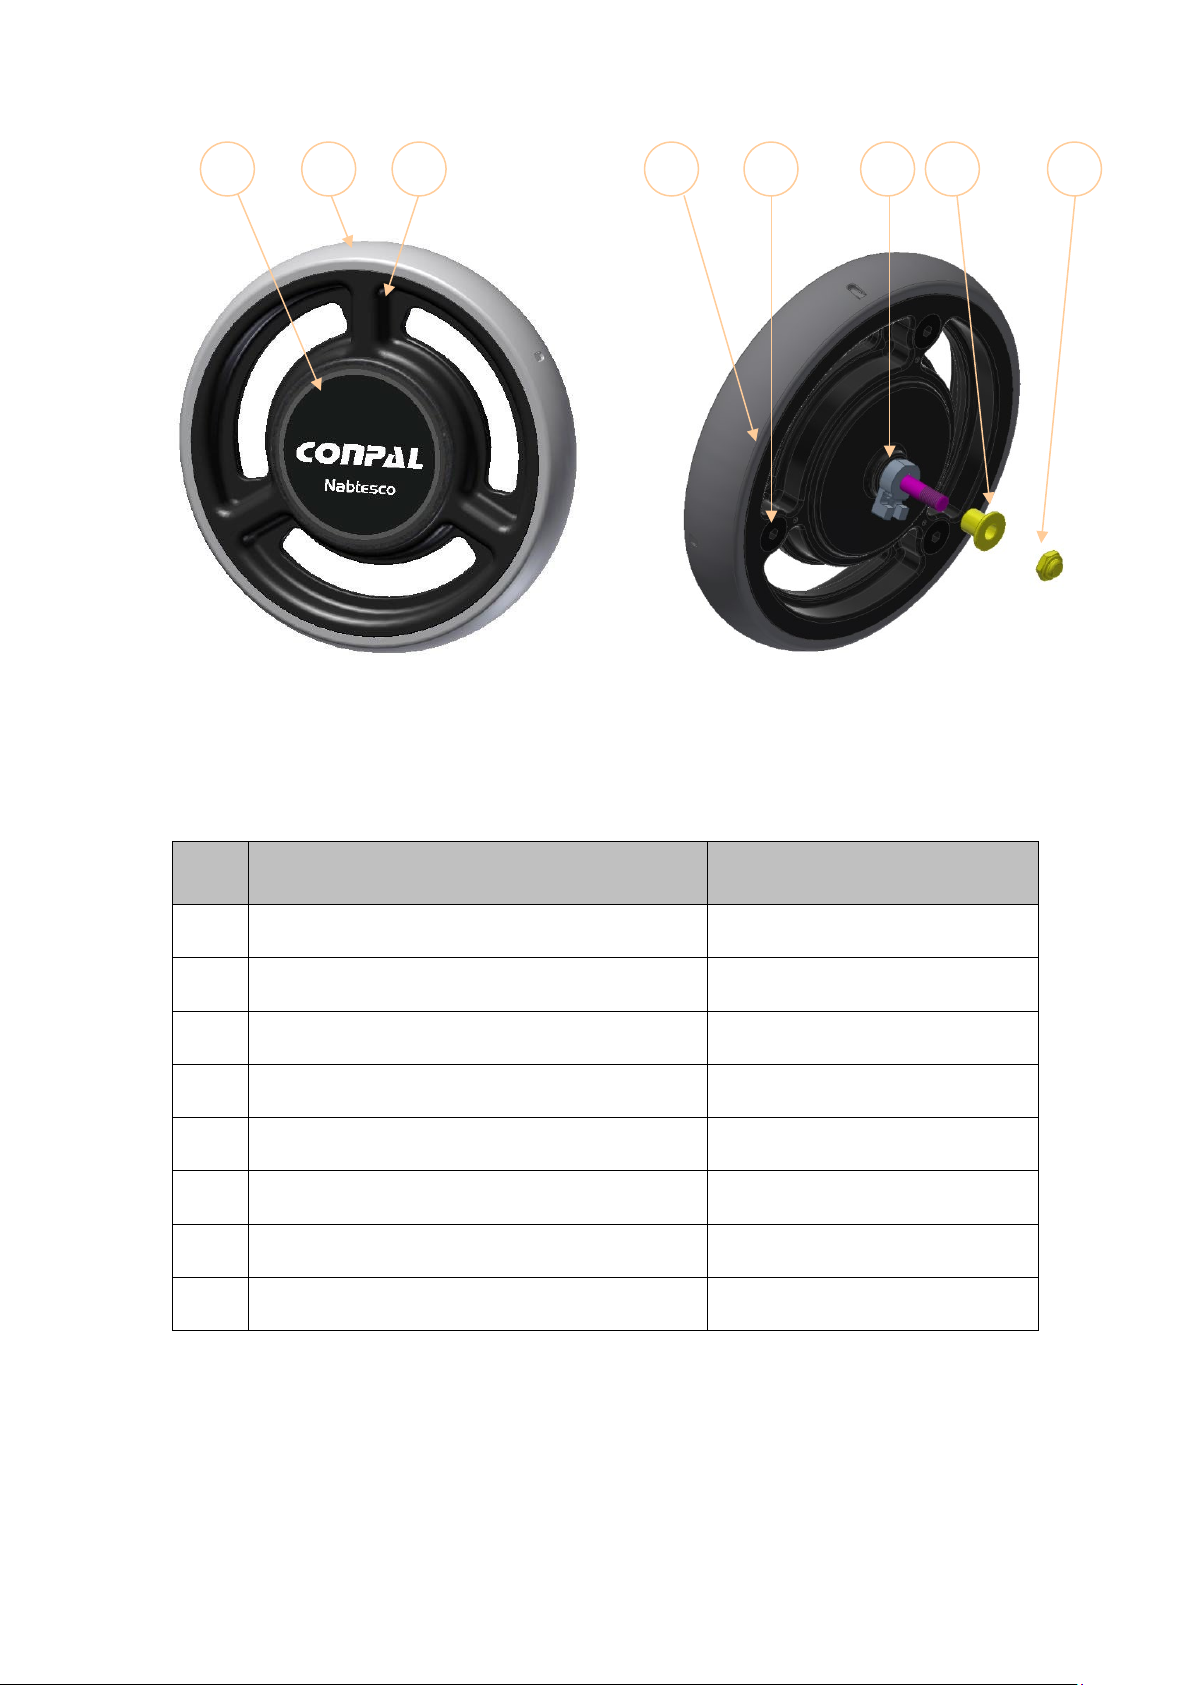
2Device Features and Component Names ..................................................................6
2.1
Device Features ....................................................................................................... 6
2.2
Component Names................................................................................................... 7
3Daily Inspections and Care.........................................................................................8
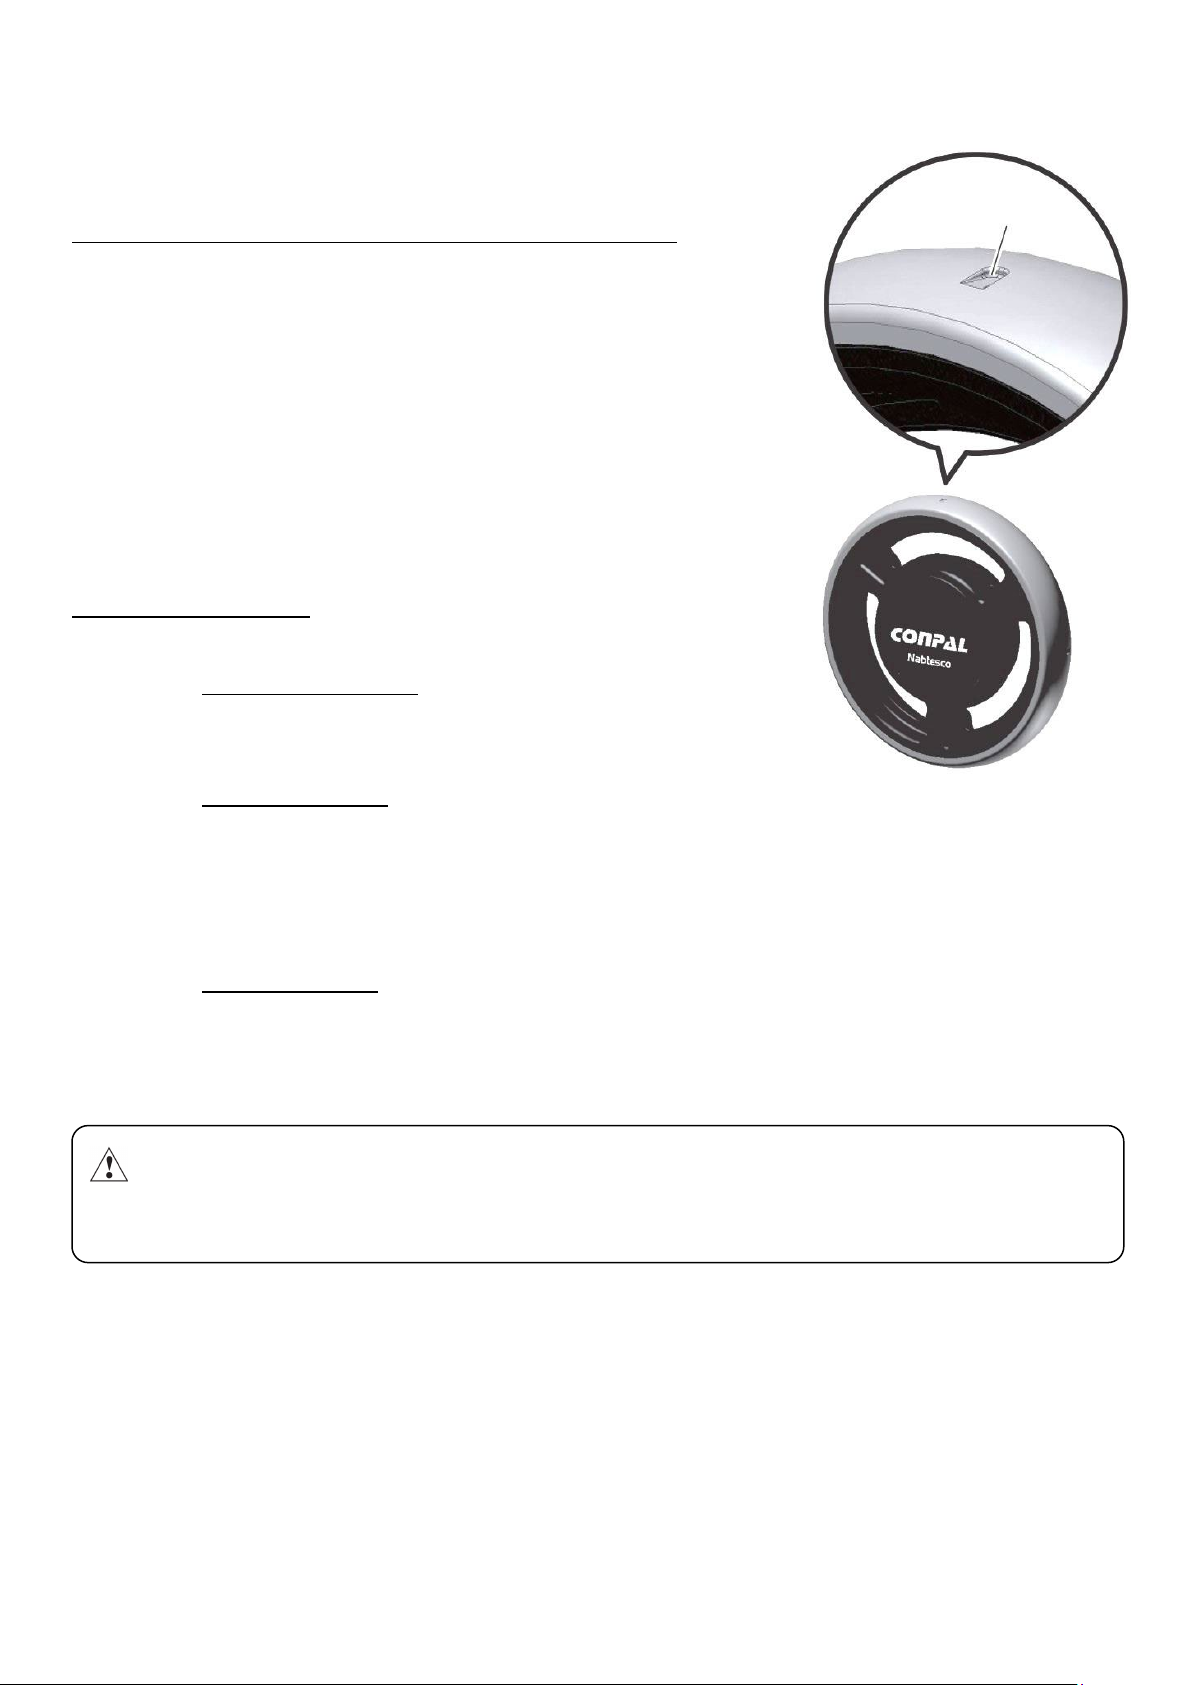
3.1
Checking When to Replace Tires ............................................................................. 8
3.2
Daily Inspections ...................................................................................................... 9
3.3
Care and Cleaning.................................................................................................. 10
4If You Find an Abnormality........................................................................................11
4.1
If You Find an Abnormality During Use................................................................... 11
5Specifications ............................................................................................................ 11
5.1
Product Specifications ............................................................................................ 11
[For Distributors]
6Information for Distributors......................................................................................12
6.1
Warnings and Cautions .......................................................................................... 12
6.2
Installing the Product to the Rollator....................................................................... 12
6.3
Adjusting the Brake Force ...................................................................................... 14
6.4
Replacing the Tire................................................................................................... 16
7Warranty and After-Sales Service ............................................................................20
7.1
Warranty conditions................................................................................................ 20
7.2
Disclaimer............................................................................................................... 20
7.3
Precautions............................................................................................................. 20
This manual describes the CONPAL unit (Speed Control unit). The manual does not describe warnings,
cautions, or the like related to the Rollator itself. Please prepare a separate user's manual for the Rollator main
body to which the CONPAL unit is to be installed for when the product is to be delivered to the user.
The first half (pages 3-11) of this manual is for the user, and the second half (pages 12-21) is for the distributor.
The first half for the user describes information that we would like you to relay to the user. We ask that you
please include the information in the user’s manual of the Rollator main body and be sure to pass the
information on to the user.
Changes in the shapes and colors used in this manual are designed to make the descriptions easier to
understand.

81-SS30095-1
- 3 -
[For Users]
1 Safety Precautions for Users
1.1
Precautions
To ensure safe and proper use of the product, please read this User’s Manual and fully understand
the warnings and cautions related to product handling, product features, and the like.
The safety alert symbols below are used to alert you to potential hazards in
handling the product.
WARNING
Indicates that incorrect handling may cause death or severe injury.
CAUTION
Indicates that incorrect handling may cause injury and/or property
damage.
1.2
Prior to Use
WARNING
• Do not remove the CONPAL unit and install it to another rollator or device. Doing so can cause an unexpected
accident.
• When the product is dropped, or malfunctions or produces an abnormal sound after installation, do not use it.
Using the product in such conditions can cause an unexpected accident.
• Do not use the product if screws or nuts are loose.
Loose screws or nuts can cause the parts to come off, resulting in falling.
• Do not disassemble or modify the product.
If overhaul is required, be sure to contact your distributor.
• Do not apply grease or oil to the CONPAL unit.
Doing so can cause insufficient brake force, resulting in falling.
• Before using the product, make sure that the brakes are activated automatically.
Failure to do so can cause an unexpected fall.
• Before using the product, confirm details of daily inspections (page 9).
If an abnormality is found, immediately stop using the product and contact your distributor.
CAUTION
• Check if a string or the like is entangled with the CONPAL unit.
If so, remove it from the CONPAL unit before use while taking care not to get your fingers pinched.
• Before using the product, check your physical conditions to ensure safe use.
An unexpected accident such as falling can result, depending on your physical conditions.
• Do not lift the main body by holding the CONPAL unit.
Doing so can cause your fingers to be pinched between the CONPAL unit and the frame, resulting in injury.

81-SS30095-1
- 4 -
1.3
Places (situations)
1.4
During Use
WARNING
Do not use the product in the following places.
• Snowy surfaces ・Icy surfaces ・Escalators
• Steep slopes ・Slippery surfaces
CAUTION
Use the product carefully in the following places and situations.
• Slopes ・Busy streets ・Gaps, steps, curbs, and uneven surfaces
• Sandbox ・Crowded places ・Mud and puddles
• At night ・Dark places where you cannot see your footsteps
WARNING
• Walk with the rollator while taking care that the CONPAL unit is not caught in a gap or groove, such as a
gap at a railroad crossing, a gap of an escalator, or a sill groove of an elevator. A wheel caught in a gap
or groove can cause falling.
• Be sure to use the product with the center cap installed. If dirt or water enters the interior, the
predetermined brake force will not be achieved, resulting in falling. If the center cap comes off, contact
your distributor.
• Do not attempt to adjust the brake force. If brake force adjustment is required, contact your distributor,
Brake force that does not match your physical activity level can cause an unexpected fall.
• Clean the surface of the CONPAL unit before use.
If it is dirty, the hand brake performance may be deteriorated.
• Do not drag the CONPAL unit while keeping the brakes applied.
Doing so can cause premature damage. (See page 8.)

81-SS30095-1
- 5 -
1.5
During Repair and Inspection
WARNING
• Do not loosen, disassemble, or modify parts connected by bolts and nuts. When disassembly or repair is
required, be sure to contact your distributor.
CAUTION
• Do not remove the center cap. If dirt or water enters the interior, the predetermined brake force will not be
achieved, resulting in falling.
• When replacing tires, replace the left and right tires at the same time. Replacing only one tire will result in
uneven brake force between left and right.
• Never apply grease or oil to the product. Doing so can cause insufficient brake force, resulting in falling.
1.6
During Storage
Store the product indoors.
Wipe the moisture off before storing. Failure to do so may cause rust.
WARNING
• Do not store the product in a location exposed to water, wind, or rain. Doing so can cause malfunction and/or device
failure, resulting in an accident.
• If water enters into the product, test the brakes in a safe place by applying the brakes five or six times to check the
brakes work.
If the brakes do not work, repeat the test until the brakes work, and then use the product.
• Do not store the product in the trunk of a car or any location that reaches high temperatures. Doing so can cause
malfunction and/or device failure, resulting in an accident.
CAUTION
• Do not lift the main body by holding the CONPAL unit.
Doing so can cause your fingers to be pinched between the CONPAL and the frame, resulting in injury.

81-SS30095-1
- 6 -
2 Device Features and Component Names
2.1
Device Features
When installed to a rollator, the CONPAL unit (Speed Control unit), automatically activates the
brakes at the time of sudden acceleration, preventing falling while using the rollator.
Unlike a conventional resistance brake system, the CONPAL unit activates the brakes only at times
of sudden acceleration, making it possible for the user to walk smoothly without the brakes applied
during normal walking.
The CONPAL unit (Speed Control unit) is a brake system capable of suppressing acceleration; it
cannot fully stop the rollator. Be careful as you may fall when you walk too far behind the rollator to
lose hold of the grip.
Conventional Rollator
The user cannot keep up with the rollator
and falls!
Automatic braking at times of
sudden acceleration
Smooth walk during
normal walk
The brakes are activated at times of sudden acceleration
only, preventing falling!

81-SS30095-1
- 7 -
2.2
Component Names
Outer View Inner View
No. Name Remarks
1 Center cap
2 Tires
3 Wheel (outer)
4 Wheel (inner)
5 Wheel installation bolt 3 pieces (M8×25)
6 Adapter
7 Bushing
8 Main body installation nut (Cap nut, M8)
1 32 54 76 8

81-SS30095-1
- 8 -
3 Daily Inspections and Care
3.1
Checking When to Replace Tires
Inspect your tires for wear and consider whether to replace them.
Each tire has grooves on the rubber surface as shown in the figure to the
right. (at three places)
If any of these grooves is worn down to a flat surface, the tire needs
replacement.
Immediately stop using the product, and contact your distributor.
If grooves on your tires are worn down in two or three months (premature
wear), it could have been caused by dragging the CONPAL unit. Take the
corrective measures below to solve the problem.
Corrective measures
If your tires are worn down prematurely
• Brake force adjustment
The brake force may be too high. Have the brake force reduced
slightly while maintaining safety.
If brake force adjustment is required, contact your distributor.
• Slow-speed walking
As you walk faster, the tires are more likely to spin out.
It is recommended to walk on a concrete or asphalt pavement at a speed of 3.5 km per hour.
Walk very slowly on uneven surfaces such as cobblestones.
Note: Walking speed of 3.5 km per hour is equivalent to walking speed of approximately 1 m
per second.
• Periodic inspection
If an abnormality is found, immediately stop using the product and contact your distributor.
Even if there is no abnormality, it is recommended to have the product inspected once a year.
CAUTION
• Replace the left and right tires at the same time.
Replacing only one tire will result in uneven brake force between left and right
Figure 2
Groove

81-SS30095-1
- 9 -
3.2
Daily Inspections
Performing inspections periodically ensures increased safety in using the product.
Basic inspection details
Check the following:
• Cracks or deformations in the tires or inner/outer wheels
• Worn-down grooves on the tires (a sign of replacement)
• Brake performance
• Abnormal sound such as squeaking/rubbing sound produced when using the CONPAL unit
• Excessive wobbling/vibration that occurs when using the CONPAL unit
• Loose main body installation nuts
• Loose center cap
• Installation angle of the CONPAL unit (not inclined)
WARNING
• If an abnormality is found during inspection, immediately stop using the product and contact your
distributor.
Using the product while there is an abnormality can cause an accident such as falling.
• To ensure safe use of the product, perform daily inspection, and also have the product inspected once a year.
If any of consumable parts is worm, replace it regardless of the period of use.
• Failure to perform inspection or using worn parts can cause an unexpected accident or failure of the device.
CAUTION
• Do not loosen, disassemble, or modify parts connected by bolts and nuts. When disassembly or repair is
required, be sure to contact your distributor.
• When cleaning the product, do not pour water over the product. Wipe down the product using a damp cloth.
• Do not apply grease or oil to the CONPAL unit.
Doing so can cause insufficient brake force, resulting in falling.
• Do not use soapy water or oil-based cleaners to clean the product.
Doing so can cause liquid to enter into the product or attach to the tire surfaces, resulting in falling due to
insufficient brake force.

81-SS30095-1
- 10 -
3.3
Care and Cleaning
WARNING
• If water enters into the CONPAL unit, follow the steps below.
1. Quickly move the product back and forth five or six times.
2. Check that the brakes are activated automatically.
CAUTION
• When cleaning the product, do not pour water over the product. Wipe down the product using a damp
cloth.
• Do not apply grease or oil to the CONPAL unit.
Doing so can cause insufficient brake force, resulting in falling.
• Do not use soapy water or oil-based cleaners to clean the product.
• Liquid entering into the CINPAL unit or attaching to its surface can cause insufficient brake force, resulting

81-SS30095-1
- 11 -
4 If You Find an Abnormality
4.1
If You Find an Abnormality During Use
Conduct investigations according to each condition, following the descriptions below. If the abnormality still exists,
contact your distributor.
Condition
Investigation
Action
The CONPAL unit
remains locked.
Is the rollator parking brake still
activated?
• Release the rollator parking brake.
-
• Immediately stop using the product
and contact your distributor.
The brakes are not
working well, or brake
performance is
different between left
and right.
-
• Immediately stop using the product
and contact your distributor.
The product produces
an abnormal sound.*
Is something caught in the wheel axis?
• Remove any caught objects.
• If the problem still exists, contact your
distributor.
The CONPAL unit
wobbles/vibrates
excessively.
Is a bolt or nut loose?
• Immediately stop using the product
and contact your distributor.
* Brake operating sound:
This brake mechanism is a friction-type mechanism, and thus produces a slight squeaking/rubbing sound.
The sound changes according to the environment, such as the atmospheric temperature, humidity, etc.
5 Specifications
5.1
Product Specifications
Dimensions Outer wheel diameter: 200 mm, Wheel width: 35 mm
Weight 1.2 kg (not including hexagonal wrench for adjustments)
Maximum user weight 100 kg (including loaded objects, such as bags)
Brake force 1.5 km/h or less (convergence speed during 8-degree free descent)
Speed adjustment 3 levels
* For improvement purposes, the information, specifications, and the like described in this manual are subject to
change without notice.
WARNING
• If an abnormality is found, do not use the product.
• If you find an abnormality while using the product, immediately stop using it and contact your distributor.
• Do not disassemble or modify the product. When disassembly or repair is required, be sure to contact
your distributor.
• Do not apply grease or oil to the CONPAL unit. Doing so can cause insufficient brake force, resulting in
falling.

81-SS30095-1
- 12 -
[For Distributors]
The first half of this manual describes information for users. Be sure to read that information along
with the information described for distributors.
6 Information for Distributors
6.1
Warnings and Cautions
6.2
Installing the Product to the Rollator
WARNING
• Firmly tighten the bolts. Otherwise, the CONPAL unit will come off, which can cause the user to fall.
• Check that the stopper is secured in the predetermined position. Failure to do so can cause wheel
disengagement, which can cause the user to fall.
• Adjust the brake force according to the user’s physical activity level.
Brake force that does not match the user’s physical activity level can cause an unexpected fall.
• Do not insert fingers into the adjustment window. Doing so can result in injury.
CAUTION
• Make sure that the product is installed in the correct orientation.
• Do not attempt to adjust the brake force beyond the allowable range. Doing so can result in damage to the brake.
• After adjustment is completed, remove the hexagonal wrench. Keep it in a safe place for future use.
WARNING
• Apply thread-locking fluid to the main body installation nuts and tighten them to the specified torque.
Insufficient tightening can cause play in the installation area or disengagement of the CONPAL unit, which
can cause the user to fall.
• Securely insert the adapter of the CONPAL unit into the indented sections of the rollator.
Insufficient fit can cause play in the installation area or disengagement of the CONPAL unit, which can
cause the user to fall.
• Do not remove the CONPAL unit and install it to another rollator or device. Doing so can cause an
unexpected accident.
• Do not use the product if it was dropped, malfunctions, or produces an abnormal sound. Doing so can
cause an unexpected accident.
CAUTION
• Make sure that the product is installed in the correct orientation. Failure to do so can cause insufficient
brake force, which can cause the user to fall.

81-SS30095-1
- 13 -
(1) Check the left/right identification stickers on the inner wheels for installation orientation. (Figure 3)
(The installation orientation can also be checked with the identification numbers inside the center cap.)
(Figure 4))
(2) Insert the bushing from inside of the frame. (Figure 3)
(3) Securely insert the adapter of the CONPAL unit into the indented sections of the rollator from outside.
(Figure 5)
(4) Apply Loctite 243 (or 248) to the threads of a new main body installation nut. Install the nut to the axis that
protrudes from the rollator inside, and tighten it to the specified torque (15 ±10% Nm).
(5) Wipe off the excess Loctite.
CAUTION
Apply Loctite to the nut threads and spread it evenly.
Loctite applied at the front end of the nut will ooze
out, resulting in poor anti-loosening performance.
Bushing
Main body installation nut
(LOCTITE 243 or 248)
(Half of circumference of the bottom two or
three threads)
Tighten to the specified torque (15 ±10% Nm).
Figure 3
R
Insert the adapter into
the indented sections.
Left/right identification sticker
If R: Install on the “right” as viewed from the rear of the
rollator.
If L: Install on the “left” as viewed from the rear of the
rollator.
Character code and installation orientation
Installation example: Figure 3
Install on the “right” as viewed from the rear of the
Note:
The frame and circle in the
figure are for reference
only, and may be different
from the actual shapes.
Figure 4
WARNING
Do not re-use the main body installation nuts.
Use new nuts.
Use only dedicated nuts.
Failure to do so can cause the CONPAL unit to come off.
Inside of the canter
Identification number
Figure 5

81-SS30095-1
- 14 -
6.3
Adjusting the Brake Force
(1) Remove the center cap with the CONPAL unit still installed on the rollator. (Figure 9)
(2) Turn the CONPAL unit, and align the adjustment window and the adjuster. (Figure 10)
(3) Insert the provided hexagonal wrench into the hexagonal hole of the adjuster.
(4) Adjust the brake force by turning the hexagonal wrench and setting the arrow of the adjuster to the desired
position. (Figure 10)
For the respective adjustment positions for low, medium, and high brake forces, see Figures 11-13.
(5) Once adjustment is completed, remove the hexagonal wrench and install the center cap.
(6) Check that the same level of brake force are applied on the left and right sides.
WARNING
• Do not insert fingers into the adjustment window. Doing so can result in injury.
• After adjustment is completed, be sure to re-install the center cap. Failure to do so can cause dust or
water to enter the interior, resulting in malfunction.
• The distributor or physical therapist must adjust the brake force according to the user’s physical activity
level. The brake force not matching the user’s physical activity level can cause unexpected falling.
CAUTION
• Remove the center cap by using a coin or slotted screwdriver.
Do not use your nails as tools. Doing so can result in injury.
• There are three adjustment levels. Rotating the adjuster excessively damages the adjuster. Caution is required.
• Do not turn the CANPAL unit with the hexagonal wrench inserted. Doing so can result in damage to the adjuster.
• Set the left and right brake force to the same level. Uneven brake force can cause unexpected falling.
Figure 9
Center cap Adjustment window
Hexagonal wrench
Adjuster
Figure 10
CAUTION
• The adjustment mechanism could be damaged if you turn the hexagonal wrench with an excessive
torque beyond the adjustment range.
Therefore, the hexagonal wrench is bent intentionally so that only the longer leg can be inserted.
• When using your own hexagonal wrench, insert its longer leg into the hole of the adjuster and turn
it to adjust the brake force within the allowable range.

81-SS30095-1
- 15 -
Brake Force: Low Brake Force: Medium
(Walking speed: 2.5 to 3.5 km/h) (Walking speed: 1.5 to 2.5 km/h)
Brake Force: High
(Walking speed: up to 1.5 km/h)
WARNING
• Do not drag the CONPAL unit while keeping the brakes applied. Doing so can cause premature damage to
the parts, resulting in an accident.
If premature damage occurs, change the brake settings or walk slowly. (See page 8.)
Figure 11
Figure 12
Figure 13

81-SS30095-1
- 16 -
6.4
Replacing the Tire
Replacing the tire (1)
(1) With the CONPAL unit mounted to the rollator, loosen the three wheel installation bolts and remove the outer
wheel and tire. (Figure 14)
(2) Install a new tire while aligning the tire protrusion to the recess of the wheel. (Figure 15)
(3) Install the outer wheel while aligning to the inner wheel.
(4) Tighten three new wheel installation bolts provided with the replacement tire to the specified torque
(6 ±10% Nm).
(5) Check that the brakes of the left and right CONPAL units work.
WARNING
• Do not insert fingers into the adjustment window during replacement. Doing so can result in injury.
Do not disassemble other sections. Doing so can cause the brake not to work, resulting in a serious
accident.
• After tire replacement, always verify that the brakes work prior to use.
CAUTION
• Firmly tighten the wheel installation bolts.
Insufficient tightening can cause play in the installation area or disengagement of the tire.
Figure 14
Wheel installation bolt
Wheel (inner)
Wheel (outer)
CAUTION
When replacing the tire, use
new bolts provided with the
replacement tire after
applying thread locker.
Tire

81-SS30095-1
- 17 -
Replacing the tire (2)
(1) Lift the protrusion inside the tire off the wheel. (Figure 16)
(2) While lifting the protrusion inside the tire, rotate the wheel and remove only the tire from the wheel. (Figure
17,18)
(3) Align the protrusion of the new tire to the recess of the wheel (Figure 19). Rotate the wheel in a similar
manner to removal and fit the tire into the wheel. (Figure 20)
Note: Using a spatula or a similar tool helps easy removal and installation of the tire.
(4) Check that the tire closely fits into the wheel. (Figure 21-24)
(5) After installation is completed, make sure that the brake works.
Figure 15
WARNING
• Be sure to replace the tire with the CONPAL unit installed to the frame. Otherwise, the parts come off and
cause malfunction.
CAUTION
• When replacing the tire, be careful not to get your fingers pinched between the brake pad and the CONPAL unit.
Also be careful not to get your fingers pinched between the frame and the CONPAL unit.

81-SS30095-1
- 18 -
Figure 16
The tire locking protrusions fit into the three
recesses of the wheel.
Figure 17
Note: Using a spatula or a similar
tool helps easy removal and
installation of the tire.
Pull the tire outward to remove it from
the wheel.
Figure 18
Figure 19
Figure 20
CAUTION
Align the protrusion of the new tire into
the recess of the wheel and fit the tire to
the wheel (at three locations).

81-SS30095-1
- 19 -
• Side view
• Top view
OK
Figure 21
Figure 22
NG
OK
Figure 23
NG
Figure 24
There is a gap between the tire and the wheel.
The tire side wall is not flush with the wheel.

81-SS30095-1
- 20 -
7 Warranty and After-Sales Service
7.1
Warranty conditions
The warranty period of a new product and the product repaired and installed by Nabtesco shall be
determined depending on the relevant agreements.
If a failure occurs under normal use during the warranty period, the product will be repaired free of
charge.
This warranty does not cover the following events, even within the warranty period.
a. Failure caused by improper handling
b. Failure or damage caused by falling the product, or stress or impact to the product
c. Failure caused by improper maintenance
d. Failure caused by disassembly or modification of the product
e. Failure or damage caused by use of non-dedicated parts
f. Failure or damage caused by force majeure (natural disaster)
g. Failure or damage caused by worn or deteriorated parts
h. Failure caused by use under conditions beyond the limit
7.2
Disclaimer
• Nabtesco Corporation shall bear NO responsibility for any incidental or consequential losses or
damages, including, but not limited to, any damage of the product, death, human bodily injury or
other damage to properties caused due to negligence of the safety instructions provided in this
manual or general safety rules.
7.3
Precautions
• Read and fully understand the warnings and cautions in this manual before use of the product,
and follow all the instructions.
• Nabtesco Corporation is not liable for any accidents caused by a sudden change in user’s
physical condition, user’s circumstances, misuse, or abuse.
• Nabtesco Corporation is not liable for any failure, or incidental or consequential losses or
damages.
• Basically, we will not be able to offer any kind of replacement or refund once you have used it.
Table of contents
Popular Controllers manuals by other brands

LSI
LSI CTS 2600 Initial setup guide

ComfortClick
ComfortClick Jigsaw Pro CC-JP-3 manual

elsner elektronik
elsner elektronik 70711 Technical specifications and installation instructions

Shinko
Shinko DCL-33A instructions

Linak
Linak TR-EM-288-SPF quick guide

Lightwave Research
Lightwave Research Data Flash AF 1000 user manual