NAD S70 User manual

GB
F
D
E
I
P
S
S70
SYSTEM REMOTE CONTROL
OWNER’S MANUAL

CONTENTS
Introduction . . . . . . . . . . . . . . . . . . . . . . . . . . . . . . . . . . . . . . . . . . . . . . . .11
Installing the battery . . . . . . . . . . . . . . . . . . . . . . . . . . . . . . . . . . . . . . . . .11
Set-up of the S70 remote control . . . . . . . . . . . . . . . . . . . . . . . . . . . . . . .11
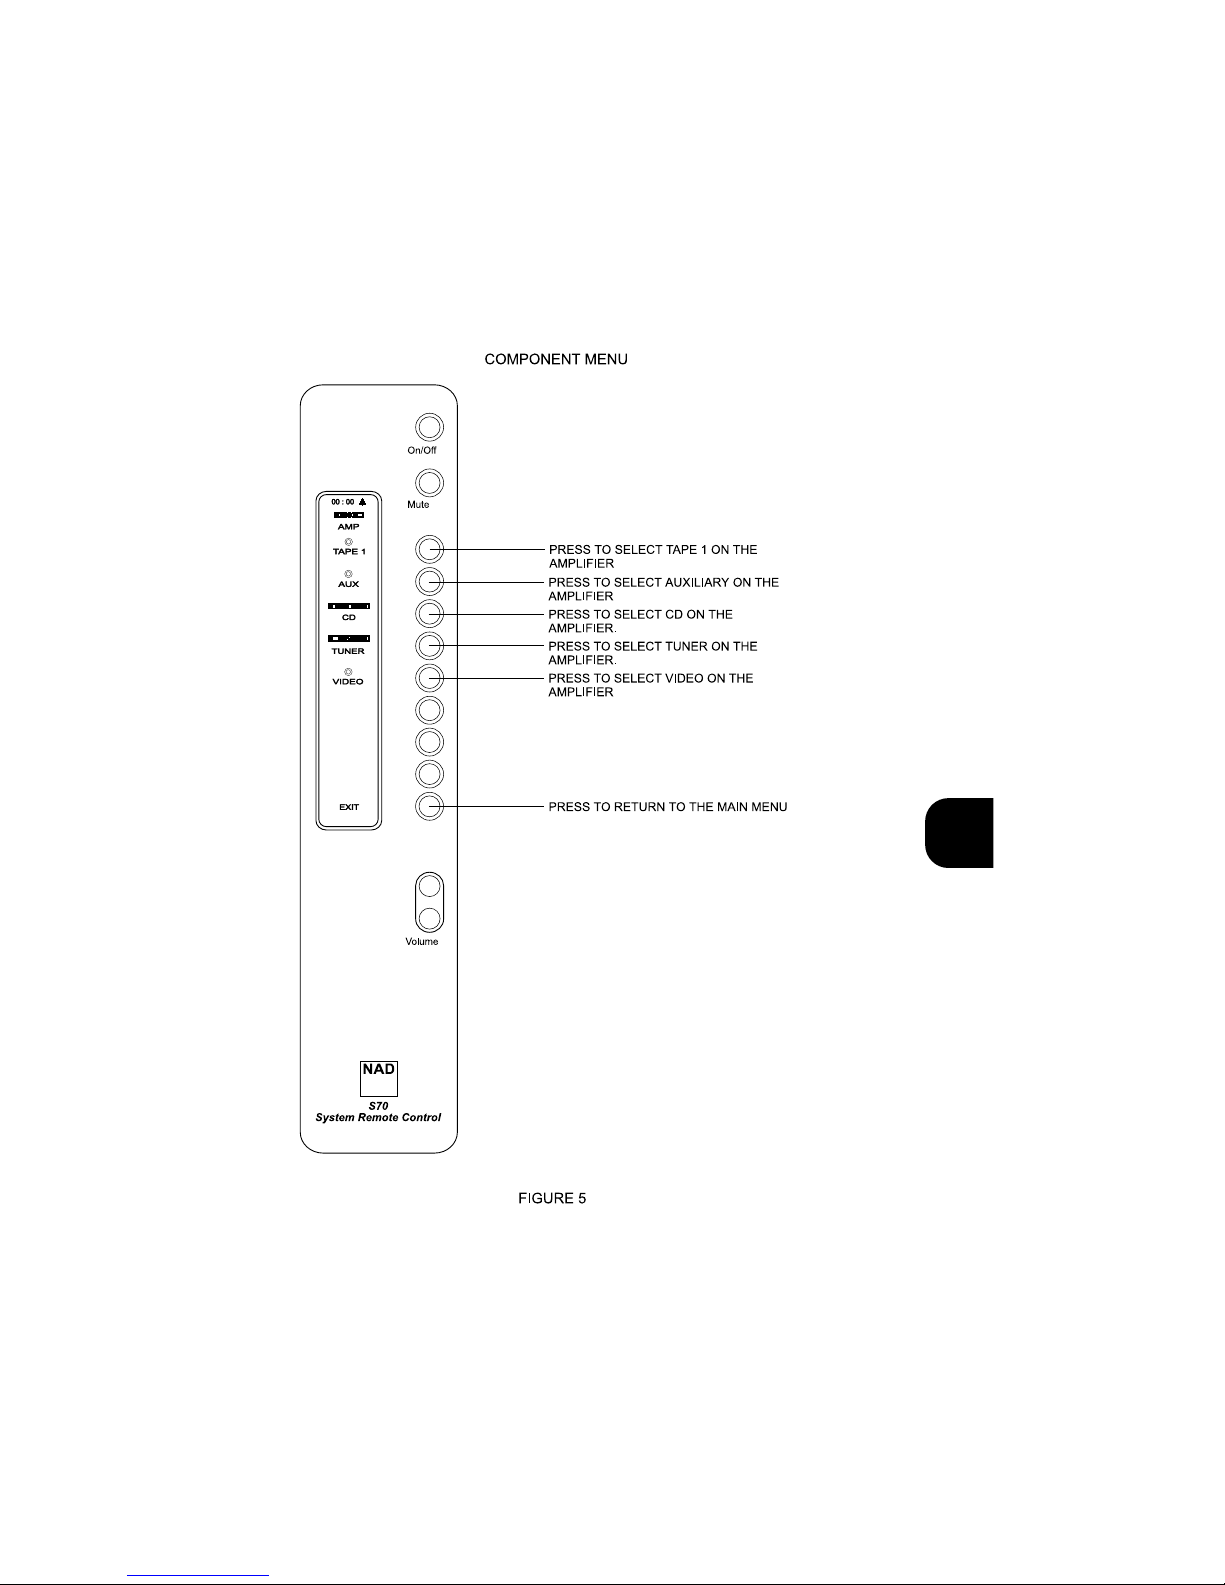
Component Selection
Activating and setting the clock
Adjusting Display Contrast
Using the NAD S70 Remote Control . . . . . . . . . . . . . . . . . . . . . . . . . . . . .12
On/Off
Mute & Display Back Light
Volume (Up & Down)
Main Menu: Operating Components in the System
Main Menu: Viewing Timer Status
Main Menu: Activating and Viewing Sleep Timer Status
Setting and Activating the Timer Function . . . . . . . . . . . . . . . . . . . . . . .15
NAD-Link . . . . . . . . . . . . . . . . . . . . . . . . . . . . . . . . . . . . . . . . . . . . . . . . . .15
Troubleshooting Guide . . . . . . . . . . . . . . . . . . . . . . . . . . . . . . . . . . . . . . .16
2
GB

GB
3
Main Menu
NAD S70 System Remote Control
Menu & Sub-menu Structure
FIGURE 1
NOTE: Component menus are optional.
Please refer to the chapter ‘Setup of the S70 remote control’
Return to Main Menu by pressing button next to ‘EXIT’ in display
Timer Status
Menu
Component No.1
menu
(eg. AMP)
Component No.2
menu
(eg. PREAMP)
Component No.3
menu
(eg. TUNER)
Component No.4
menu
(eg. CD)
System Setup
Menu
Timer Setup Menu
Timer Select Menu
Clock Setup Menu

GB
4

GB
5

GB
6

GB
7

GB
8

GB
9

GB
10

GB
11
INTRODUCTION
Thank you for purchasing the NAD S70 System Remote Control. With the S70
you can control all components of your NAD Silver Series system. The S70 can
easily be customised to suit your particular NAD Silver Series system and provides
additional functionality such as a clock, Sleep and on/off timer.
Although the S70 is primarily meant to complement the NAD Silver Series, it will
also function with most remote controlled NAD products from the C Series.
To ensure long-term, trouble free operation, avoid the remote control being
exposed to shocks and water. Should water enter the case of the remote control,
remove the battery as explained in this manual and have it inspected by a
qualified service technician before attempting to use it again. Use a dry soft cloth
to clean the remote control casing. If necessary, lightly dampen the cloth with
soapy water. Do not use solutions containing benzol or other volatile agents.
Using a fresh battery, the NAD S70 will operate up to a distance of 20ft (7m) and
within an angle of 45° either way from a straight line from the front panels of
your NAD Silver Series system. Make sure there is a clear line-of-sight between
the components of your system and the window on the front of the S70. Note
that strong lighting and direct sunlight can affect the range of the S70.
INSTALLING THE BATTERY
Alkaline batteries are recommended for maximum operating life. One 9V (PP-3)
battery must be fitted in the battery compartment at the rear of the Remote
Control handset.
• Using a Phillips No.1 screwdriver, carefully remove the screw from the battery
compartment lid.
• Lift the cover slightly at the back and then slide it backwards so it disengages
itself from the S70’s casework.
• If replacing battery; unplug the old battery from the battery snap-on
connector. Be careful not to stretch the connector’s wires.
• Plug the new battery onto the snap-on connector; make sure the orientation
is correct and that the wires aren’t trapped beneath or over the battery itself
when placing it inside the remote control’s casework.
• Slide the battery cover back on and replace the screw to hold it in place. The
screw should engage easily to the thread, don’t use force to replace the screw,
you may damage the thread in the S70’s casework.
The low power consumption and energy saving features of the S70 mean that
the battery will last a long time. When you notice that the range of the S70 is
decreasing it may be necessary to replace the battery.
NOTE: Be careful not to lose the battery compartment screw. Should the original
screw get lost, replace only with a screw of the exact same type (metric, 2mm, 8
to 10mm long). Using the wrong type of screw will permanently damage the
casework of the S70 remote control.
SET-UP OF THE S70 REMOTE CONTROL
Component selection
The NAD S70 remote control can be customised to suit your particular NAD Silver
Series system by selecting only those components present in your system.
The NAD S70 is a "menu-driven" remote control, where many of its buttons vary
in function, depending on which Menu was selected. The display next to these
buttons indicates which functions are available. In normal operation, the Main
Menu is the starting point. Figure No.1 shows how the menus are organised.

Press any button (other than Volume Up/Down) to activate the display. In the
Main menu, each category of Silver Series component is represented by its own
icon. Refer to figure No.2.
To set up the S70 for your system:
• From the Main Menu on the remote control, press the button next to where it
indicates "SYSTEM" in the display.
• The display will change to System Set-up Menu. Refer also to figure No.3
• The display will show several components, such as "AMP", "PREAMP",
"TUNER", "CD" with corresponding icons. By pressing the button next to the
component you can select or de-select a component for the Main Menu. A
tick-mark next to the component will indicate whether component has been
selected. For instance, if your system comprises the NAD S100 pre-amplifier,
S400 tuner and S500 CD player make sure the boxes for pre-amp, tuner and
CD player are ticked, the others not.
• Press the button next to "EXIT" at the bottom to leave and save the set-up
and return to Main Menu.
NOTE: If your NAD Silver Series component is not available from the System Set-
up menu, your S70 can be updated in many cases. Consult your NAD dealer.
Activating and setting the clock
The S70 Remote Control also has a clock built-in, which gives you extra facilities
such as Sleep Timer and Timer function. For these to function, you need to
activate and set the clock:
• From the Main Menu, press the button next to "SYSTEM".
• In the System Set-up Menu, activate the clock by pressing the button next to
"CLOCK"; a tick mark will appear to indicate that the clock has been
activated.
• Press the button next to "CLOCK" for 2 seconds
• The Clock Set-up Menu allows for adjusting the clock. Use the 24-hour format
to enter the correct time (for example, 2:15PM would be 14:15) by pressing
the buttons next to "HR+" (to adjust hours upwards), "HR-" (adjust hours
downwards), "MIN +" (adjust minutes upwards), "MIN -" (adjust minutes
downwards). Refer also to figure No.4.
• Press the button next to "EXIT" to return to System Set-up Menu.
• Press the button next to "EXIT" to return to Main Menu.
NOTE: If you choose to de-select (no tick-mark) from the System Set-up Menu
you will have to adjust the clock again next time you activate it.
Adjusting display contrast
The NAD S70’s display contrast can be adjusted to optimise legibility from a wide
viewing angle. The factory setting will be suitable in almost all cases but under
exceptional circumstances or if the battery is becoming very weak it may be
necessary to adjust contrast.
• From the Main Menu, press the button next to "SYSTEM".
• Press the button next to ">>" to increase contrast or "<<" to decrease
contrast.
• When the optimum contrast level has been set, press the button next to "EXIT"
to return to Main Menu.
USING THE NAD S70 REMOTE CONTROL
The NAD S70 is a "menu-driven" remote control, where many of its buttons vary
in function, depending on which Menu was selected. The display next to these
buttons indicates which functions are available. In normal operation, the Main
Menu is the starting point. Figure No.1 shows how the menus are organised.
The Volume Control, Mute and On/Off buttons will always perform the same
12
GB

function, regardless of whichever Menu was selected.
The display will always turn itself off, 25 seconds after the last button has been
pressed, to prolong battery life. Pressing any button, other than the volume
buttons, will activate the display again.
On/Off
Press this button to switch components from the Operating to the Stand-by mode
and vice versa.
As this is a toggle command, switching between Stand-by and Operating mode,
you may consider to switch all components to operating mode so that using
On/Off button on the S70 all components are synchronised in status: Press the
power button on the front panel of each remote controlled Silver Series
component so that all are turned on and in Operating mode. By connecting NAD-
Link between all components, they will remain in synchronisation with each other,
even if one of the components is just out of the S70’s range. Refer also to chapter
NAD-Link below. The On/Off function is always available, regardless of whichever
Menu the S70 is in.
Mute & Display back light
Press the Mute Button to temporarily switch off the sound from the amplifier or
pre-amplifier. Press Mute again to restore sound.
The Mute button also engages the back-lighting for the display so that the S70
can easily be used in dark environments. Press the Mute button for 2 seconds to
engage the back-lighting. The light will turn itself off automatically after 15
seconds to conserve battery power. The Mute and Back-light functions are always
available, regardless of whichever Menu the S70 is in.
Volume (Up & Down)
Press the lower button to decrease volume, the upper button to increase volume.
Using the Volume buttons doesn’t activate the display. The Volume function is
always available, regardless of whichever Menu the S70 is in.
Main Menu: Operating components in the system
The other available functions of the S70 depend on whichever Menu has been
selected. From the Main menu, (figure No. 2) you can select which component
you wish to operate, such as amplifier, tuner, CD player, etc. The S70 comes
standard with a selection of Component Menus, such as Amplifier Component,
Pre-amplifier Component, Tuner Component, CD Component, etc. The
commands from within these Component Menus correspond with those on the
front panel or the original remote control of the component.
• Select Main Menu by pressing the button next to "EXIT" in any of the other
menus.
• In the Main Menu, press the button next to component displayed you wish to
operate, e.g. "AMP".
• The appropriate Component Menu and its icon appear in the top of the
display, the "AMP" Menu in this example, with all available functions will
appear. Press the button next to the function desired in the display. See also
figure No. 5.
• Press the button next to "EXIT" again to return to the Main Menu from
where you can select another component.
13
GB

In some Component Menus selecting a function will take you to another
Component Menu. For example, pressing the button for CD in the Amplifier
Component Menu will switch the input of the amplifier to the CD input and change
from the Amplifier Component menu to the CD player Component Menu. These
buttons can be recognised by the icon corresponding to the Component Menu.
NOTE: You can set up and customise the NAD S70 to suit your particular NAD
system. Refer to chapter "Set-up of the NAD S70 Remote Control".
Main Menu: Viewing Timer status
The S70 can be used to turn your system on and off at specific times with the
Timer function. To set, activate or de-activate the Timer function, refer to chapter
"Setting and activating the Timer".
You can view the Timer status and engage from the Main Menu:
• Select Main Menu by pressing "EXIT" in any of the other menus.
• Press the button next to "TIMER" once. The display will now show the On
Time and Off Time and which component was selected. The symbol on
the right of the clock in the top of the display indicates that Timer function is
activated. Refer also to Figure No. 6.
• Press the button next to "EXIT" to return to Main Menu.
NOTE: The Timer function in the Main Menu is available only if both Clock and
Timer functions have been selected (indicated by tick-mark) in the System Set-up
Menu. Refer to chapter "Set-up of the S70 Remote Control" for information on
activating and setting the clock.
Main Menu: Activating & viewing Sleep Timer status
With the Sleep Timer function you can set the S70 to automatically switch off
your system after a preset number of minutes to Standby mode (provided all
components were in Operation mode, not in Stand-by mode).
• To activate the Sleep Timer function, press the button next to "SLEEP". The
clock in the display changes to show the time set for the Sleep Timer
Function. It is now activated and set for 10 minutes. The symbol on the
left of the clock in the top of the display indicates that the Sleep Timer
function is now activated, regardless of whichever Menu was selected. Refer
also to figure No. 7.
• Each consecutive press will advance the sleep time in 10 minutes increments,
up to 90 minutes.
• To cancel the Sleep mode, continue pressing the SLEEP button until "OFF"
appears in the display.
NOTES: Make sure that the S70 is located well within range of all components,
otherwise the Sleep Timer function will function erratically or not at all.
The Sleep function is available only if Clock function has been selected (indicated
by tick-mark) in the System Set-up Menu. Refer to chapter "Set-up of the S70
Remote Control" above for information on activating and setting the clock.
14
GB

SETTING AND ACTIVATING THE TIMER FUNCTION
The S70 can be used to turn your system on and off at specific times with the
Timer function. This way, you can use your system as an alarm clock, for instance.
Before the Timer function can be set, it needs to be activated:
• From the Main Menu, press the button next to "SYSTEM".
• In the System Set-up Menu, press the button next to "TIMER"; a tick mark will
appear to indicate that the Timer Function has been activated. In all Menus,
the symbol on the right of the clock in the top of the display indicates that
Timer function is activated.
To de-activate, press button again so that tick mark disappears.
• Press the button next to "EXIT" to return to Main Menu.
To set the timer:
• From the Main Menu, press the button next to "SYSTEM".
• In the System Set-up Menu, press the button next to "TIMER" for 2 seconds.
• In the Timer Set-up Menu, press the button next to "ON" to set the time you
want the system to switch on. Use the 24-hour format to enter the correct time
(for example, 2:15PM would be 14:15) by pressing the buttons next to "HR+"
(to adjust hours upwards), "HR-" (adjust hours downwards), "MIN +" (adjust
minutes upwards), "MIN -" (adjust minutes downwards). Refer also to figure
No.8.
• Press the button next to "OFF" to set the time to switch the system off, using
the time adjustment buttons as described above.
• Press the button next to "EXIT" to return to System Set-up Menu.
• Press the button next to "EXIT" to return to Main Menu
• You can check the Timer setting and status from the Main Menu, refer to
chapter "Using the NAD S70 System Remote Control", section "Main Menu:
Viewing Timer status".
NOTES: Make sure that the S70 is located well within range of all components,
otherwise the Timer function will function erratically or not at all.
The Timer function is available only if Clock function has been selected (indicated
by tick-mark) in the System Set-up Menu. Refer to chapter "Set-up of the S70
Remote Control" above for information on activating and setting the clock.
NAD-LINK
Many NAD components feature NAD-Link. The RCA sockets on the back panel of
these components, marked "NAD-Link In" and "Out" allow for remote control
command communication between the components when connected with each
other. Connecting NAD-Link between the various components is not strictly
necessary for the S70 to work, but it will improve overall performance and
consistency for remote control commands.
Connect the "NAD-Link Out" from one component to the "NAD-Link In" on the
other component. From the latter, connect from "NAD-Link Out" to the "NAD-
Link In" on the next component, etc., so that the entire system’s NAD Link
sockets are connected in a daisy-chained fashion, always IN to OUT and OUT to
IN. Do not connect the "NAD Link-Out" from the last component to the first
component’s "NAD-Link In" in the chain.
15
GB

16
GB
TROUBLESHOOTING GUIDE
Remote control works
intermittently or doesn’t
work at all
• Battery flat or snap-on
connector incorrectly
attached
• IR transmitter or receiver
windows obstructed
• IR receiver on components
are in direct sun or very
bright ambient light
• Check or replace battery
• Remove obstruction
• Place unit away from
direct sun, reduce amount
of ambient light
Problem Cause Solution
Sleep Timer and Timer
functions can’t be activated
• These functions are
available only if clock is
activated
• Activate clock
Although activated, Sleep
Timer and Timer function do
not work properly or at all
• IR transmitter or receiver
windows obstructed
• IR receiver on components
are in direct sun or very
bright ambient light
• Remove obstruction
• Place unit away from
direct sun, reduce amount
of ambient light
Display is difficult to read • Too little or too much
contrast
• Battery almost flat
• Adjust display’s contrast
level
• Replace battery
Sometimes not all
components respond to
On/Off command, causing
these to be "out-of-sync" for
stand-by/operating status
• Remote control is just out
of range
• Reduce operating distance
• Connect NAD-Link
between components

TELECOMMANDE DE SYSTEME NAD S70
Introduction . . . . . . . . . . . . . . . . . . . . . . . . . . . . . . . . . . . . . . . . . . . . . . . .18
Mise en place de la pile . . . . . . . . . . . . . . . . . . . . . . . . . . . . . . . . . . . . . . .18
Mise en service de la télécommande S70 . . . . . . . . . . . . . . . . . . . . . . . . .18
Choix des éléments de chaîne
Activation et réglage de l’horloge
Réglage du contraste de l’affichage
Utilisation de la Télécommande NAD S70 . . . . . . . . . . . . . . . . . . . . . . . .20
Marche/Arrêt
Muet et Rétro éclairage de l’affichage
Volume (Augmenter & Diminuer)
Menu Principal : Commande des éléments de la chaîne
Menu Principal : Visualisation de l’état de la Minuterie
Menu Principal : Activation et visualisation de l’Extinction Programmée
Réglage et activation de la fonction Minuterie . . . . . . . . . . . . . . . . . . . .22
Liaison NAD . . . . . . . . . . . . . . . . . . . . . . . . . . . . . . . . . . . . . . . . . . . . . . . .23
Guide de Dépannage . . . . . . . . . . . . . . . . . . . . . . . . . . . . . . . . . . . . . . . .24
17
F

INTRODUCTION
Nous vous remercions d’avoir acheté la Télécommande de Chaîne NAD S70. Avec
la S70, vous pouvez commander tous les éléments de votre chaîne NAD Série
Silver. La S70 est facile à personnaliser en fonction des spécificités de votre propre
chaîne NAD Série Silver ; de plus, elle est dotée de fonctionnalités
supplémentaires comme une horloge, une extinction programmée et une
minuterie d’extinction / allumage.
Bien que la S70 ait avant tout été conçue en tant que complément pour les
chaînes NAD Série Silver, elle fonctionnera aussi avec la plupart des produits NAD
télécommandés de la Série C.
Afin de garantir la longévité et la fiabilité de la télécommande, évitez de l’exposer
aux chocs ou à l’humidité. Si de l’eau pénètre dans le boîtier de la télécommande,
retirez la pile suivant les instructions données dans ce manuel, puis faites contrôler
la télécommande par un technicien de service après vente qualifié avant de tenter
de l’utiliser à nouveau. Pour nettoyer le boîtier de la télécommande, utilisez un
chiffon doux et sec. Si nécessaire, humectez le chiffon avec de l’eau savonneuse.
N’utilisez pas des solutions contenant du benzol ou tout autre agent volatile.
Munie d’une pile neuve, la NAD S70 fonctionnera jusqu’à une distance de 7
mètres et à un angle de 45° de part et d’autre de l’axe perpendiculaire aux faces
parlantes de votre chaîne NAD Série Silver. Veillez à ce qu’il y ait un espace
dégagé entre les éléments de votre chaîne et la fenêtre à l’avant de la S70. Notez
qu’un éclairage puissant ou une exposition directe aux rayons du soleil peuvent
diminuer la portée de la S70.
MISE EN PLACE DE LA PILE
Il est recommandé d’utiliser des piles alcalines pour une longévité maximale. Une
pile de 9 V (PP-3) doit être insérée dans le compartiment à l’arrière du combiné de
télécommande.
• A l’aide d’un tournevis cruciforme, retirez avec précaution la vis du couvercle
du compartiment de la pile.
• Soulevez légèrement l’arrière du couvercle puis glissez le couvercle vers l’arrière
de manière à le dégager du boîtier de la S70.
• Si vous remplacez la pile, débranchez le connecteur à pressions de l’ancienne
pile. Faites attention de ne pas étirer les câbles du connecteur.
• Branchez le connecteur à pressions sur la nouvelle pile ; veillez à ce que
l’orientation soit correcte et à ce que les fils ne sont pas coincés sur ou sous la
pile lorsque vous insérez cette dernière dans le boîtier de la télécommande.
• Glissez le couvercle de la pile pour la remettre en place, puis revissez la vis
pour l’y maintenir. La vis doit entrer facilement dans le filetage du trou. Ne
forcez pas pour remplacer la vis, car vous risqueriez d’endommager le filetage
du boîtier.
La faible consommation et les fonctionnalités d’économie d’énergie de la S70
permettent à la pile de durer longtemps. Dès que vous remarquerez que la portée
de la S70 diminue, cela voudra peut-être dire qu’il est temps de remplacer la pile.
NOTA: Faites attention de ne pas perdre la vis du compartiment de la batterie. Si
vous perdez la vis d’origine, remplacez la par une vis identique (pas métrique, 2
mm, longueur 8 à 10 mm). Si vous utilisez une vis qui n’est pas du bon type, cela
endommagera définitivement le boîtier de la télécommande.
MISE EN SERVICE DE LA TÉLÉCOMMANDE S70
Choix des éléments de chaîne
La télécommande NAD S70 est personnalisable en fonction de votre propre
chaîne NAD Série Silver, car vous pouvez sélectionner uniquement les éléments
présents dans votre chaîne.
18
F

La NAD S70 est une télécommande “à menus”, sur laquelle beaucoup des boutons
ont des fonctions différentes suivant le menu sélectionné. L’affichage à côté de ces
boutons indique les fonctions disponibles. En fonctionnement normal, le Menu
Principal est le point de départ. La Figure N° 1 montre l’organisation des menus.
Appuyez sur n’importe quel bouton (autre que Volume Augmenter/Diminuer
[Volume Up/Down]) pour activer l’affichage. Sur le Menu Principal, chaque
catégorie d’élément de la Série Silver est représentée par sa propre icône.
Reportez-vous à la Figure N° 2 (Menu principal).
Pour configurer la S70 pour votre système :
• A partir du Menu Principal de la télécommande, appuyez sur le bouton en
face du mot “CHAINE” [“SYSTEM”] de l’affichage.
• L’affichage passera au menu de Configuration de la Chaîne [System Set-Up].
Reportez-vous aussi à la Figure N° 3.
• L’affichage montrera plusieurs éléments, comme “AMPLI”, “PREAMPLI”,
“TUNER”, “CD” avec les icônes correspondantes. En appuyant sur le bouton à
côté de l’élément, vous pouvez sélectionner ou désélectionner un élément à
inclure dans le Menu Principal. Lorsque l’emplacement à côté de l’élément
concerné est coché, cela indique qu’il a été sélectionné. Par exemple, si votre
chaîne comporte le préamplificateur NAD S100, le tuner S400 et le lecteur de
CD S500, veillez à ce que les cases du préampli, du tuner et du lecteur de CD
soient cochées, mais pas les autres.
• Appuyez sur le bouton en face du mot “QUITTER” [“EXIT”], dans la partie
inférieure de l’affichage, pour quitter le menu de configuration et revenir au
Menu Principal.
NOTA: Si votre élément NAD Série Silver ne figure pas sur le menu de
Configuration du Système, votre S70 pourra être mis à jour dans de nombreux
cas. Consultez votre revendeur NAD.
Activation et réglage de l’horloge
La Télécommande S70 a une horloge intégrée, qui vous apporte d’autres
fonctionnalités comme par exemple une Extinction Programmée [Sleep Timer] et
une Minuterie [Timer]. Pour que ces fonctionnalités soient actives, vous devez
d’abord activer et régler l’horloge :
• A partir du Menu Principal, appuyez sur le bouton à côté du mot “SYSTEME”
[“SYSTEM”].
• Sur le Menu de Configuration Système, activez l’horloge en appuyant sur le
bouton à côté du mot “HORLOGE” [“CLOCK”]; l’emplacement correspondant
est coché pour indiquer que l’horloge a été activée.
• Appuyez sur le bouton à côté du mot “HORLOGE” [“CLOCK”] pendant 2
secondes.
• Le Menu de Configuration de l’Horloge permet de régler l’horloge. Utilisez le
format 24 heures pour entrer l’heure (par exemple, 14:15 pour deux heures et
quart de l’après midi), en appuyant sur les boutons à côté de “HR +”
(augmenter l’heure), “HR -” (diminuer l’heure), “MIN +” (augmenter les
minutes) et/ou “MIN -” (diminuer les minutes). Reportez-vous aussi à la Figure
N° 4.
• Appuyez sur le bouton à côté du mot “QUITTER” [“EXIT”] pour revenir au
Menu de Configuration Système.
• Appuyez sur le bouton à côté du mot “QUITTER” [“EXIT”] pour revenir au
Menu Principal.
NOTA: Si vous décidez de désélectionner l’horloge (option non cochée) sur le
Menu de Configuration Système, il sera nécessaire de régler l’horloge à nouveau
la prochaine fois que vous la sélectionnerez.
19
F

Réglage du contraste de l’affichage
Il est possible de régler le contraste de la NAD S70 afin d’optimiser la lisibilité
pour des angles de vision très larges. Le réglage d’origine conviendra presque
toujours mais, dans des circonstances exceptionnelles ou si la pile est très faible, il
peut être utile de régler le contraste.
• A partir du Menu Principal, appuyez sur le bouton à côté du mot “SYSTEME”
[“SYSTEM”].
• Appuyez sur le bouton à côté de l’icône “>” pour augmenter le contraste, ou
sur le bouton à côté de l’icône “<” pour diminuer le contraste.
• Une fois que le contraste idéal aura été trouvé, appuyez sur le bouton à côté
du mot “QUITTER” [“EXIT”] pour revenir au Menu Principal.
UTILISATION DE LA TÉLÉCOMMANDE NAD S70
La NAD S70 est une télécommande “à menus”, sur laquelle beaucoup des
boutons ont des fonctions différentes suivant le menu sélectionné. L’affichage à
côté des ces boutons indique les fonctions disponibles. En fonctionnement
normal, le Menu Principal est le point de départ. La Figure N° 1 montre
l’organisation des menus.
Les boutons de Commande de Volume, de Marche/Arrêt [On/Off] et de la
fonction Muet [Mute] assurent toujours la même fonction, quel que soit le Menu
affiché.
L’affichage s’éteint toujours 25 secondes après la dernière impulsion sur un
bouton, afin de prolonger la durée de vie des piles. Pour réactiver l’affichage, il
suffit d’appuyer sur n’importe quel bouton autre que les boutons de commande
du volume.
Marche/Arrêt [On/Off]
Appuyez sur ce bouton pour mettre les différents éléments de votre chaîne en
Marche ou en mode Veille.
Ce bouton fonctionne comme un sélecteur à bascule, chaque impulsion ayant
pour effet de passer d’un état à l’autre (de Marche à Veille ou inversement), il
serait utile que vous commenciez par mettre tous les éléments de votre chaîne en
mode Marche, de manière à ce que chaque impulsion sur le bouton Marche/Arrêt
de la S70 ait un effet synchronisé sur tous les éléments : Appuyez donc sur le
bouton d’alimentation sur la face parlante de chaque élément télécommandé Série
Silver de manière à ce que tous soient allumés et opérationnels. Si vous reliez tous
les éléments avec la liaison NAD [NAD Link], ils resteront tous synchronisés, même
si l’un des éléments est hors de portée de la télécommande S70. Reportez-vous
aussi au chapitre concernant la Liaison NAD ci-dessous. La fonction Marche/Arrêt
est toujours disponible quel que soit le Menu affiché sur la S70.
Muet [Mute] et Rétro éclairage de l’affichage
Appuyez sur le bouton Muet [Mute] pour couper provisoirement le son de
l’amplificateur ou du préamplificateur. Appuyez à nouveau sur le bouton Muet
pour rétablir le son.
Le bouton Muet [Mute] sert aussi à allumer le rétro éclairage de l’affichage de
manière à permettre une utilisation aisée de la S70 dans une ambiance non-
éclairée. Appuyez sur le bouton Muet pendant 2 secondes pour allumer le rétro
éclairage. L’éclairage s’éteint automatiquement après 15 secondes afin
d’économiser les piles. Les fonctions Muet et Rétro éclairage sont toujours
disponibles, quel que soit le Menu affiché sur la S70.
20
F
Other manuals for S70
1
Table of contents
Languages:
Other NAD Remote Control manuals