NAD HTR 8 User manual

Owner’s Manual
Manuel d’Installation
Manual del Usuario
Manuale delle Istruzioni
Bedienungsanleitung
Gebruikershandleiding
Bruksanvisning
Инструкция по эксплуатации
ENGLISHFRANÇAISESPAÑOLITALIANODEUTSCHNEDERLANDSSVENSKAРУССКИЙ
///
®
HTR8
Learning Remote
HTR8_eng_OM_v03.indd 1 20/01/2012 1:46am

1 Top section features ON/OFF, MACRO
and eight DEVICE SELECTOR keys
2 Upper middle section has CHANNEL,
VOLUME, MUTE, navigation and sur-
round keys
3 Middle section with A/V PSET,
SPEAKER, PROGRAM, CLEAR, TEST,
REPEAT and number keys 0 to 10+
4 Lower middle section with transport
control keys
5 Bottom section with CHANNEL
VOLUME trimming keys
NAD is a trademark of NAD Electronics
International, a division of Lenbrook Industries
Limited
Copyright 2012, NAD Electronics International, a
division of Lenbrook Industries Limited
///
1
2
3
4
5
2
ENGLISH FRANÇAIS ESPAÑOL ITALIANO DEUTSCH NEDERLANDS SVENSKA РУССКИЙ
HTR8_eng_OM_v03.indd 2 20/01/2012 1:46am

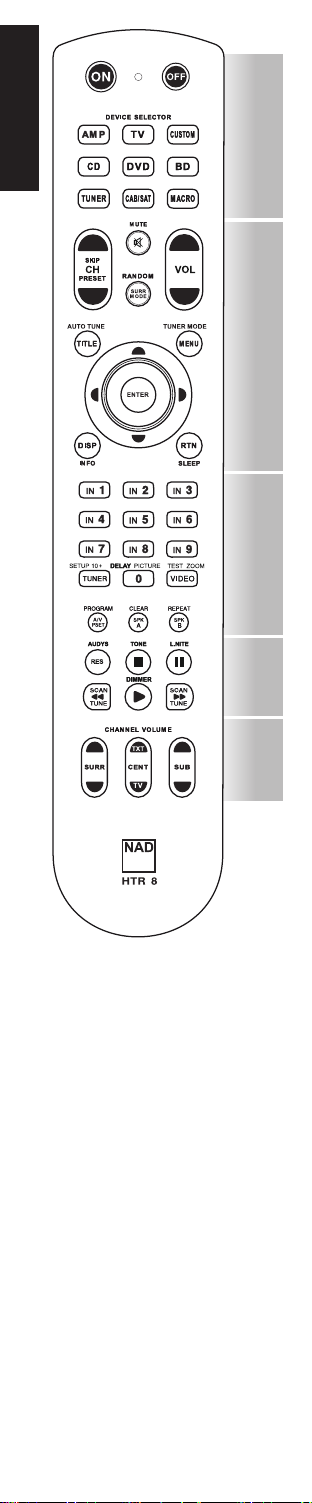
OVERVIEW OFTHE HTR 8
• Controls up to 8 devices.
• Learns up to 360 commands.
• Records up to 52 macros with a
maximum of 64 commands each.
• Congurable punch-through.
• Key illumination with programmable
timeout.
• Upgradable.
• Contains pre-programmed library of
NAD remote codes.
The NAD HTR 8 is ready to operate NAD
components right out of the box, but it
is really eight remotes in one. Each of the
8 DEVICE SELECTOR keys at the top of
the handset can call up a new“page”of
remote control codes to be transmitted
by the remaining keys. You may“teach”
codes from any infrared-remote con-
trolled component, regardless of brand,
to any or all of these.
Obviously, the most logical system is
that you teach the codes from your DVD
player to the [DVD] DEVICE SELECTOR
“page,”your television’s codes to the [TV]
“page”and so on, but there is no required
scheme: You may load any commands
to any key on any page (see“LEARNING
CODES FROM OTHER REMOTES”below).
The HTR 8 is already pre-programmed
with a full complement of NAD
receiver commands on its [AMP] DEVICE
SELECTOR page, and as well as with
library commands to operate most
NAD-brand DVD, BD, CD or TUNER com-
ponents on the corresponding DEVICE
SELECTOR“pages”. These default com-
mands are permanent: Even if you teach
the HTR 8 new commands to take their
place, the underlying library commands
remain in place and can easily be recalled
should you add an NAD component to
your system later (see“DELETE MODE”
below).
GETTING FAMILIAR WITH
THE HTR 8
The HTR 8 is divided into two main sec-
tions. Eight DEVICE SELECTOR keys at the
top—[AMP], [DVD,] [TV,] and so on - set
the handset’s remaining keys to a “page”
of commands to control a particular
component. A DEVICE SELECTOR key
determines only what component the
HTR 8 will command; it does not perform
any function on the component. All the
remaining keys are function keys that can
“learn”control codes from virtually any
infrared remote controller, allowing you
to teach the codes of your equipment,
regardless of brand, to the HTR 8.
3
ENGLISHFRANÇAISESPAÑOLITALIANODEUTSCHNEDERLANDSSVENSKAРУССКИЙ
HTR8_eng_OM_v03.indd 3 20/01/2012 1:46am

All of the function keys on the [AMP]
DEVICE SELECTOR“page”are pre-
programmed to control NAD ampliers,
preampliers and receivers. The HTR 8
can also command many other NAD
components from its [DVD], [CD], [BD]
and [TUNER] pages.
It is important to note that certain
HTR 8 keys perform dierent functions
depending on the selected DEVICE
SELECTOR“page”. The colour of the
DEVICE SELECTOR key-labelling cor-
responds to the labelling of the function
keys. Most centrally, the black [AMP]
DEVICE SELECTOR“page”corresponds to
the black keys: When the HTR 8’s [AMP]
DEVICE SELECTOR page is active; these
keys select the amplier or receiver
inputs. Similarly, the purple [DVD] DEVICE
SELECTOR“page”corresponds to several
purple labels and so on.
LEARNING CODES FROM
OTHER REMOTES
Begin by positioning the HTR 8“nose-to-
nose”with the source remote so the two
devices’infrared windows are about 2
inches apart.
• Enter Learning Mode: On the HTR 8,
simultaneously press-and-hold for
3 seconds both a DEVICE SELECTOR
key and the [RES] key until the Learn
LED of the HTR 8 turns steady green.
• Press the HTR 8’s function key you
wish to teach a command; the Learn
LED will turn amber.
• Press-and-hold the function key on
the source remote: The HTR 8’s Learn
LED will icker amber for a second
or two, then turn solid green. The
command is learned.
• Press the HTR 8’s DEVICE SELECTOR
key again to exit the learning mode.
If the Learn LED does not icker amber
you may need to vary the distance
between the remotes. If the Learn LED
turns red rather than green, that par-
ticular command of that source remote
command could not be learned. In rare
instances, there maybe some IR format
that is not compatible with the HTR 8.
4
ENGLISH FRANÇAIS ESPAÑOL ITALIANO DEUTSCH NEDERLANDS SVENSKA РУССКИЙ
HTR8_eng_OM_v03.indd 4 20/01/2012 1:46am

Example: Learning“DVD Pause”
Position the HTR 8 and your DVD player’s
remote as described above.
• On the HTR 8, simultaneously press-
and-hold [DVD] and [RES]; the Learn
LED turns steady green.
• Press the HTR 8’s Pause [j] key; the
Learn LED turns amber.
• Press-and-hold the correspond-
ing Pause key of your DVD player’s
remote control; the HTR 8’s Learn LED
ickers amber and then turns solid
green. The command is learned.
• Press [DVD] again to exit the learning
mode.
Notes
· The HTR 8 can learn up to 360 com-
mands making use of all the DEVICE
SELECTOR and function keys.
· The DEVICE SELECTOR keys can
themselves be congured to learn a
command.
· Press and hold a congured DEVICE
SELECTOR for at least 2 seconds to
execute a function assigned to the
particular DEVICE SELECTOR key.
· Short press of a congured DEVICE
SELECTOR will just switch the active
device.
CANCEL OPERATION
You can cancel conguring a key, by
pressing the active DEVICE SELECTOR key
before the learn process is complete; the
Learn LED will turn red.
PUNCH THROUGH
The HTR 8’s “punch-through”function
allows you to retain a function key from
one Device Select “page”to another, so
that, for example, the AMP [SURR MODE]
function might still control the NAD A/V
receiver when the DVD DEVICE SELECTOR
page is active.
Note
The HTR 8’s [VOL D/F] keys are pre-
programmed as “punched-through”
for all Device Select pages: [VOL
D/F] will operate the NAD’s master-
volume regardless of the currently
selected device. The [SURR] [CENTER]
and [SUB] Channel Volume controls
similarly are pre-programmed as
punched-through.
To set a punch through, after entering
the Learning Mode, and pressing the de-
sired key to be punched through, simply
press the device key twice of the device
to punch through to. The status LED will
turn green; press the DEVICE SELECTOR
key again to exit Learning Mode.
5
ENGLISHFRANÇAISESPAÑOLITALIANODEUTSCHNEDERLANDSSVENSKAРУССКИЙ
HTR8_eng_OM_v03.indd 5 20/01/2012 1:46am

Example: Punch-through AMP [SURR
MODE] key to the DVD “page”
• On the HTR 8, simultaneously press-
and-hold [DVD] and [RES]; the Learn
LED turns steady green.
• Press [SURR MODE]; the Learn LED
turns amber.
• Press [AMP] twice; the Learn LED
turns green.
• Press [DVD] again to exit the learning
mode.
COPy A COMMAND FROM
ANOTHER KEy
You may copy a command from any
HTR 8 key to any other. To copy a key
function, after entering the Learning
Mode, and pressing the desired key to
be copied to, simply press the device
key from which you wish to copy, having
rst pressed its DEVICE SELECTOR key if
it resides on another“page.”The status
LED will turn green; press the DEVICE
SELECTOR key again to exit Learning
Mode.
Example: Copy the Pause command
from the CD page to the AMP [j] button
• On the HTR 8, simultaneously press-
and-hold [AMP] and [RES]; the Learn
LED turns steady green.
• Press Pause [j]; the Learn LED turns
amber.
• Press [CD]; press Pause [j]; the Learn
LED turns green.
• Press [AMP] again to exit the learning
mode.
Note
The copy and punch-through func-
tions are similar. However, if you copy
a command and then subsequently
delete or overwrite the original
(source-key) command, the copied-to
key’s command remains unchanged.
If you punch-through to a command
and then delete or overwrite the
original key, the punched-through
functions also change accordingly.
MACRO COMMANDS
A“macro”command is a series of two or
more remote codes issued automatically
from a single keypress. You might use a
macro to automate a simple command
sequence, such as,“Turn on the DVD
player and then press PLAY”. Or you might
compose an elaborate macro to power
up an entire system, select a source,
choose a Listening Mode, and begin play-
back again, all from a single keypress. The
HTR 8 can store one macro on each of its
DEVICE SELECTOR and function keys.
6
ENGLISH FRANÇAIS ESPAÑOL ITALIANO DEUTSCH NEDERLANDS SVENSKA РУССКИЙ
HTR8_eng_OM_v03.indd 6 20/01/2012 1:46am

Note
Macros are independent of the cur-
rently selected device.
RECORDING MACROS
To record a macro, simultaneously
press-and-hold for 3 seconds both the
[MACRO] key and the HTR 8 function key
to which you wish to assign the macro,
until the status LED turns green. The
macro button will also light up.
Press the sequence of function keys to be
recorded into the macro, being sure to
rst press the requisite DEVICE SELECTOR
key for each function (you may switch
devices while recording the macro as
many times as necessary), allowing you to
create macro containing commands from
more than one DEVICE SELECTOR“page.”
When you have nished entering the
desired command sequence, press
[MACRO] again to store the macro; the
Learn LED and [MACRO] key illumination
will turn o.
Note
Each macro can store a maximum of
64 command steps. If you exceed this
number, the macro will be stored au-
tomatically after the 64th command
is added.
Example: Record a Macro to the [0] key
to turn ON the NAD Receiver, turn ON the
DVD Player, Select Input 1 (Source 1) and
commence disc playback of connected
Source 1 device (as in the DVD player)
• On the HTR 8, simultaneously press-
and-hold [MACRO] and [0] (numeric
zero); the Learn LED turns steady
green.
• Press [AMP], press [ON]; press [DVD],
press [ON]; press [AMP], press [1]
(Input 1); press [DVD], press [4] (Play)
– the Learn LED blinks as each step is
added.
· Press [MACRO] again to exit the
macro-record mode.
To clear a macro, perform the above steps
without entering any functions.
7
ENGLISHFRANÇAISESPAÑOLITALIANODEUTSCHNEDERLANDSSVENSKAРУССКИЙ
HTR8_eng_OM_v03.indd 7 20/01/2012 1:46am

EXECUTING MACROS
To execute a macro, press and release
[MACRO]; its key illumination lights for
5 seconds. While it remains lit, press an
HTR 8 key to which a macro has previ-
ously been stored.
The corresponding macro will run; as
each step executes, its“parent”DEVICE
SELECTOR key ashes briey; when
execution is nished, the [MACRO] key
illumination goes out. Pressing any other
HTR 8 key while a macro is executing
will abort the macro. Remember that
you must hold the HTR 8 so that its
infrared emitter can activate the target
components.
Note
When a macro executes, a 1 second
delay is automatically inserted
between its commands. If you need
more than a 1 second delay between
particular commands—for example,
to permit a component to power up
completely—you can record “empty”
steps into the macro by changing
DEVICE SELECTOR “pages” without
entering actual command functions.
KEy ILLUMINATION TIMEOUT
The HTR 8’s key-illumination can be set
to remain lit for 0-9 seconds. The default
value is 2 seconds. To set the illumination
timeout, simultaneously press-and-hold
for 3 seconds both the HTR 8’s [DISP] and
the [0-9] key, with the digit correspond-
ing to the desired timeout duration; the
Learn LED will ash twice to conrm
the new setting. When set to zero, the
illumination will not turn on at all.
Notes
· Key illumination is activated when
one presses any HTR 8 key.
· If HTR 8 senses movement, key illu-
mination is activated without having
to press a key. If HTR 8 is shaken, key
illumination is also activated.
· Key illumination is the biggest drain
on the HTR 8’s batteries. A short key
illumination timeout will extend
battery life appreciably; turning it o
altogether (set it to 0 seconds) will
lengthen it still further.
8
ENGLISH FRANÇAIS ESPAÑOL ITALIANO DEUTSCH NEDERLANDS SVENSKA РУССКИЙ
HTR8_eng_OM_v03.indd 8 20/01/2012 1:46am

CONFIGURING KEy
ILLUMINATION
Keys to Press
(for 3 seconds) Mode
DISP + Digit Key
(0-9)
Set key illumination
timeout to number of
seconds corresponding
to digit key. Zero turns
o the key illumination
entirely.
DISP + OFF Disable light sensor. Key
illumination will turn on
with any key press.
DISP + ON Enable light sensor.
DISP + ENTER Set the light sensor
threshold to the current
light level.
DISP + RTN Restore all key illumina-
tion settings to the
defaults.
FACTORy RESET
The HTR 8 can be reset to its factory state,
deleting all learned commands, copied
and punched-through keys, macros,
and other setup information; reverting
all keys to their pre-programmed library
commands.
To perform a factory reset simultane-
ously press-and-hold for 10 seconds the
HTR 8’s [ON] and [RTN] keys; the Learn
LED will start to ash green. Release
[ON] and [RTN] before the second ash
is complete; the Learn LED will turn red,
indicating the remote has been reset.
Note
You must release [ON] and [RTN]
before the second ash goes out, oth-
erwise the unit will not reset; should
this occur, repeat the full procedure.
DELETE MODE
The HTR 8 can store learned, copied, and
“default library”commands on any single
key. The default library commands are the
pre-programmed NAD codes, such as the
native NAD receiver commands on the
[AMP]“page”.
You can delete commands by layers back
“down”to the default library command
on any key, removing learned com-
mands, punched-through functions, and
copied keys.
Note
The default library commands can-
not be deleted, so you need not worry
that using Delete Mode might cause
irreparable changes.
9
ENGLISHFRANÇAISESPAÑOLITALIANODEUTSCHNEDERLANDSSVENSKAРУССКИЙ
HTR8_eng_OM_v03.indd 9 20/01/2012 1:46am

To enter Delete Mode, simultaneously
press-and-hold for 3 seconds both the
desired key’s DEVICE SELECTOR key and
the [RTN] key, until the Learn LED turns
green. Press the function key whose com-
mand you wish to delete; the Learn LED
ashes; the number of times indicates
which type of function has become
active - see the table below. Press the
active DEVICE SELECTOR key again to exit
Delete Mode.
Note
You may delete multiple function-key
commands on the same DEVICE
SELECTOR “page”, but to delete from
more than one DEVICE SELECTOR
page you must exit Delete Mode and
then re-enter it on the required page.
Flashes Command Type
1 Default Library Command
2 Copied Library Command
3 Learned Command
LOADING CODE-LIbRARIES
The HTR 8 can store a dierent library of
default NAD codes for each of its DEVICE
SELECTOR“pages”. If the original default
library does not control your NAD CD
player, BD player, DVD player or other
component, follow the procedure below
to change the code-library.
Begin by ensuring that the component
you wish the HTR 8 to control is plugged
in and powered-up (“ON”, not merely
in standby). To enter the HTR 8’s Library
Mode, simultaneously press-and-hold
for 3 seconds both the desired DEVICE
SELECTOR key and the [A/V PSET] key,
until the Learn LED turns green.
While keeping the HTR 8 pointed toward
the component, enter the rst appropri-
ate three-digit code-library number from
the table below and then press [OFF]. If
the component turns o, press [ENTER] to
accept that code-library number and exit
the Library Mode. If the component does
not turn o, enter the next three-digit
code-library number from the table.
When you enter the correct number the
component will turn o; press [ENTER] to
accept that code library number and exit
the Library Mode.
10
ENGLISH FRANÇAIS ESPAÑOL ITALIANO DEUTSCH NEDERLANDS SVENSKA РУССКИЙ
HTR8_eng_OM_v03.indd 10 20/01/2012 1:46am

LIBRARY
CODE NAD PRODUCT DESCRIPTION
100 Receiver/Processor
(Discrete ON/OFF)
101 Receiver/Processor
(Toggle ON/OFF)
102 S170
103 L75
104 Second Zone Commands (Zone 2)
3112 Zone 3
4112 Zone 4
105 L70
106 L76
107 118
108 L53
109 L73
110 Stereo Receiver/Amplier
111 Stereo Second Zone
112 Txx5 Series
200 CD Player
201 CD Player (old)
202 5170, 5240, 5340
203 5325
204 5060
205 M5
300 Tuner
301 L75, L76 Tuner
302 L70Tuner
303 L53Tuner
304 L73Tuner
305 C425
306 C445
307 Txx5 Series Tuner
400 Tape Deck B
401 TAPE Deck A
500 TV 280
501 MR13
502 MR20
503 PMR45
600 T535, T562,T585, M55
601 T550, L55
602 T512,T531, T532, T571,T572
603 L70, L73 DVD
604 L56
605 T513,T514, T515, T517,T524,
T533,T534
606 L53 DVD
11
ENGLISHFRANÇAISESPAÑOLITALIANODEUTSCHNEDERLANDSSVENSKAРУССКИЙ
HTR8_eng_OM_v03.indd 11 20/01/2012 1:46am

SEARCH MODE
If none of the codes from the table, when
entered, turns on the component, and
if you are quite sure you have followed
the above procedure completely and
carefully, you may want to try the “search”
method as follows:
Enter Library Mode by simultaneously
pressing-and-holding for 3 seconds both
the desired DEVICE SELECTOR key and
the [A/VPSET] key, until the Learn LED
turns green. Now press-and-hold the
HTR 8’s [D] or [F] key; the remote will
step through all the available codes at a
rate of approximately 1 per second.
When the component turns o, immedi-
ately release the cursor key; press [ENTER]
to accept that code-library and exit the
Library Mode. Try a few commands;
should you prove to have stepped past
the needed code-library, re-enter the
Library Mode and use the cursor key to
step back to it.
Note
It is possible that search mode will
nd code-libraries that operate, at
least partially, some other brand
(non-NAD) components. You may
certainly exploit such capabilities
as you nd them. However, since we
can only ensure the completeness or
accuracy of NAD code-libraries, we
cannot support the HTR 8’s operation
with other-brand components.
CHECKING CODE-LIbRARy
NUMbER
You can check the current code-library
on any DEVICE SELECTOR key as follows.
Enter Library Mode by simultaneously
pressing-and-holding for 3 seconds
both the desired component’s DEVICE
SELECTOR key and the [A/V PSET] key,
until the Learn LED turns green. Press the
[DISP] key; the HTR 8 indicates the current
code-library by ashing its [CUSTOM],
[BD], and [MACRO] keys.
For example, to indicate code-library
#501, the HTR 8 will ash [CUSTOM] 5
times, pause, and then ash [MACRO]
once. You might wish to make a note of
your components’code-library numbers.
12
ENGLISH FRANÇAIS ESPAÑOL ITALIANO DEUTSCH NEDERLANDS SVENSKA РУССКИЙ
HTR8_eng_OM_v03.indd 12 20/01/2012 1:46am

SUMMARy OFTHE HTR 8
MODES
Mode Keys To Press
(for 3 seconds)
Learn/Copy/Punch
Through Device Key + RES Key
Delete Mode Device Key + RTN Key
Macro Record MACRO Key + Function
Key
Library Mode Device Key + A/V
PSET Key
Back Light
Timeout DISP Key + Digit Key
Factory Reset See“Factory Reset”above
USb INTERFACE
The HTR 8 allows one to upload and
download the conguration through
a Windows
®
PC and NAD’s Proprietary
HTR 8 programming software. Use a USB
A male to mini USB B male 5-pin cable
(not supplied) between your Windows
®
PC and the HTR 8. See illustration below
on how to connect a USB A male to mini
USB B male 5-pin cable to the HTR 8.
Note
Please log onto www.
nadelectronics.com/HTR8 for
the latest HTR 8 interface control
software. Your custom installer or
dealer can assist you in the proper
setup and conguration of the mini
USB interface and software.
13
ENGLISHFRANÇAISESPAÑOLITALIANODEUTSCHNEDERLANDSSVENSKAРУССКИЙ
HTR8_eng_OM_v03.indd 13 20/01/2012 1:46am

1 La partie supérieure comprend
les commandes MARCHE/ARRÊT
[ON/OFF] et MACRO, ainsi que huit
touches de sélection d’appareils
2 La section au dessus du milieu com-
porte les touches de [MUTE], de sé-
lection des voies/chaînes, de réglage
du volume sonore, de navigation et
de conguration de la sonorisation
enveloppante
3 La section du milieu comporte les
touches de [A/V PSET], [SPEAKER],
[PROGRAM], [CLEAR], [TEST],
[REPEAT] ainsi qu’un pavé numérique
de 0 à 10+
4 La section en dessous du milieu
comporte les touches de commande
de délement
5 La section inférieure comporte les
touches d’ajustement du volume
pour les diérentes voies
NAD est une marque de commerce de NAD
Electronics International, une division de
Lenbrook Industries Limited
©Tous droits réservés 2012, NAD Electronics
International, une division de Lenbrook
Industries Limited
///
1
2
3
4
5
2
ENGLISH FRANÇAIS ESPAÑOL ITALIANO DEUTSCH NEDERLANDS SVENSKA РУССКИЙ
HTR8_fre_OM_v03.indd 2 20/01/2012 1:47am

VUE D’ENSEMBLE DE LA HTR 8
· Permet de commander jusqu’à
8appareils.
· Apprend jusqu’à 360commandes.
· Enregistre jusqu’à 52macros,
dont chacune peut comporter
64commandes.
· Fonctions d’accès direct
congurables.
· Éclairage des touches avec tempori-
sation programmable.
· Évolutive.
· Contient une bibliothèque prépro-
grammée de télécommandes NAD.
Aussitôt déballée, la télécommande NAD
HTR 8 est déjà prête à commander vos
appareils NAD; mais son principal atout
est qu’elle constitue, à elle seule, huit
télécommandes distinctes. Chacune
des 8touches de Sélection d’Appareils
en haut du combiné permet d’appeler
une nouvelle «page» de télécom-
mandes à transmettre grâce aux autres
touches. Vous pouvez «enregistrer» des
commandes à partir de n’importe quel
appareil télécommandé en infrarouge,
quelle qu’en soit la marque, et les enre-
gistrer sous une, plusieurs ou toutes ces
touches.
Il est évident que la démarche la plus
logique consiste à enregistrer les com-
mandes de votre lecteur DVD sur la
«page» de Sélection d’Appareil [DVD],
ceux de votre téléviseur sur la page [TV],
et ainsi de suite, mais rien n’est obliga-
toire: Vous pouvez enregistrer n’importe
quelle commande sous n’importe quelle
touche de n’importe quelle page (repor-
tez-vous à la rubrique «APPRENTISSAGE
DES COMMANDES D’AUTRES
TELECOMMANDES» ci-dessous).
La télécommande HTR 8 est déjà prépro-
grammée avec un jeu complet de com-
mandes NAD, sur la page de Sélection
d’Appareil AMPLI [AMP], ainsi qu’avec des
commandes de bibliothèque permettant
de faire fonctionner la plupart des appa-
reils NAD de type DVD, CD, BD ou TUNER
sur les «pages» de Sélection d’Appareils
correspondantes. Ces commandes par
défaut sont permanentes: Même si vous
utilisez la fonction d’apprentissage pour
les remplacer par d’autres commandes,
les commandes sous-jacentes de la bi-
bliothèque resteront toujours en place et
vous pourrez facilement les rappeler plus
tard, si jamais vous ajoutez un nouvel ap-
pareil NAD à votre chaîne (reportez-vous
à la rubrique «MODE D’EFFACEMENT»
ci-dessous).
3
ENGLISHFRANÇAISESPAÑOLITALIANODEUTSCHNEDERLANDSSVENSKAРУССКИЙ
HTR8_fre_OM_v03.indd 3 20/01/2012 1:47am

APPRENDRE À CONNAÎTRE
LA HTR 8
La télécommande HTR 8 est divisée en
deux parties principales: Les huit touches
de Sélection d’Appareils en haut de la té-
lécommande (AMPLI [AMP], [DVD], [TV],
etc.) renvoient les autres touches du com-
biné de télécommande à une «page»
de commandes, an de commander un
appareil spécique. Une touche Sélection
d’Appareil ne fait que dénir l’appareil qui
sera commandé par la télécommande
HTR 8; elle ne réalise aucune fonction
sur l’appareil concerné. Toutes les autres
touches sont des touches de fonction ca-
pables «d’apprendre» les codes de com-
mande de pratiquement n’importe quelle
télécommande infrarouge, ce qui vous
permet d’enregistrer les commandes
de vos appareils dans la télécommande
HTR 8, quelle qu’en soit la marque.
Toutes les touches de Commande de
la Sélection d’Appareil «AMPLI» [AMP]
sont préprogrammées pour comman-
der les amplicateurs, préamplicateurs
et récepteurs NAD. La HTR 8 peut aussi
commander de nombreux autres appa-
reils NAD, à partir de ses pages [DVD],
[CD], [BD] et [TUNER].
Il est important de savoir que certaines
touches de la télécommande HTR 8
assurent des fonctions diérentes, sui-
vant la page de Sélection d’Appareil
sélectionnée. La couleur de l’étiquette
sur la touche Sélection d’Appareil cor-
respond aux étiquettes des touches de
fonction. La page la plus au milieu, c’est
à dire la touche de Sélection d’Appareil
noire AMPLI [AMP], correspond aux éti-
quettes de sélection d’entrées: Lorsque
la page Sélection d’Appareil AMPLI [AMP]
de la télécommande HTR 8 est active,
ces touches permettent de sélection-
ner les entrées des amplicateurs ou
des récepteurs. De la même façon, la
«page» mauve de la touche de Sélection
d’Appareil [DVD] correspond à plusieurs
légendes mauves et ainsi de suite.
4
ENGLISH FRANÇAIS ESPAÑOL ITALIANO DEUTSCH NEDERLANDS SVENSKA РУССКИЙ
HTR8_fre_OM_v03.indd 4 20/01/2012 1:47am

APPRENTISSAGE DES
COMMANDES D’AUTRES
TELECOMMANDES
Commencez par placer la télécommande
HTR 8 «nez à nez» avec la télécom-
mande d’origine, de manière à ce que la
fenêtre infrarouge de chaque télécom-
mande se trouve à environ 5centimètres
de l’autre.
· Activez le Mode d’Apprentissage:
Sur la télécommande HTR 8, appuyez
simultanément sur une touche de
Sélection d’Appareil et sur la touche
[RES] et maintenez ces touches en-
foncées pendant 3 secondes, jusqu’à
ce que la LED d’Apprentissage [Learn]
de la télécommande HTR 8 s’allume
en vert et de façon xe.
· Appuyez sur la touche de Fonction
de la télécommande HTR 8 dans
laquelle vous voulez enregistrer une
commande; la LED d’Apprentissage
[Learn] devient orange.
· Appuyez de façon continue sur la
touche de fonction de la télécom-
mande d’origine: La LED d’Appren-
tissage [Learn] de la télécommande
HTR 8 clignote pendant une ou deux
secondes puis devient verte et reste
allumée de façon xe. La commande
a été apprise.
· Appuyez à nouveau sur la touche
de Sélection d’Appareil la télécom-
mande HTR 8 pour quitter le mode
d’apprentissage.
Si la LED d’Apprentissage [Learn] ne cli-
gnote pas en orange, il vous faudra peut-
être varier la distance entre les deux télé-
commandes. Si la LED d’Apprentissage
[Learn] devient rouge au lieu de devenir
verte, cela veut dire que la commande
concernée n’a pas pu être enregistrée.
Dans de rares cas, il arrive que le format IR
de la télécommande d’origine ne soit pas
compatible avec celle de la HTR 8.
Exemple: Programmation de la fonction
«Pause DVD»
Positionnez la télécommande HTR 8 et la
télécommande de votre lecteur DVD sui-
vant les indications données ci-dessus.
· Sur la télécommande HTR 8, appuyez
simultanément et de façon conti-
nue sur [DVD] etsur [RES]; la LED
d’Apprentissage [Learn] clignote en
orange puis devient verte et reste
allumée de façon xe.
· Appuyez sur la touche [j](pause) de
la télécommande HTR 8; la LED d’Ap-
prentissage [Learn] devient orange.
· Appuyez de façon continue
sur la touche «pause» de la
5
ENGLISHFRANÇAISESPAÑOLITALIANODEUTSCHNEDERLANDSSVENSKAРУССКИЙ
HTR8_fre_OM_v03.indd 5 20/01/2012 1:47am

télécommande du lecteur DVD; la
LED d’Apprentissage [Learn] de la
télécommande HTR 8 clignote en
orange puis devient verte et reste
allumée de façon xe. La commande
a été apprise.
· Appuyez à nouveau sur la touche
[DVD] pour quitter le mode
d’apprentissage.
REMARQUES
· La télécommande HTR 8 peut
apprendre 360 commandes an de
pouvoir utiliser toutes les touches
Sélection d’Appareil [DEVICE
SELECTOR] et de fonctions.
· Les touches Sélection d’Appareil
[DEVICE SELECTOR] peuvent elles-
mêmes être congurées pour pro-
duire une commande.
· Tenez enfoncée une touche Sélection
d’Appareil [DEVICE SELECTOR]
pendant au moins 2 secondes pour
exécuter la fonction attribuée à cette
touche Sélection d’Appareil [DEVICE
SELECTOR] particulière.
· Une brève pression d’une touche
Sélection d’Appareil [DEVICE
SELECTOR] congurée ne fera que
commuter l’appareil activé.
ANNULATION DE L’OPERATION
Vous pouvez annuler la conguration
d’une touche en appuyant sur la touche
de Sélection d’Appareil active avant la n
de la séquence d’apprentissage; la LED
d’Apprentissage [Learn] devient rouge.
ACCES DIRECT
La fonction «accès direct» de la
télécommande HTR 8 vous permet de
conserver une même touche de fonc-
tion sur plusieurs «pages» de Sélection
d’Appareil diérentes de manière à ce
que, par exemple, la fonction MODE
AMBIOPHONIQUE [SURR MODE] du
dispositif AMPLI puisse toujours com-
mander le récepteur alors que la page de
Sélection d’Appareil DVD est active sur la
télécommande.
6
ENGLISH FRANÇAIS ESPAÑOL ITALIANO DEUTSCH NEDERLANDS SVENSKA РУССКИЙ
HTR8_fre_OM_v03.indd 6 20/01/2012 1:47am

NOTA
Les touches de Volume [VOL D/F]
de la télécommande HTR 8 sont pré-
programmées en «accès direct» sur
toutes les pages de Sélection d’Appa-
reil: les touches [VOL D/F] agissent
donc sur le volume général de la
chaîne NAD quel que soit l’appareil
sélectionné. De la même façon, les
commandes de volume des Voies
Ambioph. [SURR], CENTRE [CENTER]
et [SUB] sont préprogrammées en
accès direct pour tous les appareils.
Pour congurer un accès direct, après
avoir activé le Mode d’Apprentissage et
avoir appuyé sur la touche à programmer
en accès direct, il vous sut d’appuyer
deux fois sur la touche de sélection cor-
respondant à l’appareil vers lequel vous
voulez un accès direct. La LED d’état
devient verte; appuyez à nouveau sur la
touche de Sélection d’Appareil pour quit-
ter le Mode d’Apprentissage.
Exemple: Accès direct de la touche
MODE AMBIOPHONIQUE [SURR MODE]
de l’AMPLI depuis la «page» DVD
· Sur la télécommande HTR 8, appuyez
simultanément et de façon conti-
nue sur [DVD] etsur [RES]; la LED
d’Apprentissage [Learn] clignote en
orange puis devient verte et reste
allumée de façon xe.
· Appuyez sur la touche MODE
AMBIOPH. [SURR MODE]; la LED
d’Apprentissage [Learn] devient
orange.
· Appuyez deux fois sur AMPLI [AMP];
la LED d’Apprentissage [Learn] de-
vient verte.
· Appuyez à nouveau sur la touche
[DVD] pour quitter le mode
d’apprentissage.
COPIE D’UNE COMMANDE
DEPUIS UNE AUTRE TOUCHE
Vous pouvez copier une commande de
n’importe quelle touche de la télécom-
mande HTR 8 vers n’importe quelle autre
touche. Pour copier la fonction d’une
touche, après avoir accédé au Mode
d’Apprentissage et avoir appuyé sur la
touche vers laquelle copier la commande,
il vous sut d’appuyer sur la touche à
partir de laquelle vous souhaitez copier
(après avoir d’abord appuyé sur la touche
de Sélection d’Appareil correspondante,
si la touche à copier se trouve sur une
autre «page»). La LED d’état devient
verte; appuyez à nouveau sur la touche
de Sélection d’Appareil pour quitter le
Mode d’Apprentissage.
7
ENGLISHFRANÇAISESPAÑOLITALIANODEUTSCHNEDERLANDSSVENSKAРУССКИЙ
HTR8_fre_OM_v03.indd 7 20/01/2012 1:47am

Exemple: Pour copier la commande
de Pause de la page CD vers la touche
AMPLI [j]
· Sur la télécommande HTR 8, appuyez
simultanément et de façon conti-
nue sur [AMP] etsur [RES]; la LED
d’Apprentissage [Learn] clignote en
orange puis devient verte et reste
allumée de façon xe.
· Appuyez sur [j](pause); la LED d’Ap-
prentissage [Learn] devient jaune.
· Appuyez sur [CD]; appuyez sur [j]
(pause); la LED d’Apprentissage
[Learn] devient verte.
· Appuyez à nouveau sur la touche
AMPLI [AMP] pour quitter le mode
d’apprentissage.
NOTA
Les fonctions Copie et Accès Direct
se ressemblent. Néanmoins, si
vous copiez une commande avant
d’eacer ou d’écraser la commande
d’origine (celle de la touche source),
la commande copiée sur la nouvelle
touche reste inchangée. Si vous créez
un accès direct vers une commande
avant d’eacer ou d’écraser la com-
mande de la touche faisant l’objet de
l’accès direct, les fonctions auxquelles
vous accédez via l’accès direct sont,
elles aussi, eacées ou écrasées.
MACRO-COMMANDES
Une «macro-commande» est une série
d’au moins deux commandes de télé-
commande émise automatiquement
à partir d’une seule impulsion sur une
touche. Vous pouvez, par exemple, utiliser
une macro pour automatiser une simple
séquence comme «Allumer le lecteur
DVD puis appuyer sur PLAY (Lecture)».
Ou vous pouvez compiler une macro
complexe pour mettre sous tension une
chaîne complète d’appareils, sélectionner
une source, choisir un Mode d’Écoute et
lancer la lecture, le tout grâce à une seule
touche macro. La télécommande HTR 8
peut enregistrer une macro pour chaque
touche Sélection d’Appareil [DEVICE
SELECTOR] et de fonction.
NOTA
Les macros fonctionnent indépen-
damment de l’appareil actuellement
sélectionné.
8
ENGLISH FRANÇAIS ESPAÑOL ITALIANO DEUTSCH NEDERLANDS SVENSKA РУССКИЙ
HTR8_fre_OM_v03.indd 8 20/01/2012 1:47am
Table of contents
Languages:
Other NAD Remote Control manuals
Popular Remote Control manuals by other brands

CaryMart
CaryMart 0020390 manual

Universal Remote Control
Universal Remote Control MX-980 brochure

Associated Electrics
Associated Electrics XP3-SS instruction manual

TLC
TLC magician4 manual

Universal Remote Control
Universal Remote Control UR4-DCT operating instructions

HomeMatic
HomeMatic HmIP-KRCA user manual