manuals.online logo
Brands
  1. Home
  2. •
  3. Brands
  4. •
  5. Napier
  6. •
  7. Automobile Accessories
  8. •
  9. Napier Sportz 57 Series User manual

Napier Sportz 57 Series User manual

Includes:
Blue Poles (2)
Dark Gray (2)
Light Gray Pole (1)
Black Pole (1)
Inside Awning Poles (2)
MODEL # 57 Series
PACKAGE COMPONENTS
Tent bag
Tent
Tent tie straps (2)
Rain fly
Pole bag
Stake bag
Stakes (4)
Guide ropes (4)
Gear loft
Instructions & Warranty Card
WarrantyCard
ModelName
ModelNumber
Dateof Purchase
Whereboy Purchased
Tent poles (7)
Awning poles (4)
Awning pole caps (4)
CAUTION
. N ver use candles, light
y type of open flame in or near the
te t
•Do not cook inside the tent.
•Do not store flammable liquids inside the tent.
•Allow adequate ventilation inside the tent at all times.
Never refuel lanterns, heaters or stoves inside the tent.
Do not smoke inside the tent.
NEVER run the engine when the tent is attached to the
vehicle.
When the temperature is below freezing, do not install the
tent when your vehicle is wet as it may cause damage.
Do not attempt to drive the vehicle with the tent attached.
•
•
- Select a level campsite
- Park the vehicle into the chosen campsite with the vehicle
in park and turned off. Apply the parking brake.
SETTING UP THE TENT
SELECT CAMPSITE
2) Remove the tent from the tent bag and lay it flat on the
ground. Locate the front door and place this end at the
tailgate with the other end towards the cab.
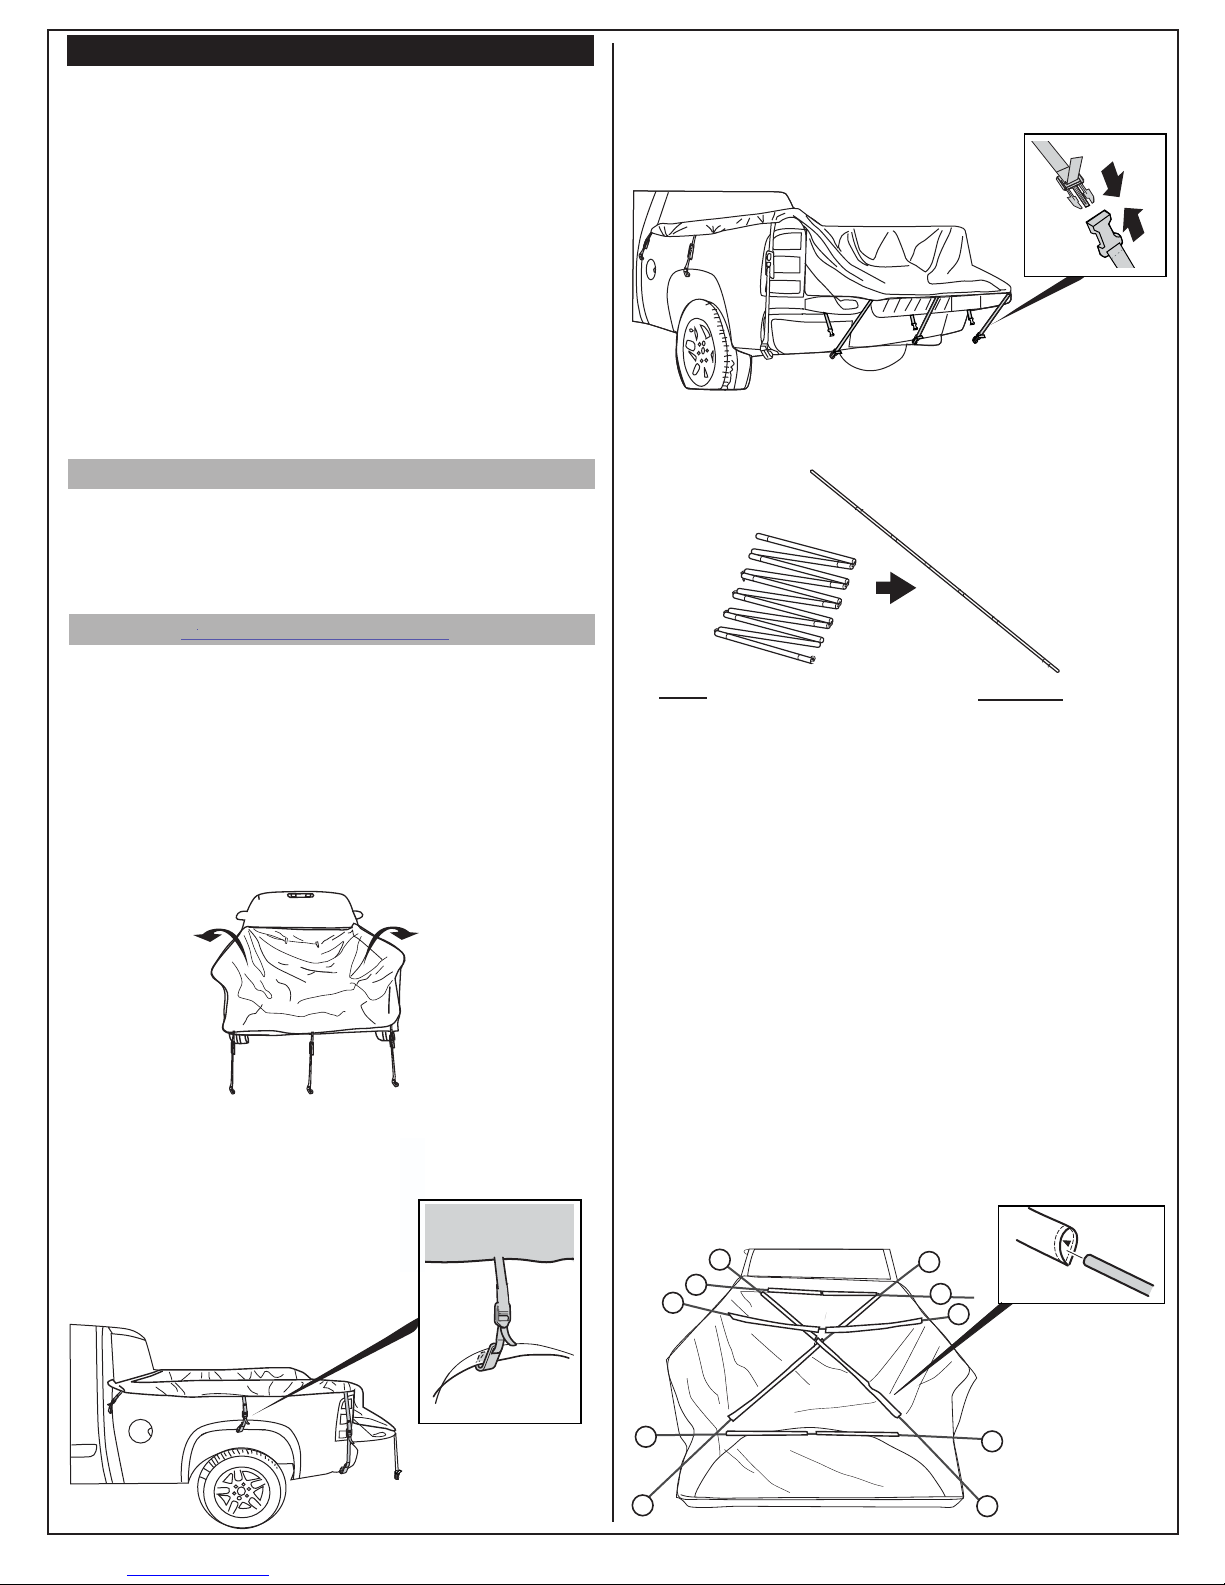
5) Assemble the tent poles by unfolding each section.
Below is a list of the poles and the placement.
•
•
•
1) Lower the truck’s tailgate.
Pole Location
Blue poles (A) Corner-to-Corner
Long Dark Gray pole (D)
Tailgate
Light Gray pole (B) Side-to-side
Black pole (for step 8)
Blue poles (for step 12)
Inside
Inside Awning
6) Insert the poles into the corresponding color sleeve.
Do not place the poles into the pole pockets at this time.
A) Slide the blue pole diagonally, corner-to-corner going
through the pole sleeves in the roof of the tent.
Repeat for the other blue pole.
B) Insert the light gray pole into the corresponding gray
sleeve in the roof of the tent, going side-to-side. Make
sure the Corner-to-Corner are below the gray pole.
C) Slide the short dark gray pole into the corresponding
pole sleeves at the back (cab) of the tent.
D) Slide the long dark gray pole into the corresponding
pole sleeve at the front (tailgate) of the tent.
3)
each strap to the truck’s body.
4)
NOTE: For easier assembly, set the tent up on the ground
leaving step 2-4 until the end. After the poles are inserted,
lift the tent into the truck bed and strap down.
Locate the tent side straps (3 per side). Loosely attach
Locate the tent tailgate straps (3). Slide the 3 straps
with male clip between the truck box and the tailgate.
Connect the strap with the male clip to the corresponding
strap with the female clip.
Short Dark Gray pole (C)
Access Cab
A
A
A
A
BB
CC
DD
Do not use candles, matches or open flames of any kind in or near
the tent.
Do not cook inside the tent.
Build campfires downwind and several metres away from a tent and
be sure to full extinguish campfires before leaving a campsite or before
retiring for the night.
Do not refuel lamps, heaters or stoves inside a tent.
Extinguish or turn off all lanterns before going to sleep.
Do not smoke inside the tent.
Do not store flammable liquids inside a tent.
NEVER run the engine when the tent is attached to the vehicle.
Do not install the tent when the temperature is below 0º/32ºF or when
your vehicle is wet as it may cause damage
Do not attempt to drive the vehicle with the tent attached
Exercise extreme caution when using fuel-powered lanterns or heaters
inside a tent and use battery-operated lanterns whenever possible.
•
•
•
•
•
•
•
•
•
•
12)
13)
11)
B
BB
B
D
D
C
C
A
A
SETTING UP THE AWNING
SETTING UP THE RAIN FLY
The poles may get stuck on the pole sleeves. Do
not force the pole, simply lead the pole through the sleeve.
NOTE:
7) Insert the poles into the pole pockets in the below order.
8) Once the tent is assembled, attach the pole clips to
the tent pole.
9) If the tent side straps are too loose, tighten the straps.
Remember the straps should not be too tight.
10) To install the gear loft, place each corner hook of the
gear loft into the loop located on the ceiling of the tent.
Locate the front of the rain fly that goes over the door.
It will have a woven Sportz logo tag. Place the rain fly
over the tent. You may need assistance due to height.
Attach the rain fly to the tent by clipping the 6 straps (2 per
side and 2 at tailgate). Tighten the straps if necessary.
Slide the gray poles through the pole sleeve in the roof of
the awning. Insert the poles into the pole pockets on each
corner of the awning.
NOTE: If you do not want to use the awning, roll up the
awning and secure it with the toggles.
A) Insert the light gray (side-to-side) pole into the black
webbing pocket above the window.
B) Insert the blue (Corner-to-Corner) pole into the blue pole
pocket near the truck’s cab. Insert the other end into
the blue pole pocket by the tailgate. Repeat with the other
blue pole.
C) Insert the end of the short dark gray pole (rear cab) pole
into the grommet hole located on the gray tab near the
side of the tent. Repeat on the other side.
D) Insert the long dark gray (tailgate) pole into the gray pole
pockets at the tailgate.
E) Insert the black (inside) pole into the black pole pocket
(above door and rear cab access) inside the tent. Velcro
the pole to the tent using the Velcro tabs.
10)
14) Insert the ring on the guide rope around the point and place
the awning cap over the guide rope. Stake the other end of
the ground with a peg. Adjust length of guide rope.
Assemble the awning poles (4 pieces). Insert the top pole
into the bottom end with clasp. Place one pointed end into
the grommet hole at the tailgate. Place the other end into
the grommet hole at the corner of the awning. Secure
with strap. Repeat for the other pole.

Other Napier Automobile Accessories manuals

Napier SPORTZ 57 Series User manual

Napier

Napier SPORTZ 57 Series User manual

Napier 295 User manual

Napier

Napier 295 User manual

Popular Automobile Accessories manuals by other brands

ACV 381143-40 installation manual

ACV

ACV 381143-40 installation manual

Rockford Fosgate Polaris PMX-P2 Operation manual

Rockford Fosgate

Rockford Fosgate Polaris PMX-P2 Operation manual

EUFAB JAKE operating instructions

EUFAB

EUFAB JAKE operating instructions

Falcon 4.3” Digital Wireless Reversing Camera Kit user manual

Falcon

Falcon 4.3” Digital Wireless Reversing Camera Kit user manual

Hak-System 12040510PL Fitting instructions

Hak-System

Hak-System 12040510PL Fitting instructions

Roadmaster 2000-1 owner's manual

Roadmaster

Roadmaster 2000-1 owner's manual

Denso KRISTAL user manual

Denso

Denso KRISTAL user manual

Westin 28-0160 instructions

Westin

Westin 28-0160 instructions

Raptor Series MAGNUM RT GTS79TY manual

Raptor Series

Raptor Series MAGNUM RT GTS79TY manual

Prorack K160 Fitting Instructions for Basic Carrier

Prorack

Prorack K160 Fitting Instructions for Basic Carrier

Thule 76 Mounting & installation

Thule

Thule 76 Mounting & installation

AutoConnect AC200GP Quick install guide

AutoConnect

AutoConnect AC200GP Quick install guide

Brodit Passive Holder brochure

Brodit

Brodit Passive Holder brochure

BETTY & BERTIE LUPIN manual

BETTY & BERTIE

BETTY & BERTIE LUPIN manual

Thule 1576 instructions

Thule

Thule 1576 instructions

Volvo 31213723 installation instructions

Volvo

Volvo 31213723 installation instructions

Front Runner TRFD001 quick start guide

Front Runner

Front Runner TRFD001 quick start guide

NanoCam Plus NANO CONNECT Smartview 72 quick start guide

NanoCam Plus

NanoCam Plus NANO CONNECT Smartview 72 quick start guide

manuals.online logo
manuals.online logoBrands
  • About & Mission
  • Contact us
  • Privacy Policy
  • Terms and Conditions

Copyright 2025 Manuals.Online. All Rights Reserved.