NARDINI MASCOTE MS-1400S User manual

NARDINI
SPARE PARTS
AND
OPERATIONS MANUAL
FOR
MS-14005
MS-1400E ( inch version) MS-1600S
MS-1600E
MS.2O5AS
MS.zO5AE
MS-175S
MS_ 17SE (metric version)
MANUFACTURED BY
INDUSTRIAS NARDINI S.A.
Av. Mons. Bruno Nardini, 1735
13470 - Americana - SP - Brazil
Phone (0194) 61-4026
Tlx.019 1551 INNA BR
UNITED STATES HEADOUARTERS
NARDINI INTERNATIONAL, INC.
9225 Eton Avenue
Chatsworth, California 9131 1
Phone (B1B) 700-1041
Tlx. 9104942107 NARD INT


INTRODUCTION
This manual describeis the MASCOTE lathe models MS-1400S/E, MS-1600S/E, MS-175S/E
and MS-205AS/AE.
It has been carefully prepared to assist you to take advantage of the qualities of these machines.
The first sections presen't instructions about foundation, leveling, lubr:'rcation; main-shaft adjust-
ment, axial adjustment of the spindle, drive-belt adjustment and other detailsimportanttocorrect
operation of the machine,
The second part presents blown-up views in perspective, parts list and inforrnation on ordering
spare parts,
ln the interest of continuing industrial and technological development, NARDINI reserves the
rightto change the design and specifications of its machines without previous notice.
NARDINI's expert technicians are always avaiable to help you solve any problem in the
operation of these machines.
The serial number of the lathe is stamped on the back part of the bed. For any claims please
always refer to this number.
INDUSTRIAS NARDINI S.A.
Americana-SP-Brazil

INDEX
Specifications... .,....5
Lifting and Cleanlines. . . .. . .. . .6
Foundation ....'..7
Levellingand EletricalConnections.... .........8
DimensionsandPrincipal Assemblies... .......9
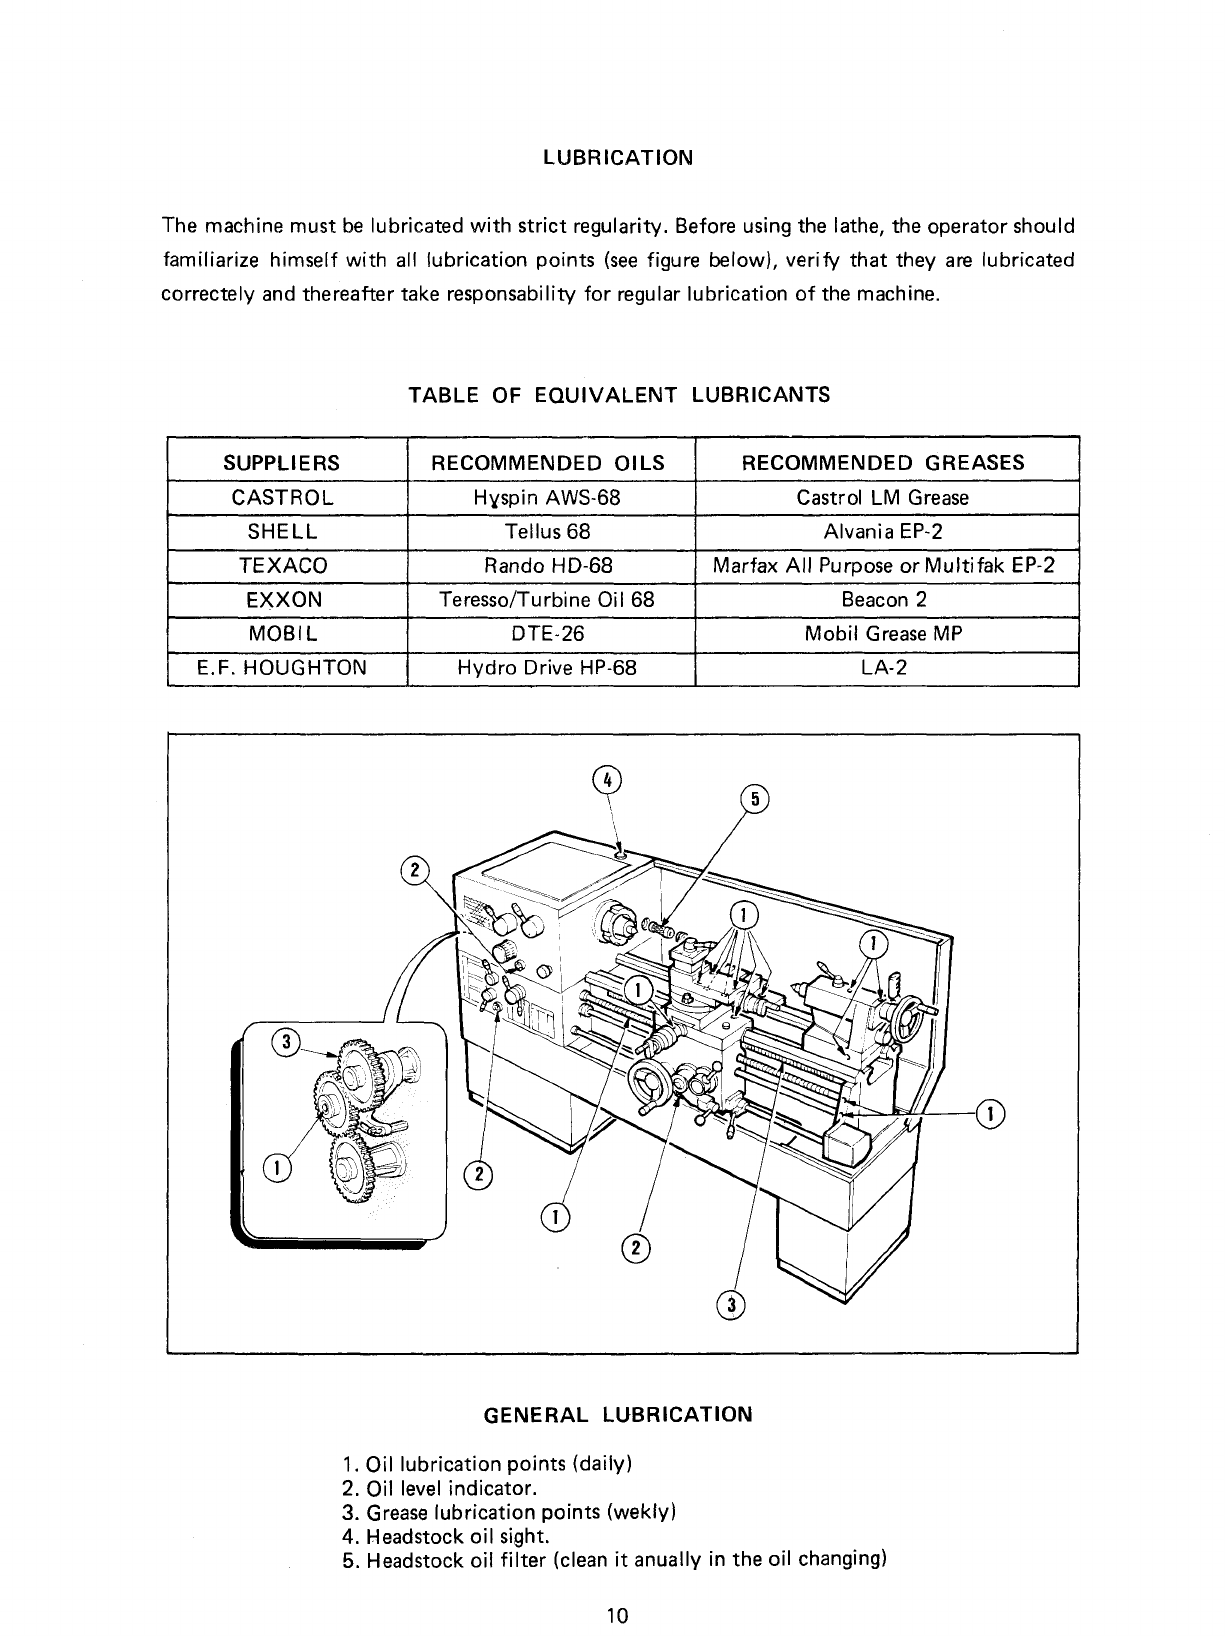
Lubrication ......10
Oil change ........11
LatheControls ....12
LatheOperations. ......13
Headstock lnstructions ........14
Threads and Feeds Gear Box lnstructions .. .. , .. .15
Threads and Feeds Gear Box Data Plate .. . . . .16
Saddle lnstructions ......18
Apron (left - hand) lnstructions . . .19
Apron (right-hand) Instructions .......20
Tailstock lnstructions ....21
MotorDriveSystem lnstructions... .... '22
Change Gears and Safety Coupling lnstructions . . . . . .23
Threads Cutting lndicator lnstructions (Leadscrew 4 TPI) . , . .24
Threads Cutting lndicator lnstructions (Leadscrew 6mm). . . . . .25
Spindle and Leadscrew Axle Adjustment lnstructions . . . .. .. .26
BrakeSystem ........27
Electrical Diagram ......28
Part Listlntroduction.... .,.....31
Headstock (MS-M|-401C) . .. . .32
Headstock(Ms-Ml-402C) ... ......34
Headstock (MS-M1"403C) ...,...36
GearBox (MS-M|-404C) .......38
GearBox (MS-M|-405C) ... ,....40
Gear Box (MS-M|-406C) . ... ... .42
Saddle (MS-M|-407C) ........44
Apron(left-hand) (MS-M|-408C). ....,46
Apron(left-hand) (MS-M|-409C). ..... '48
Tailstock (MS-M|-410C) ...50
Bed(MS-Ml-411C) ...52
Change Gears (ledascrew4TPl)(MS-MI-412C1 ........54
Change Gears (leadscrew 6mm) (MS-MI-413C) . . .56
Motor Drive System (MS-M l-4143lr . . . .58
SteadyRest(MS-Ml-415C) ....59
Follow Rest (MS-M|-416C) . .. . . 60
Tool Post (MS-M|-417C\ . .. . . .. .61
Drive Plate, Universal Chuck Flange, Back Plate (MS-M|-418C) .......62
TaperAttachment (MS-M|-419C) .....64
CoolantPump (MS-Ml-42rc\ ....,66
Threads Cutting lndicator (leadscrew 4 TPI) (MS-M|-421C], . . . . 67
MicrometerStop (MS-M|-422C]r ........68
ChipGuard (MS-M|-423C\ .....70
Chuck Guard (MS-M|-424C\ .........71
Threads Cutting lndicator (leadscrew 6mm) (MS-M|-425C\ . . . . .72
Apron (right-hand) (MS-M|-426C). . . .74
Apron (right-hand (MS-M|-427C\ .....76

Cross slide travel . 8"- 205 9.114"- 235
CAPACITY
Height of centers. . .
Distance between centlis : : :. . : : . . : . :
Swing over bed
Swing over wings of saddle
Swing in gap
Gap length in front of faceplate
Top slide travel .
Tool section ...... : :.. : : : :.... : : :,
BED
Widht
Height
HEADSTOCK
Spindle bore .
Spindle nose .
Spindle internal taper .
Taper in reduction sleeve,
Spindle speeds:
MS 175S,205AS, 14005 and 16005....
MS-l75E, 205AE, 1400E and 1600E . . .
Speeds range:
MS-1755,2055, 14005 and 16005
MS-175E,205E, 1400E and 1600E. .. ..
TAILSTOCK
Ouill diameter. . .
Ouill internal taper
Ouill travel
Lateral adjustment
GEAR BOX - Pitch of Leadscrew - 6mm
Threads number
Metric threads (64) . .
lnch threads (32). .
Module threads (64)
Diametral pitch thread, tb)i
FEEDS RANGE
Number of feeds
Longitudinal feeds ( 1 28)
Cross feeds (1 28).
GEAR BOX - Pitch of Leadscrew 4 T.P.l.
Threads number
Metric threads (45)
lnch threads (33).
Module threads (25) . . . . . .
Diametral pitch threads (32)
FEEDS RANGE
Number of feeds
Longitudinal feeds (128) .
Cross feeds (128).
MOTORS
Main motor:
MS-175S,2055, 14005 and 16005
MS-175E, 2O5E,1400E and 1600E. . . , .
Coolant pump
SPECIFICATIONS
MS-1400 MS-1600
MS-175 MS-205
6.718" 175 8.5164"- 205
20"- 500 32"- 800 40"- 1000
13.25132"-350 15.15116"-405
12.13164"- 310 14.9116"- 370
20"- 500 22.3164"- 560
5.45164"-145
4" 100
518"x5lL" - l6xl6
8.21132"-220
1 1 .131 16" - 300
1.13116"- 46 *
ASA L-O**
1:2O
3
... lnch/mm
MT
50 to 2000
25 to 2000
2"-50
3
5.33164"- 140
318" - 70
192
0,375 to 7,0
3to56
0,1 875 to 3,5
12 to 2OB
2ffi
0,042 to 0,929
0,015 to 0,338
135
0,4 to 7,0
3 to 5,6
O,25to 3,75
12 to 208
2rc
0,0015" to 0,0427"- 0,038 to 1,085 lnchlmm Rev
0,00075" to 0,02135"- 0,019 to 0,5425 lnchlmm Rev
6 (60H2) or 5,5 (50H2) (one speed motor)
6,3/4 (two speed rnotor)
0,12
(42mm)
(46mm)
lnchlmm
lnchlmrn
lnchlmm
lnchlmm
lnchlmm
lnchlmm
lnchlmm
lnchlmm
lnchlmm
lnchlmm
lnchlmm
. rpm
. rpm
. .. lnchlmm
...MT
. .. lnchlmm
. .. lnchlmm
I
1B
, ,mm
I nch
MOD
.DP
HP
HP
HP
Optional
*" Cam Lock D1 5 * 1.21132"
** Cam Lock DIN 55022-5 * 1.13116"
Under Request
** Cam Lock D1 6 or DIN 55022-6 - * 2.1132" (52mm)
5
...mmRev
...mmRev

LIFTING
To raise the lathe, move the tranwersal carriage and tailstock to the right extremity of the bed and
fix them, making sure that they will not slide and cause damage to others parts.
Put an square steel bar of aproximated 2" (50mm) under the bed, place the cables through the
first vertical discharge for chips and tie on the square steel bar.
For safety precautions, prop the cables with wooden blocks.
When the lifting process begins the cables are taut, check if the square steel bar is upholded and
leveled properly.
CLEANL]NESS
All NARDINI lathes leave the factory protected by grease and preventativeswhich must be remo-
ved. Use a soft cloth moistened with kerosene.
Do not use thinner, gasoline or other kinds of removers.
Give special attention to cleaning the guides of the ded and then lubricate them.

FOUNDATION
The precision of the lathe depends on how well it is installed. The durability of the machine is
only guaranteed if the lathe has been firmly and preci*ly installed.
The foundation area rnust consist of good concret and have minimum depth af 12" (300mm) to
support the lathe's weight at the cofumns areas.
hJO'IE:Anchor screws and plates are not included with the rnachine.
625
,*---- ,osa" T
POWER ,/
E-UJ-BANEE ,'
__,t
A
{
sEc'Ll_a.N_ A-A
Ld 535
2t"
- 325 -*._.--:]5-O
t?!rq" , 5 ?rB"
DI STA NCE
BETWEN
C FNT FRS
rrArr
mm NCH mm I NCH
500 zo" 77' so 5/a"
800 52" r0t3 rg'/a"
too0 qo" r 253 +g ?re
-4
--r
------l

LEVELIT{G
The precision and durability of the lathe depends on its being perfectly level. Final inspection rnust
h,e done only when the machine has beefi eorrectly leveled. When the machine ison itsfoundation,
level readings must be done with the level in positions A, B" C and D (see figure). Usea precise
level of 0.0008"x40" Q,A2 n000mm)
The transversal reading mulst be done
using a precision level (1) and two
parallel wedges (2).
eare must be taken that the machi-
ne is not moved untill the screws
are fixed in the concrete (minimum
48 hours). After his period of time,
use the precision level again to
obtain a perfect levelness"
Note Leveling of the machine
should be checked again after the
first week of the operation to en-
su re its permaRency" Repeat this
operation each six months.
ELECTRICAL CONNECTIONS
All electrical connections are by L1 , L2, L3 and GRD terminale found in the electricalcabinet,
wich is equiped with circuit breakes and contactors.
Before connecting the lathe to power source, ensure that the source does not vary more than + 10
or - 5%. Variatione outside this range may be harmful.
The power lines must be well dimensioned, by preferance 4x6mm2 (Ll, L2, L3 and GR D).
We recommend the grounding for your protection (see electrical diagramns).
The following is reconnmended for preventive maintenance of .electrical system -
Every three months - Tighten all contact screw.
Every six months - Clean the motor and its electrical connections.
Clean all electrical equipment, including microswitches, cabinets and
pumps,
Annualy - lf necessary, change the contacts,

PRINCIPAL ASSEMBLIES
1 " Headstock
2. Four inelepenrlent jaw chuck
3. Saddle
4. f ailstock
5. Bed
6. Apron
7. Gear box
8. Drive unit
L Change gears
1 0. E lectric panel
DIMENISIONS
ABc
24"
500mm 64.112"
1638mm 66.118"
1680mm
32"
B00mm 73.112"
1B67mm 75.118"
1908mm
40"
1000mm 83.118"
21'!1mm 84.314"
2153mm
oB
Fd
9*
oo
oo
a9
6b
=>
GQ
tr, &
=--ris
i
i
I
,tlt'

LUBRlCATION
The machine must be lubricated with strict regularity. Before using the lathe, the operatorshould
familiarize himself with all lubrication points (see figure below), verifo that they are lubricated
correctely and thereafter take responsability for regular lubrication of the machine.
TABLE OF EOUIVALENT LUBRICANTS
GENERAL LUBRICATION
1. Oil lubrication points (daily)
2. Oil level indicator.
3. Grease lubrication points (wekly)
4. Headstock oil sight.
5. Headstock oil filter (clean it anually in the oil changing)
SUPPL!ERS RECOMMENDED OILS RECOMMENDED GREASES
CASTROL Hyspin AWS-68 Castrol LM Grease
SHE LL Tellus 68 Alvania EP-2
TEXACO Rando HD-68 Marfax All Purpose or Multifak EP-2
EXXON Teresso/Turbine Oil 68 Beacon 2
MOBI LDTE.26 Mobil Grease MP
E.F. HOUGHTON Hydro Drive HP-68 LA-2
a
10

LUBRICATION
TO CHANGE OIL
HEADSTOCK
Drain the oil through plug (2).
Refill with fresh oil through the
oil sight (1).
GEAR BOX
Drain the oil through plug (4).
Refill with fresh oil through the
plus (3).
APRON
Drain the oil through plug (6).
Refill with fresh oil through the
plus (5).
ASSEMBLY FREOUENCY OF OIL CHANGE OUANTITY
HEADSTOCK ANNUALLY 3,5 LIT RES
GEAR BOX 2,b Lt I Hh
APRON 1,5 LITRES
11

(,_u) il; ()\ (0)
'al
\- <'
(ir) e)
LATHE CONTROLS
1. Circuit control ON and emergency stop. 15. Spindle speeds selectors.
2. General switch. 16. Spindle rotation forward, reverse and
3. Cross slide handle. stop.
4. Toolpost handle.
5. Top slide handle. For models MS-1400E, MS-175E
6. Tailstock barrel lever. MS-1600E and MS-205AE
7. Tailstock clamp lever. 17. Coolant pump ON/OFF button.
8. Tailstock handwheel. 18. Low and hiEh main motor rotation.
9. Lever for engaging the leadscrew nut, the
longitudinal and tranwersal feeds. For rigrth hand apron models
10, Engage and desengage of automatic feeds 19. Apron handwheel.
lever. 20. Engage and desengage of automatic feeds
11. Apron handwheel. levers.
12. Coolant pump ON/OFF button. 21. Lever for engaging the leadscrew nut, the
13. Threads and feeds selectors. longitudinal and tranwersal feeds.
14. Saddle longitudinal motion handle.
12
\',?), {i; I6)
,r2\
,'D
id,

LATHE OPEBATION
CAUTIONS -
- To safeguard against damage or injury, it is recommended that the operator read carefully all
instructions in this manual before beginning operation of the lathe.
* Check the oil level of the headstock and lubrication of the threads, feeds gear box and all other
lubrication points. Tlre !athe leaves the factory correctly lubricated at all points, hut a general
inspectiorr befr:re operatir:n is inrportant.
-* Before cleaning the lathe, verify that the spindle lever is in the center position.
-- Until the operatoi has hrecome completely familiarized with all the lathe's controls, he should
operate it only with the motor at low speed.
IMPORTANT-
Do not change speeds, threads or feeds selectors with the spindle in motion. This can wear or
break the gear teeth.
13

HEADSTOCK FOR MODELS:
MS-14005, MS-16005, MS-175S and MS-205AS
Selection of speeds is through the handle wheels (1 ) and (2). These controls allow 9 different speeds.
When the circuit control and emergency stop buttons (4) are pulled out, all electric commands of
the lathe are ON. Pushing them in bring the reverse - all commands are OFF.
The handle wheel (3) controls the rotation of the leadscrew, bringing it to reverse or to full stop.
HEADSTOCK FOR MODELS:
MS-14008, MS-1600E, MS-175E and MS-205AE
Selection of speeclsisthroughthehandlewheels(1)ariA(2),Thesecontrolsallowgdifferentspeeds.
Nine ad<jitionai speeds nray be obtained by changing motor speed from low to high rotation, or
vice-versa, through key (4), giving a total of 18 speeds.
When circuit control and emergency stop buttons (5) are pulled out, all electric commands of
the lathe are ON. Pushing then in brings the reverse - all commands are OFF.
The handle (3) controls the rotation of the leadscrew, bringing it to reverse or to full stop.
r-
I
14

1i:-;'i.:'--
-==-'
\ --''
\/
?-\
-zr / -\
r (4)
t-,/'
TI"{READS AND FEEDS GEAR BOX
Selection of threads is through levers (1|, (2],, (3)and (4)"
The lubrication is made by an internal pump placed in the box, with reservoirs and channelsdis-
tributed through the wole set, guaranteeing that every parts is well lubricated.
To set a specific pitch of thread or feed, find it on the data plate the value of this pitch. Then, on
the same line, find the letters and numbers that indicate the position of levers (1), (2), (3) and (4)
Example :Tooling of a metric thread pitch of 1mm.
- Locate the pitch on the data plate.
- Set the levers according to the letters and numbers corresponding to pitch 1,00 (LJA1).
- The assembly is now prepared to make threads of 1mm pitch.
To obtain a tooling with tranversal and longitudinal addances, proceed in the same way.
15
-i--------.-
3i1)
q#

GEAR BOX DATA PLATE
(Leadscrew pitch: 4TPl )
o) QI
M,[,=%\ffW
I:I= LJD4
!t,'ffJ i O
ENN MoD.
MOD PGS MOD I pOS MOD PO PO MOD
MKDS
T:i6- 0.875 lUD6
lom lr tn7 t.5m
1,625
1,750
1 475
M.ID2 31
!&'',f* /O
POS INCH
.0030
mg KHT 0075 I
o,@1 IMKET lO.r98 I .0r I.IBT 9t
0,5
0,6
0,6
txrt6 LKts Ix)l I
EeI tnp0 MKC Io,224
.@39 LKE Iuw5 MKts I o.241 .0263 MJG
.uu5 LKC II l4 .o122 LJH 3lu .03 lMJ
.wl LKtsI I l9 .ur 3l LJG 332 .0342 MJD
LKAT t35 .o142 LJFT 361 0360 MJCT 14
.ffi MKHI 155 194 m80 BT
.0071 MKF LJCT
O
@

GEAR BOX DATA PLATE
{Leadscrew pitch:6mm}
Or---\
t\
\/
@\-=-l
-.--..-\
/\
(\
\/
\ ,,/
^ -L ---l ^
u$)
{
i ,r*t I *[n,Tuu t uir^,
i *./O

ta .\\
\.\
SADDLE
The saddle assembly consists of a toolpost (1), a top slide (2), a swivel slide (3), a cross slide (4),
a device to automatic desengage of the tranwersal feed (7) and the housing of the saddle (8).
Itwas projected to offer easy handling that is smooth and precise.
To ensure precision readings on the cross slide dial, the nut (6) is special designed to elimina-
te all looseness, that is regulated through set screw (9).
Always, when turning faces, lock the saddle in its correct position using screw (5).
Give special attention to lubrication of the saddle, wich is done handle (see pag. 10).
18
II
\--_
i.-.:-..

lal
tT'
l
I
(t) ri;
APRON
(left hand)
The apron is positioned mannualy by handwheel ('l )
The longitudinal and transversal feeds and leadscrew nut are clamped using only one lever (2) in
three positions.
Position A - Transversal feeds clamp.
Position B Longitudinal feeds clamp.
Position C - Leadscrew nut clamp.
The automatic disengage or engage is done through the lever (3).
The lubrication is done by a pump located inside the apron, with oil reservoirs and channels
distributed inside the box guaranteeing that every part of the set is perfectly lubricated.
Spindle rotation and neutral position are done through lever (5) with three positions:
Downward position - The spindle turns forward.
Upward position - The spindle turns backward.
Central position - The spindle remains stopped.
The bed stops (4) does the longitudinal automatic discngage system, wich can be fitted at any
position along the bed to be used in five stop positions.
19

APRON
(right - hand)
The apron is positioned mannualy by handwheel (1).
The longitudinal and transversal feeds and leadscrew nut are clamped using only one lever (3) in
three positions.
Position A - Leadscrew nut clamp.
Position B - Transversal feeds clamp.
Position C - Longitudinal feeds clamp.
The automatic disengage or engage is done through.the lever (2).
The lubrication is done by a pump located inside the apron, with oil reservoirs and channels
distributed inside the box guaranteeing that every part of the set is perfectly lubricated.
Spindle rotation and neutral position are done through lever (5) with three positions:
Downward position - The spindle turns forward.
Upward position - The spindle turns backward.
Central position ' The spindle remains stopped.
fhe bed stops (4) does the iongitudinal automatic disengage system, wich can be fitted at any
position along the bed to be used in five stop positions.
\
\
it j
20
-...:
)
/
ai
This manual suits for next models
7
Table of contents