National Luna NL12-ICE MAKER User manual


ICE MAKER
Camping
National Luna sales and support:
Tel : +27 (0)11 452-5438
www.nationalluna.com
Model NL12-ICE MAKER
Power Supply 220 – 240Vac / 50Hz
Electrical Safety Class I
Climate Class SN, N, ST, T
Ice-making Rating 0.7A
Ice-harvest Rating 1.0A
Refrigerant R600a/26g
Foam Insulation C5H10
Net Weight 7.8kg
Dimension (W x D x H) 242
mm
x 358
mm
x 328
mm
TECHNICAL INFORMATION
• Cycle time: 6-13 minutes
• 2.2 L Water Reservoir Capacity
• 0.7kg Ice Basket Capacity (Full)
• Hollow Bullet Shape Ice (2 x size options)
• Operating Ambient Temperature 10ºC to 43ºC

Instruction Manual
ICE MAKER
Camping
NL12-ICE MAKER
Read these instructions carefully before using your Camping Ice Maker.
We recommend that you keep this manual in a safe place for future reference.
Read these instructions carefully before using your Camping
I
ce
M
aker.
We recommend that you keep this manual in a safe place for future reference.

IMPORTANT SAFETY INSTRUCTIONS & SAFETY TIPS 1
PREPARING YOUR ICE MAKER FOR USE 2
GETTING TO KNOW YOUR UNIT 3
OPERATING PROCEDURES & MAINTENANCE 4
UNPACKING YOUR ICE MAKER 4
CONNECTING YOUR ICE MAKER 5
CLEANING AND MAINTAINING YOUR ICE MAKER 5
USING YOUR ICE MAKER 6
TROUBLE-SHOOTING 7
TECHNICAL PARAMETERS & EXPLODED PARTS DIAGRAM 8
ELECTRICAL CIRCUIT DIAGRAM 10
NATIONAL LUNA LIMITED WARRANTY 11
CONTENTS
This Appliance conforms to IEC 60335-2-24 Safety Standards

www.nationalluna.com
NL12-ICE Maker Manual Page 1
Fire Hazard Symbol: Adhere to disposal regulations relating to
refrigeration appliances.
SAFETY TIPS
• Keep air ventilation openings clear of obstruction.
• Do not damage the refrigerant circuit.
• Never “hack/chip” at the ice with a plastic/metal tool or other means
to accelerate the defrosting or ice harvesting process. (Doing so could
puncture the cooling gas pipes & damage the unit.)
• Do not use any other type of electrical appliances inside the ice-maker.
NB: The Ice Maker must operate on a level fl at stable surface (see page 6)
IMPORTANT SAFETY INSTRUCTIONS
This product should not be disposed with other household waste.
Recycle responsibly to prevent possible harm to human health or the
environment, as well as to promote the sustainable re-use of materials.
Your safety and the safety of others is very important to us. This appliance manual
contains important safety instructions. Please read carefully before use.
Safety alert symbol: All safety messages will follow the safety alert
symbol and the word “WARNING” or “DANGER”.
Electrical Hazard Symbol: This appliance operates off 220 - 240Vac and is
potentially lethal if incorrectly used.
This Appliance conforms to IEC 60335-2-24 Safety Standards
(Flamable Materials)
(High Voltage)
(General Warning)
Ensure electrical appliance is earthed/grounded as shown:
(Failure to follow these instructions could lead to serious injuries.)
WARNING !
This appliance
MUST be
earthed.
Connect 3 pin
plug as
follows:
If the power supply cord is
damaged it must be replaced
by the manufacturer or a
quali ed person.

www.nationalluna.com
NL12-ICE Maker Manual
Page 2
When using electrical appliances, basic safety precautions should be followed to
reduce the risk of re, electrical shock, and injury to persons or property.
Read all instructions before using this appliance.
• This appliance is not intended for use by persons (incl. children) with reduced
physical, sensory or mental capabilities, or lack of experience and knowledge.
Exercise caution and supervise when this appliance is used near children.
• Do not operate this appliance with a damaged cord. (If the supply cord is
damaged, it must be replaced by the manufacturer or its service agent or a
similarly qualied person.)
• The power cord must be connected to an earthed power source. (See page 5)
• Do not run the power cord over carpeting or other heat insulators. Do not cover
the cord. Keep cord away from trafc areas, and do not submerge in water.
We do not recommend the use of an extension cord, as it may overheat
and become a re hazard. If you must use an extension cord, use
0.75mm2 minimum size 3-core cable thickness and rated no less than
16A/250Vac with a 3-pin plug. Ensure that the extension cable has
correct earth/grounding. (Do not use a 2-core cable extension !!)
• Unplug the ice maker before cleaning or making any repairs or servicing.
• Do not use liquid other than water to make the ice.
• Do not clean your ice maker with amable uids. Fumes can create a re hazard.
• This ice maker is designed to operate between 10ºC and 43ºC ambient
temperatures.
• Do not store explosive substances such as aerosol cans with a ammable
propellant in this appliance.
• Do not expose your ice-maker to the elements. Place the ice-maker away from
direct sunlight and make sure that there is at least 10mm of space between the
back of your unit and a wall. Keep at least 10mm on each side of your unit for
free airow. (See page 6)
• This appliance is intended to be used in household and similar applications.
PREPARING YOUR ICE MAKER FOR USE

www.nationalluna.com
NL12-ICE Maker Manual Page 3
GETTING TO KNOW YOUR UNIT
GENERAL INSTRUCTIONS:
1. Ice shovel.
2. Ice full sensor
3. Ice basket
4. Top cover with transparent window
5. Air outlet
6. Water drain plug: at front under side of the unit.
7 . M A X I M U M W A T E R L E V E L : — — — — — ▲ — — — — —
(In order see the water level mark, remove the ice basket.)
SIZE CONTROL:
Makes Small & Large Ice Bullets
20mm 25mm
25mm
30mm
20mm
25mm
25mm
30mm
1
3
7
The Ice-maker must be
positioned so that the water
drain plug is accessible.
4
5
6
Water drain plug
1
2
3

www.nationalluna.com
NL12-ICE Maker Manual
Page 4
Postion of control panel & function:
Control Panel: Easy to use, visible functions, touch display setting.
A. Selected ice size displaying: Small and Large.
B. Button to select ice cube size.
C. Button to turn the unit ON/OFF.
D. Ice-Full indicator
E. Water shortage indicator
1. Remove the exterior and interior packaging. Check if the ice basket and ice
shovel are inside. If any parts are missing, please contact your supplier.
2. Remove the tapes securing the ice basket and ice shovel.
3. Put the ice maker on a level & at counter top with no direct sunlight and other
sources of heat. Make sure that there is at least a 10cm gap all around the unit.
4. Allow one hour for the refrigerant uid to settle before plugging ice maker in.
5. The appliance must be positioned so that the drain plug is accessible.
6. WARNING: Fill the water reservoir with drinking water only.
UNPACKING YOUR ICE MAKER
OPERATING PROCEDURES & MAINTENANCE
A
C
D
B
E

www.nationalluna.com
NL12-ICE Maker Manual Page 5
CONNECTING YOUR ICE MAKER
1. This unit should be properly earthed/grounded for your safety. The power
cord of this appliance is equipped with a grounding plug which connects with
standard grounding wall outlets to minimize possibility of electric shock.
2. Plug your appliance into an exclusive, properly installed, grounded wall outlet.
Do not, under any circumstances, connect a damaged electrical cable to the
wall socket.
3. Any questions concerning power and/or grounding should be answered
by a certi ed electrician.
4. This appliance requires a standard 220-240Volt, 50Hz electrical outlet.
CLEANING AND MAINTAINING YOUR ICE MAKER
Before using your ice maker, it is recommended to clean it thoroughly:
1. Take out the ice basket and ice shovel.
2. Clean the interior with a mild diluted detergent, warm water and a soft cloth.
3. Rinse the inside parts, and drain out the water by unplugging the water
drain plug on the front underside of the ice maker.
4. The outside of the ice maker should be cleaned regularly with a mild
detergent solution and warm water.
5. Dry the interior and exterior with a clean soft cloth.
6. When the machine is not going to be used for a long time, drain the water
completely, dry the interior and leave the lid ajar.
Ensure electrical appliance is earthed/grounded as shown:
WARNING !
This appliance
MUST be
earthed.
Connect 3 pin
plug as
follows:
If the power supply cord is
damaged it must be replaced
by the manufacturer or a
quali ed person.

www.nationalluna.com
NL12-ICE Maker Manual Page 6
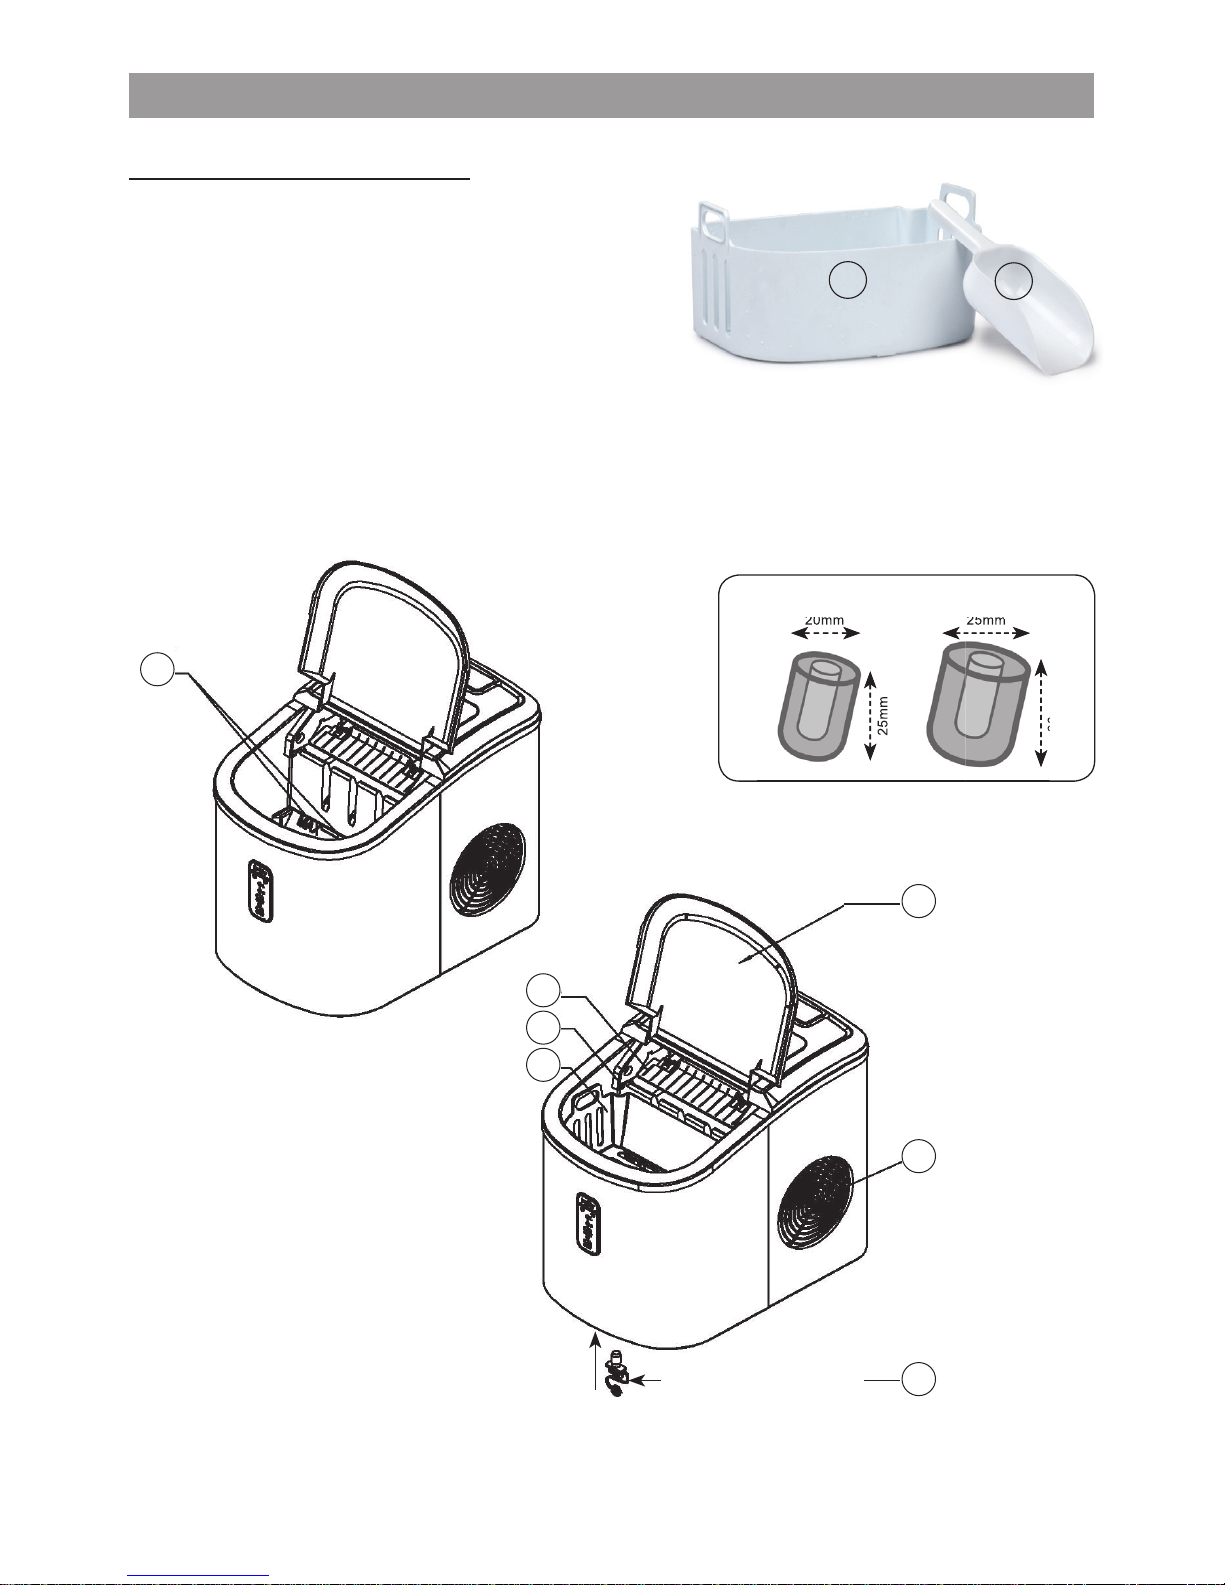
1. Open the cover, remove the ice basket and pour 2.2 litres of water into the
reservoir (tank). Keep water level below the MAXIMUM water level mark.
2. Press the “ON/OFF” button on the control panel to begin the ice making cycle.
3. Select the ice bullet size by pressing the “SELECT” button. If the room
temperature is lower than 15ºC, it is recommended to select small “S” ice.
(This prevents the ice bullets sticking together.)
4. The ice bullet making cycle lasts approx. 6 to 13 minutes, depending on
seletion of ice size and the room temperature. The recommended ambient
room temperature is between 10ºC to 43ºC.
The colder the ambient temperature, the quicker the ice will form.
Below 10ºC, and “L” setting, the unit may form a solid block around
the metal freeze ngers and jam/damage the ice scoop mechanism.
5. If the water pump can’t inject water, the ice maker will stop automatically, and
the “Add Water” indicator will go on. Press the “ON/OFF” button, ll water up
to the max. water level mark and press “ON/OFF” button again to turn on
the unit again. Allow the refrigerant liquid inside the compressor at least
3 minutes to settle before restarting.
6. The unit stops when the ice basket is full (“Ice Full” indicator on).
There is an optical (infra-red) sensor beam which will stop the ice making
process when interrupted by ice lling the basket.
Direct sunlight or sunlight refl ection may cause the infra-red sensor
to malfunction. (eg.The unit may not stop even though the ice
basket is full, or may switch off the ice-making process prematurely.)
7. To ensure healthy hygiene and prevent possible bacterial contamination, it is
recommended to change the water in the water reservoir every 24 hours.
8. If the unit is not being used, drain all the water via the water drain plug and
dry the reservoir and unit thoroughly - leaving the door ajar for airing.
(NOTE: If stored damp, mould and bacteria build-up will occur.)
USING YOUR ICE MAKER
NB: The Ice Maker must operate on a level fl at stable surface.

www.nationalluna.com
NL12-ICE Maker Manual
Page 7
TROUBLE-SHOOTING
PROBLEM POSSIBLE CAUSE SOLUTION
Lack of Water.
Switch off the ice maker.
Remove the ice basket & ll
water to the water level mark.
Press “ON/OFF” button again
to restart the unit.
The basket is full of ice. Remove ice from ice basket.
Ice has accumulated to one
side only Level the Ice Maker
Ice shovel left inside basket
is obstructing the infra-red
Remove or reposition ice
shovel
The ice making cycle is too
long.
Stop the ice maker. Restart it
when the ice melts. Select the
size “S” ice bullet selection.
Water temperature in the
inner reservoir is too low.
Replace the water.
(Temperature of water
recommended at 10-32ºC)
Ambient temperature or
water temperature in inner
reservoir is too high.
The room temperature should
be 10-43ºC, reservoir water
temperature should be 10-32ºC
Ventilation around the fan is
inadequate.
Move Ice Maker to ensure
free air ow.
The cooling fan is not
working.
Verify this with a qualied
technician.
Refrigerant in cooling
system has leaked.
Verify this with a qualied
technician.
Pipe in the cooling system is
blocked.
Verify this with a qualied
technician.
“ADD WATER”
indicator is on.
Ice bullets
stick together.
Ice making cycle
is normal, but no
ice has formed.
“ICE FULL”
indicator is on.

www.nationalluna.com
NL12-ICE Maker Manual
Page 8
TECHNICAL PARAMETERS & DIAGRAM

www.nationalluna.com
NL12-ICE Maker Manual
Page 9
1. Power cord
2. Back panel
3. Plate reinforce
4. Magnetic valve
5. Evaporator
6. Control box cover
7. Main PCB
8. Control box
9. Ice making box
10. Micro switch
11. Inner tank bracket, LH
12. Cam
13. Ice scoop link
14. Ice scoop
15. Back window
16. Back top panel
17. Ornament pad
18. Front top panel
19. Operation panel frame
20. Displaying PCB
21.Touch pad
22. Ice basket
23. Foamed assembly
24. Water lter
25. Inner tank bracket, RH
26. Sychronuous motor
27. Stainless wire
28. Condenser
29. DC Fan motor
30. Filter dryer
31. Copper tube lter
32. Silicon plug drain
33. Nylon plug drain
34. Silicon sealing pump
35. DC water pump
36. Compressor
37. Plate bottom
38. Rubber foot
39. Air grille
TECHNICAL PARAMETERS & DIAGRAM

www.nationalluna.com
NL12-ICE Maker Manual
Page 10
ELECTRICAL CIRCUIT DIAGRAM

www.nationalluna.com
NL12-ICE Maker Manual Page 11
This Warranty, for SOUTH AFRICA only, supersedes any other advertised Guarantee
or Warranty provided with this appliance by any wholesaler or retailer.
National Luna warrants this product to be free from defects in materials and / or workmanship under
normal use and service to the original purchaser subject to the following:
1. At any time within THREE YEARS from the date of purchase by the original purchaser,
National Luna will at its discretion replace or repair without cost to the owner, and if through an
authorised service agent, any part found to be defective by National Luna.
2. Where parts are replaced by an authorised service agent, the labour account for the work done
will be for the owner’s account.
3. The Warranty will not apply in cases of normal wear & tear or damage caused by non-observance
of the user Instuction Manual.
4. National Luna may consider a warranty void if modications have been made to this appliance
which may cause hazardous operation or may be the cause of the malfunction of this product.
5. National Luna shall not be responsible for any damages of any kind resulting from incorrect voltages
or faults with regards to power supply which fall outside of the appliance operating specications.
6. National Luna shall not be responsible for damage to the appliance caused by negligent use,
storage of hazardous chemicals, use of corrosive substances, re, ood, civil-disturbances,
lightning or any other natural phenomenon.
7. National Luna will not accept any responsibility for the consequential loss or damage caused by,
or due to the malfunctioning of this appliance.
8. National Luna shall not be held responsible for any injuries to persons caused by the incorrect or
negligent usage of this appliance.
9. Repair work to be done in terms of this warranty must be referred to National Luna for written
authorisation before any work is carried out.
10. Warranty returns to the factory for repairs - if the unit has been shipped to the factory for repairs,
transport costs will be for the owners account.
11. Proof of purchase and purchase date must be presented with submission of a warranty claim.
All units have a unique serial number. (For your convenience ll in your details in the area
provided below and keep this manual in a safe place.)
NATIONAL LUNA LIMITED WARRANTY
Supplier’s name : ______________________________
Date purchased : ______________________________
Invoice No : ______________________________
Model : ______________________________
Serial No : ______________________________
Supplier’s Stamp :
(Removal of the serial number on the appliance will render this warranty void).
Table of contents
Popular Ice Maker manuals by other brands

KitchenAid
KitchenAid KUIP15PRXX2 Use & care guide

Hoshizaki
Hoshizaki KM-1301SAH/3 Service manual

Hoshizaki
Hoshizaki KM-590DJ instruction manual

Hoshizaki
Hoshizaki Serenity Series Service manual

Follett
Follett Horizon Elite HCD1010RHT installation instructions

Hoshizaki
Hoshizaki KML-351MAH instruction manual