NATURE'S HEAD Self-Contained Composting Toilet Guide

Nature’s Head, Inc.
www.NaturesHead.net
Sales
PO Box 250
Van Buren, OH 45889
Phone: 251-295-3043
Email: [email protected]
Corporate
535 Bayou Sara Avenue
Saraland, AL 36571
Made in the USA
NATURE’S HEAD
Self-Contained Composting Toilet
Installation Manual and User’s Guide

ITEMS YOU MAY NEED TO COMPLETE
YOUR INSTALLATION
Your Nature’s Head™comes with most of the items necessary for comple-
tion of your installation. The outside vent is not included because each ap-
plication is different and many will require a different vent. Please see the
venting section of our instructions for additional tips and suggestions. Feel
free to contact us by email or phone with any questions you have concern-
ing your installation.
Some installations may require increased hose lengths which are supplied
on a per foot basis. PVC pipe which may be obtained at most home im-
provement stores may also be substituted for longer hose sections.
For floor construction other than wood a different type mounting bolts
may be required. If the installation is in a basement or other concrete floor,
many customers have found it convenient to mount the toilet to a section of
plywood rather than trying to drill masonry. The plywood can be placed on
the concrete floor and painted or varnished for appearance.
If regular household current is available (110 volts), the head can be
powered by a 12 volt transformer or wall adapter. These are available from
Nature’s Head.
Some type of composting material will be required. The most commonly
used material is sphagnum peat moss which is available at most garden
stores or home improvement stores such as Lowes and Home Depot. It is
usually available in a shrink-wrapped 3 ft cubic bale for $8 to $10. This
quantity of peat moss will sustain use of the head for a year or longer. The
peat moss should be regular sphagnum peat, no additives. DO NOT use
Miracle Grow peat moss.
Coconut fiber (also referred to as coir brick) is also an acceptable compost-
ing medium. However, it is more costly and less readily available. It may
be obtained at hydroponic gardening outlets.
© 2013 Nature’s Head Inc.
Page 2
Congratulations on your acquisition of a Nature’s Head! Although the
concept of a composting head (toilet) is not a new one, the unit which you
have purchased is the freshest of the new generation of this kind of prod-
uct. Nature’s Head™ designers and their wives, all sailors with many years
of boating experience, having used earlier versions of composting toilets
on their boats, saw a need for a better designed more user friendly product.
The concept has been refined and reworked to provide you with a more
user friendly product which is aesthetically pleasing, more space-efficient,
and a more affordable alternative to previously offered models. While
designed to withstand the rigors of the boating environment, the Nature’s
Head™ is well suited for many other applications.
Wherever you choose to install your new Nature’s Head, it is sure to pro-
vide you with years of worry-free sanitation solutions without the hassles,
inconvenience, and odors of traditional sanitation systems.
WHAT’S IN THE BOX?
1) Your new Nature’s Head™ composting toilet
2) Basic installation kit:
• 5 feet of 1½ inch inside diameter hose with ends
• inside vent flange
• agitator handle
• 2 mounting brackets and knobs
• 4 mounting bolts (for wood floor installations)
• 6 feet wiring for internal fan hook-up required for 12 volt
system
• fuse holder and fuse for direct battery attachment
• Allen wrench for installation of spider handle
• liquids tank cap
3) Instruction manual
Note: The exhaust fan for the head has been installed before shipment.
Nature’s Head™ Composting Toilet
© 2013 Nature’s Head Inc. Page 1

DIMENSIONS
Page 4
Pre-Installation © 2013 Nature’s Head Inc.
DIMENSIONS
Note:
Dimensions can vary up to 4% due to the rotaonal molding of polyethelene plasc.
Please note as stated in our instrucons, the following:
• Allow 2 inches behind toilet if against a bulkhead or wall for the bowl to lt for
servicing.
• To disengage the bowl from the base the bowl as facing the toilet, the bowl
slides to the le 2 inches to disconnect from the slip hinge
• Handle and agitator can be switched as well as the fan housing to either side
Page 3
Pre-Installation
© 2013 Nature’s Head Inc.

Page 6
Installation © 2013 Nature’s Head Inc.
MOUNTING
After choosing the location for your
toilet, it is necessary to secure it to
the floor of your boat, cabin, or RV
using the two L-brackets. The brack-
ets may be positioned to the inside
or outside of the base of the unit as
you desire. (The normal mounting
is to position the L-brackets under
the base in the recesses in the toilet.)
Figure 3.
Figure 3
Mounting screws are included for mounting to a wooden floor. If you
choose to mount your unit with the L-brackets facing inward in the recess-
es provided in the base, counter-sunk screws or bolts are required.
To mount the L-brackets to the floor, position the base of the toilet in the
previously selected location. Attach the L-brackets to the toilet with the
knobs provided. If you choose to mount the L-brackets facing out (not
under the toilet) simply mark the holes in the brackets with a pencil for
drill locations. If you choose to mount them under the toilet, carefully
trace around as much of the outline of the bracket as possible. Make note
of the distance between the bracket and the lines you drew. Now remove
the brackets from the toilet and move the toilet out of the way. Carefully
position the L-brackets inside of the lines that you drew and mark the
holes for drilling. BEFORE DRILLING ANY HOLES IN YOUR FLOOR
OR WALLS BE SURE YOU KNOW WHAT IS BEHIND THEM! The
holes in the brackets are for #12 countersunk bolts or screws. If you are
using the screws provided you will need to drill a 1/8 inch pilot hole in
the drill marks you made on the floor. If you are uncertain if your brackets
are positioned correctly, drill and mount just one bracket. Then reposition
the toilet and mount to the one attached bracket. Check the positioning of
your other bracket and marks. If all looks good proceed with drilling and
mounting the other bracket. If your markings are off, adjust your lines and
proceed with mounting the second bracket. If mounting the toilet to a floor
that will get wet frequently a small amount of caulk should be placed in the
holes before installing your screws. Attach your toilet and check to be sure
everything works and fits as you intended.
Do not over ghten the hold down knobs as you will damage the threads in the base!
Page 5
Installation
© 2013 Nature’s Head Inc.
When locating your new
Nature’s Head, be certain to
allow enough room for the toilet
to function and be serviced.
Be sure that the lid will open
fully. You must also be certain
that the bowl has enough room
to tilt rearward to allow for its
removal and for the removal
of the liquid tank. If mounted
against a wall or bulkhead allow
a minimum of 2 inches between
the back of the toilet and the
wall. Figure 1.
It is necessary to allow adequate
room for the hose connection
and agitator handle. Both of
these may be re-located to the
opposite side of the unit if
needed. In some space-restricted
areas it may be necessary to off-
set the toilet to one side or even
turn the toilet slightly to one
side to allow for extra clearance.
With the standard handle attached the width of the unit is 20 ¾ inches. For
more confined spaces, the optional spider handle decreases the width to 17
¾ inches. Two inches to the left side of the head (as you face it) is required
to slide the bowl off the slip hinge for servicing the base. Figure 2. In
severely confined spaces removing the mounting knobs and sliding the
toilet away from the mounting location may be a more desirable method of
servicing the unit.
LOCATION
Figure 1
Figure 2
INSTALLATION

Page 8
Installation © 2013 Nature’s Head Inc.
The hose adapter provided with the toilet would be placed inside under
the vent. On many boats the pump-out fitting can be removed and the
mushroom vent mounted over the existing hole. The venting hose pro-
vided with the unit will attach directly to the adapter. Clamping is not
necessary on the connection for the head, and normally not necessary
on the exterior connecter. With an overhead connection, you may find it
necessary to clamp this end depending on the amount of support provided
for the vent hose. If the hose is supported properly, you will probably not
need a clamp. The vent hose must be attached to the housing which has
the fan inside it. The unit is designed to pull fresh air through the head and
ventilate it outside. If you disassemble the fan housing, always check to
be certain that the fan is blowing out of the vent before re-attaching the
vent hose.
A simple 12 volt computer muffin fan
drawing less than 2 amp hours (12 volt
power) in 24 hours is the only power
required for this unit. The power plug, a
single pin attachment with a wire length
of 6 feet, is also included. The “single
pin” power supply will plug into the re-
ceptacle on the FAN housing. Figure 5.
It may be necessary to extend the length
of the connecting wire.
POWER CONNECTION
As with all electrical connections, be sure your head is on a fused circuit.
The fuse should be no less than 2 amps and no more than 5 amps (12
volts). A fuse holder and fuse are provided for use in a non-protected 12
volt system such as direct attachment to a battery.
The fan may also be powered by a 110 volt source with an appropriate
power adapter that reduces the power to 12 volts. If the system is being
powered by the 110 volt power adapter disregard the fuse, fuse holder and
single pin cable as they are intended for use ONLY with a 12 volt power
source. No fuse is required when using the wall transformer. These power
adapters are available through Nature’s Head.
If you are unsure about your wiring system or requirements,
please consult an electrician.
VENTING, Continued
Figure 5
Page 7
Installation
© 2013 Nature’s Head Inc.
The unit must be vented to the outside of your cabin whether it is a boat,
RV, truck, or vacation property. This helps keep your bathroom smelling
fresh, and allows for proper growth of beneficial bacteria which facilitates
the composting process.
Installing the venting system will be the most difficult portion of the instal-
lation. The average do-it-yourselfer should be able to easily accomplish
this if one is familiar with and has the proper tools. Depending on the type
and placement of your vent you may be required to cut holes in the wall,
ceiling, or the floor. If you are unsure if you are qualified to complete this
portion, it may be wise to hire a contractor or handyman to do this for you.
Due to the variety of ventilation choices available, the external vent has
not been provided. Mushroom vents, solar vents, and clamshell type vents
are commonly used for venting to the exterior. The unit may be vented
horizontally or vertically through the roof, wall, or the floor. Rubber hose
adapters which connect directly to your toilet and the outside vent flange
are provided. For installations in homes, cabins, and other permanent
structures the venting can be placed horizontally through the wall with 1¼
inch PVC pipe. The outside vent can be as simple as a PVC pipe with a 90
degree elbow pointing down to prevent wind and water entering into the
toilet. Attaching screen over the opening is recommended. This will pre-
vent the entry of insects into the system. Any mesh fabric such as window
screen or nylon netting will provide an adequate insect barrier. A mush-
room vent may be used in place of the PVC elbow and has a built in screen.
VENTING
If a sharp 90 degree turn from the
fan housing is needed, a 1¼ inch
PVC street elbow may be used to
achieve a proper configuration.
Figure 4. Installations on boats and
RV’s are easily managed with the
stainless steel mushroom vent with
the built in screen and adjustable
top which is self-sealing. The hose
adapter provided with the toilet
would be placed inside under the vent. On many boats the pump-out
fitting can be removed and the mushroom vent mounted over the existing
hole. The venting hose provided with the unit will attach directly to the
adapter.
Figure 4

Page 10
Usage © 2013 Nature’s Head Inc.
USAGE
Before use it is necessary to add
compost material to the base of the
unit. Gallon size “Ziploc” type bags
are an inexpensive manner for storing
the medium. To fill your toilet or refill
it after emptying pour two one-gallon
bags of pre-moistened sphagnum peat
moss or coconut fiber into the base of
the toilet. The peat moss should rise
to the level of the agitator bar in a
horizontal position or the centerline of
the agitator crank. Figure 8. Figure 8
The peat moss should be damp and crumbly, never wet or soupy. If your
peat moss or coconut fiber is dry, add a small amount of water. When not
in use, the lid of the toilet should be in the closed position, preventing the
entry of insects and allowing proper ventilation. The peat moss should
be regular sphagnum peat, no additives. DO NOT use Miracle Grow peat
moss.
The primary concept of our composting toilet is the separation of liquids
and solid wastes!! Be sure to inform your guests as to the proper use of
your head. This will allow proper composting action and assist your guests
in feeling comfortable with a new piece of equipment.
Allowing the entry of urine into the composting chamber will cause un-
pleasant odor and prevent proper compost action.
Seated usage is recommended. While seated the unit may be used with
the trap door in the open or closed position. Male or female, the liquids
and solids will be directed to the correct locations from this position. With
any bowel movement the trap door must be open. Male stand-up usage is
less acceptable as splatter may result. In the event that the unit is used in
a standing position, the trapdoor must remain closed in order to prevent
mingling of liquid and solid wastes.
Toilet paper is typically placed in the toilet. Since paper products do not
decompose as quickly as solid wastes, they will be visible long after the
solid matter has broken down. Any type of toilet paper is acceptable; less
substantial brands (such as marine or RV paper) will compost the quickest.
Most users keep a small spray bottle filled with a mixture of water and
vinegar nearby to spray off the bowl in the event that some solid waste
adheres to the bowl. Spritzing of the bowl also assists in cleansing the urine
passages.
Page 9
Installation
© 2013 Nature’s Head Inc.
POWER CONNECTION, Continued
This unit may be converted to a powerless installation by using a solar vent
on the roof or cabin top and attaching the vent hose underneath. Depending
on the fan chosen and the type of roof in your application, some form of
adapter may be necessary. Be sure and use the solar vent with battery back-
up so your Head will vent continuously. The internal fan in the toilet can be
left in the unit if you choose this option.
INSTALLATION TIPS
If installation of the ventilating hose is better suited to placement on one
side of the unit than the other, the fan/filter housing is interchangeable with
the filter-only housing. This is accomplished by swapping sides with the
components and their respective housings. The toilet is shipped with the
agitator handle unattached and must be installed before use. The standard
handle is attached with a collar and hairpin clip, while the spider handle
attaches with an allen set screw and locknut. In the event that the handle
must be moved to the opposite site of the base, the agitator must be manu-
ally removed, reversed, and reinstalled. Figures 6 and 7.
Figure 7Figure 6

Page 12
Installation © 2013 Nature’s Head Inc.
Solid wastes should be removed from the storage base when the tank ap-
pears to be 3/4 full. One of the benefits of a composting toilet (unlike other
toilet systems) is that the longer you wait before emptying the more pleas-
ant the job will be. The solid wastes will be fully decomposed and will look
and smell like dirt. There may still be some paper remnants depending on
the amount of time that was allowed for composting. Paper products take
considerably more time to decompose than the solid wastes.
With the bottle assembly removed,
lift the seat unit several inches and
slide it to the left to disengage the
slip hinge. (You may need to unhook
your vent hose and power supply if
it is necessary to move the bowl to
the side.) Remove the knobs from
the mounting brackets at each side of
the base and the base is now ready to
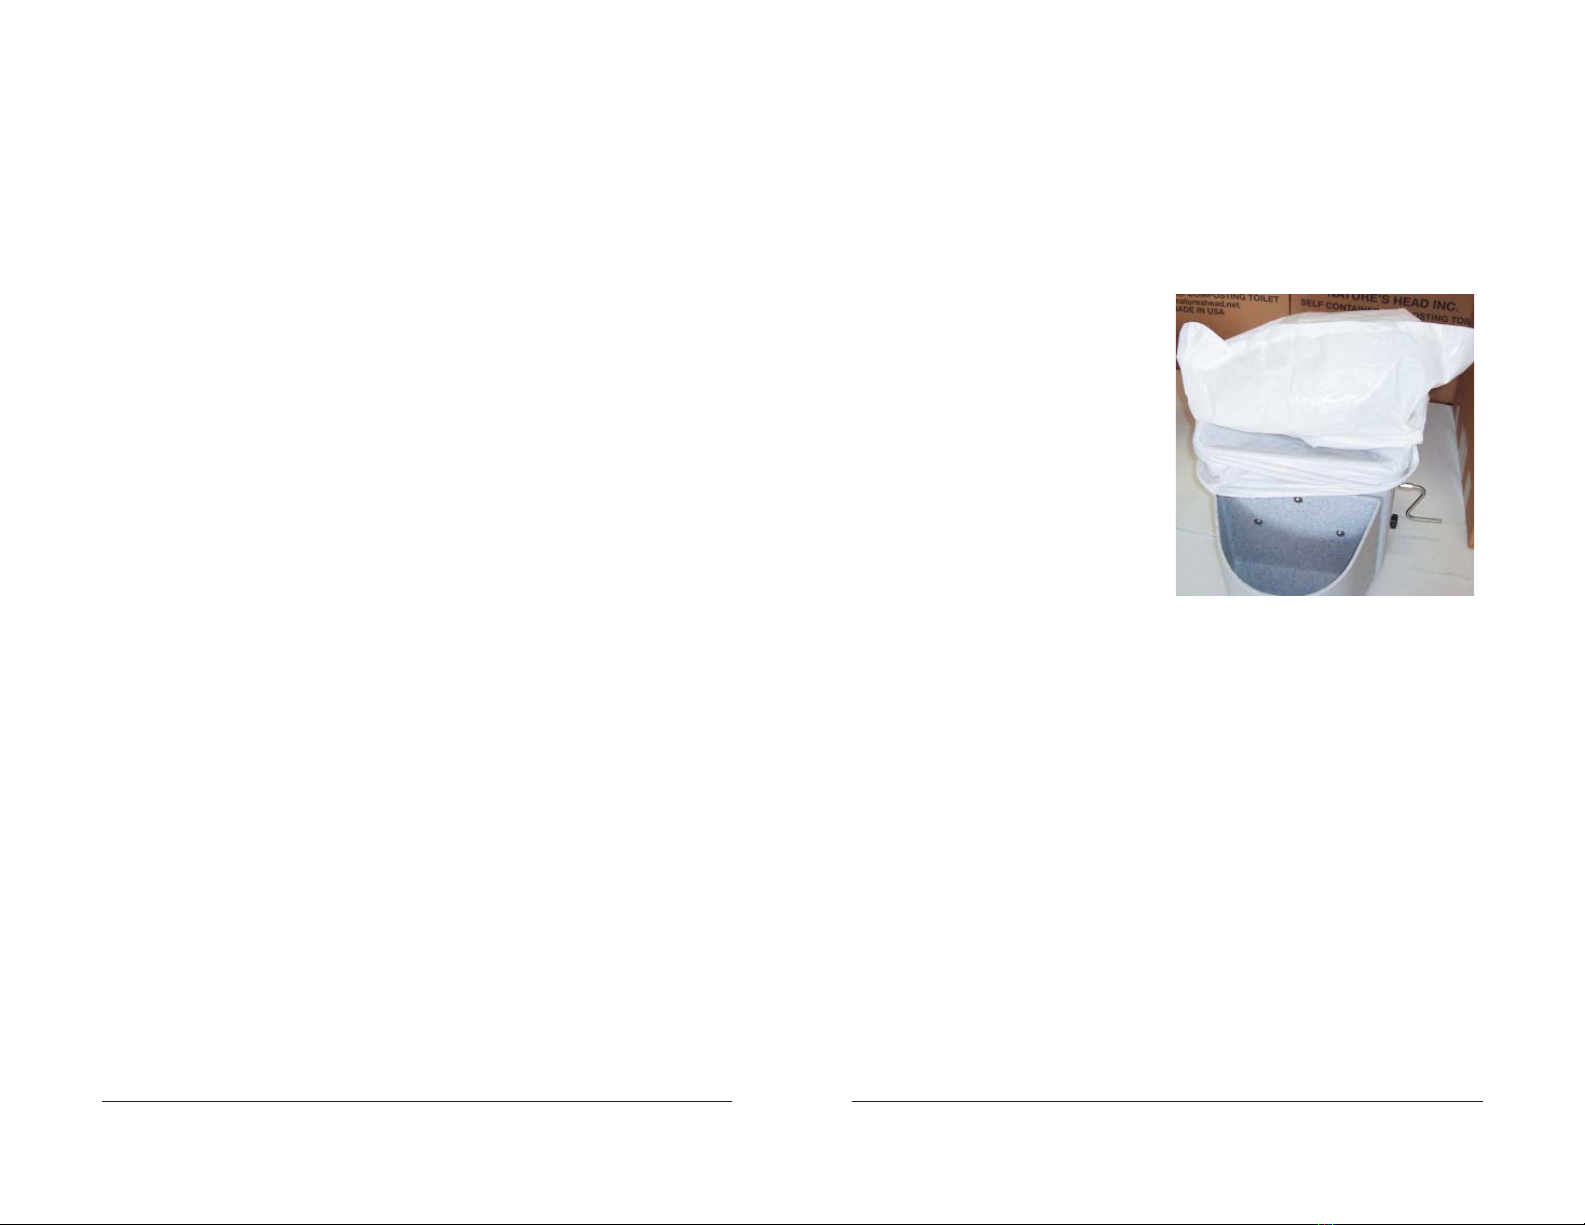
empty. One of the simplest methods
of emptying is to place a 13 gallon
kitchen bag over the opening of the
base (NOTE: the bag does NOT go in
the base.) Figure 9. The bag should Figure 9
fit tightly over the rim and allow you to invert the base and empty the con-
tents into the bag without spillage. This is especially useful when the toilet
is used for boats and other mobile units, as removing the toilet is
unnecessary.
It is unnecessary to clean the interior of the solid waste container as com-
posting will continue from the residual matter clinging to the sides. Clean-
ing the base unit, especially with any chemicals, may inhibit its ability to
generate the good bacteria that is breaking down the solid wastes. Simply
empty, put in more peat moss, and re-assemble your toilet.
The recommended procedure for disposing of the contents of the solid
waste tank is placing it in a proper composting bin to allow it to fully
decompose. When traveling in a boat or RV this may not be practical.
The contents of the solid waste tank may be safely placed into a conven-
tional dumpster if it has been allowed to compost fully and is bagged and
sealed. When fully composted, the solid wastes may be used to fertilize
non-ingestible plantings. Placing human waste compost on edible plants or
vegetables is not recommended.
EMPTYING, Continued
Page 11
Usage
© 2013 Nature’s Head Inc.
All urine has an odor. It will not be noticed with normal use. It will be
present when the storage container is open to the air for emptying. For
persistent urine odors to the container the addition of 1 tablespoon of raw
sugar to the tank will reduce this odor.
After solid waste addition, the peat moss or coconut fiber must be agitated
2-3 revolutions in order to mix the waste into the compost and promote the
composting process. Contents of the solid waste container must be kept
moist, not wet, and remain separated from the liquid waste. If the toilet is
functioning correctly the composted matter will have a musty or soil-like
odor and the visual appearance will be very similar to that of the original
peat moss. If the compost is staying wet and you have odor problems, the
solids tank is becoming contaminated with urine and steps must be taken
to prevent this. This is not normal for the toilet. If this problem persists,
and you are unable to determine how it is becoming contaminated, please
contact us for help.
Vomiting and diarrhea, if not persistent, are unlikely to affect the head
function. If increased wetness of the compost results, the situation may be
corrected with the addition of a small amount of dry compost medium.
EMPTYING
The liquid waste vessel will contain approximately 2.2 gallons of urine.
The translucent material of the container allows easy visualization of the
liquid level.
To empty the liquid waste container: 1) Release the latches located at both
front sides of the unit which secure the bowl to the base. 2) Raise the bowl
to an angle of approximately 45 degrees, install the cap, and remove the
bottle. 3) Dispose of the contents in an appropriate manner. The urine
bottle maybe emptied into a conventional toilet or other appropriate facil-
ity. Many books and articles have been written on the benefits of using
diluted urine as a fertilizer. This may also be part of your environmental
plan for disposing of wastes in a cabin situation.
Should overflow of the liquid waste container occur the liquid will remain
confined to the container base so long as the overflow is not excessive.
The liquid tank should be emptied frequently and rinsed with clear water.
Allowing urine to remain in the storage container for extended periods is
unwise as this will result in increased odor production. If the toilet is used
in combined bath/shower, you may wish to drill a drain hole in the urine
tank holder if water accumulation becomes a problem.
USAGE

Page 14
Usage © 2013 Nature’s Head Inc.
Fan not working
If using 12 volts, battery, check for voltage.Make sure the positive wire
marked positive is attached to the positive from the battery. Check the fuse.
Check to see if the single pin hookup is making contact. If using the power
transformer ( 110 to 12v) Check voltage at the outlet. Verify the single pin
connection. Try unplugging and reconnecting. When the fan is running
make sure the fan is blowing outward. If the fan is still not working, con-
tact Nature’s Head or your dealer for a free replacement.
Compost too wet
If too wet due to prolonged diarrhea add small amount of peat moss. If wet
due to excessive condensation also add a little peat moss.
Make sure excessive wetness is not due to somone urinating directly into
the compost section. This can also contribute to an unpleasant odor. The
compost area should have only a musty smell. If there a sewage odor is
present please contact Nature’s Head for consultation.
If the compost is dry or hard add some water and turn the agitator after the
peat moss has absorbed the moisture.
Gnats or flies
If your toilet incurs flies or gnats add two cups of natural Diatomaceous
Earth to the compost. This will kill and deter any future infestation. The
Diatomaceous Earth can be purchased at swimming pool supply stores,
Lowes, Home Depot, etc.
Handle difficult to turn
If the crank handle is hard to turn, dry and hard compost, add a little water,
or add some morning coffee grounds. If it is too wet add some peat moss.
Use only standard peat moss no additives, coconut fiber. DO NOT use
Miracle Grow peat moss.
TROUBLESHOOTING
FAQ
Will freezing temperatures damage the toilet?
Other than emptying the urine bottle nothing needs to be done and it will
not affect the toilet.
Does composting work in cold conditions?
Composting works from 55 degrees and warmer. The warmer it is the faster
it compost. When there is freezing temps the compost will be dormant until
heat is introduced into the area.
Can the toilet be used in a basement?
Yes it will work fine in a basement and any room or closet where a toilet is
required.
Page 13
Installation
© 2013 Nature’s Head Inc.
EMPTYING, Continued
Full time users have some special circumstances to deal with. Full time
use does not allow enough time for the solid wastes to compost. The most
recent waste, although mixed with the already composted material, will not
be decomposed. This also means that the fecal bacteria (present in fresh hu-
man wastes) may still be present. We recommend taking precautions such
as the use of gloves if you may come into contact with waste material. It
is advisable that you delay emptying the solid waste for 6-8 hours after the
last use.
Another method for dealing with non-composted wastes (if space allows)
is to purchase the “extra base” option and swap out the bases. The extra
base comes complete with all the necessary hardware, agitator, and bottle
holder. It also comes with a vented lid so the contents can be set aside and
allowed to compost. A storage bin utilizing the trash bag method of empty-
ing, placing the bag into a small plastic bucket, ventilating the lid, then al-
low it to finish composting may be constructed. In a cabin setting contents
could be emptied into a traditional compost bin and allowed to finish there.
IF PLACED IN A COMPOST BIN, THAT COMPOST IS NO LONGER
SUITABLE FOR USE ON INGESTIBLE PLANTS!!
CLEANSING AND MAINTAINENCE
A quick spray of water from a squirt bottle is all that is needed to keep your
Nature’s Head fresh between uses. If necessary, a moistened paper towel
(no synthetics) is excellent for cleansing the interior (as well as the exte-
rior) of the head.
For more intensive cleansing or dried-on matter, a paper towel moistened
with a 1:1 solution of vinegar and water may be used, and disposed of, in
the same manner after cleaning. Bleach, ammonia, and other commercial
cleaning compounds should never be added to your composting head as
they will interfere with the composting process and may lead to unpleasant
odors. These cleaners maybe used to clean the exterior surfaces
Maintenance requirements for the head are very minimal. All metal parts
(bolts, hinges, latches, knobs, agitator, and trapdoor components) are either
stainless steel or brass. Filters on each side of the base should be removed
and cleansed yearly or when emptying the solid wastes. Each filter is
secured to the housing with 2 Phillips-head bolts. Remove bolts, clean and
replace. Caution should be taken that the fan is reinstalled with the airflow
exiting the unit.
The full size molded in seat of the head which is designed for safety and
comfort requires no special care.

Page 16
Parts List © 2013 Nature’s Head Inc.
PARTS LIST
1 - bowl
1 - base
1 - bottle
1 - bottle holder
1 - fan housing
1 - lter housing
1 - tray
1 - trap door
1 - lid
1 - hose connector
2 - rubber hose ends
1 - hose
1 - strap
1 - bottle seal
1 - power jack
1 - power cord
2 - /” bushing
2 - /” bushing
1 - fan
2 - lter
1 - cap
1 - bowl seal
1 - slip hinge
2 - lid hinge
2 - latch and catch
1 - agitator
1 - trap door arm
1 - trap door bracket
2 - L bracket
1 - spring bracket
1 - spring
2 - bracket knobs
2 - vent gasket
1 - trap door knob
1- standard handle
1- spider handle
1 - /” x 3 /”extension spring
2 - / x / brass cotter pin
2 - /” at washer
2 - / x / round head bolt
2 - / nish washer
4 - / x / at head bolt
4 - / x 1/ round head bolt
2 - #8 x 2” at head screw
4 - / keps nut
4 - / x / round head bolt
2 - / x / round head bolt
8 - / x / round head bolt
2 - / nylock nut
12 - / nylock nut
4 - / x / at head bolt
8 - / nylock nut
4- / x / at head bolt
3 - / x / truss head bolt
4 - #12 x / at head screw
2 - /” at washer (for knobs)
2 - /” thread knobs
2 - hitch pin clips
2 - #8 x / sharp point screw
2 - #8 x 1 sharp point screw
at washers
For Spider Handle:
1 - / x / set screw
1- / jamb nut
For Standard Handle:
1 - large hitch pin clip
1 - /” toothless retainer
Page 15
Options
© 2013 Nature’s Head Inc.
OPTIONS
For enhanced capacity and convenience, consider these options
for your Nature’s Head Composting Toilet. All items are available
on our website www.NaturesHead.net, from our distributors, or by
phone at 251-295-3043.
Extra Bottle
Bottle with cap.
Extra Base, with Lid
Complete with lids for storage allow for further
composting and to extend the use of the unit. Bases
have the agitator and hinge pre-installed for rapid
change out. Handle is included.
Lid for Solids Bin
Vented lid for use when transporting solids bin is
necessary.
Mushroom Ventilator
Polished 304 sheet stainless steel with a screw down
knob to open and close the vent. Includes a stainless
steel mesh mosquito screen.
VENTS
Nicro Day/Night Plus - 3” Day/Night Vent
with Stainless Cover
Rechargeable battery allows for 24-hour continuous
operation. No wiring required.
EXTENDED CAPACITY
Wall Transformer
Optional 110 V adapter
Screened vent assembly for through-the-wall installa-
tion in structures such as cabins, homes, workshops,
barns. Fits 1.5" opening. 16" connector pipe can be
shortened as required. Can be installed horizontally or
vertically. Vent hose snugly fits end of connector pipe.
PVC Screened Vent Assembly for Structures
Other manuals for Self-Contained Composting Toilet
1
Table of contents
Other NATURE'S HEAD Toilet manuals
Popular Toilet manuals by other brands

Geberit
Geberit IDO Trevi 91597 Installation instruction

Thetford
Thetford Aria CLASSIC quick start guide

Invacare
Invacare H304 Finesse user manual

Toto
Toto MS855D Series installation manual

American Standard
American Standard BOULEVARD 2891 installation instructions

Zoeller
Zoeller QWIK JON 200 Quick reference guide

Kohler
Kohler ESCALE K-24838T-S installation instructions

American Standard
American Standard ACTICLEAN 7381557-400.0070A Assembly

Eczacibasi
Eczacibasi VitrA V-Care Comfort 5674/431470 user manual

Delabie
Delabie 110390 manual

Streamline
Streamline ARCISAN Kudos KU04118 installation guide

Kohler
Kohler K-3384 Homeowner's guide