NAV VIDEO GMUNLOCKPRO User manual

IMPORTANT NOTE:
Technical support on this product is only available via e-mail. Before
submitting a technical support e-mail please thoroughly read through this
installation guide and double check your installation.
If you have a technical question please send an e-mail to
[email protected]. Technical support e-mails will be returned within 2
business days.
NV_GMUNLOCKPRO
DVD & Navigation In-Motion, AV Input, After arket Bluetooth Kit

Nav Video Installation Guide. © 2009
2
Pre-Installation Disclaimer:
By purchasing and installing our products, you agree that NAV VIDEO Inc., its
employees and affiliates cannot be held responsible for any accidents, tickets, misuse of
products or damage caused to your vehicle. The driver must always keep their eyes and
attention on the road at all times. Our products are intended for passenger entertainment
and off-road use. In some states it is illegal to have a TV viewable by the driver while the
vehicle is in motion, please obey your state laws. In addition it is your responsibility to
provide this disclaimer to any party that may purchase your NAV VIDEO navigation
interface from you, in or out of your vehicle. NAV VIDEO cannot be held responsible for
discrepancies, or inconsistencies that may occur due to vehicle manufacturing changes.
Please adhere to all state and federal laws when operating your video interface.
Product Overview (NV_GMUNLOCKPRO)
The NV_GMUNLOCKPRO is a plug and play module that allows the override of certain
vehicle entertainment functions while the vehicle is in motion. The GMUNLOCKPRO
also gives you three sets of video inputs, and two sets of audio inputs that pair up to two
of those three video inputs. You can also add an aftermarket Bluetooth hands free kit to
your truck and this module and have the vehicles audio system broadcast the audio from
incoming calls automatically. Lastly the GMUNLOCKPRO module will enable you to view
the factory backup camera (if equipped) while the vehicle is moving forward.
Once installed the NAV VIDEO GM Unlock Module will enable you to:
•Watch DVD movies played in the front factory DVD player on the screen while
the vehicle is in motion.
•Watch video from any video device connected to the rear seat auxiliary input jack
while the vehicle is in motion (if the vehicle is equipped with an auxiliary input).
•Enable you to enter addresses into the navigation system while the vehicle is in
motion (unlocks the input for 60 seconds while you can enter the address
information)
•Enable you to scroll through the XM channels list while the vehicle is in motion (if
the vehicle is equipped with the XM radio option)
•Add up to 4 aftermarket cameras (front, back, left, right). OR if factory camera is
present, toggle it on the screen while driving.
•Add up to two video and audio sources, such as an iPod video, Zune, or Game
Console.
•Add an aftermarket Bluetooth hands free kit to enable you to auto mute the radio
and listen to the output of your phone on the factory stereo whenever a call
comes in (this kit is not provided)
Aftermarket Backup Camera Input
NOTE: TO USE THE VIDEO AND CAMERA CONNECTIONS AVAILABLE ON THE
GMUNLOCKPRO GMUNLOCKPRO, YOUR VEHICLE MUST HAVE A FACTORY
REAR VIEW CAMERA INSTALLED OR MUST HAVE THE RADIO ENABLED FOR
THE REAR VIEW CAMERA OPTION.
In order to use the audio/video input features on the module, the GM / Cadillac
dealer must re-flash / reprogram your navigation head unit to be setup for the
factory backup camera system. Some dealer technicians may not know how to
perform this operation or will refuse to do this, therefore this feature is not
guaranteed or supported by NAV VIDEO. Basic instructions informing the GM

Nav Video Installation Guide. © 2009
3
technician on how to accomplish this are provided at the end of this installation
guide.
ALSO, SO, IF YOU HAVE ADDED A NAVIGATION RADIO TO A NON-NAV VEHICLE
YOU MAY OMMIT THE COMPLICATED INSTALLATION OF VEHICLE SPEED
SIGNALS NORMALLY NECESSARY FOR THE PROPER INSTALLATION PROCESS.
THE GMUNLOCKPRO WILL PROPERLY PROVIDE THE NECESSARY
INFORMATION FOR YOUR UPGRADED RADIO.
Operating Instructions
VOICE / MUTE BUTTON ON THE STEERING
WHEEL SHOWN ABOVE
WINDOW LOCKOUT BUTTON ON DRIVERS
WINDOW CONTROL CONSOLE SHOWN
ABOVE.
1. To enable video viewing of your Factory DVD player or console mounted AUX input
jacks, press the MUTE button on your steering wheel four (4) times within 3 seconds
while in DRIVE. Your will hear an audible beep. Once unblocked, video will be viewable
on the front screen for the entire duration of your trip or until you turn the function OFF.
To turn the DVD or AUX video override OFF and return to standard navigation operation,
press the MUTE button on your steering wheel two (2) times. Your will hear two audible
beeps to signal that you were successful. It’s as simple as that to have full control of the
factory video on your front screen.
2. If you wish to input addresses, points of interest, view additional XM category
information, or enable any other available blocked radio function or text– all while in
motion – Press the MUTE button two (2) times within 3 seconds. When activating the
GMUNLOCKPRO for navigation override only, the unit is designed to automatically “time
out” after approximately 60 seconds. If you need additional time after this period, simply
press the mute button two (2) times again for an additional 60 seconds. To immediately
turn OFF the unblock without waiting for the timeout process, press the MUTE button (2)
times.
3. To turn ON the factory or aftermarket rear view camera while in DRIVE, place the
radio in any function other than XM mode (AM, FM, CD, DVD, AUX, etc.). Now, press
the WINDOW LOCKOUT button four (4) times within 4 seconds. The display will then
change to the view from your camera. The audio from whatever source or band your
radio is on will continue playing through your sound system. To turn OFF the camera
view, press the WINDOW LOCKOUT BUTTON four (4) times or press the mute button
2x. Note: FACTORY Camera turn-on requires the installation of the factory camera

Nav Video Installation Guide. © 2009
4
option wire described in step 7 of the installation guide. The ignition key must be fully ON
to enable the camera or extra video inputs on the GMUNLOCKPRO.
4. To turn on the video inputs of the GMUNLOCKPRO and view your attached
accessory, place the radio in XM mode. Now, press the WINDOW LOCKOUT button
four (4) times within 4 seconds.
• The display will immediately change to the accessory video you have connected to the
VIDEO 1 source of the GMUNLOCKPRO and the sound will change to the audio
connected to the source 1 stereo RCA audio inputs (unless switch 5 is down, then
default is video/audio 2).
• To turn off the Video 1 picture and listen to only the source 1 audio sound, press the
SEEK
button on your radio (SEEK on Cadillac Escalade)
• To toggle back to the Video 1 picture, press the SEEK again. (This may be repeated
as desired)
• Press SEEK (SEEK on Cadillac Escalade) to switch to the Video 2 source and the
audio from the source 2 connector
• To turn off the Video 2 picture and listen to only the source 2 audio sound, press the
SEEK button on your radio
• To to
ggle back to the Video 2 picture, press the SEEK again. (This may be repeated
as desired)
*** To turn off the Video and Audio inputs and return to standard radio operation,
Press the WINDOW LOCKOUT button four (4) times or press the MUTE button 2x.
Pressing the MUTE button 2x will cancel any override, video or camera operation
currently in progress with the GMUNLOCKPRO
**During the time that you are actively viewing a factory DVD or factory AUX video while
in motion, OR while you are inputting an address or taking advantage of the other radio
unblocking technology, active map tracking is not occurring (if you switch to the map
view immediately from an unblocked function, the map will not be moving or pinpointing
your exact location). Press the MUTE button two (2) times as mentioned above to
immediately restore factory operation and begin map tracking again. It may take several
seconds for the map to recalculate your current position.
**Use of the factory camera, aftermarket cameras or either of the 2 Video/Audio inputs
available on the GMUNLOCKPRO while in motion does not affect active map tracking
while on.

Nav Video Installation Guide. © 2009
5
GMUNLOCKPRO OPERATION WHILE IN MULTI-CAMERA MODE
When switch 2 is in the UP position on the GMUNLOCKPRO module, the interface will
allow operation of left and right cameras automatically and manually. When switch 4 is
UP, a front camera will automatically activate when the vehicle slows below 8 mph and
turn off when the vehicle accelerates. The advanced properties of the GMUNLOCKPRO
allow it to control and power all camera functions making an installation of this type
amazingly simple.
• Switch 4 UP - When the vehicle is started up and placed in DRIVE, the front camera is
automatically activated and will display on your navigation screen a view from the front
of your vehicle. As the vehicle is accelerated past 8 mph, the front view will automatically
deactivate and the radio view will return to standard radio/map displays. This will occur
each time the vehicle slows to below 8 mph for automatic help when parking or
maneuvering in close quarters. If you wish to manually turn off the front camera view
while it is on the screen, simply press the MUTE button on your steering wheel 2x and
wait for 2 audible beeps. The radio will then return to its standard screen view. It will not
return to the front camera view until the vehicle accelerates past 8 mph and then slow
down again.
• Switch 3 UP - When the vehicle is placed in REVERSE, the rear camera is
automatically activated and will view on the front screen. If you wish to view the rear
view camera while in DRIVE, place the radio on AM, FM etc. (anything other than XM).
Then press the window lockout button 4x within 4 seconds. This will activate your rear
view camera and display it even if you are not in REVERSE. To turn off the rear view
camera view, simply press the window lockout button 4x again or press the MUTE
button on your steering wheel 2x and the radio will return automatically to its standard
view. If you have a factory rear view camera, make sure you have connected the BLUE
reverse wire as described in step 7 of the installation process for proper
GMUNLOCKPRO control.
NOTE: Some vehicles with a factory rear view camera, may require a relay to prevent
mixing of front camera signals immediately after switching out of reverse due to the
factory rear system which may continue to leave the rear camera view on for up to 10
seconds, even after you switch to Drive. This will not occur if you use an aftermarket
camera for rear viewing. Please consult the supplied drawings for additional instructions.
• Switch 2 UP - When the vehicle’s LEFT or RIGHT turn signal is activated, the
GMUNLOCKPRO will automatically switch to the appropriate side camera and display
the picture on your radio. The picture will remain during the time that your turn signal is
actively blinking and will automatically turn off when the turn/lane change has completed.
If you wish to turn on either of the side cameras without using the turn signal, the
GMUNLOCKPRO can provide full manual control. Place the radio on XM and then
press the window lockout button 4x within 4 seconds. This will activate the driver side
camera and display the picture on the radio. If you would like to view the right camera
press the SEEK button on your radio. If you would like to return to the left camera
press the SEEK on your radio. You can easily switch back and forth between the side
cameras using the SEEK buttons on your radio. To turn off the side camera manual
viewing, press the window lockout button 4x or press the MUTE button 2x.


NAV VIDEO NavVideo Installation Guide. © 2006.
7

NAV VIDEO NavVideo Installation Guide. © 2006.
8

NAV VIDEO NavVideo Installation Guide. © 2006.
9
Installation of the NV_GMUNLOCKPRO
Installing the NV_GMUNLOCKPRO module is very easy, the installation is completely plug and play (other
than the optional blue wire that needs to be cut if you wish to be able to toggle the OEM reverse camera
while you are in motion, this doesn’t apply for aftermarket reverse cameras)
IMPORTANT: The accessory, 12V and ground wires, are for powering auxiliary devices such
as a camera, DVD player etc. The module itself DOES NOT need to have these connected.
Video & Audio Inputs
An important feature of your GMUNLOCKPRO is the ability to easily input video from a backup camera and
two additional audio and video sources (rear, front, baby cam, DVD, video iPOD, ZUNE, etc. or as a video
input for vehicles not equipped with factory DVD play or video AUX input capability) This input is dependent
upon the presence of a factory rear view camera or, the option for factory rear view camera can easily be
turned on at your dealership. If your vehicle is not equipped with a factory rear view camera and you desire
to use the video input provided by the GMUNLOCKPRO harness, programming instruction for your dealer
can be found at the end of this manual.
Switching between these A/V inputs is described in the previous section of this manual.
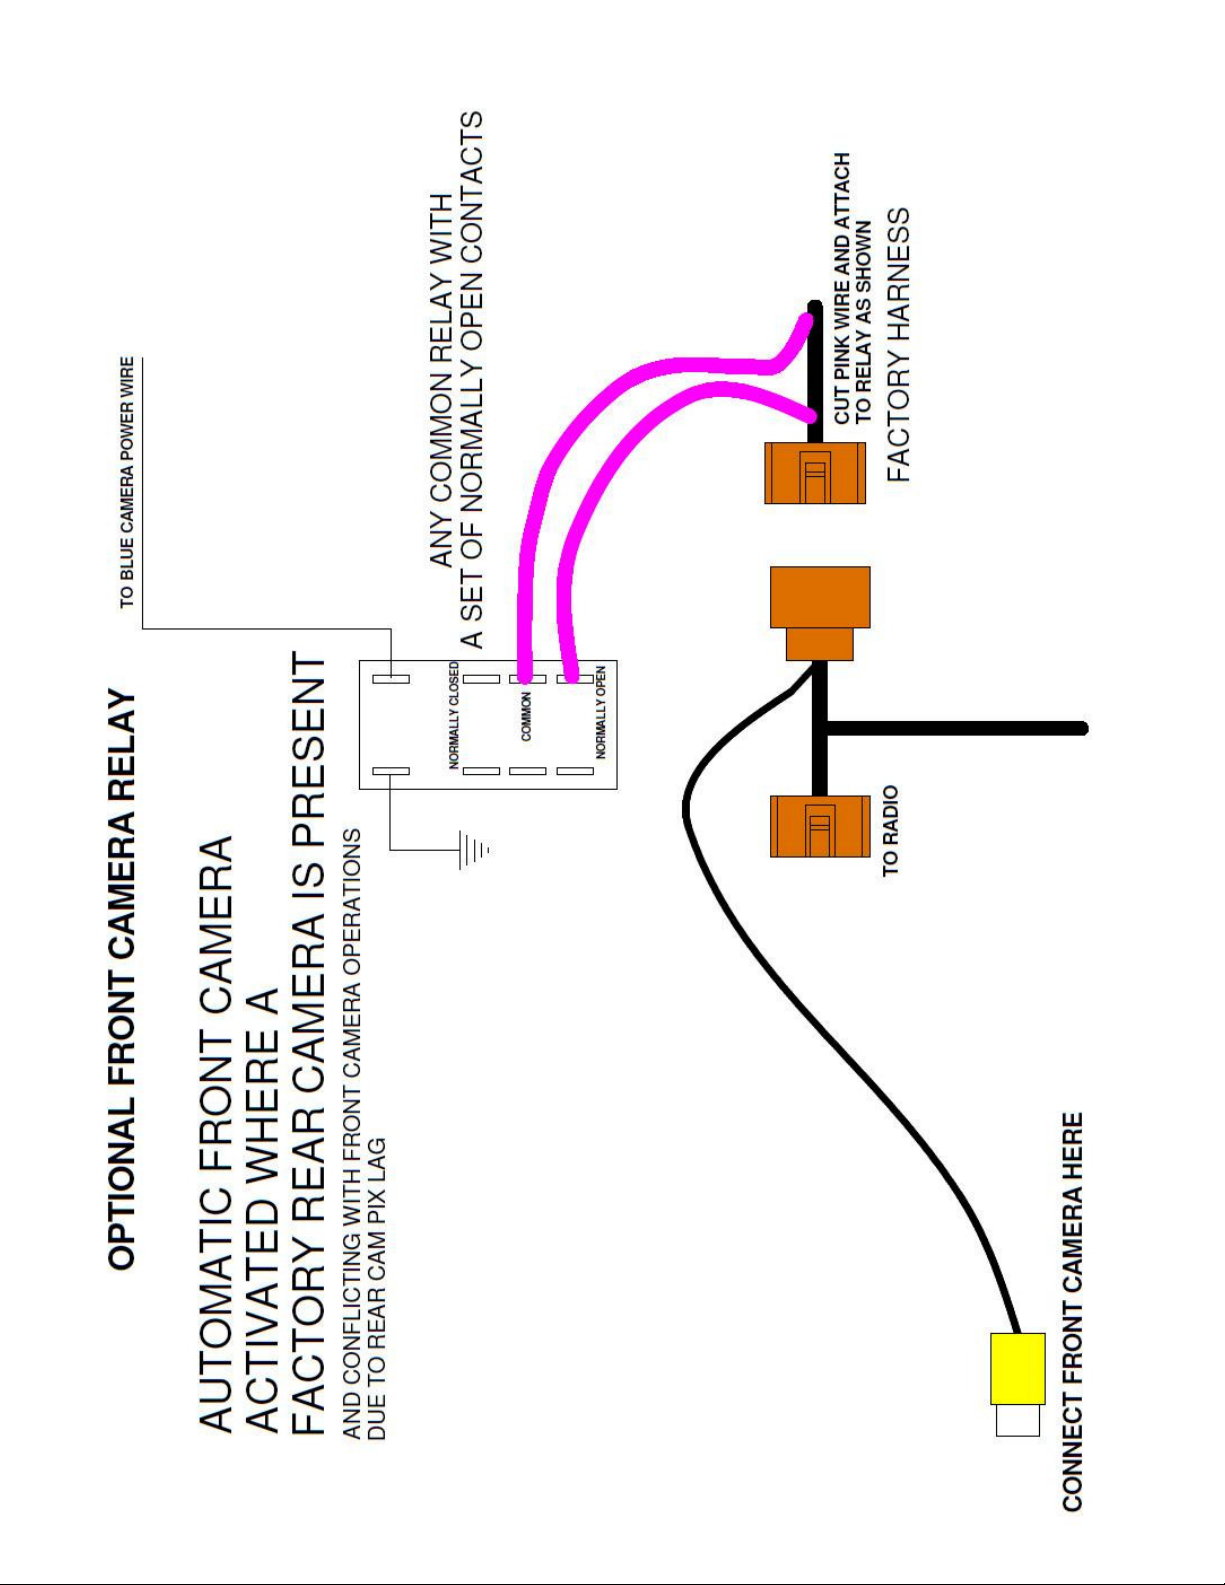
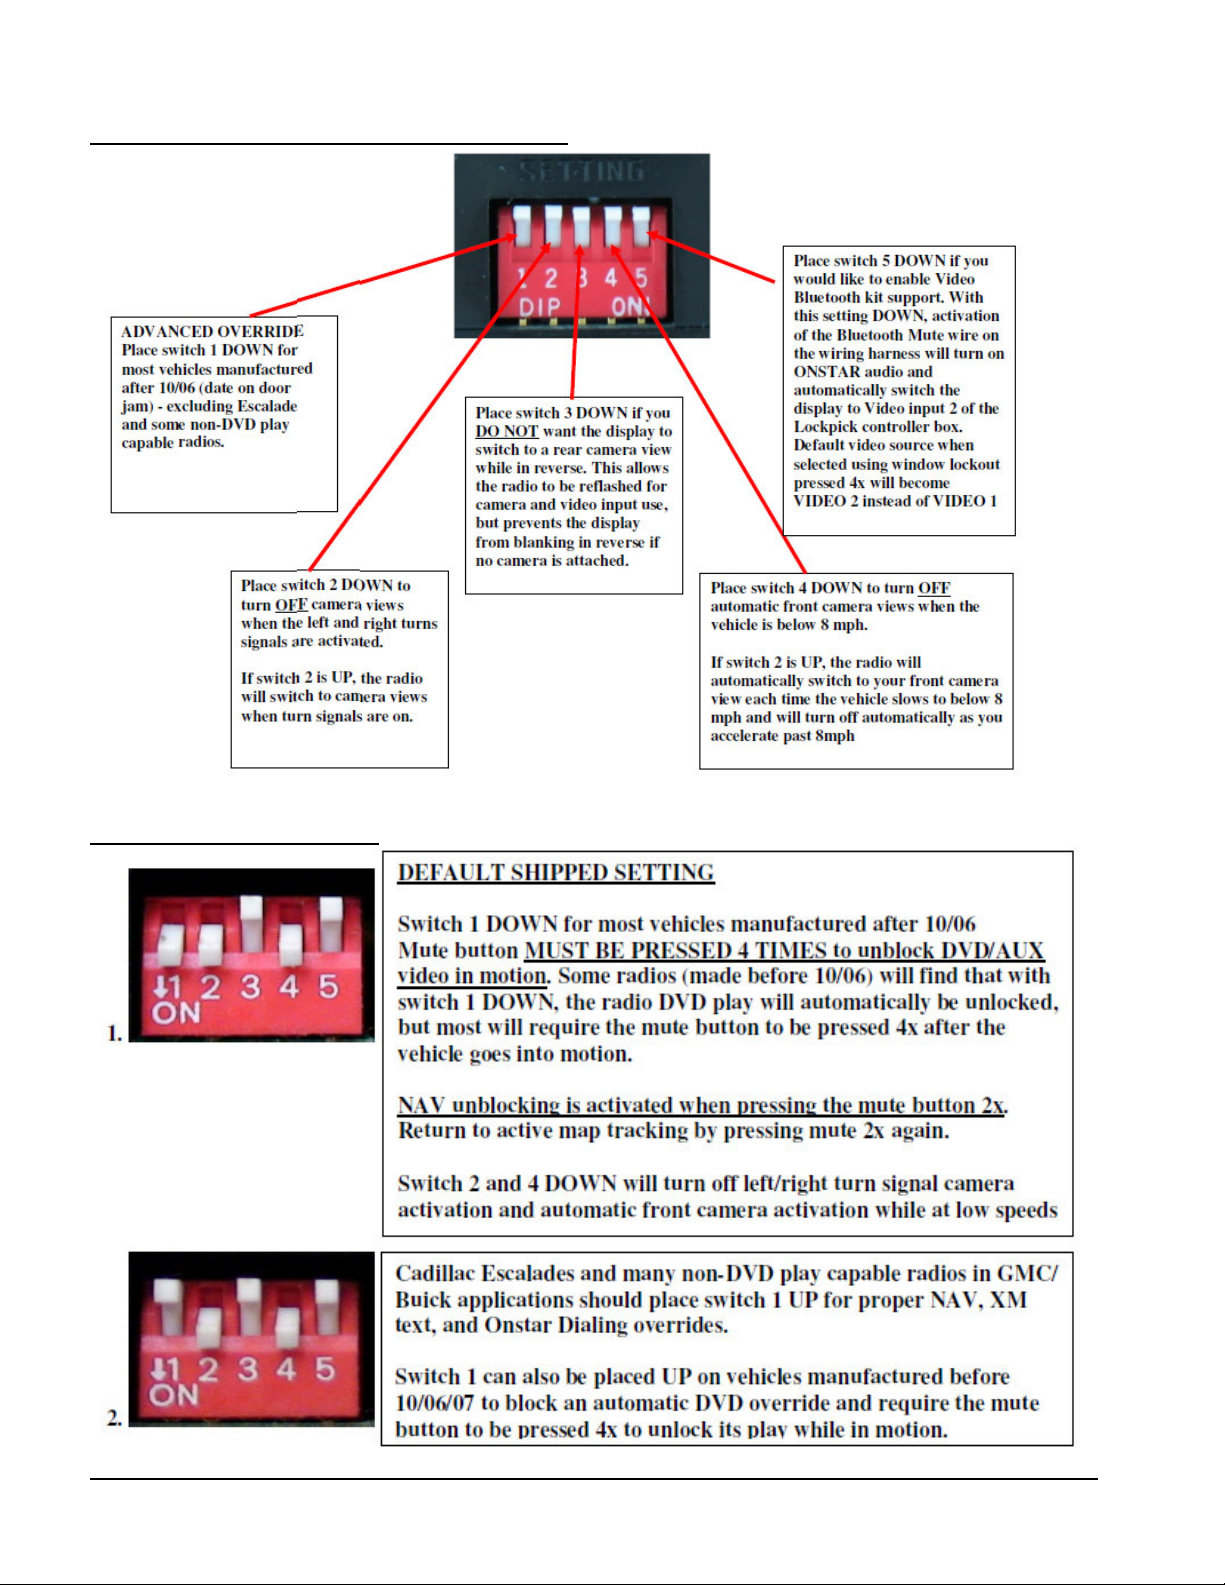
If you have the factory camera programming enabled, but do not plan to use a rear view camera, the GM
GMUNLOCKPRO can prevent the screen from blanking during reverse operation. Setup the dip switches for
NO REAR VIEW CAMERA PRESENT and your screen will not blank during reverse, even if it has been
updated for reverse camera operation. This allows you to use the video source provided by the
GMUNLOCKPRO for other purposes and not have the screen search for a rear view camera during reverse.
If you have a factory camera or will be adding an aftermarket reverse camera, place the switch in the UP
position to allow the screen to automatically switch to rear camera view while in reverse.
Accessory ignition Switched 12V power (RED)
The switched ignition 12V source (ACC) RED wire, will turn off when the car is turned off. This is useful to
allow the installation of aftermarket accessories (DVD, radar detector, etc) without worrying that they may run
down the vehicle battery when the car is turned off. It may be connected to your aftermarket Bluetooth kit as
an accessory power connection. This output is capable of 2.5 amps.
If the CAM VIDEO FUNCTION is enabled, the ACC power provided by the RED wire in your harness will turn
off while the car is in reverse and for approximately 10 seconds afterward. This allows you to connect
additional cameras, DVD’s, etc. to the provided video connector and not have the video interfere with factory
reverse camera installations. Use the ACC power provided by the GMUNLOCKPRO and your video device
will be powered off during reverse operation.
Aftermarket rear view cameras should be powered by the reverse tail light. Connect the video to the
connector provided by your GMUNLOCKPRO harness and you are ready to go. You could also connect
additional video from a front, baby cam, or any external video source powered by the ACC power connection
provided by the GMUNLOCKPRO without interference using a “Y” harness on the provided video input. Your
secondary video source will turn off while the car is in reverse preventing interference from simultaneous
video signals.
**The action and operation of the ACC and REVERSE power output wires are modified when
switch 2 is UP and the GMUNLOCKPRO is connected to front, side and rear cameras. For proper
operation of multiple cameras which are being powered and controlled by these connections, the
ACC and REVERSE power outputs of the GMUNLOCKPRO should not be used for purposes other
than the intended cameras when in this special multi-camera mode.

NAV VIDEO NavVideo Installation Guide. © 2006.
10
Setup DIP Switches (Manual or Automatic Mode)
Common DIP Switch Settings

NAV VIDEO NavVideo Installation Guide. © 2006.
11
•Add switch 3 DOWN if the rear view camera option has been activated in your radio but you
will not be installing a rear view camera.
• Place switch 2 in the UP position if you are installing left and right turn signal cameras.
• Place switch 4 in the UP position if you are installing a front camera and want automatic
activation while you are parking or driving at slow speeds.
**Note (switch 2 UP) - When using the GMUNLOCKPRO for DVD/AUX/NAV override and for control of
multiple cameras, the video inputs on the GMUNLOCKPRO module will be used for camera inputs and are
not available for other video sources. Also, if your vehicle already has a factory rear view camera
and you wish to add a front camera (switch 4 UP), a relay may be necessary to prevent mixing of
signals immediately after switching out of reverse due to the factory system which may continue to
leave the rear camera view on for up to 10 seconds, even after you switch to Drive. This will not
occur if you use an aftermarket camera for rear viewing. Please consult the supplied drawings for
additional instructions or call for a GMUNLOCKPRO front cam relay preassembled.
• Add switch 5 down when installing a video Bluetooth handsfree kit for automatic viewing of
caller ID information when receiving a call.
**IMPORTANT** SET SWITCH SETTINGS BEFORE PLUGGING
GMUNLOCKPRO INTO THE WIRING HARNESS TO INSURE PROPER
PROGRAMMING WHEN INITIALIZED
Step 1: Remove Trim Panels
Carefully remove the entire set of trim panels around the LCD screen with flathead screwdriver, being
especially careful not to scratch the trim.

NAV VIDEO NavVideo Installation Guide. © 2006.
12
Step 2: Remove The Bolts Holding The Radio / LCD Console In Place
Remove all of the bolts that hold the accessory controls, A/C controls and LCD display in place.
Step 3: Remove Accessory Controls, A/C Controls & LCD Display

NAV VIDEO NavVideo Installation Guide. © 2006.
13
Step 4: Unplug 3 OEM Connectors Behind LCD Display, And Install GM Unlock Module In Line
Step 5: Connect Video Devices
Connect any video and audio devices to the inputs of the module before reassembling the dash.
Step 6: Aftermarket Bluetooth Kit Connection
If you have an aftermarket Bluetooth kit to add to the module, install it at this time and follow the instructions
included with the kit.
Step 7: OPTIONAL – For OEM REAR CAM CONTROL
If you would like to enable full control and viewing of your FACTORY REAR VIEW CAMERA
when in DRIVE, attach the included FACTORY CAMERA OPTION wire to the REVERSE wire
labeled in your GMUNLOCKPRO harness. A crimp connector is already attached for your convenience.
Route the wire along the edge of the console and down to the small silver module under the passenger
seat. Slide the seat all the way back to view the connector on the front or side edge. Unplug the
connector and cut the Blue wire pictured in the photo below ( end wire, left side, from the back of the
plug ). Crimp the Blue wire from your kit to the blue wire on the connector. The other cut end of the
wire in the factory harness should be insulated and left disconnected. Do not connect the GMUNLOCKPRO
Blue wire without cutting the factory wire or improper operation will occur. For 2008 H2 Hummer
installations, run the GMUNLOCKPRO blue wire to the back of the vehicle and connect directly to the rear
view camera connector blue wire. Other vehicles (Enclave, Acadia) may place the module in the rear as well

NAV VIDEO NavVideo Installation Guide. © 2006.
14
Your GMUNLOCKPRO can also automatically control a front, rear and 2 side cameras!! If switch 4 is
placed in the up position, the GMUNLOCKPRO will automatically turn on a front camera while at speeds less
than 8 mph. If switch 2 is placed up, the side cameras will activate when the corresponding turn signal is
switched on. Connect the power needs of the front and both side cameras to the RED ACCESORY power
wire provided by the GMUNLOCKPRO. Connect the power/reverse needs of an aftermarket rear view
camera to the REVERSE power wire on the GMUNLOCKPRO, or follow step 7 if your vehicle is already
equipped with a factory rear view camera. The left camera video should plug into the Video 1 input on the
GMUNLOCKPRO as shown in the accompanying wiring diagram, the right camera video to the Video source
2 input, and the front camera to the video connector provided on the provided Brown connector behind the
radio. The factory rear view camera is already connected when plugging in the GMUNLOCKPRO harness.
For aftermarket rear view camera installations simultaneous with front camera installations, a video RCA “Y”
connector should be placed on the provided Brown connector video input so that both the rear and front
camera video will plug into the same input. No other connections are necessary as the GMUNLOCKPRO will
automatically detect the speed, shifter state, and turn signal use for proper operations of the various
cameras. Also, if your vehicle already has a factory rear view camera and you wish to add a front camera
(switch 4 UP), a relay may be necessary to prevent mixing of signals immediately after switching out of
reverse due to the factory system which may continue to leave the
rear camera view on for up to 10 seconds, even after you switch to Drive. This will not occur if you use an
aftermarket camera for rear viewing. Please consult the supplied drawings for additional instructions or call
for a GMUNLOCKPRO front cam relay preassembled. If you will not be installing left and right cameras, a
rear view camera, or a front camera, each can be turned off individually by placing switches 2, 3, and 4 into
the Down position as described in the installation instructions.
Step 8: Reverse Procedure to Put Dash Back Together
•Safely place the GM Unlock module inside the dash where it will not interfere with the radio or other
hardware.
•Follow the directions for taking the dash apart in reverse, in order to put it back together.
•You may want to fully test the units functions, following the operating procedures described at the
beginning of this manual, before you put the dash back together.
Installation Complete! You should now be able to override the blue disabling screen to be able to watch DVD
or video from the auxiliary input, while the vehicle is in motion, as well as enter navigation street addresses
and scroll through the XM radio channels list.

NAV VIDEO NavVideo Installation Guide. © 2006.
15
OPTIONAL: Aftermarket Bluetooth Kit Connection
Your GMUNLOCKPRO UNLOCK is already configured to allow the simple integration of an aftermarket
Bluetooth Handsfree kit. Included in your wiring harness, are all the power, ground and audio connections
needed to connect a handfree kit to your vehicle and listen to the sound through your cars’ factory sound
system. There is no need to install extra speakers or cut any factory wires. Your Bluetooth handfree kit will
need a constant power source, another which turns off with the radio, ground, a mute connection, and a
place for its line level audio to connect. All these are provided directly on the GMUNLOCKPRO wiring
harness.
The advanced software in your UNLOCK will automatically detect a phone operation in progress and will
activate the ONSTAR function of your radio. The sound from your conversations will be heard through your
sound system automatically and even if your radio is powered off with its power button, the sound will still be
activated (just like ONSTAR). No ONSTAR functions are disabled with the GMUNLOCKPRO so your factory
system will operate just as before, except with the added bonus of easy integration with your cell phone.
Additionally, the GMUNLOCKPRO is preprogrammed to operate with the newest Video Bluetooth integration
kits. These kits can display full menus, address books, caller ID, etc., and with the GMUNLOCKPRO, it
automatically integrates this information directly onto your factory screen.To enable this programming, place
switch 5 in the down position before plugging the UNLOCK module into its harness. Connect the standard
power, ground, and audio wires which are part of any Bluetooth kit installation. Now, plug in the video output
from your video Bluetooth kit, into the Video Source 2 input of the GMUNLOCKPRO module. Note: Your
Bluetooth kit may contain other outputs and control lines, but all of them are unnecessary for the
GMUNLOCKPRO and no other interfaces are needed.
The following instructions are specific to the TellPhone 5000vi Video Bluetooth Kit.
When the TellPhone kit and video output module are powered up for the first time, they take about 90
seconds to initialize. Turn the car on and wait before performing any additional tests of the Bluetooth kit. The
menus, address book, contact lists etc. are easily accessed by turning on the Video 2 source on your
UNLOCK ( select
XM, press window lockout 1x, then mute 4x, followed by Seek on your radio). All on-
screen Caller ID and other incoming call info are automatically displayed when receiving a call without any
button presses. Additionally, pressing the talk button for voice commands will automatically display on-screen
text and prompts. After the Tellphone has initialized, turn the car off and back on to begin the process of
marrying the remote, setting the language, pairing the first phone, etc. To see the text for these menus,
simply turn on the Source 2 video as described above, and follow the Bluetooth kit instructions. Your
GMUNLOCKPRO requires a only couple of seconds when the car is first turned on before it can access the
video functions so allow a brief moment before you turn on the video source.

NAV VIDEO NavVideo Installation Guide. © 2006.
16
OPTIONAL : GM Technician Instructions For Activating The Aftermarket Camera / Video Input Feature
The section below is only for GM / Cadillac service technicians. This feature is not supported officially by
NAV VIDEO and is entirely at the discretion of the GM / Cadillac technician and associated dealership. This
is an OPTIONAL step and only needs to be done if you wish to use the video input feature of our
module to add an aftermarket backup video camera or other video device.
1. Perform service programming from Tech II and choose Radio.
2. Build out the remainder of the vehicle. In this case a Chevrolet Tahoe with Navigation Radio.

NAV VIDEO NavVideo Installation Guide. © 2006.
17
3.Choose software that applies to particular vehicle based on options available.

NAV VIDEO NavVideo Installation Guide. © 2006.
18
Once complete upload back to vehicle. This enables the camera port when the vehicle is in reverse.
Popular Automobile Accessories manuals by other brands

Dometic
Dometic Oceanair Skysol Frame Manual Installation and operating manual

Thermo King
Thermo King SLXi-100 Operator's manual

König Electronic
König Electronic CSSPCH100 Step-By-Step Instructions

SBS
SBS TESUPPWINDWIR10W user manual

HOLDEN
HOLDEN H831 instruction sheet

Nokia
Nokia CK-300 User and installation guide