Naxa NPB-257 User manual

Portable MP3/CD Player, AM/FM Radio &
USB Input
NPB-257
Instruction Manual
Please read carefully before use and keep for future reference.

Page 2 Naxa Electronics
Table of Contents
Thank You ..................................................................... 3
In the Box ...................................................................... 3
Before You Start ........................................................... 4
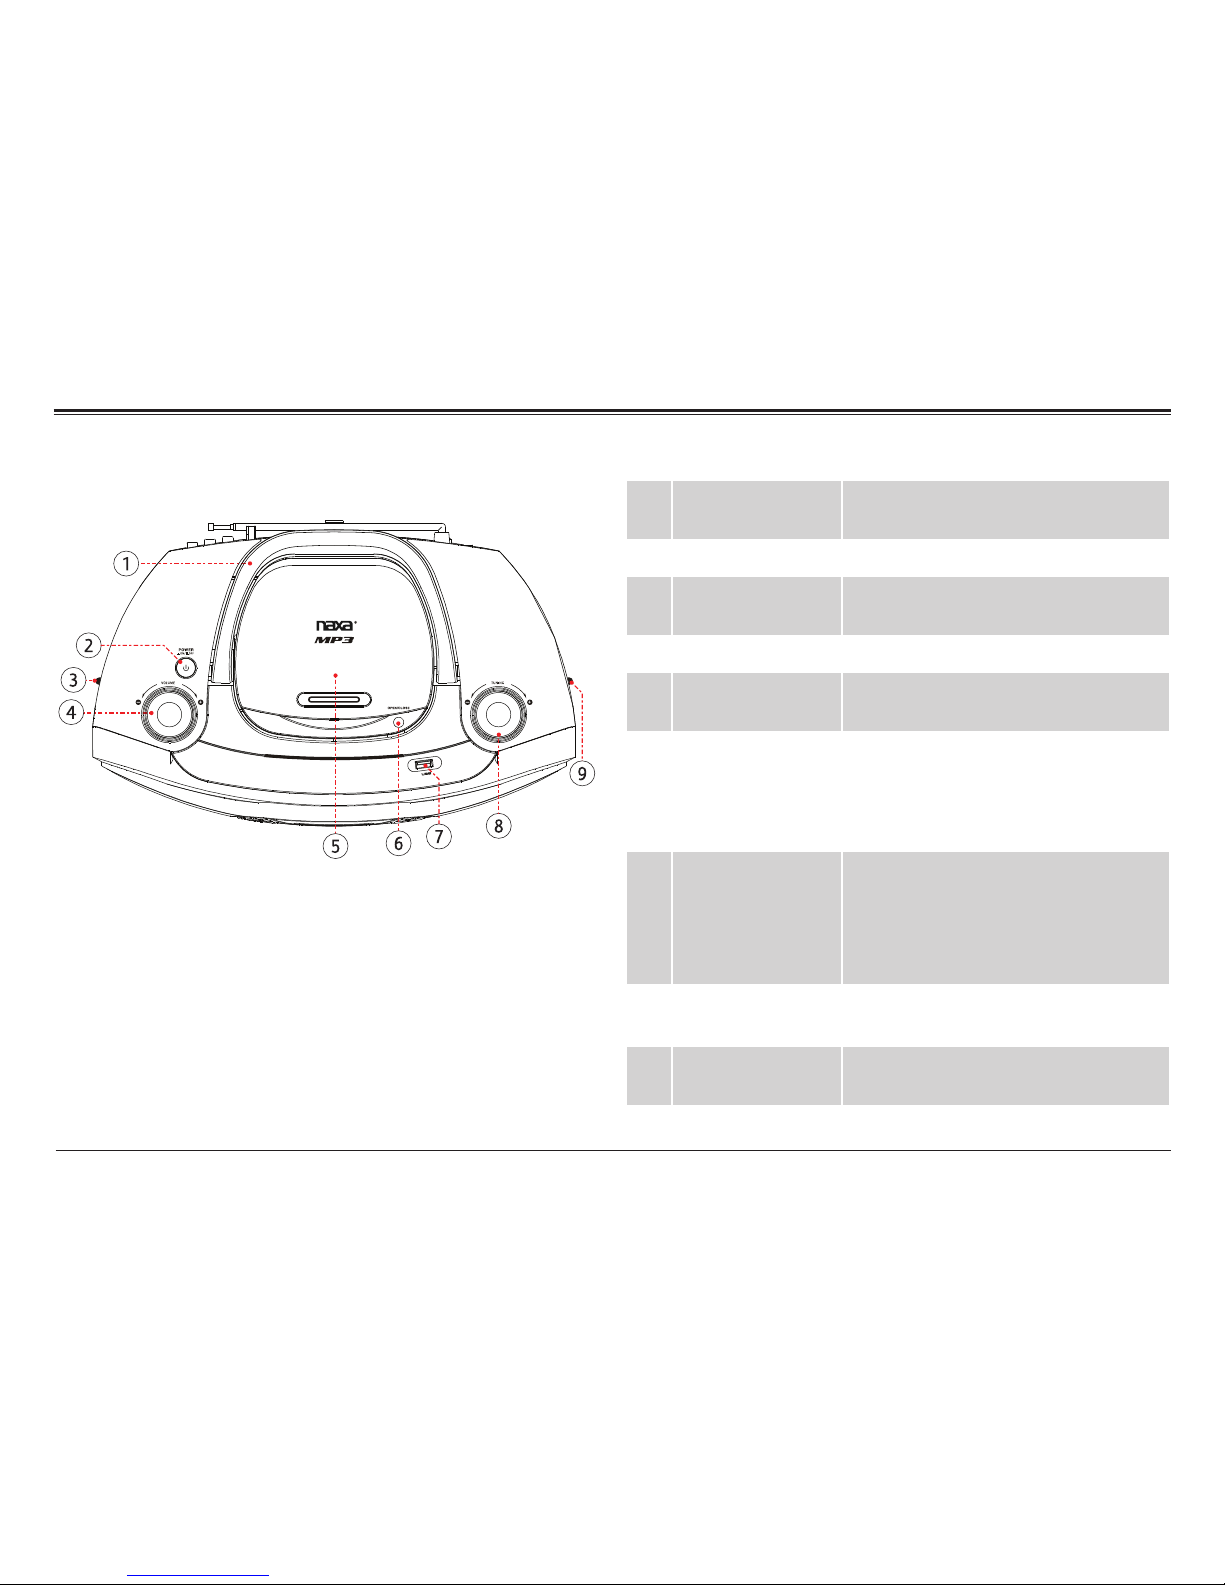
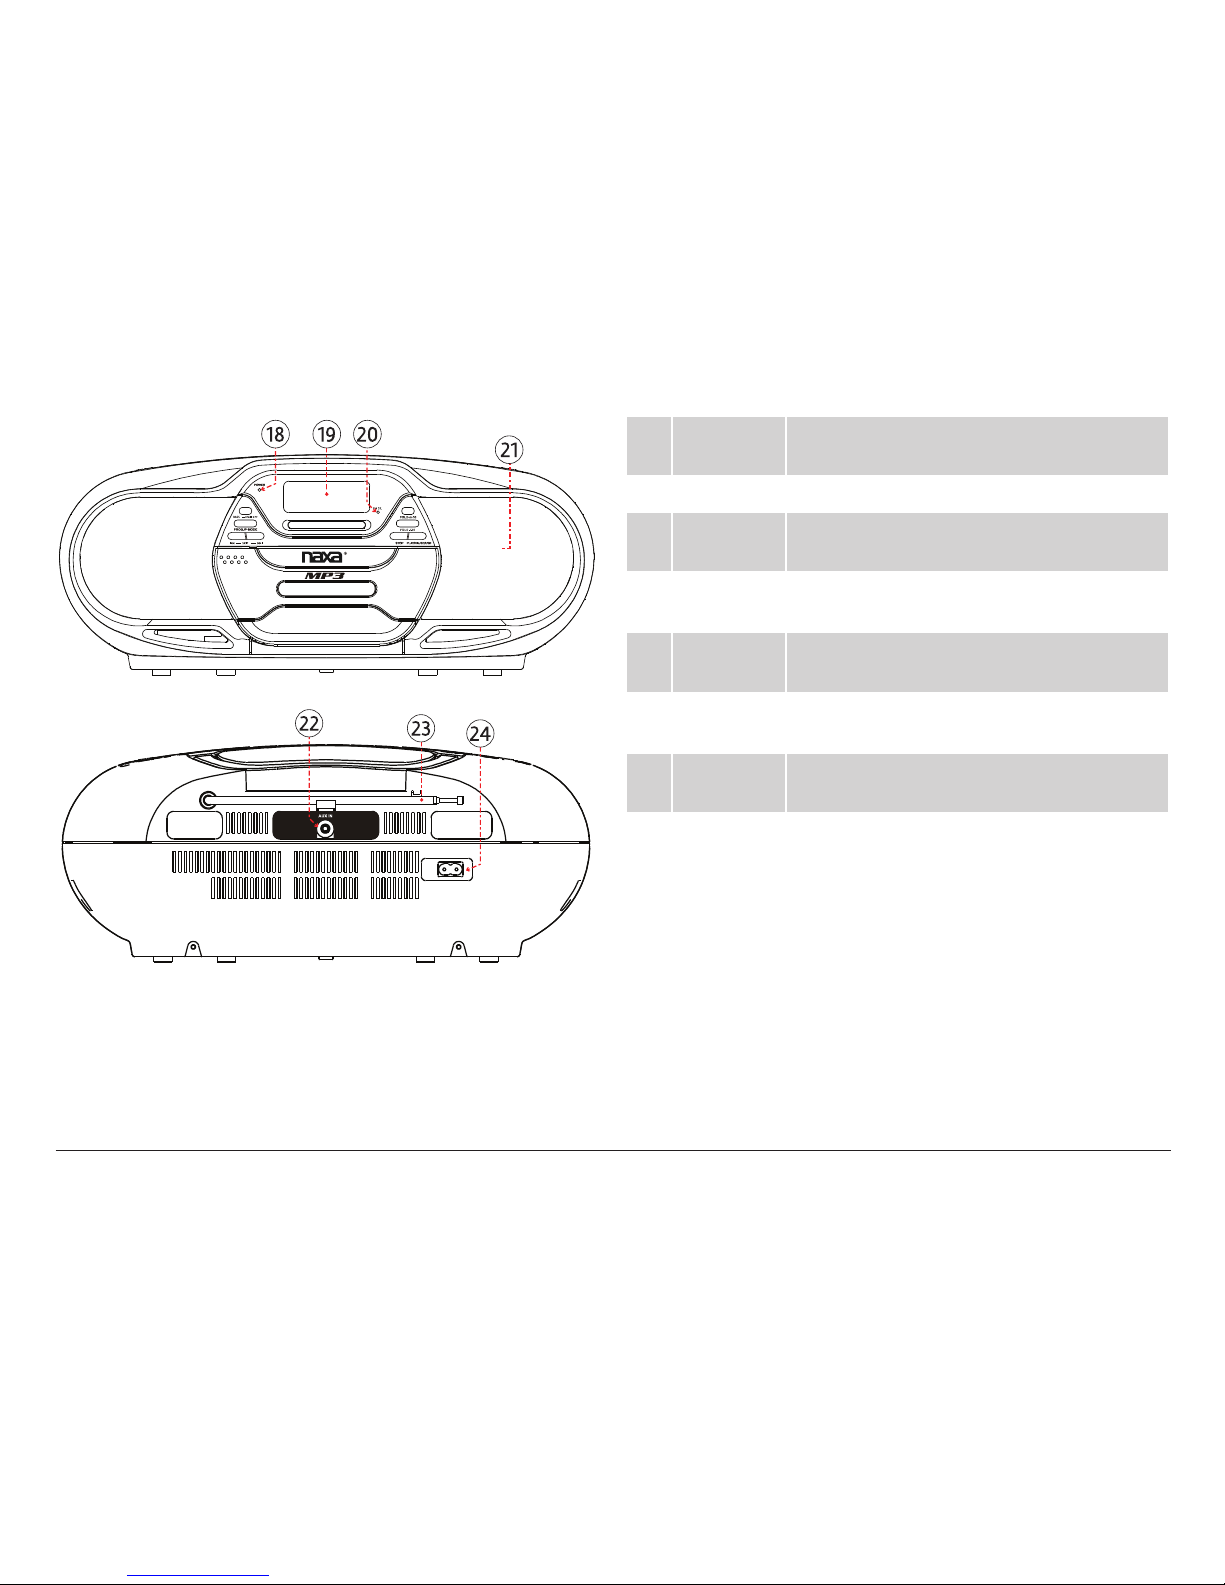
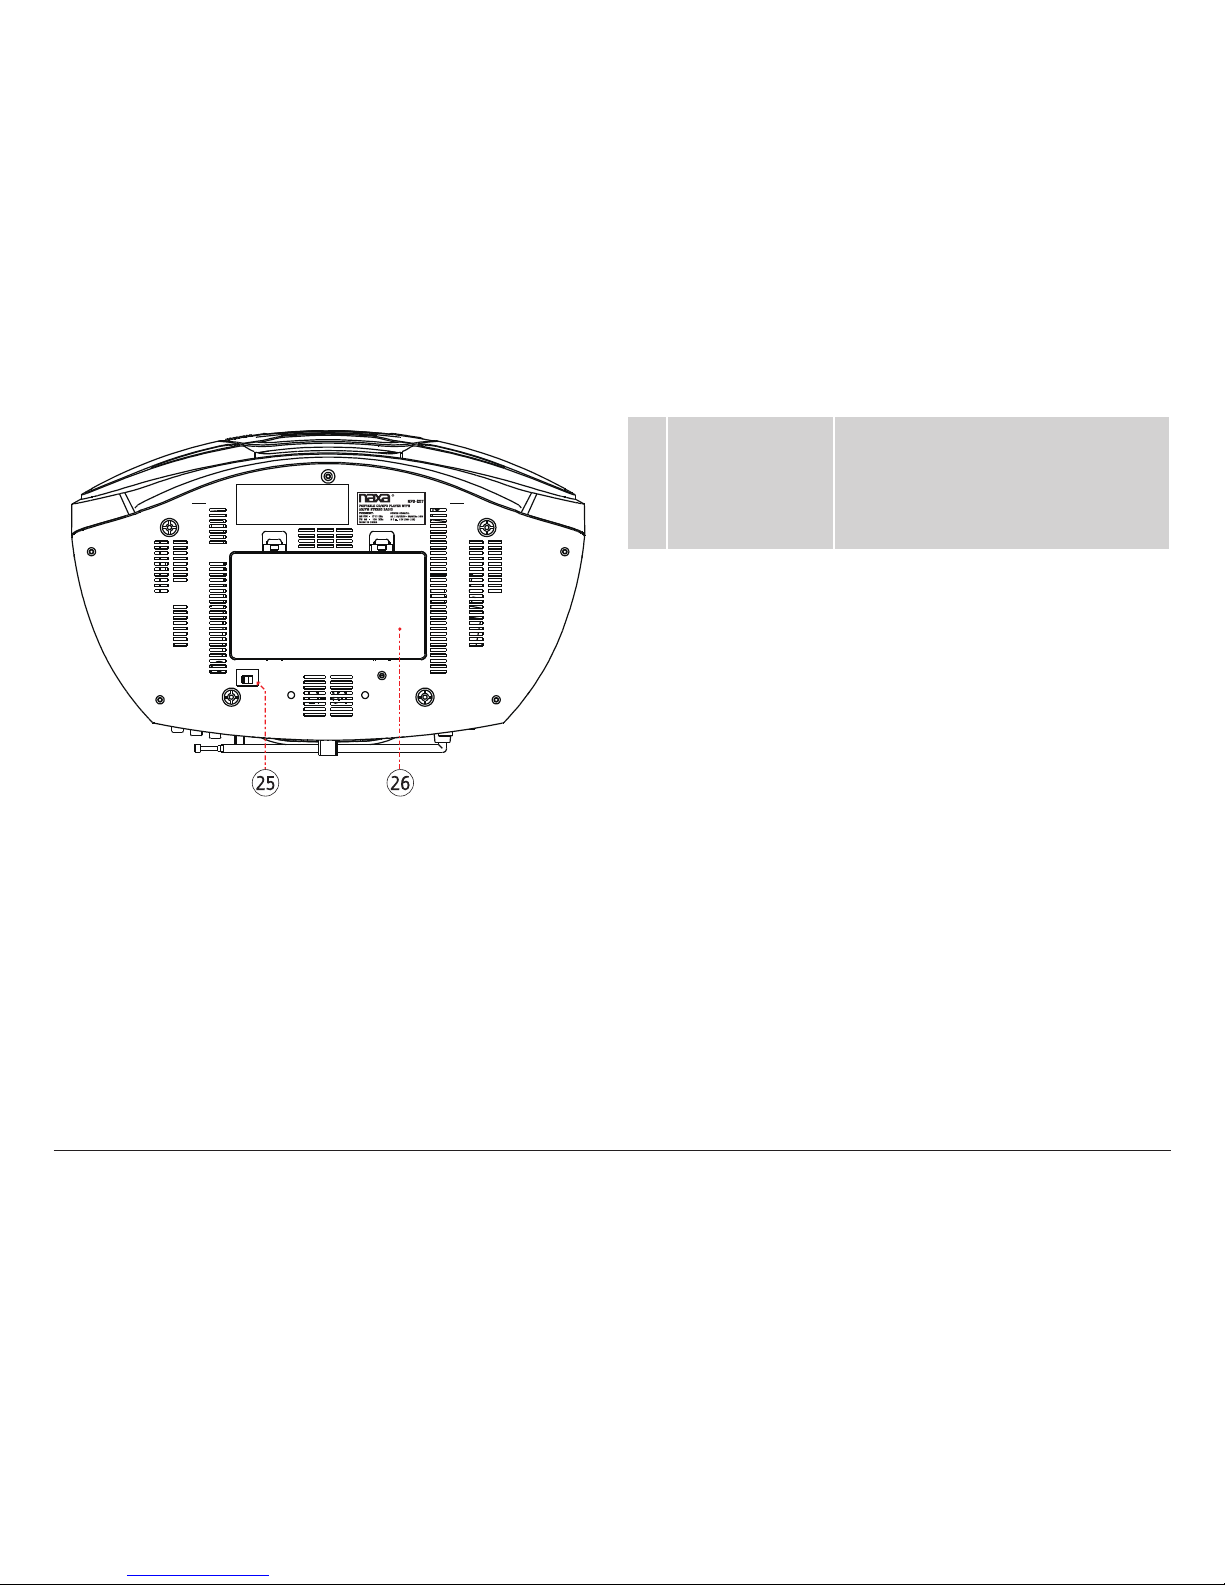
At a Glance .................................................................... 5
Connect Power.............................................................. 9
AC Power.......................................................................................... 9
Battery Power................................................................................. 9
Basic Functions............................................................10
Turning the Unit On and Off ...................................................... 10
Changing Function Modes.......................................................... 10
Adjusting the Volume.................................................................. 10
Bass Boost..................................................................................... 10
Using the Radio............................................................10
Using the CD/MP3 Player ............................................ 11
About Compact Discs................................................................... 11
Loading a Disc................................................................................ 11
Playing a Disc.................................................................................12
Repeat, Random, and Intro Playback........................................13
Programming a Playlist .............................................................. 14
Using the USB Player...................................................15
About USB Drives .........................................................................15
Loading a USB Stick Drive............................................................15
Playing Music from USB Drives ..................................................16
Using the AUX Input ....................................................16
Warnings and Precautions.......................................... 17
Specications ..............................................................21
Support ....................................................................... 22

www.naxa.com Page 3
Thank You
We know you have many choices when it comes to
technology; thank you for choosing us here at Naxa
Electronics. Established in 2001 in Los Angeles, Califor-
nia, we are dedicated to delivering products that en-
tertain and delight.
We trust that you will be happy with your purchase.
Please read this manual carefully and save it for refer-
ence. You may also nd the latest FAQ, documentation,
and other product material at our website. Come visit
us on the web at www.naxa.com and see all that we
have to offer!
In the Box
Please take a moment to make sure that you have ev-
erything in the list below. Although we make every ef-
fort to ensure that each Naxa device is securely packed
and sealed, we know a lot can happen in between us and
you. If anything is missing, check back with your local
retailer to get immediate assistance. If they cannot help
you, please contact our Naxa Support team at www.
naxa.com/naxa_support.
•NPB-257 portable MP3/CD player
•AC power cable
•User manual

Page 4 Naxa Electronics
Before You Start
Please take note of the following before you start.
•Do not block the ventilation openings or holes.
•Avoid installing the unit in locations described be-
low:
•Places exposed to direct sunlight or close to
heat radiating appliances (such as electric
heaters, or on top of other stereo equipment
that radiate heat).
•Places lacking ventilation or dusty places.
•Places subject to constant vibration.
•Places that are humid or moist.
•Operate turning controls and switches as instruct-
ed in manual.
• Before turning on the power for the rst time, make
sure that the power cord is properly installed.
•Store your tapes or CD in a cool area to avoid dam-
age from heat.
CAUTION: TO REDUCE THE RISK OF ELECTRIC SHOCK,
DO DOT REMOVE COVER (OR BACK). NO USER SER-
VICEABLE PARTS INSIDE, REFER SERVICING TO QUALI-
FIED SERVICE PERSONNEL.
WARNING: Remove batteries if exhausted or if they will
not be used again for a long period. The incorrect use
of batteries can cause electrolyte leakage and will cor-
rode the compartment or cause the batteries to burst,
therefore:
•Do not mix battery types, e.g. alkaline with zinc
carbonate.
•When inserting new batteries, replace all batteries
at the same time.

www.naxa.com Page 5
At a Glance
1 Handle Raise the handle to transport the
unit safely and easily.
2 POWER button Press to turn the player on or off.
3 FUNCTION switch Set the switch to the position of the
desired function mode.
4 Volume dial Turn to adjust the volume level.
5 CD compartment Load compact discs here. The label
side should face up.
6 CD door latch Press here to open/close the door of
the CD compartment [5].
Never open the compartment while
a CD is playing or spinning!
7 USB Port Load USB memory sticks here. The
USB port is designed for music play-
back from ash memory devices. It
is not designed to charge high-power
devices.
8Radio Tuning dial Turn the dial to tune to a radio
station.
9 Band switch Set the switch to the desired radio
band.

Page 6 Naxa Electronics
10 PROG/
P-MODE key
PROG: Create a custom playlist. Press to
enter Program mode.
P-MODE: Press to change the playback
mode.
11 BASS key Press to enable/disable bass boost.
12 FOLD+/
+10 key
FOLD+: Skip to the next folder (MP3 only).
+10: Press to skip 10 tracks forward.
13 FOLD–/
–10 key
FOLD–: Skip to the previous folder (MP3
only).
–10: Press to skip 10 tracks back.
14 SKIP key
(Previous/
Reverse)
Previous: Press to skip to the previous
track.
Reverse: Press and hold to scan quickly in
reverse through the current track.
15 SKIP key
(Next/
Forward)
Next: Press to skip to the next track.
Forward: Press and hold to scan quickly
forward through the current track.
16 STOP key Press to stop playback.
17 PLAY/PAUSE/
USB key
Play/Pause: Press to start, pause, or
resume playback.
USB: Press to switch to USB mode.

www.naxa.com Page 7
18 Power
Indicator
Lights up when power is on.
19 LCD screen Displays player status information.
20 FM ST
indicator
The indicator lights up when the radio is
tuned to an FM stereo signal.
21 Speakers Full-range drivers deliver powerful stereo
sound.
22 AUX Input
jack
Play audio from a device that is connected
to this 3.5mm input jack.
23 Antenna Extend the antenna fully and adjust its posi-
tion to optimize FM radio reception.
24 AC power
socket
Connection for the included AC power
cable.

Page 8 Naxa Electronics
25 AC Voltage switch
(dual voltage
only)
Available only on models that support
dual-voltage. This switch is found
inside the battery compartment [25].
Make sure the switch is set to match
your household power supply.
26 Battery
compartment
Load 8 UM-2 “C” size batteries into
the compartment for portable power.

www.naxa.com Page 9
Connect Power
The unit can be powered by AC household power, or by
batteries.
AC Power
This unit operates on AC 110 V or 220 V power. Make
sure the AC voltage switch [25] is set to match the
voltage supplied in your region. The voltage switch
can be found on the bottom of the main unit.
1. Remove the battery compartment lid to reveal the
AC voltage switch.
2. Push gently on the switch with a at head screw-
driver to set it.
3. Replace the battery compartment lid.
4. Connect the AC power socket [27] to a household
power socket with the included power cord.
⚠⚠Contact your local power utility if you are
not sure which type of power you have.
Most power sources in North America sup-
ply AC 110 V power.
Battery Power
Install 8 UM-1 “D” size batteries to enjoy music wher-
ever you are.
1. Remove the lid of the battery compartment [26]
found on the back of the main unit.
2. Load eight “D” size batteries, taking care to match
the polarities marked on the inside of the com-
partment.
3. Replace the lid of the battery compartment [26].
⚠⚠Remove the batteries if they are exhausted
or will not be used for a long time.
Batteries contain chemicals that may be
regulated by your local government. Dispose
of them properly according to regulations.

Page 10 Naxa Electronics
Basic Functions
Turning the Unit On and O
To turn the unit on, press the POWER button [2]. The
power indicator [18] will light up.
To turn the unit off, press the POWER button [2] again.
Changing Function Modes
Set the FUNCTION switch [3] to one of the function po-
sitions (e.g., CD/MP3/USB/AUX, RADIO).
⚠L To change between CD and USB modes,
press and hold the PLAY/PAUSE/USB key
[17] while the FUNCTION switch [3] is set to
CD/MP3/USB/AUX.
Adjusting the Volume
Turn the VOLUME dial [4] clockwise or counter clockwise
to increase or decrease the volume level, respectively.
Bass Boost
Turn the Bass Boost adjustment on to emphasize low
frequency sound output.
Press the BASS key [11] to turn Bass Boost on and off.
⚠L Producing low frequencies at high volumes
can be demanding for audio equipment. If you
experience audio clipping when Bass Boost is
turned on, lower the volume gradually.
Using the Radio
Set the FUNCTION switch [3] to the RADIO position to
start using the radio.
1. Select a frequency band. Set the BAND switch [9] to
the AM, FM, or FM ST. position.
2. Turn the Radio Tuning dial [8] to tune to a radio
station; the current station can be seen on the LCD
screen [19].

www.naxa.com Page 11
3. Optimize radio reception:
•Fully extend the telescopic ANTENNA [23] and
adjust its orientation to optimize FM radio
reception.
•The AM antenna is built into the player. Adjust
the orientation and position of the player itself
to optimize AM radio reception.
⚠L Select the FM mono band when tuning to a
station with a weak signal. Select the FM ST
(stereo) band when the signal is strong. The
FM Stereo indicator [20] will light when the
tuner is locked in on a stereo signal.
Using the CD/MP3
Player
Set the FUNCTION switch [3] to the CD/MP3/USB/AUX
position to start using the CD/MP3 player.
About Compact Discs
This player is compatible with all digital audio CDs,
digital audio CD-Recordable discs (CD-R) and CD-Re-
writable discs (CD-RW) that have been nalized, and
CD-DA format digital audio CDs.
This player is also compatible with MP3-CDs. These are
compact discs that contain MP3 audio les on them.
⚠L Only handle a CD by its edge. Avoid touch-
ing the label or the playable side with your
hands or any other object.
Loading a Disc
1. Open the CD compartment [5]. Press down on the
CD door latch [6] to release it; the CD door will
swing up.
⚠L Lower the handle [1] before opening the CD
compartment. A raised handle will prevent
the CD compartment door from opening
completely.
2. Load a compatible disc. Place the CD into the com-
partment [5] with its label facing up.

Page 12 Naxa Electronics
3. Lower the door by pushing down on the CD door
latch [6]; push down until you hear the latch click
and the compartment is securely closed.
4. The player will attempt to read the disc once the
compartment is closed.
•The LCD screen [19] will show the number of
playable tracks on the disc.
•The LCD screen will show “NOd” (No disc) if it
cannot read the disc. Make sure that the disc
is loaded properly, and that is not damaged,
dirty, or incompatible.
⚠L To ensure good system performance, wait
until the player recognizes and reads the
disc before proceeding.
MP3-CDs take longer to read because
they have more data on them. Please wait
patiently until the player has recognized
the disc.
Playing a Disc
With a compatible disc in the CD compartment [5]:
•Press the PLAY/PAUSE/USB key [17] to start play-
back.
•Play will start from track 1.
•The Play indicator () will appear on the LCD
screen [19].
•To pause playback, press the PLAY/PAUSE/USB key
[17] while a disc is playing.
•The Play indicator () will ash on the LCD
screen [19].
•Press the PLAY/PAUSE/USB key [17] again to
resume playback.
•To stop playback, press the STOP key [16].
•The LCD screen [19] will again show the number
of playable tracks.
•To select a track to play:
•Press the SKIP key [15] to skip to the next
track. The LCD screen [19] will change tracks
accordingly.

www.naxa.com Page 13
•Press the SKIP key [14] to skip back to the
previous track. The LCD screen [19] will change
tracks accordingly.
•Press the FOLD+/+10 key [12] to skip 10 tracks
forward. The LCD screen [19] will change tracks
accordingly.
•Press the FOLD–/–10 key [12] to skip 10 tracks
backward. The LCD screen [19] will change
tracks accordingly.
⚠L Skipping 10 tracks will only work on media
that contain more than 10 MP3s (e.g., MP3-
CDs, USB ash drives).
•To scan through a track at high speed:
•Press and hold the SKIP key [15] during
playback. Play will advance quickly through
the current track; release the key to resume
playback at normal speed.
•Press and hold the SKIP key [14] during
playback. Play will reverse quickly through the
current track; release the key to resume play-
back at normal speed.
•To select a folder to play (MP3 only):
1. Press and hold the FOLD+/+10 key [12] to skip to
the next folder. The player will skip to the next
folder and the LCD screen [19] will display the
current folder number.
2. Press and hold the FOLD–/–10 key [13] to skip
to the next folder. The player will skip to the
next folder and the LCD screen [19] will display
the current folder number.
⚠L Selecting a folder will only work on media
that contain MP3s organized within fold-
ers/directories (e.g., MP3-CDs, USB ash
drives).
Repeat, Random, and Intro Playback
You can change the order in which the tracks of a CD
are played by pressing the PROG/P-MODE key [10]. To
cancel these special playback modes, press the PROG/
P-MODE key [10] until all of the P-MODE indicators
disappear from the LCD screen [19].

Page 14 Naxa Electronics
•To repeat a single track, press the PROG/P-MODE
key [10] until the “Repeat” indicator ashes on the
LCD screen [19]. The current track will replay re-
peatedly until play is stopped.
•To repeat all the tracks, press the PROG/P-MODE
key [10] until the “Repeat” indicator appears steady
on the LCD screen [19]. The player will replay all
tracks on the CD until play is stopped.
•To repeat all the tracks in a folder, press the PROG/
P-MODE key [10] until the “Repeat Folder” indica-
tor appears steady on the LCD screen [19].
⚠L This option will only work with media that
contain MP3s organized within folders/di-
rectories (e.g., MP3-CDs, USB ash drives).
This option will not work when playing a
regular audio CD.
•To randomize the track order during playback,
press the press the PROG/P-MODE key [10] until
“Random” appears steady on the LCD screen [19].
The player will shufe the playback order before
each track is played.
• To play just the rst 10 seconds of each track, press
the PROG/P-MODE key [10] until “INTRO” appears
steady on the LCD screen [19]. The player will play
the rst 10 seconds of a track and then skip to the
next one.
⚠L This option will only work with CDs. This op-
tion is not supported with USB ash drives.
Programming a Playlist
When the CD is stopped, you can select up to 20 CD
tracks (or 99 MP3 tracks) to play in any order that you
choose.
1. Press the STOP key [16] to make sure that playback
has stopped.
2. Press the PROG/P-MODE key [10]. The LCD screen
[19] will show “P01” and the PROGRAM indicator
will ash.
3. Use the SKIP and SKIP keys [15, 14] to choose
a track to enter into the playlist. (You may also
use the FOLD+/+10 and FOLD–/–10 keys [12, 13] to
choose a track.)

www.naxa.com Page 15
4. Press the PROG/P-MODE key [10] to save the track
into the playlist. The LCD display [19] will then show
the next playlist track number (e.g., “P02”).
5. Repeat steps 3 and 4 until your playlist is complete.
6. Press the PLAY/PAUSE/USB key [17]. Play will start
from the rst track in the playlist and stop once all
of the programmed tracks have been played.
7. Press the STOP key [16] to stop the programmed
playlist, then press the STOP key [16] a second time
to clear the playlist from Program memory.
⚠L Opening the CD compartment [5] will also
clear the playlist from Program memory.
Using the USB Player
Set the FUNCTION switch [3] to the CD/MP3/USB/AUX
position to play les from a USB stick drive.
About USB Drives
This player can play supported audio les from USB
stick drives connected to the USB port [7].
For a list of supported audio les, please refer to the
Specications section of this manual.
⚠L There are many different USB stick types
and manufacturers. Although this player
should support most of these memory
devices, it is impossible to guarantee com-
patibility with ALL USB drives.
Loading a USB Stick Drive
1. Plug your USB memory stick drive into the USB port
[7] found on the top of the player.

Page 16 Naxa Electronics
⚠⚠If you feel resistance when plugging your
USB drive in, stop! Turn it over and try
again. The USB port accepts drives in one
position only.
2. Set the FUNCTION switch [7] to the CD/MP3/USB/
AUX position.
3. Press and hold the PLAY/PAUSE/USB key [17] to
switch to the USB reader from the CD player. The
player will attempt to read all the compatible les
on your memory device.
•The LCD screen [19] will show the number of
playable tracks on the USB drive.
•The LCD screen will show “NOd” if it cannot read
from the USB drive. Make sure that the drive is
plugged in securely, that it is a compatible for-
mat, and that it contains compatible les.
⚠L To switch between the USB player and the
CD player, press and hold the PLAY/PAUSE/
USB key [17].
Playing Music from USB Drives
Using the USB player is the same as using the CD player.
•Press the PLAY/PAUSE/USB key [17] to start, pause,
or resume playback.
•Press the STOP key [16] to stop playback.
⚠L To learn more about how to control play-
back, please refer to the “Using the CD/
MP3 Player” section of this manual (“Play-
ing a Disc,” “Repeat, Random, and Intro
Playback,” “Programming a Playlist”).

www.naxa.com Page 17
Using the AUX Input
Set the FUNCTION switch [3] to the CD/MP3/USB/AUX
position to play devices connected to the AUX Input
jack [22].
1. Connect the audio source to the player. Use an op-
tional audio patch cable to connect the 3.5mm
headphone or line-out jack of the audio source to
the 3.5mm AUX Input jack [22] found on the back of
the player.
2. Prepare the player. Set the FUNCTION switch [3] to
the CD/MP3/USB/AUX position. Turn the VOLUME
dial [4] to lower the volume level.
3. Prepare the audio source. Start playback on the
device. Set the volume level of the device to ap-
proximately 80% of its maximum.
4. Adjust the nal volume. Turn the VOLUME dial [4]
of the player to set the volume to a comfortable
level.
⚠L Use the audio source to control playback
(e.g., stop, play, next). Use the player to
control the volume.

Page 18 Naxa Electronics
Warnings and Precautions
The lightning ash with arrowhead symbol within an equilateral
triangle is intended to alertthe user to the presence of uninsulat-
ed “dangerous voltage” within the product’s enclosure that may
be of signicant magnitude to constitute risk of electric shock.
The exclamation point within an equilateral triangle is intended
to alert the userto the presence of important operation and ser-
vicing instructions in the literature accompanying the appliance.
On Protection Against Laser Energy Exposure
• As the laser beam used in this product is harmful to the eyes, do not
attempt to disassemble the casing.
• Stop operation immediately if any liquid or solid object should fall
into the cabinet.
• Do not put anything in the safety slot. If you do, the laser diode will
be ON when the disc compartment door is still open.
• If the unit is not to be used for a long period of time, make sure that
all power sources are disconnected from the unit. Remove all batter-
ies from the battery compartment, and unplug the AC-DC adapter
from the wall outlet. Make it a practice to remove the AC-DC adapter
by grasping the main body and not by pulling the cord.
• This unit employs a laser. The use of controls or adjustment or per-
formance of procedures other than those specied here may result in
exposure to hazardous radiation.
CAUTION
• Do not block the ventilation openings or holes.
• Do not place any naked ames (such as lighted candles) on the ap-
paratus.
• When discarding batteries, follow all local rules and laws governing the
disposal of batteries. Consider the environmental impact of your actions!
• Invisible laser radiation when open and interlock has failed or been
defeated. Avoid direct exposure to beam.
• To prevent re or shock hazard, do not expose this appliance to rain
or moisture.

www.naxa.com Page 19
Important Safety Information
1. Read Instructions: All the safety and operating instructions should be
read before the product is operated.
2. Retain Instructions: The safety and operating instruction should be
retained for future reference.
3. Heed Warnings: All warnings on the product and in the operating in-
structions should be adhered to.
4. Follow Instructions: All operating and usage instructions should be
followed.
5. Cleaning: Unplug this product from the wall outlet before cleaning.
Do not use liquid cleaners or aerosol cleaners. Use a damp cloth for
cleaning.
6. Attachments: Use only attachments recommended by the manufac-
turer. Use of other attachments may be hazardous.
7. Water and Moisture: Do not use this product near water (e.g., near a
bathtub, washbowl, kitchen sink, laundry tub, in wet basements, or
near a swimming pool and the like).
8. Accessories: Do not place this product on an unstable cart, stand,
tripod, bracket, or table. Use only with carts, stands, tripods, brack-
ets, or tables recommended by the manufacturer or
sold with the product. Any mounting of the product
should follow the manufacturer’s instructions and
should use a mounting accessory recommended
by the manufacturer. A product and cart com-
bination should be moved with care. Quick stops,
excessive force, and uneven surfaces may cause the
product and cart combination to overturn.
9. Ventilation: Slots and openings in the cabinet are provided for ven-
tilation to ensure reliable operation of the product and to protect it
from overheating. These openings should never be blocked by placing
the product on a bed, sofa, rug, or other similar surface. This product
should not be placed in a built-in installation such as a bookcase or
rack unless proper ventilation is provided or the manufacturer in-
structions have been adhered to.
10. Power Sources: This product should be operated only from the type of
power source indicated on the rating label. If you are not sure of the
type of power supply to your home, consult your product dealer or
local power company. For products intended to operate from battery
power or other sources, refer to the operating instructions.
11. Grounding or Polarization: This product may be equipped with a po-
larized alternating-current line plug that has one blade wider than
the other. This plug will only t into the power outlet in one direction.
This is a safety feature. If you are unable to insert the plug fully into
the outlet, try reversing the direction of the plug. If the plug should
still fail to t, contact an electrician to replace the obsolete outlet. Do
not defeat the safety purpose of the polarized plug.
12. Power-Cord Protection: Power supply cords should be routed so that
they are not likely to be walked on or pinched by items placed upon
or against them, paying particular attention to cords at plugs, conve-
nience receptacles, and at the point which they exit from the product.
13. Protective Attachment Plug: The product may be equipped with an at-
tachment plug with overload protection. This is a safety feature. See
the operating instructions for replacement or directions to reset the
protective device. If replacement of the plug is required, be sure the
service technician has used a replacement plug that has the same over-
load protection as the original plug as specied by the manufacturer.
14. Outdoor Antenna Grounding: If an outside antenna is connected to
the product, be sure the antenna system is grounded so as to provide
some protection against voltage surges and built-up static charges.
Article 810 of the National Electrical Code, ANS/NFPA70 provides in-
formation with regard to proper grounding of the mast and support-

Page 20 Naxa Electronics
ing structure,grounding of the lead-in wire to an antenna-discharge
unit, size of grounding conductors, location of antenna-discharge
unit, connection to grounding electrodes, and requirements for the
grounding electrode (see gure).
15. Lightning: For added protection for this product, unplug it from the
wall outlet and disconnect the antenna or cable system during a
lightning storm or when it is left unattended and unused for long pe-
riods of time. This will prevent damage to the product due to lightning
or power-line surges.
16. Power Lines: An outside antenna system should not be located in the
vicinity of overhead power lines or other electric light or power cir-
cuits, or where it can fall into such power lines or circuits. When in-
stalling an outside antenna system, extreme care should be taken to
keep from touching such power lines or circuits, as contact with them
might be fatal.
17. Overloading: Do not overload wall outlets, extension cords, or inte-
gral convenience receptacles as this can result in a risk of re or elec-
tric shock.
18. Object and Liquid Entry: Never push objects of any kind into this prod-
uct through openings as they may touch dangerous voltage points or
shout-out parts that could result in a re or electric shock. Never spill
liquid of any kind on the product.
19. Servicing: Do not attempt to service this product yourself as open-
ing or removing covers may expose you to dangerous voltage or other
hazards. Refer all servicing to qualied service personnel.
20. Damage Requiring Service: Unplug this product from the wall outlet
and refer servicing to qualied service personnel under the follow-
ing conditions: a) when the power-supply or plug is damaged; b) if
liquid has been spilled or if objects have fallen into the product; c) if
the product has been exposed to rain or water; d) if the product does
not operate normally by following the operating instructions. Adjust
only those controls that are covered by the operating instructions as
improper adjustment of other controls may result in damage and will
often require extensive work by a qualied technician to restore the
product to its normal operation; e) if the product has been dropped or
damaged in any way; f) when the product exhibits a distinct change in
performance—this indicates a need for service.
21. Replacement Parts: When replacement parts are required, be sure
that your service technician has used replacement parts specied
by the manufacturer or have the same characteristics as the original
part. Unauthorized substitutions may result in re, electric shock, or
other hazards.
22. Safety Check: Upon completion of any service or repairs to this
product,ask the service technician to perform safety checks to ensure
that the product is in proper operating condition.
Other manuals for NPB-257
1
Table of contents
Other Naxa CD Player manuals