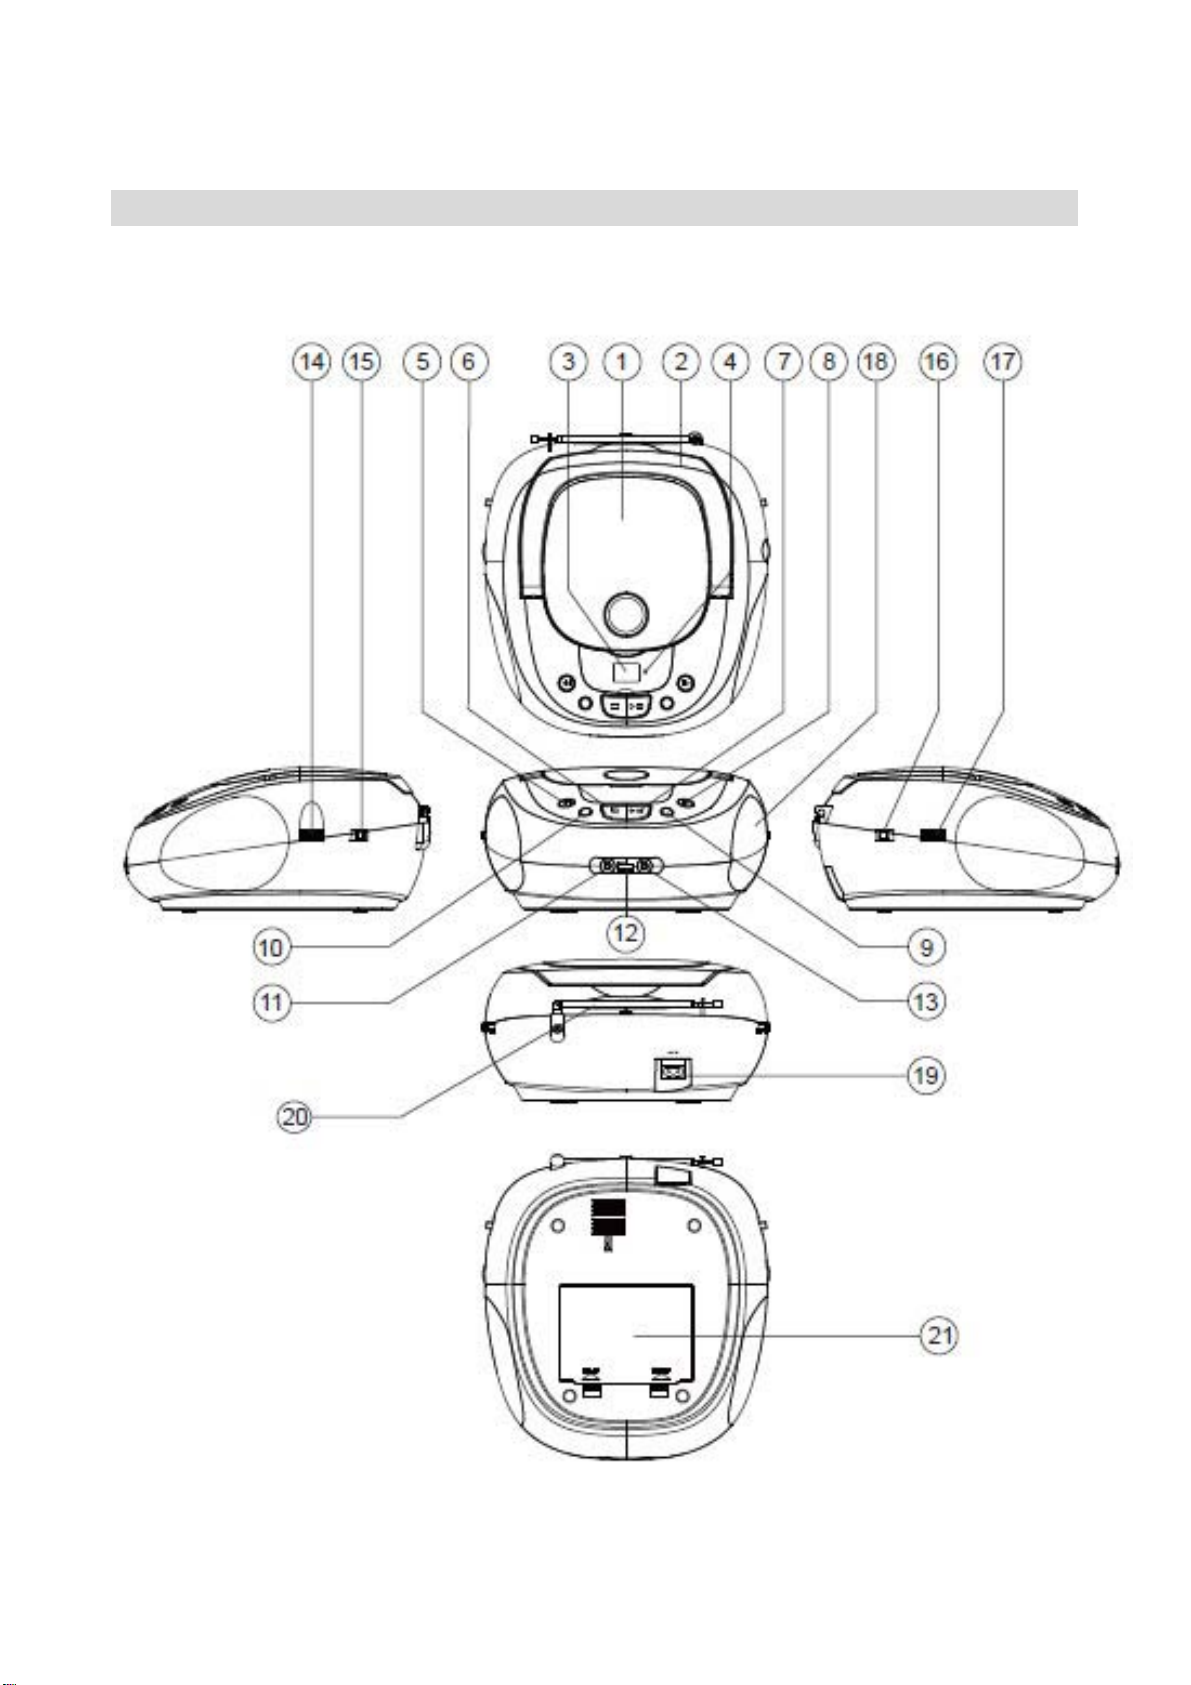
Naxa NPB-265 User manual

MODEL NPB-265
PORTABLE CD RADIO PLAYER WITH
MP3/USB/BLUETOOTH
PLEASE READ THIS USER MANUAL COMPLETELY BEFORE
OPERATING THIS UNIT AND RETAIN THIS BOOKLET FOR
FUTURE REFERENCE.

E-1
WARNING
TO PREVENT FIRE OR SHOCK HAZARD, DO NOT USE THIS PLUG WITH AN EXTENSION
CORD, RECEPTACLE OR OTHER OUTLET UNLESS THE BLADES CAN BE FULLY
INSERTED TO PREVENT BLADE EXPOSURE. TO PREVENT FIRE OR SHOCK HAZARD, DO
NOT EXPOSE THIS APPLIANCE TO RAIN OR MOISTURE.
The Caution Marking is located at the bottom enclosure of the apparatus.
IMPORTANT SAFETY INSTRUCTIONS
1. Read these instructions.
2. Keep these instructions.
3. Heed all warnings.
4. Follow all instructions.
5. Do not use this apparatus near water.
6. Cleaning-Unplug this product from the wall outlet before cleaning. Do not use liquid cleaners
or aerosol cleaners. Clean only with dry cloth.
7. Do not block any ventilation openings. Install in accordance with the manufacturer’s
instructions.
8. Do not place this product on an unstable cart, stand, tripod, bracket, or
table. The product may fall, causing serious injury to a child or adult
and serious damage to the product. Use only with a cart, stand, tripod,
bracket, or table recommended by the manufacturer, or sold with the
product. Any mounting of the product should follow the manufacturer’s
instructions, and should use a mounting accessory recommended by
the manufacturer. A product and cart combination should be moved with care-quick stops,
excessive force and uneven surfaces may cause the product and cart combination to
overturn.
9. Do not install near any heat sources such as radiators, heat registers, stoves, or other
apparatus (including amplifiers) that product heat.
10. Do not defeat the safety purpose of the polarized or grounding-type plug. A polarized plug
has two blades with one wider than the other. A grounding type plug has two blades and a
third grounding prong. The wide blade or the third prong is provided for your safety. If the
provided plug does not fit into your outlet, consult an electrician for replacement of the
obsolete outlet.

E-2
11. Protect the power cord from being walked on or pinched particularly at plugs, convenience
receptacles, and the point where they exit from the apparatus.
12. Only use attachments/accessories specified by the manufacturer.
13. Unplug this apparatus during lightning storms or when unused for a long periods of time.
14. Refer all servicing to qualified service personnel. Servicing is required when the apparatus
has been damaged in any way, such as power-supply cord or plug is damaged, liquid has
been spilled or objects have fallen into the apparatus, the apparatus has been exposed to
rain or moisture, does not operate normally, or has been dropped.
15. This appliance shall not be exposed to dripping or splashing water and that no object filled
with liquids such as vases shall be placed on the apparatus.
16. Do not overload wall outlet. Use only power source as indicated.
17. Use replacement part as specified by the manufacturer.
18. The product may be mounted to a wall only if recommended by the manufacturer.
19. Upon completion of any service or repairs to this product, ask the service technician to
perform safety checks.
20. Power Sources - This product should be operated only from the type of power source
indicated on the marking label. If you are not sure of the type of power supply to your home,
consult your product dealer or local power company. For products intended to operate from
battery power, or other sources, refer to the operating instruction.
21. Object and Liquid Entry - Never push objects of any kind into this product through openings
as they may touch dangerous voltage points or short-out parts that could result in a fire or
electric shock. Never spill liquid of any kind on the product.
22. Damage Requiring Service - Unplug this product from the wall outlet and refer servicing to
qualified service personnel under the following conditions:
a) When the power-supply cord or plug is damaged,
b) If liquid has been spilled, or objects have fallen into the product,
c) If the product has been exposed to rain or water,
d) If the product does not operate normally by following the operating instructions. Adjust
only those controls that are covered by the operating instructions as an improper
adjustment of other controls may result in damage and will often require extensive work
by a qualified technician to restore the product to its normal operation.
e) If the product has been dropped or damaged in any way, and
f) When the product exhibits a distinct change in performance - this indicates a need for
service.
23. The mains plug of apparatus should not be obstructed OR should be easily accessed during
intended use.
24. Battery shall not be exposed to excessive heat such as sunshine, fire or the like.
25. Warning: 1)Caution Marking and rating plate was located at bottom enclosure of the
apparatus.( French:Les précautions d'emploi sont inscrites en bas de l'appareil.)
2) Warning: To reduce the risk of fire or electric shock, do not expose this apparatus to rain
or moisture.(French:Avertissement: pour réduire le risque d’incendie ou de choc électrique,
ne pas exposer cet appareil sous la pluie et l’humidité)
3) The mains plug is used as disconnect device. The mains plug of apparatus should not be
obstructed OR should be easily accessed during intended use. To be completely disconnect
the power input, the mains plug of apparatus shall be disconnected from the
mains.(French:La prise du secteur est utilisé pour déconnecter le système. La prise du
secteur ne doit pas être obstruée ou doit être facilement accessible pendant
sonutilisation.Pour être complètement déconnecté de l’alimentation d’entrée, la prise doit être
débranchée du secteur.)
4) Battery shall not be exposed to excessive heat such as sunshine, fire or the
like.(French:Les piles ne doivent pas être exposées à de forte chaleur, tel qu'à la lumière du
soleil, au feu ou autres choses de semblable.)
5)The apparatus shall not be exposed to dripping or splashing and that no objects filled with
liquids, such as vases, shall be placed on apparatus.(French: L'appareil ne doit pas être
exposé aux écoulements ou aux éclaboussures et aucun objet ne contenant de liquide, tel
qu'un vase, ne doit être placé sur l'objet.)

E-3
26. This device complies with Part 15 of the FCC Rules
Operation is subject to the following two conditions: (1) this device may not cause harmful
interference, and (2) this device must accept any interference received, including
interference that may cause undesired operation.
THE MANUFACTURER IS NOT RESPONSIBLE FOR ANY RADIO OR TV INTERFERENCE
CAUSED BY UNAUTHORIZED MODIFICATIONS OR CHANGE TO THIS EQUIPMENT.
SUCH MODIFICATIONS OR CHANGE COULD VOID THE USER’S AUTHORITY TO
OPERATE THE EQUIPMENT.
CAUTION
Follow the advice below for safe operations.
ON PROTECTION AGAINST LASER ENERGY EXPOSURE
•As the laser beam used in this compact disc player is harmful to the eyes, do not attempt to
disassemble the casing.
•Stop operation immediately if any liquid or solid object should fall into the cabinet.
•Do not touch the lens or poke at it. If you do, you may damage the lens and the player may not
operate properly.
•Do not put anything in the safety slot. If you do, the laser diode will be ON when the CD door is
still open.
•If the unit is not to be used for a long period of time, make sure that all power sources are
disconnected from the unit. Remove all batteries from the battery compartment.
•This unit employs a laser. The use of controls or adjustment or performance of procedures
other than those specified here may result in exposure to hazardous radiation.
Should any trouble occur, remove the power source and refer servicing to qualified personnel.

E-4
LOCATION OF CONTROLS

E-5
1. CD Door 12. USB Slot
2. Handle 13. AUX IN Jack
3. LCD Display 14. Tuning Control
4. FM Station Indicator 15. Band Selector (AM/FM/FM Stereo)
5. Skip/Search Backward Button 16. Function Switch
(CD/MP3/USB/BT./Off/Radio)
6. Stop/Pair Button 17. Volume Control
7. Function /Play/Pause Button 18. Speakers
8. Skip/Search Forward Button 19. AC Power Jack
9. Repeat (REP) Button 20. Telescopic Antenna
10. PROG/+10 Button 21. Battery Compartment Door
11. Phone Jack
IMPORTANT NOTES
Avoid installing the unit in locations described below:
•Places exposed to direct sunlight or close to heat radiating appliances such as electric heaters.
•Dusty places.
•Places subject to constant vibration.
•Humid or moist places.
POWER SOURCES
This unit operates on 120V~ 60Hz or 6 x DC1.5V “C” size batteries. Do not attempt to operate the radio on
any other power source. You could cause damage to the unit and void your warranty.
Please be sure the power outlet you plug this unit into is working and receives constant (unswitched) power.
AC OPERATION
1. When the AC power cord (included) is connected to the AC Power Socket on the back of the unit and the
other end is plugged into a 120V AC~ 60Hz wall outlet, the unit will disconnect the batteries automatically,
and operate on AC Power only.
2. Slide the FUNCTION SWITCH to “CD” for CD play, “FM” or “FM ST.” for FM radio, “AM” for AM radio
and “OFF” for unit power off.
BATTERY OPERATION
1. Remove the BATTERY DOOR.
2. Install 6 x DC1.5V “C” size batteries (not included) according to the polarity diagram inside the battery
compartment.
3. Close the BATTERY DOOR.
IMPORTANT: Be sure that the batteries are installed correctly.
Wrong polarity may damage the unit and void the warranty.
For best performance and longer operating time, we recommend the use of good quality
alkaline-type batteries.
CAUTION
1. Do not mix old and new batteries.
2. Do not mix alkaline, standard (carbon-zinc) or rechargeable (nickel-cadmium) batteries.
3. If the unit is not to be used for an extended period of time, remove the battery. Old or leaking battery can
cause damage to the unit and may void the warranty.
4. Do not dispose of batteries in fire, batteries may explode or leak.

E-6
BATTERY REPLACEMENT
When the output sound of this unit becomes distorted or the CD player operation appears unstable, the
batteries are weak. You need to replace all the exhausted batteries at the same time as soon as possible to
avoid battery leakage.
RADIO OPERATION
1. Slide the FUNCTION SWITCH (#16) to “RADIO”.
2. Select your desired radio band using the BAND SELECTOR (#15) for AM/FM or FM Stereo.
3. Rotate the TUNING CONTROL (#14) to your desired radio station according to the DIAL SCALE on the
unit.
4. Rotate the VOLUME CONTROL (#17) to adjust to the desired output level.
5. To turn off the radio, slide the FUNCTION SWITCH (#16) to “OFF”.
TIPS FOR BEST RECEPTION
AM – The AM antenna is located inside the cabinet of the unit. If AM reception is weak, change the position
of unit until the internal antenna picks up the strongest signal.
FM – If a stereo broadcast program is being received, the FM STEREO INDCATOR will light. During FM or
FM Stereo reception, always keep the FM TELESCOPIC ANTENNA fully extended for best
performance. However, if FM reception is weak, try repositioning the unit near an open window until
you get the best reception.
CD OPERATION
NOTE: THIS UNIT NOT ONLY PLAYS COMMERCIAL COMPACT DISCS BUT ALSO SELF-COMPLIED
CD-RW DISCS.
•Because of non-standardized format definition/production of CD-R/RW, playback quality &
performance is not guaranteed.
•Manufacturer is not responsible for the playability of CD-R/RW due to recording conditions such as
PC performance, writing software, media properties etc.
•Do not attach a label or seal to either side of the CD-R/RW disc. It may cause a malfunction.
PLAY MODE
1. Slide the FUNCTION SWITCH (#16) to the “CD” position.
2. Open the CD DOOR (#1), load a CD with the label side facing upward and then close the CD door.
3. Disc information (total number of tracks) will appear on the LCD DISPLAY.
4. Press PLAY/PAUSE BUTTON (#7) to start playing the CD, the display will show the TRACK No. .
5. While playing, press the PLAY/PAUSE BUTTON (#7) to pause, the TRACK No. will flash. Press
PLAY/PAUSE BUTTON (#7) again to resume playing.
6. Adjust the VOLUME CONTROL (#17) to the desired volume level.
7. Press STOP BUTTON (#6) to stop playing.
8. To turn off the CD player, slide the FUNCTION SWITCH (#16) to “OFF”.
NOTE: If skipping occurs during CD play, try turning the volume down.
Do not open the CD DOOR when a CD is playing.
REPEAT MODE
Repeat 1
When the REPEAT BUTTON (#9) is pressed once, the symbol will occur in the CD Track
Display. The current track will be repeated until it is interrupted.
Repeat All
When the REPEAT BUTTON (#9) is pressed twice, the symbol will occur in the CD Track
Display. The whole disc will be played continuously.
Repeat TRACKS FILE (When the unit plays the mp3 disc)
When the REPEAT BUTTON (#9) is pressed three times, the symbol in the CD Track
Display will occur. The whole file will be played repeated.
RANDOM MODE
Press the repeat button (#9) one more; the unit will enter to the random mode, the word “RAND” will show in
the display.
To Cancel Repeat Function: Press the REPEAT BUTTON (#9) until the repeat indicator is off.

E-7
SKIP AND SEARCH MODE
1. During Play or Pause mode, tap the SKIP FORWARD "" (#8) or SKIP BACKWARD "" BUTTON (#9)
to go to the next track or go back to the beginning of the current track.
2. During play mode or Pause mode, press and hold the SEARCH FORWARD "" (#8) or SEARCH
BACKWARD "" BUTTON (#9) to search within the current track with audible high speed playback.
MP3 PLAYER OPERATION
1. PLAY / PAUSE
Press the PLAY / PAUSE button (#7) once to play an MP3 and double click the same button to suspend it.
2. You can select to play your favorite track directly if you press Skip+/Skip- to move forward or backward.
The LCD display will show the selected track number.
3. To repeat playback of a particular track, press REPEAT (#9) once.
4. To repeat the entire CD playback, press REPEAT twice.
5. To repeat the whole tracks file, press REPEAT three times.
6. Press the REPEAT again; the unit will turn into the random mode to play the tracks randomly.
7. To stop playback, press the STOP button (#6).
CONNECTING A USB DEVICE
Insert a USB key inside the connector.
In CD mode, Press the CD FUNCTON button (#7) to switch to CD / USB playback.
1. Press the CD FUNCTON button once (for one second) changing to USB function
2. Press Stop button to cancel the CD and USB playing.
Remark: Depending on the capacity of the device, the reading can take more than 1 minute.
This USB port can not communication with PC.
The unit cannot read my USB device.
1. Once you have plugged your device to the unit, you may need to switch on the USB device before it can
operate.
2. This unit does not support a direct USB connection with a computer. You need to use a USB device, or a
MP3 player.
3. If you are using a USB external hard disk: you need to connect your device simultaneously to an external
power source and to the unit. If you are using a self-powered PMP, make sure that the battery is sufficiently
loaded.
4. Check that the files system of your USB device is formatted into the FAT or FAT 32 format. USB device
formatted into NTFS are not compatible with this unit. Caution: if you attempt to modify your file system,
formatting your device will erase all data. Please refer to your USB device’s instruction manual first.
PROGRAM PLAY MODE
This function allows music tracks to be played in a programmed sequence.
NOTE: Program can only be set in STOP mode.
1. Under CD stop condition, press the PROG/+10. Button (#10). The CD Track Display will display “01” and
character “PROG.” will blink.
2. Press the CD REW Skip Button (#5) or CD FWD Skip (#8) Button to select the song to be programmed.
3. Press the PROG/+10 Button again to store selection. The CD Track Display will advance to “02”.
4. Press the CD REW Skip Button (#5) or CD FWD Skip Button (#8) to select the next song to be
programmed
and press the PROG/+10 Button to store selection.
5. You may repeat steps #2 - #3
to program as many as 20 tracks. If you attempt to program more than 20
tracks, the CD Track Display will revert to “FUL”.
6. Press CD PLAY/PAUSE Button (#7) to begin programmed play. The first track in program will appear in
the CD Track Display (#3). Press the CD REW Skip Button (#5) or CD FWD Skip Button (#8) to show all
the programmed songs.
7. To cancel programmed play, press the CD STOP Button (#6).
8. As long as the unit remains on and the CD Door (#1) is not opened, you can resume programmed play
any time by pressing the PROG/+10 Button (#10) and then CD PLAY/PAUSE Button (#7) in stop condition.
10. Under CD playing condition, press the +10 button, the track will skip forward to 10 tracks. For example:
If the current track is 001, press the button will jump to the 011.

E-8
USING BLUETOOTH PAIRING YOUR DEVICE
Using Bluetooth Pairing Your Device
Pairing with Your Mobile Phone
You Bluetooth Player are connected to mobile phones using a procedure by following a few simple steps; a
mobile phone can be paired with Bluetooth Player in a matter of seconds.
Setup your Bluetooth Player on BLUETOOTH mode.
Slide the FUNCTION SWITCH (#16) to the “BT” position and then the word “BT” will flash slowly in the LCD
display.
Set your phone to “discover” the your unit
1. Make sure that Bluetooth is activated on your mobile phone.
2. Set your phone to discover your Bluetooth Player
3. Your phone will find the Bluetooth Player under name “NPB-265”.
4. Press the PAIR button(#6), the character “BT” will flash fast to indicate the device is under pairing
5. Once pairing is complete, the character “BT” will stop blink and become stable
6. Press skip +/- to skip up/back the audio files from your phone.
7. Use the VOLUME +/- to adjust volume.
After all above setting, music of mobile phone will sound through the Bluetooth.
AUX IN OPERATION
This CD features an aux line-in jack for connecting your iPod, MP3 player or other digital music player.
1. Connect the headphone jack of your external device to the AUX IN jack (#13) located on the left side of
front cabinet (The connection cable is not included).
2. Turn on the CD player and it will enter the AUX function mode once an external device is plugged into
the AUX IN jack.
3. Start to play your iPod, MP3 player or other external audio device.
4. Slowly adjust both volume controls on your CD player and the external device.
5. Turn off your iPod, MP3 player and etc. when finish listening. Turn the CD player off and unplug the AUX
IN jack.
Remark: Once the AUX IN jack is plugged, the CD player will automatically enter the AUX mode no matter
the Function Selector is in CD or Radio mode. Remember to disconnect the cable from the CD player after
use in order to be able to listen to the radio or CD player again.
HEADPHONE OPERATION
USING HEADPHONES (NOT INCLUDED)
Inserting the plug of your headphones (#11) into the Phone Jack will enable you to listen to the CD and
Radio in private. When using headphones, the Speakers will be disconnected.
SPECIFICATIONS
Frequency Range: AM 530 - 1710 kHz
FM 87.5 - 108 MHz
Power Sources: 120V~ 60Hz 12W or
6 x DC1.5V ‘C’ size Batteries (Not included)
CARE AND MAINTENANCE
1. Children should be supervised when using this appliance.
2. Never wrap the earphone lead around any animal or person. Special care should be taken with long
wires.
3. Clean your unit with a damp (never wet) cloth. Solvent or detergent should never be used.
4. Avoid leaving your unit in direct sunlight or in hot, humid or dusty places.
5. Keep your unit away from heating appliances and sources of electrical noise such as fluorescent lamps
or motors.
6. If drop-outs or interruptions occur in the music during CD play, or if the CD
fails to play at all, its bottom surface may require cleaning. Before playing,
wipe the disc from the center outwards with a good soft cleaning cloth.

E-9
TROUBLESHOOTING GUIDE
Symptom Possible Cause Solution
Noise or sound distorted
on AM or FM broadcast - Station not tuned properly for AM or
FM.
- FM: FM telescopic antenna is not
extended.
- AM: The bar antenna is not positioned
correctly
- Retune the AM or FM broadcast
station.
- FM: Extend FM telescopic antenna.
- AM: Reposition the unit until the best
reception is obtained.
AM or FM no sound - Unit not in “RADIO” function mode.
- Volume set at minimum
- Slide Function Switch to “RADIO”
position.
- Increase Volume.
CD player will not play - Unit not in CD function mode.
- CD is not loaded properly.
- If the CD is self-compiled, the media
used may not be compatible with the
player.
- Select CD function mode.
- Load CD with label side up.
- Use better quality blank media and
retest.
CD skips while playing - Disc is dirty or scratched. - Wipe CD with clean cloth or use
another disc.
Intermittent sound from
CD player - Dirty or defective disc
- Dirty pick up lens
- Player is subject to excessive shock
or vibration
- Clean or replace the defective disc.
- Use a CD lens cleaning disc to clean
the lens.
- Relocate the player away from
shock or vibration.
Sound appears
distorted at high volume
setting
- Volume control is set to maximum. - Adjust Volume Control to a lower
comfortable level.
- Turn off DBBS function for very loud
music.
FCC NOTE:
This device complies with Part 15 of the FCC Rules. Operation is subject to the following
two conditions: (1) this device may not cause harmful interference, and (2) this device
must accept any interference received, including interference that may cause undesired
operation.
THE MANUFACTURER IS NOT RESPONSIBLE FOR ANY RADIO OR TV
INTERFERENCE CAUSED BY UNAUTHORIZED MODIFICATIONS OR CHANGE TO
THIS EQUIPMENT. SUCH MODIFICATIONS OR CHANGE COULD VOID THE USER’S
AUTHORITY TO OPERATE THE EQUIPMENT.
Table of contents
Other Naxa CD Player manuals