Naxa NI-3103A User manual

THE NEW GENERATION IN TECHNOLOGY
NI-3103A
Alarm Clock w/FM Radio
iPod® & iPhone®Docking
Operating Instructions

2
Table of Contents
Important Safeguards..............................................................................3
Parts..................................................................................................6
Controls..............................................................................................6
To Set Up ............................................................................................7
iPod/iPhone Installation and Use ................................................................8
Clock and Alarm ....................................................................................9
Radio ............................................................................................... 10
Other Options ..................................................................................... 11
Care and Maintenance........................................................................... 12
Troubleshooting …………………………………………………………………………………………………………… 12

3
IMPORTANT SAFEGUARDS
Signal Word Definitions
DANGER – Indicates an imminently hazardous situation, which, if not avoided, will
result in death or serious injury. Usage of this signal word is limited to the most
extreme situations.
WARNING – Indicates a potentially hazardous situation, which, if not avoided, could
result in death or serious injury.
CAUTION – Indicates a potentially hazardous situation, which, if not avoided, may
result in minor/moderate injury or product/property damage. It also alerts against
unsafe practices.
READ ALL INSTRUCTIONS BEFORE USE.
Always follow basic safety precautions when using electrical products, especially
when children are present.
!!
WARNING-- To reduce the risk of fire, electric shock, or serious personal
injury:

4
•Keep the product out of the reach of children and pets. This product is not
intended for use by children. Extra caution is necessary when using any electrical
product near children.
•Always ensure the product is unplugged from the electrical outlet before
relocating or cleaning it.
•Keep the power cord and product away from heated surfaces.
•Do not use the product near water or other liquids.
•Do not place or drop the product into water or other liquids. If the product falls
into water, immediately unplug it from the electrical outlet; do not touch or reach
into the water.
•To disconnect the product, pull directly on the plug; do not pull on the power
cord.
•Do not put any stress on the power cord where it connects to the product as the
power cord could fray and break.
•Do not plug/unplug the product into/from the electrical outlet with a wet hand.
•Do not operate the product if it has a damaged or cut power cord or adapter, if
wires are exposed, if it malfunctions, if it is dropped or damaged, or if it is
dropped in or exposed to water. This product has no user-serviceable parts. Do
not attempt to examine or repair this product yourself. Only qualified service
personnel should perform any servicing; take the product to the electronics repair
shop of your choice for inspection and repair.
!!
CAUTION-- To reduce the risk of personal injury or product/property
damage:
•This product is intended for indoor, non-industrial, non-commercial use; do not
use the product outdoors.
•Do not wall or ceiling mount this product.
Battery Handling and Usage:
WARNING: Only adults should handle batteries. Do not allow a child to use this
product unless the Battery Compartment Cover is securely attached to the Battery
Compartment in accordance with all product usage instructions.
•Follow the battery manufacturer’s safety and usage instructions.
•Keep batteries away from children and pets.
•Do not mix a new and a used battery or mix batteries of different chemistries or
sizes.
•Insert the batteries observing the proper polarity (+/−) as indicated inside the
battery compartment. Failure to properly align the battery polarity can cause
personal injury and/or property damage.
•Remove spent or discharged batteries from the product.

5
•Remove the batteries when not using the product for an extended period.
•Never throw batteries into a fire. Do not expose batteries to fire or other heat
sources.
•Dispose or recycle spent/discharged batteries in compliance with all applicable
laws. For detailed information, contact your local solid waste authority.
IMPORTANT INFORMATION REQUIRED BY THE FCC
This device complies with Part 15 of the FCC Rules. Operation is subject to the
following two conditions: (1) this device may not cause harmful interference; and (2)
this device must accept any interference received, including interference that may
cause undesirable operation.
NOTE: This equipment has been tested and found to comply with the limits for a
Class B digital device, pursuant to Part 15 of the FCC Rules. These limits are designed
to provide reasonable protection against harmful interference in a residential
installation. This equipment generates, uses, and can radiate radio frequency energy
and, if not installed and used in accordance with instructions, may cause harmful
interference to radio elevation reception, which can be determined by turning the
equipment off and on. Try to correct the interference by using one or more of the
following measures:
•Reorient or relocate the receiving antenna.
•Increase the separation between the equipment and receiver.
•Connect the equipment into an outlet on a circuit different from that to which the
receiver is connected.
•Consult the dealer or an experienced radio/TV technician for help.
SAVE THESE INSTRUCTIONS FOR FUTURE REFERENCE

6
Parts
•Remote Control
•AC Power Adapter
•Dock Inserts:
iPod
iPod Video
iPod Photo
20 GB
30 GB
20 & 30 GB
40 GB
60 GB
40 & 60 GB
Mini
Nano
Controls
Top of Unit:
1. Volume Button
2. Previous Preset Button
3. iPhone Play Button
4. Snooze Button
5. Alarm2 Set Button
6. LCD Display
7. Function Button
8. Power Button
9. Menu Mono Button
10. Frequency Search Button
11. iPod/iPhone Dock
12. Next Preset Button

7
Back of Unit:
13. AC Adapter Jack
14. Auxiliary Input Jack
15. Alarm Set Button
16. Time/Preset Memory Button
17. Select Button
18. Battery Compartment
Remote Control:
1. LED Indicator
2. POWER Button
3. iPod/iPhone Play Button
4. Tune+/Skip+ Button
5. M+/Up Button
6. Select Button
7. Alarm 2 Button
8. Volume Up Button
9. Sleep/Snooze Button
10.Time / Preset Memory Button
11.Volume Down Button
12.Alarm 1 Button
13.Menu/Mono Button
14.M-/DN Button
15.Tune-/Skip- Button
16.Function Button
17.Battery Compartment
To Set Up
Battery Installation:
Clock/Radio

8
NOTE: Batteries may be installed as a backup to maintain timekeeping if AC power is
interrupted. The Time will not be displayed but will reappear when AC power is
restored.
1. Remove the Battery Compartment Cover by pushing the tab in the direction of the
arrow.
2. Insert three "AA" alkaline batteries (not included), observing the proper polarity
(+/−) as indicated inside the Battery Compartment, and then replace the Cover.
Remote Control
1. Remove the Battery Compartment Cover by sliding it in the direction of the arrow.
2. Insert two "AAA" alkaline batteries (not included), observing the proper polarity as
marked inside the Compartment, and then replace the Cover.
Power Adapter:
Insert the small end of the AC Adapter into the Jack in the back of the unit and plug
the other end into a standard 240-volt AC electrical outlet.
iPod/iPhone Installation and Use
Installing the iPod/iPhone into the Unit:
1. Remove the Dock Cover by pulling it up.
2. Connect the iPod/iPhone to the dock.
3. To remove the iPod/iPhone, simply lift the
iPhone up.
Using the iPod/iPhone with the Unit:
1. Press the Power Button on the unit, and
then press the Function Button repeatedly
until "iPod/iPhone" is displayed.
2. Using the iPod/iPhone Controls or the
Remote Control (see the “Remote Control”
subsection), browse for a song.
3. Use the unit Controls as follows:
Function
Action
Play/Pause a song
Press the PLAY Button.
Adjust the volume
Press the VOL+ or VOL- side of the
VOLUME Button.
Skip to the next song
Press the TUNE+/SKIP+ side of the
SEARCH Button.
Restart a song or skip to the
Press the TUNE-/SKIP- side of the

9
previous song
SEARCH Button once to restart a
song or twice to skip to the previous
song.
Turn off the device
Press the POWER Button.
Fast-forward or rewind a song
Press and hold the TUNE+/SKIP+ or
TUNE-/SKIP- side of the SEARCH
Button to fast-forward or rewind,
respectively.
Charging the iPod/iPhone in the Unit:
The unit will recharge the iPod while docked.
NOTE: The unit will not charge an iPod Shuffle or any other audio device.
Clock and Alarm
Setting the Time:
1. In StandBy mode, with the Time displayed, press the TIME/MEM Button for 2
seconds until the hour number blinks, then press again the TIME/MEM Button on
the back of the unit repeatedly to select the value to be changed. After that,
press the "+" or "-" side of the TUNING Button repeatedly to increase/decrease the
value one by one, or hold the Button to rapidly increase/decrease the value.
NOTE: If the Time is not displayed, press the POWER Button to turn off the
function in use.
2. Press the TIME/MEM Button again to return to the normal display.
NOTE: The normal display will return after two seconds of inactivity.
Setting and Using the Alarm:
1. In Standby mode, with the Time displayed, press the Alarm Control Button to
activate the Alarm Function. "ALARM" display indicates the Alarm1 is activated.
“ALARM2” display indicates the Alarm2 is activated
NOTE: If the Time is not displayed, press the POWER Button to turn off the
function in use.
2. Press either the ALARM SET or the ALARM2 SET button for two seconds to enter
Alarm Control mode. Press either the Alarm Set or the Alarm 2 Set button Control
Button repeatedly to change the time and also select "BUZZER," "TUNER," or "iPod"
as the Alarm sound. The text display indicates the selection.
3. Press and hold the Alarm Control Button for 2 seconds, and then press the Alarm
Control Button again to select the value to be changed.
4. Press the "+" or "-" side of the TUNING Button repeatedly to increase/decrease the
value one by on, or hold the Button to rapidly increase/decrease the value.
5. Press the Alarm Control Button again to return to the normal display.
NOTE: The normal display will return after two seconds of inactivity.

10
6. To turn the Alarm off when it sounds, press the Alarm Control Button.
Snooze Function:
When the Alarm sounds, press the SNOOZE Button, which will turn off the Alarm and
sound it again after nine minutes. The Snooze icon "ZzZ" will display indicating the
function is on.
Sleep Function:
1. To activate the Sleep Function, press the POWER Button to turn on the Radio, and
then press the SLEEP/SNOOZE Button repeatedly to set the duration in 10-minute
intervals up to 90 minutes. "SLEEP" will display indicating the function is on.
2. The function will turn off when time has elapsed, or it can be manually turned off
by pressing the POWER Button.
Radio
1. To turn on the Radio, press the Power Button and then press the Function Button
repeatedly until a radio station displays.
2. Press the Band Button to select AM or FM.
3. Extend the wire Antenna until a clear signal is received.
4. Adjust the volume by pressing the VOL+ or VOL- side of the Volume Button
repeatedly to slowly increase/decrease the volume, or hold the Button to rapidly
increase/decrease the volume.
5. Press the SEARCH+ or SEARCH- side of the TUNING Button repeatedly to manually
select a frequency, or hold and release after three seconds to scan for the next
receivable radio station. If frequencies have been preset, press the PRESET+ or
PRESET- Button repeatedly to select one of the preset frequencies (see the
"Presetting Radio Frequencies" subsection).
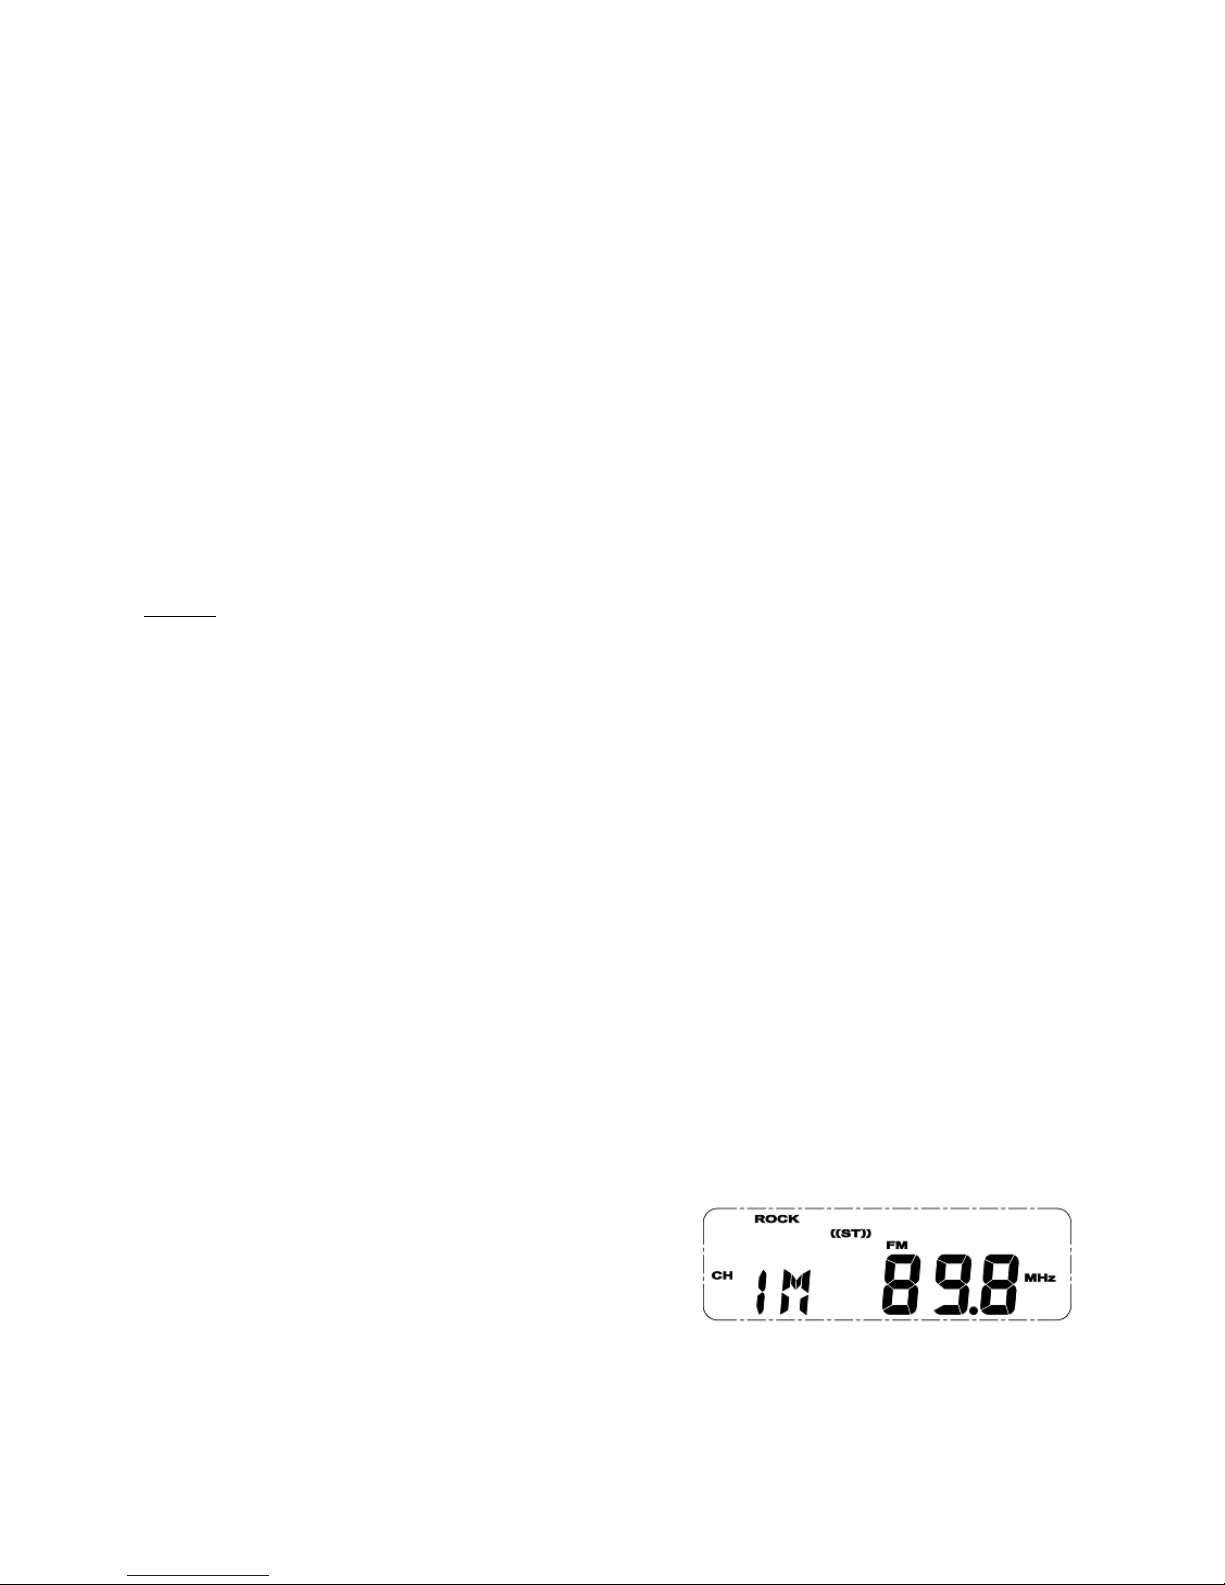
NOTE: "ST" will display indicating that the frequency selected is broadcasting in
stereo.
6. To turn off the Radio, press the Power Button.
Presetting Radio Frequencies:
1. With the Radio on, select the Frequency to be stored (see the "Radio" subsection).
2. Press the TIME/MEM Button, and then press
the SEARCH+ or SEARCH– side of the TUNING
Button to select the Preset Channel number
(CH) from 1 to 9.
3. Press the TIME/MEM Button to save the frequency.
NOTE: A stored frequency can only be erased by replacing it with another frequency.

11
Remarks: When you listen to the AM frequency radio, please remove the iPod/iPhone
from the unit in order to avoid any interference of the AM reception.
Other Options
Remote Control:
Use the Remote Control Buttons in the same manner as the Buttons on the unit.
Equalizer:
When using the Radio, iPod/iPhone, or Auxiliary
functions, the Equalizer can be adjusted by
pressing the EQ Button on the back of the unit to
select "POP," "ROCK," "JAZZ," "CLASSIC," or no
selection. The text will display indicating the selection, except if none is selected.
Using a Non-Docking iPod or Other Audio Device:
1. Connect the audio device to the AUX-IN Jack on the back of the unit using a
stereo audio cable (not included).
2. Press the POWER Button on the unit, and then press the Function Button
repeatedly until "AU" (Auxiliary) displays.
3. Turn on and play the audio device.
4. Adjust the volume using the Volume Button on the unit and on the device, if
necessary.
5. To turn off the audio device, press the POWER Button on the unit and then turn
off the device.
Headphone Jack:
To use headphones (not included) with this unit, ensure the volume is adjusted to a
low level, and then connect the headphones to the PHONES Jack on the back of the

12
unit. The unit’s speakers will deactivate.
WARNING: Avoid prolonged exposure to high sound levels, as this may cause
permanent hearing damage.
Care and Maintenance
Clean the product with a soft cloth; do not use liquids or abrasive chemicals or pads.
Troubleshooting
PROBLEM
PROBABLE CAUSE
RESOLUTION
No sound
•The volume is set too low.
•A headphone (or earphone is
plugged into the unit.
•The iPod is not inserted
properly.
•The iPod is paused or in the
Hold position.
•The IPod may need to be
reset.
•Increase the volume by pressing
the VOL+ side of the Volume
Button.
•Unplug the headphone (or
earphone).
•Remove and reinsert the
iPod/iPhone.
•Switch the iPod/iPhone from
the Pause or Hold position.
•Reset the iPod/iPhone as
instructed by the device
manufacturer’s instructions.
Distorted
sound
•The volume level is too high.
•The song file is distorted.
•Decrease the volume of the unit
or of the device.
•Skip to another song file.
Unit warm
after
lengthy
play.
•This is acceptable, especially
if the volume is at a high level.
•Lower the volume or turn off
the unit until cool.
No power
•The Insert is not securely
connected.
•The electrical outlet is not
operational.
•Ensure the Adapter is securely
connected to both the Jack and
to the electrical outlet.
•Ensure the unit is plugged into
an operating electrical outlet.
No power -
Remote
Control
•The transmitter on the front of
the Remote or the sensor on
the front of the unit is
blocked.
•Remove any material or dirt
from the transmitter or sensor.
•Replace the batteries as
instructed by the “Battery

13
•The battery power is low.
•The batteries are incorrectly
installed in the Battery
Compartment.
Installation” subsection.
•Verify that the battery
polarities are correct in the
Battery Compartment and
adjust if necessary.
iPod/iPhone
did not
charge
•The iPod/iPhone is not seated
properly in the Dock.
•The iPod/iPhone is not
operating properly.
•Remove and replace the
iPod/iPhone, ensuring the
Connector is unobstructed and
the correct Insert is installed.
•Refer to the iPod/iPhone
manufacturer’s instructions for
troubleshooting information.
Table of contents
Other Naxa Docking Station manuals