Naxa NKM-101 User manual
Portable Karaoke Party System with Bluetooth®
NKM-101
Instruction Manual
Please read carefully before use and keep for future reference.

Page 2 Naxa Electronics
Table of Contents
Thank You ..................................................................... 3
In the Box ...................................................................... 3
At a Glance .................................................................... 4
Remote Control............................................................................ 10
Using the Remote Control...................................................12
Installing or Replacing Batteries........................................12
Getting Started............................................................13
Connecting Power.........................................................................13
Using AC Power......................................................................13
Using the Battery..................................................................13
Using DC Power .................................................................... 14
Connecting the Microphones..................................................... 14
Connecting to a TV....................................................................... 14
Turning the Unit On and Off........................................................16
Adjusting the Volume...................................................................16
Turning the Display On and Off ..................................................16
Turning the Lights On and Off.....................................................16
DISC/USB Mode............................................................ 17
About Optical Discs and USB Drives..........................................17
Optical Discs ..........................................................................17
USB Flash Drives ..................................................................17
Loading a Disc or USB Drive ........................................................18
Optical Discs ..........................................................................18
USB Flash Drives ...................................................................18
Playback Controls.........................................................................19
DVD 19
CD and MP3...........................................................................20
Photos 21
Programming Tracks .................................................................. 22
Programming DVD Tracks................................................... 22
Programming CD and MP3 Tracks..................................... 22
Bluetooth®Mode........................................................ 23
Pairing/Connecting a Bluetooth Device................................... 23
Playing Audio Wirelessly From a Bluetooth Device ...................
Warnings and Precautions......................................... 26
Troubleshooting ......................................................... 30
Specications ..............................................................31
Support ....................................................................... 32

www.naxa.com Page 3
Thank You
We know you have many choices when it comes to
technology; thank you for choosing us here at Naxa
Electronics. Established in 2001 in Los Angeles, Califor-
nia, we are dedicated to delivering products that en-
tertain and delight.
We trust that you will be happy with your purchase.
Please read this manual carefully and save it for refer-
ence. You may also nd the latest FAQ, documentation,
and other product material at our website. Come visit
us on the web at www.naxa.com and see all that we
have to offer!
In the Box
Please take a moment to make sure that you have ev-
erything in the list below. Although we make every ef-
fort to ensure that each Naxa device is securely packed
and sealed, we know a lot can happen in between us
and you. If anything is missing, check back with your
local retailer to get immediate assistance. If they can-
not help you, please contact our Naxa Support team at
www.naxa.com/supportcenter.
•NKM-101
•Two (2) microphones
•Two (2) microphone cables
•A/V cable
•AC power cord
•Instruction Manual
•Warranty Card
Page 4 Naxa Electronics
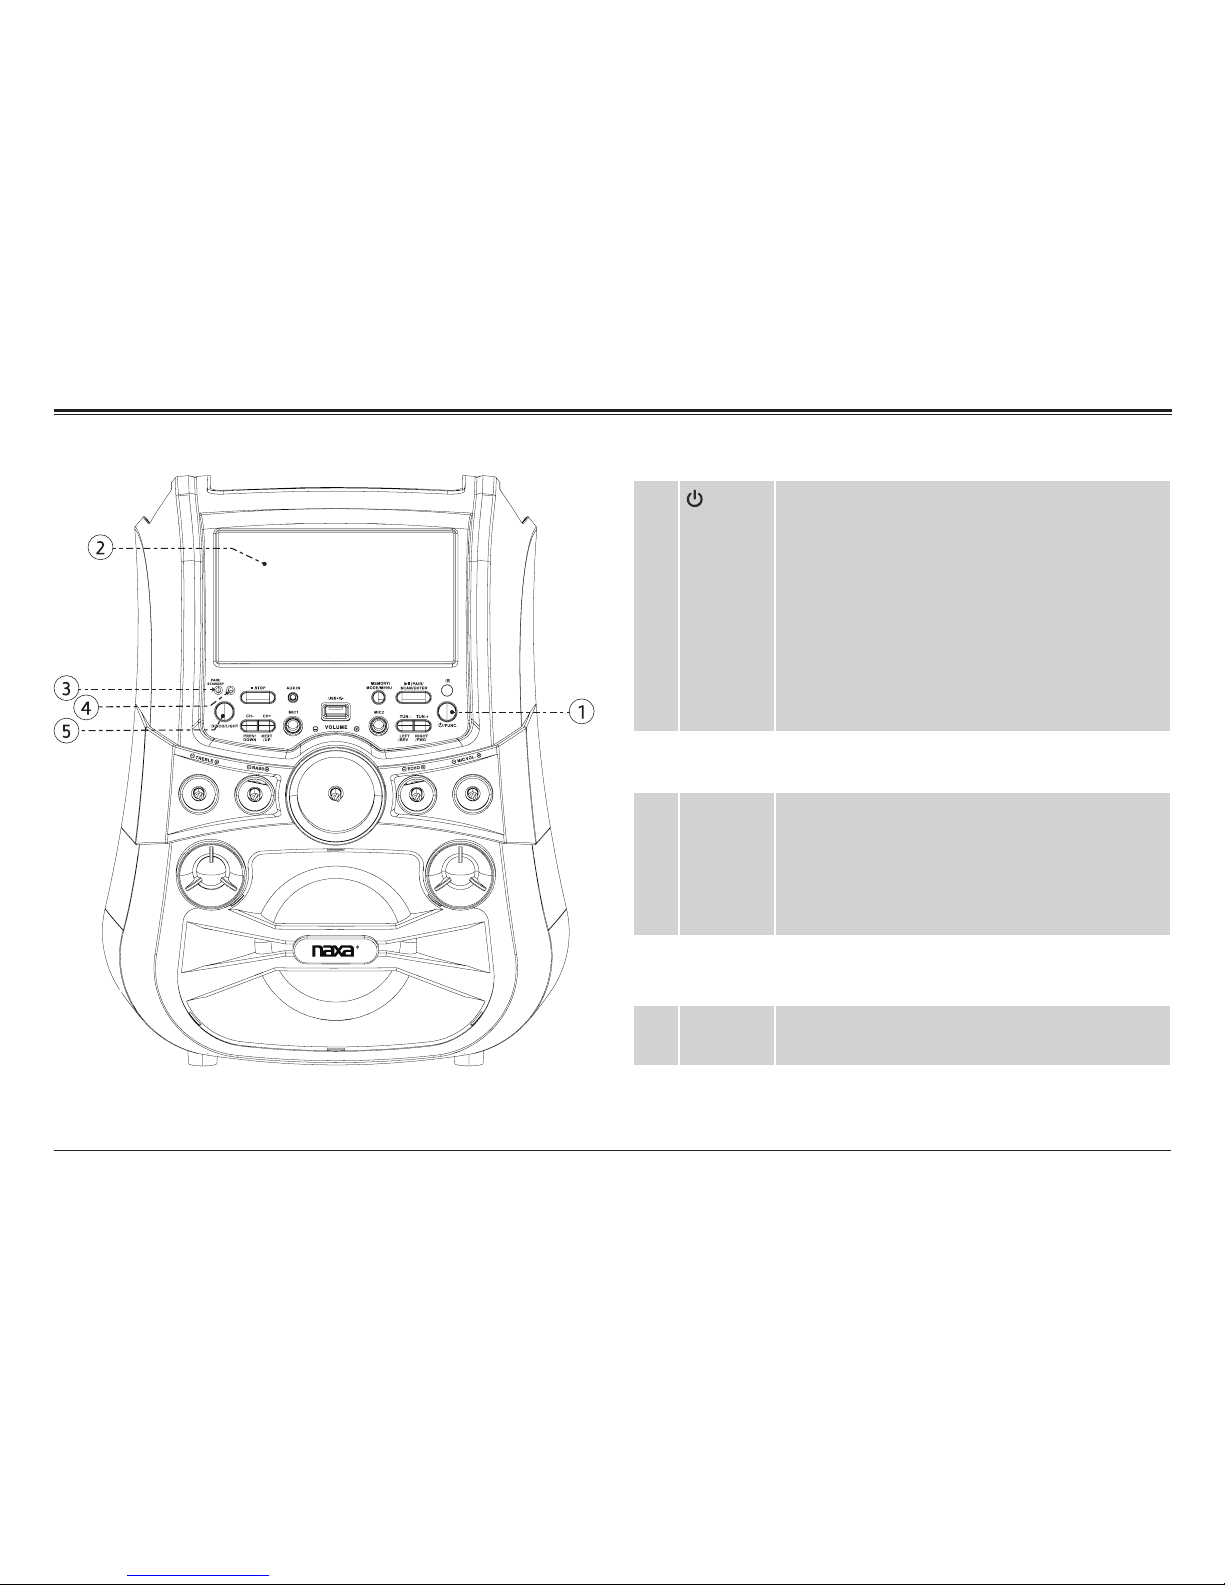
At a Glance
BAT
1 /FUNC Power: Press to turn the unit on. Press and
hold to turn the unit off.
Make sure the Master switch on
the back of the unit is set to the ON
position and that the PAIR/STANDBY
indicator is lit.
Function: Press to change the active source
mode when the unit is on (Disc, Bluetooth,
Radio, AUX-In).
2 Display The LCD screen displays video, status infor-
mation and lyrics (when available).
3 PAIR/
STANDBY
Pair: Lights blue when the unit is connected
to a Bluetooth®device.
Stand By: Lights red when the unit is in Stand
By mode (i.e., connected to power and the
MASTER switch is set to the ON position).
4 BATTERY Lights red when the unit is charging.
Lights green when the unit is fully charged.
5 DISCO/
LIGHT
Press and hold to turn the LED lights on or
off. Press to change the light effect mode.

www.naxa.com Page 5
BAT
6 MEMORY/
MODE/
MENU
Memory: In radio mode, press to save a
preset station. Mode: In Disc mode, press and
hold to switch between Disc and USB. Menu:
In Disc mode, press to display the system op-
tions menu.
7 STOP Stop playback.
8 CH–
PREV/
DOWN
CH–: Skip to the previous radio preset.
Previous: Skip to the previous title, chapter,
or track. Down: Move down when browsing
menu screens.
9 CH+
NEXT/UP
CH+: Skip to the next radio preset. Next: Skip
to the next title, chapter, or track. Up: Move
up when browsing menu/option screens.
10 /PAIR/
SCAN/
ENTER
: Start, pause, or resume playback. Pair:
Connect to a Bluetooth®device. Scan: Find radio
stations automatically. Enter: Select the high-
lighted item when browsing menu screens.
11 TUN+
RIGHT/
FWD
TUN+: Tune to a higher radio station. Right:
Move right when browsing menu screens.
FWD: Scan forward through a track.
12 TUN
-
LEFT/REV
TUN–: Tune to a lower radio station. Left:
Move to the left when browsing menus
screens. REV: Scan in reverse through a track.

Page 6 Naxa Electronics
BAT
14 USB Connection for a USB ash drive.
The USB port is designed to play
media from ash memory de-
vices. It is not designed to charge
high-power devices.
To switch to USB mode: 1) Press
/FUNC to set the unit to Disc
mode; 2) Press and hold MEMO-
RY/MODE/MENU.
15 AUX IN 3.5 mm stereo audio input connection
for AUX IN mode.
16 MIC 1 6.35 mm input connection for Micro-
phone 1.
The microphone input is active in
all modes.
17 MIC 2 6.35 mm input connection for Micro-
phone 2.
The microphone input is active in
all modes.
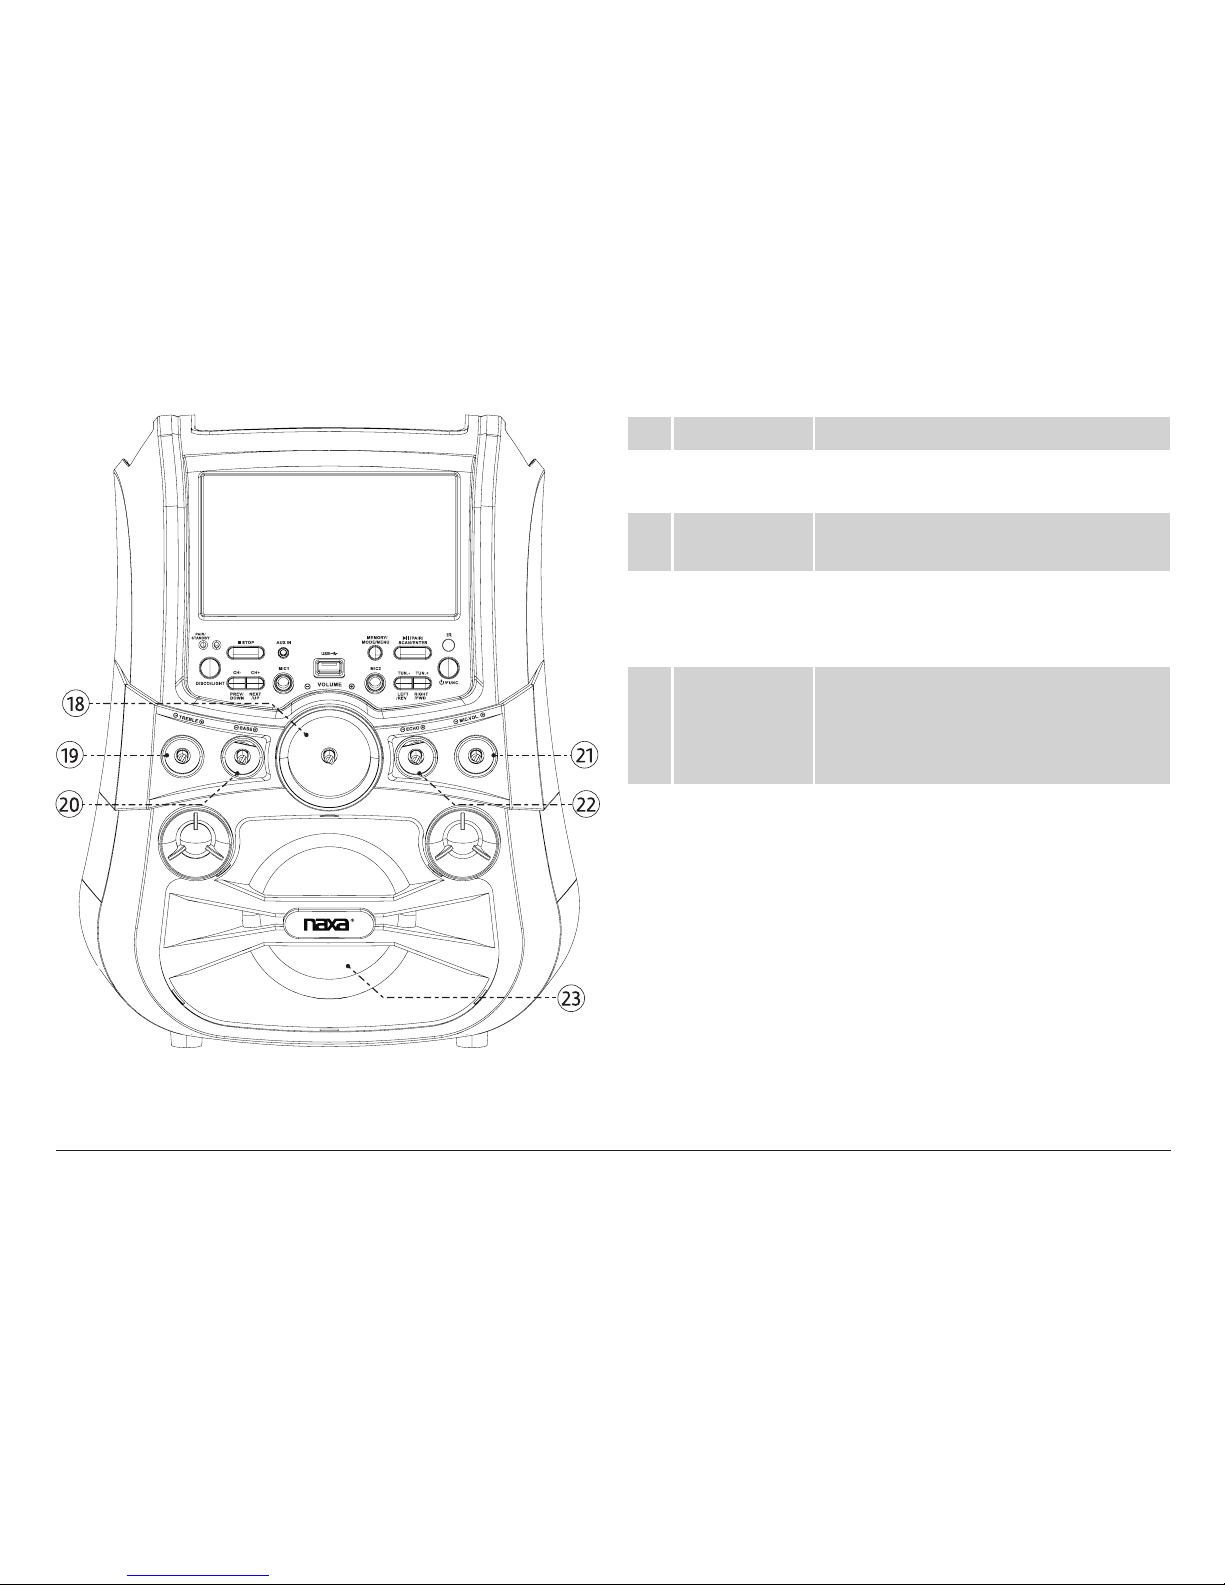
www.naxa.com Page 7
BAT
18 VOLUME Turn to adjust the master volume level.
19 TREBLE Turn to adjust the high-frequency
(treble) levels.
20 BASS Turn to adjust the low-frequency (bass)
levels.
21 MIC VOL Turn to adjust the microphone levels.
This dial controls both MIC 1 and
MIC 2 input levels.
22 ECHO Turn to adjust the reverb (echo) effect
levels.
This dial controls both MIC 1 and
MIC 2 echo levels.
23 Speaker Dynamic full-range speaker.
Page 8 Naxa Electronics
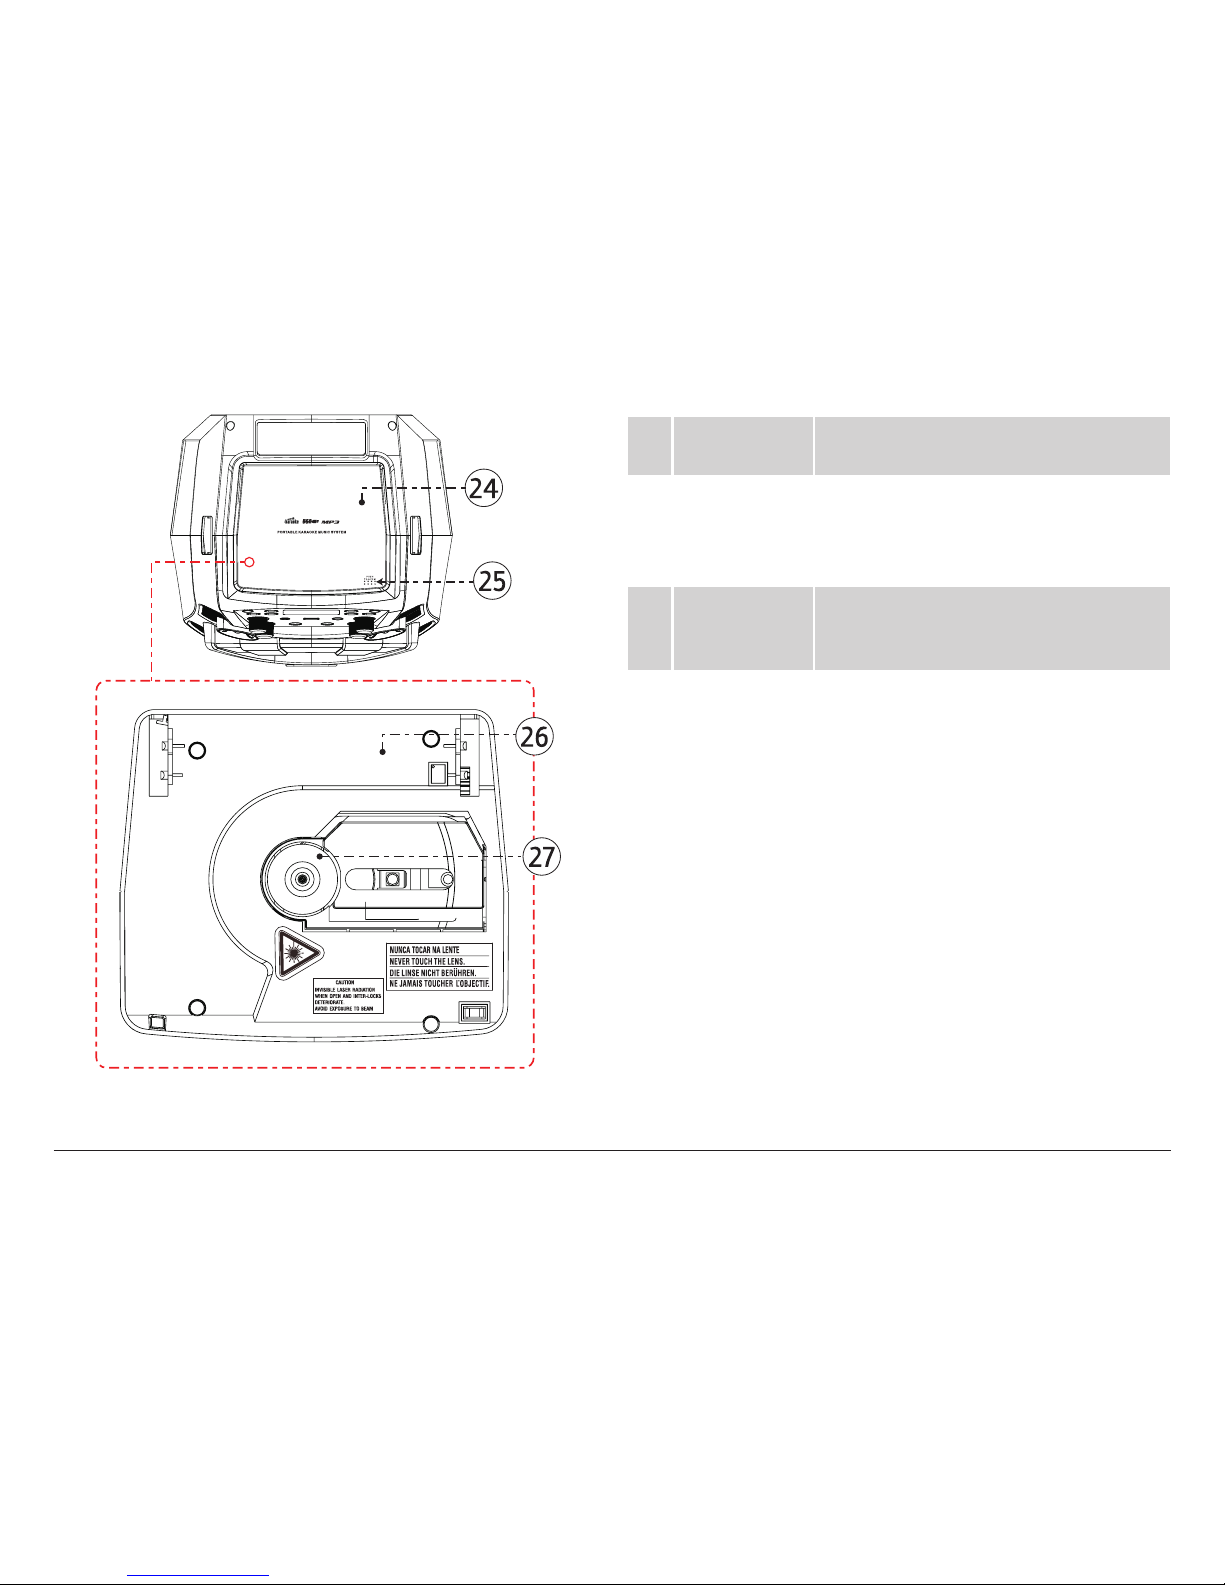
24 Disc Door Covers and protects the disc
compartment.
25 Disc Door
latch
Press down until the latch clicks to open
the disc door. To close it, gently lower it
and push down until the latch clicks into
place.
26 Disc
compartment
Load optical discs here for playback (e.g.,
DVD, CD, CD+G, MP3+G discs). The label
side of the disc should face up.
27 Disc spindle The spindle is the mechanism that locks
the disc into place.
To load a disc, center it over the spindle
and then push it down gently until it
clicks into place.
To release a disc, lift it gently out of
the compartment by its edges. You may
need to place a nger on the spindle to
get some leverage. Never use force to
remove the disc to avoid damage.

www.naxa.com Page 9
28 Microphone
holsters
Flip down and out to store the included
microphones.
29 Master Power
Switch
(OFF/ON)
Set the switch to ON to provide power to
the unit and place it in Stand By mode.
(Press the /FUNC button on the front
of the unit to turn it on.)
Set the switch to OFF to turn the unit off
completely.
30 AC AC input power connector (AC 120 V,
60 Hz). Use with the included AC power
cable.
31 DC IN 12 V DC input power connector (DC 12 V). Use
with a properly rated DC power cable
(not included).
32 R-SPEAKER- L A/V out. Use with the included RCA A/V
cable to connect to a TV when playing
video.
• Red: audio out (right)
• White: audio out (left)
33 VIDEO A/V out. Use with the included RCA A/V
cable to connect to a TV when playing
video.
• Yellow: composite video out

Page 10 Naxa Electronics
Remote Control
STANDBY Turn the unit on or off. (Make sure the Master
switch on the back of the unit is set to the ON
position and that the PAIR/STANDBY indicator
is lit.)
FUNCTION Change the active source mode (Disc, Blue-
tooth, Radio, AUX-In).
USB/DVD In Disc mode, switch between Disc and USB
modes.
DISPLAY ON/
OFF
Turn the LCD screen on or off.
MUTE Disable or restore sound.
DISPLAY Show program information on the LCD screen.
ZOOM Change the magnication level.
SLOW Slow the speed of playback.
SETUP Display the system options menu.
TITLE/PBC Go to the DVD/SVCD title screen.
/SCAN Play, pause, or resume playback.
/PAIR Stop playback or connect to a Bluetooth®
device.
Table of contents
Other Naxa Karaoke System manuals


