November 2016
INSTALLATION:
Note:
The NCE530LEDG is designed to operate on 12Volt DC power only. Installation
into a Recreational Vehicle must be compliant with Australian Standard
AS5601-2004,noting required height and clearance regulations
The NCE530LEDG Rangehood can be installed via overhead or side mounting.
Option 1. Overhead Mounting
Holes required MUST be measured and marked prior to any alteration to cabinet
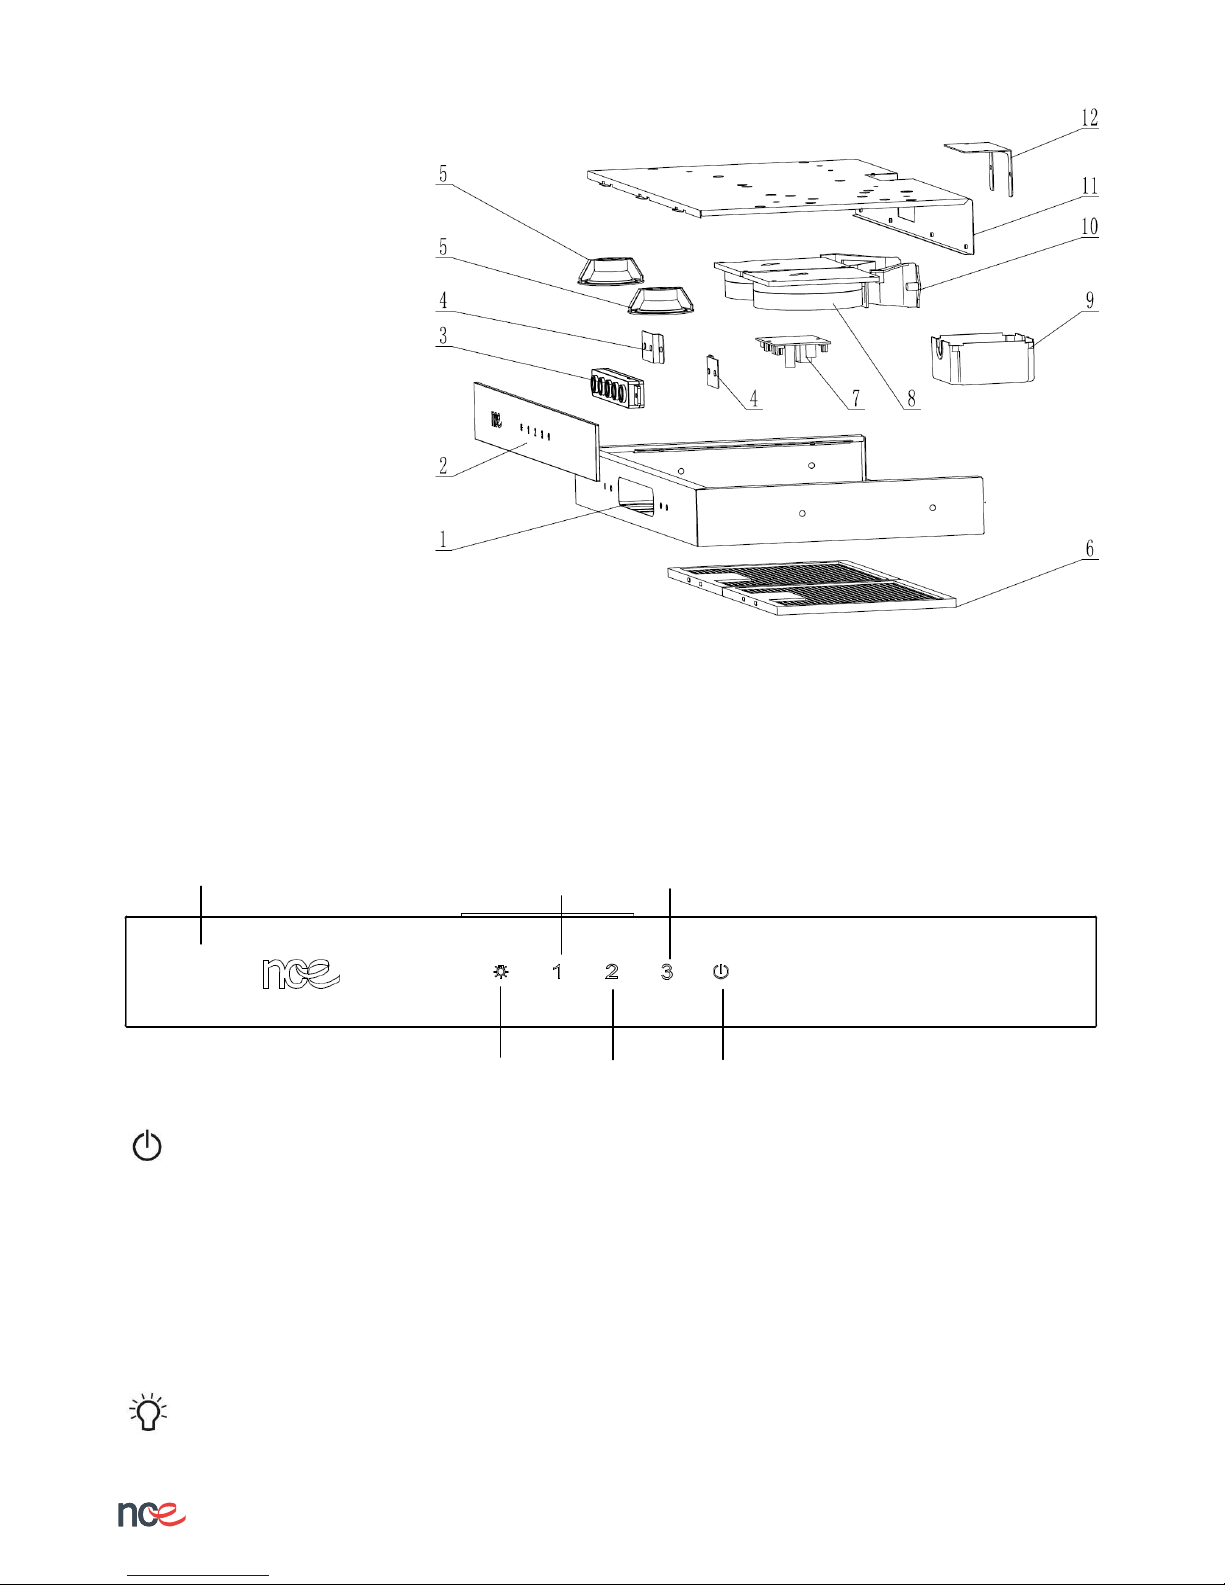
1. Remove filters
2. Locate holes in the top of the Rangehood
3. Connect rangehood power wires to pre-installed RV wiring using the 12volt power
source (Wires are labelled +/- take care to ensure connection completed correctly)
4. Lift Rangehood into designated position and locate pre-marked holes
5. Use 4xSS screws only into locating holes (shown above)
6. Install filters
7. NCE recommends that after mount, power on and test all functions
Option 2. Side Mounting
NCE Rangehood - NCE530LEDG
1. Remove filters
2. Locate holes in the top of the Rangehood
3. Connect rangehood power wires to pre-installed RV wiring using the 12volt power
source (Wires are labelled +/- take care to ensure connection completed correctly)
4. Lift Rangehood into designated position and locate pre-marked holes
5. Use 4xSS screws only into locating holes (shown above)
6. Install filters
7. NCE recommends that after mount, power on and test all functions
November 2016
INSTALLATION:
Note:
The NCE530LEDG is designed to operate on 12Volt DC power only. Installation
into a Recreational Vehicle must be compliant with Australian Standard
AS5601-2004,noting required height and clearance regulations
The NCE530LEDG Rangehood can be installed via overhead or side mounting.
Option 1. Overhead Mounting
Holes required MUST be measured and marked prior to any alteration to cabinet
1. Remove filters
2. Locate holes in the top of the Rangehood
3. Connect rangehood power wires to pre-installed RV wiring using the 12volt power
source (Wires are labelled +/- take care to ensure connection completed correctly)
4. Lift Rangehood into designated position and locate pre-marked holes
5. Use 4xSS screws only into locating holes (shown above)
6. Install filters
7. NCE recommends that after mount, power on and test all functions
Option 2. Side Mounting
NCE Rangehood - NCE530LEDG
1. Remove filters
2. Locate holes in the top of the Rangehood
3. Connect rangehood power wires to pre-installed RV wiring using the 12volt power
source (Wires are labelled +/- take care to ensure connection completed correctly)
4. Lift Rangehood into designated position and locate pre-marked holes
5. Use 4xSS screws only into locating holes (shown above)
6. Install filters
7. NCE recommends that after mount, power on and test all functions
Where the required clearance to a range hood cannot be met, a range hood constructed of non-
combustible materials may be installed at not less than 450 mm, provided that
(i) the range hood is suitable at the installed clearance; and
(ii) the gas appliance is certified as a caravan/marine cooker at the installed clearance.
Note: This requirement does not apply to the installation of commercial catering equipment.
INSTALLATION
Note: The RH530LEDG is designed to operate on 12 Volt DC power only. Installation into a Recreational
Vehicle must be compliant with Australian Standard AS5601-2004, noting required height and clearance
regulations.
The RH530LEDG Rangehood can be installed via overhead or side mounting. Holes required MUST be
measured and marked prior to any alteration to cabinet
Option 1. Overhead Mounting
1. Remove filters
2. Locate holes in the top of the Rangehood
3. Connect rangehood power wires to pre-installed RV wiring using the 12 volt DC power source
(Wires are labelled +/- take care to ensure connection is completed correctly)
4. Lift Rangehood into designated position and locate pre-marked holes
5. Use 4 x Stainless Steel screws only into locating holes (shown above)
6. Install filters
7. NCE recommends that after mount, power on and test all functions
Option 2. Side Mounting
1. Remove filters
2. Locate holes in the top of the Rangehood
3. Connect rangehood power wires to pre-installed RV wiring using the 12 volt DC power source
(Wires are labelled +/- take care to ensure connection is completed correctly)
4. Lift Rangehood into designated position and locate pre-marked holes
5. Use 4 x Stainless Steel screws only into locating holes (shown above)
6. Install filters
7. NCE recommends that after mount, power on and test all functions