nCounters Portable Angle Monitor User manual

Portable Angle Monitor Instruction Manual.March .2021

Portable Angle Monitor Instruction Manual.March .2021
Table of Contents
Portable Angle Monitor –use ………………..……..
Contents ………………………………………………..
Specifications and Cleaning …………………………
Indications and Intended Use ……………….…………...
Theory of Operation …………………………………….…
Warranty ………………………………………………….
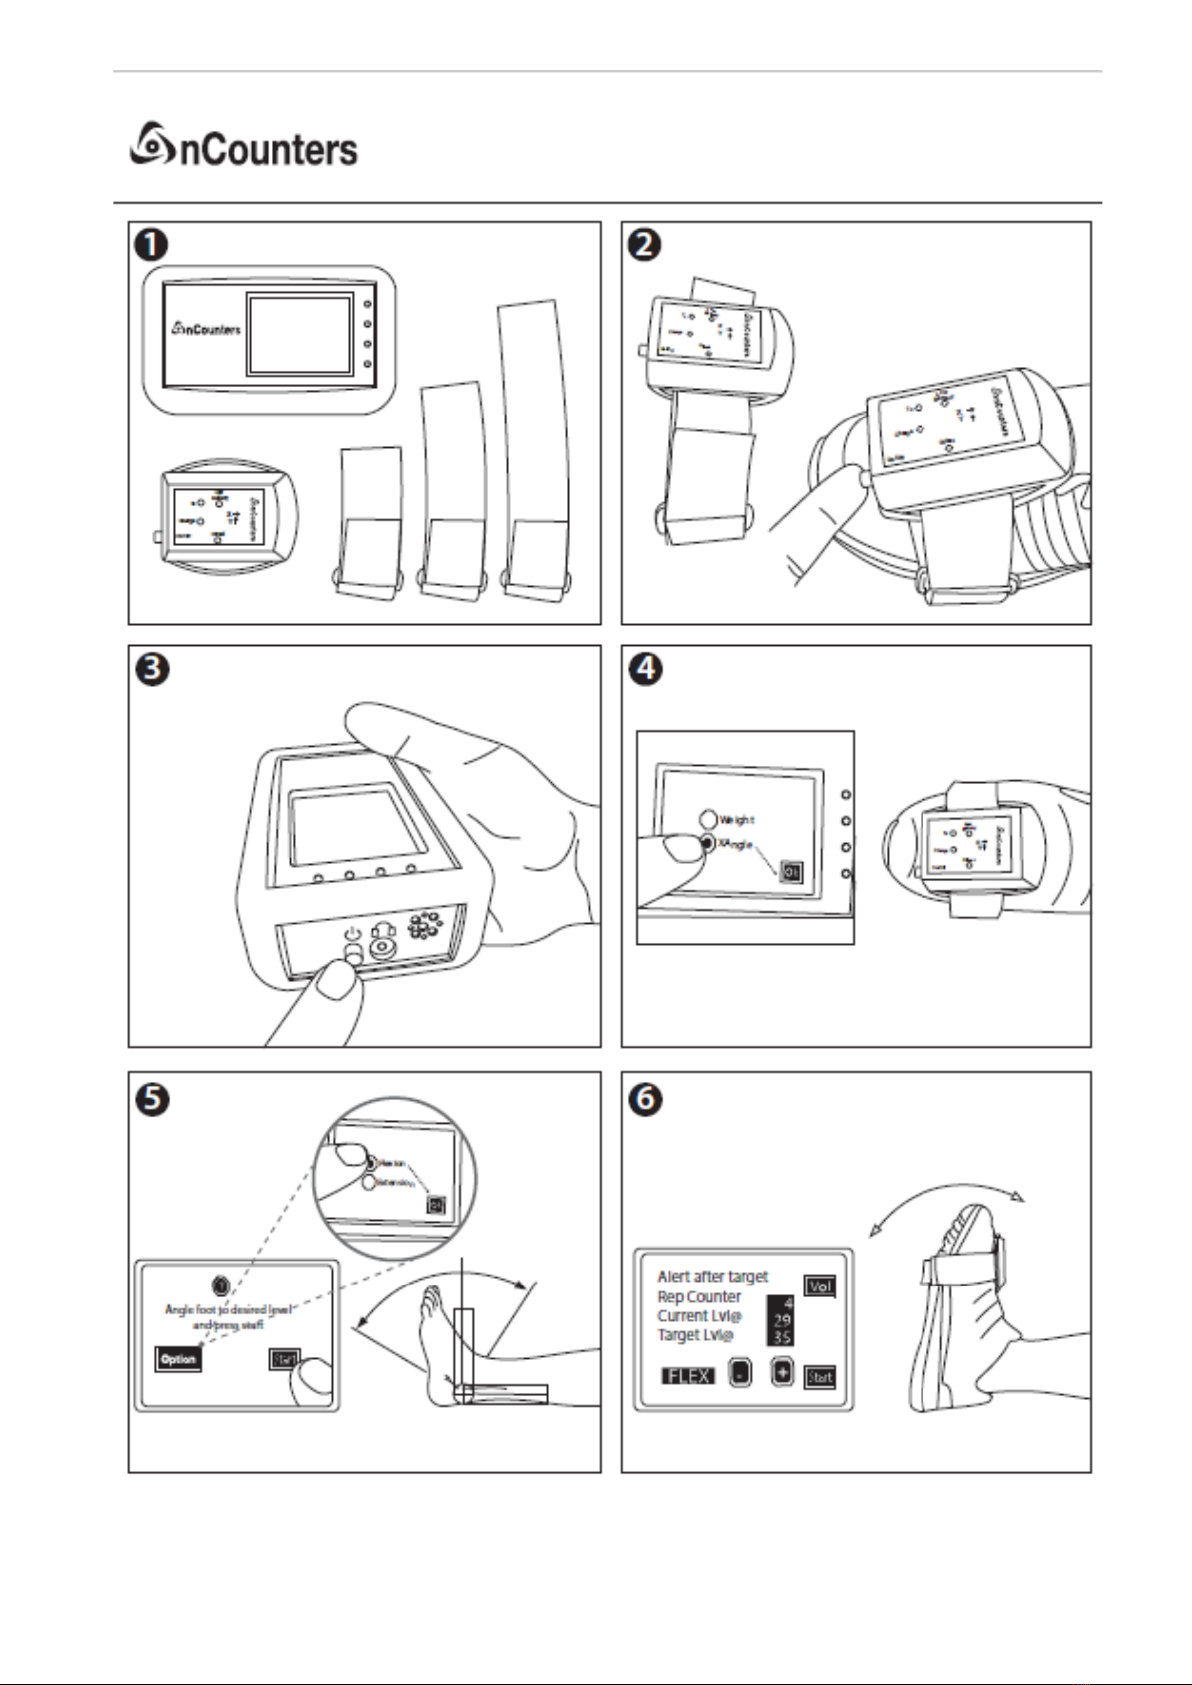
User Instructions ……………………………….……
Battery charging …………………………….
What’s what ……………………………….
PAM 2 placement …………….………………..
Using with PLLM Control Unit ………………
Mode of Operations Screens ………………………..
Flexion /Dorsiflexion ……………………………………
Extension / Plantar Flexion …………………………
Quick Start Guide …………………………………..
Portable Angle Monitor (PAM 2)
The Portable Angle Monitor (PAM 2) is designed to only
be used with the Control Unit for the Portable Limb Load
Monitor (PLLM). For further information on the PLLM
visit our website: ncountersonline.com
If you have ordered the PAM 2 Unit you should have
the following:
Operation Manual; version: nCounters March 2021
Portable Angle Monitor (PAM 2) Unit
4 x elastic Velcro straps to secure PAM 2 unit in position:
XSmall –15cm, Small –20cm, Medium –30cm,
Large –40cm
Specifications wireless PAM 2 unit
General
Rated power source 3.7 V DC
Format Lithium Polymer
Max current consumption 68 mA
Dimensions (L x W x H) 81 x 55 x 23 mm
Weight 54g
Cleaning
All surfaces of the system should be cleaned with wet
wipe between each use
Indications and intended use
The Portable Angle Monitor (PAM 2) is an assist device
that provides feedback on ankle joint range of movement
by sending data wirelessly to the Portable Limb Load
Monitor (PLLM) Control Unit. The Control Unit displays
the live data and provides audio-visual feedback on joint
flexion and extension.
The PAM 2 is an assist device to augment gait
rehabilitation and enhance gait retraining. It may assist
orthopaedic surgical patients to exercise their ankle
joints following surgery. The PAM 2 may aid in recovery
from the following pathologies/injuries; acquired brain
injury, cerebrovascular accident (stroke), as well as
conditions which affect the Central Nervous System
Theory of operation
The PAM 2 will provide feedback on ankle joint range of
movement.
Feedback on target is designed to encourage
joint range of movement.
Position the ankle at the angle of desired feedback –this
is the Target Level. This level can be adjusted up and
down via the Control Unit. Each timer user reaches the
target user receives audio visual feedback via the
Control Unit. The screen Repetition (Rep) Counter
increases each time the user reaches the target. Either
sitting or walking
Warranty
•This device comes with 12-month warranty on parts
from date of purchase.
•Wherever possible a replacement unit will be
provided while yours is being repaired.
•Free firmware and software upgrades are available
for the first 12 months of purchase
1
1
1
1
1
1
2
2
3
3
3
4
5
5
6
1

Portable Angle Monitor Instruction Manual.March .2021
User instructions
Battery charging
The PAM 2 unit comes pre-installed with a lithium polymer battery that does not need replacing.
The battery is charged via a USB connection to a PC and whilst charging a red LED will appear.
Once your battery has finished charging the red LED light will disappear.
If you have finished the session and the Low Battery LED is lit, then recharge your device before the next use.
If for any reason you need to replace your battery, contact nCounters, so as we can provide you with the correct battery
for the charger circuit.
The Portable Angle Monitor (PAM 2) Unit
1
2
3
4
5
6
7
1On / Off single press switch
2Red light active when
charging battery via USB
port (8). When battery is fully
charged, red light turns off
3Yellow light active when
device in Transmit mode (data
is being transferred to Control
Unit)
4Red LED lit when PAM Unit
battery low –battery needs to
be charged via USB port (8)
5X Axis for feedback on
flexion / extension of joint
6Y Axis for feedback on
inversion / eversion
7Offset –LED briefly lit when
device is turned on. Turns off
when foot (joint) stationary.
Angle set to zero.
8USB port. USB cable required
to charge device.
Figure 1 –Portable Angle Monitor –upper surface view
Figure 2 –Portable Angle Monitor –end view.
Ensure On / Off switch MUST face away from user’s ankle
8
1
2

Portable Angle Monitor Instruction Manual.March.2021
Portable Angle Monitor placement for ankle joint monitoring
To get the best results from your PAM 2, place the sensor over the forefoot of the user’s shoe / runner. Choose the
appropriate size nCounters’ elastic strap with Velcro, so it passes under the PAM 2 enclosure securing it in position as
shown in Figure 3.
Four elastic straps with Velcro are provided: Small - 30cm, Medium –35cm Large –40cm, XLarge –55cm
Using the PAM 2 with the PLLM Control Unit.
1After securing the PAM 2 in position use a single press of the on-off button to turn your unit on. An active Tx
yellow light will indicate the device is in Transmit mode.
2The offset LED will start to flash. It will continue to flash if the foot is moving. At the point the foot stops moving,
the offset LED will stop flashing and the device angle has now been zeroed at that angle.
3If yellow Tx light is active –turn on PLLM Control Unit - Welcome Screen appears then Choice Screen.
Choose X Angle radio button. Next is Start Screen. No need to press OPTIONS as Flexion is default
4Flex (foot) ankle to desired angle for feedback and press Start.
5After pressing START –angle is captured and recorded on Control Unit screen as Target Level (Target Lvl).
The Target Level can be altered using the live screen “+” or “-“buttons. Current Level (Lvl) represents real time
joint angle. The Rep Counter records each time the user reaches the target angle. LEDs indicate how far above
target user has gone.
6Press END button and Analysis Screen appears displaying number of seconds each feedback LED has been
on. (LED) Y1 means user gone just above the target up to (LED) R2 which means user has gone a lot past the
target. XX REPS number of times user received feedback. T MINS Total Session Time. Press OK and
Goodbye screen appears and the Control Unit turns off by itself. Then turn off PAM 2. Your session is complete.
Figure 3
Portable Angle Monitor –in position with the
On / Off switch facing away from user’s ankle
Use an nCounters’ elastic strap with Velcro to secure
the PAM 2 unit to user’s forefoot as shown in Figure
3.
The longer straps are for hip and knee angle
measurements.
ENSURE THAT RED ON / OFF
SWITCH IS FACING AWAY FROM
USER’S ANKLE

Portable Angle Monitor Instruction Manual.March .2021
WELCOME SCREEN
CHOICE SCREEN
Choose radio button X Angle
for feedback then press OK.
START SCREEN
LIVE DATA SCREEN
ANALYSIS SCREEN
GOODBYE SCREEN
START SCREEN
Set target angle and then
press Start
or select Options
Displays Target Level
(Target Lvl). Current Level
(Lvl) represents real time
joint angle and # repetitions.
Press “END”to finish
session.
Press OK - Goodbye screen
appears and Control Unit
turns off by itself.
The PAM 2 unit must be
manually turned off.
Goodbye screen displays Total
Time PLLM has been used
since manufacture in minutes.
Unit turns itself off.
PLLM Control Unit hard turn off –press
ON / OFF button for at least 2 seconds
and machine turns off –NO Visual
Feedback Screen or Goodbye screen
PAM is on - turn on PLLM
Control Unit. Welcome screen
displayed if there is
communication between PAM 2
unit and PLLM Control Unit
PLLM MODE OF OPERATIONS SCREENS WHEN
USING THE PORTABLE ANGLE MONITOR (PAM2)
Select Options to choose
•Flexion (Dorsiflexion)
•Extension (Plantar Flexion)
Make selection then press
OK. Return to Start Screen
and press Start
OPTIONS SCREEN
4
Press VOL on Live Data Screen - you
will be able to adjust volume of speaker
and headphone independently.

Portable Angle Monitor Instruction Manual.March .2021
Flexion (Dorsiflexion)
Hold the foot to the desired angle for feedback. Press START –angle is captured and recorded on Control Unit screen
as Target Level (Target Lvl). See Live Data Screen
The Target Level can be altered using the live screen “+” or “- “buttons. To an angle you choose.
Extension (Plantar Flexion)
By keeping foot still and flat on floor turn on PAM 2 and this is 0 degrees . Choose “Extension”, in Options Screen
Extend the foot to the desired angle for feedback. Press START –angle is captured and recorded on Control Unit screen
as Target Level (Target Lvl).
Figure 4
Ankle joint at angle for desired feedback - press START
Figure 5
Bring back ankle to start position (0 degrees),
then flex ankle to target level for feedback
Figure 6
Ankle joint at angle for desired extension for feedback -
press START.
Figure 7
Ankle extended beyond start angle so will get feedback.
5

Portable Angle Monitor Instruction Manual.March.2021
PORTABLE ANGLE MONITOR QUICK START GUIDE
6
This manual suits for next models
1
Table of contents
Other nCounters Medical Equipment manuals