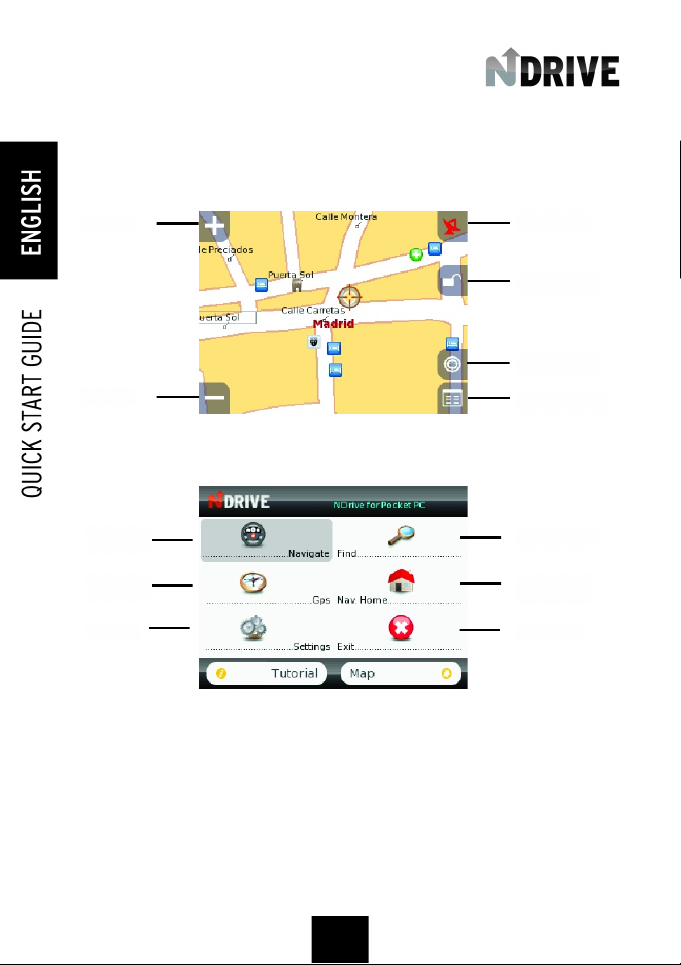
NDrive NS 35-50 - User manual


2

Quick start guide
Welcome to NDrive and thank you for choosing one of our products. This quick start guide allows you
to take the first steps navigating with the NDrive. With frequent navigation you may even find some
functions that are not described in this manual. When you have any doubt you may also consult the
“Tutorial”, from the initial program menu.
Table of contents
I - Compatibility and minimum requirements............................................
a) PC requirements
II - First Steps................................................................................................
a) GPS
b) NDrive software installation
c) Ready to navigate
III - First Impressions...................................................................................
IV - The Ndrive in detail...............................................................................
a) Map window
b) Find
c) Navigation
d) Favorites and home
e) Settings
f) Buying and actualizing maps
V - Tricks and tips.........................................................................................
3
4
4
6
7
14

I - Compatibility and minimum requirements
a) PC* minimum requirements
- Operating system Windows 98SE/Me/NT/2000/XP or superior;
- DVD-ROM drive (4x or superior);
- Card reader;
II - First Steps
a) GPS
- To retrieve a position you must have, at least, 3 satellites with good reception (they appear with a
red bar in the GPS window). With 4 or more satellites you will have a more precise position and an
altitude measure;
- The first time you turn on the GPS, or without using it for a few hours, the first reception will take
longer (about 5 minutes to obtain signal in some cases);
- Tospeed up the signalreception you must be in a wide open place and with some visible sky above
you. Walking will increase the time to retrieve the first position;
- Clouds, trees, buildings and fog will decrease considerable the quality and intensity of the GPS
signal. The errors will be higher and the system will be slower.
4

b) NDrive software installation
Installation by Memory Card
This installation option is available both for Pocket PC and Symbian equipments compatible with the
NDrive. To install through the memory card is easier, although it has an important requirement: you'll
need a memory card reader. In this case, these are the steps to install. Insert the NDrive DVD in your
DVD computer drive. Three options will be shown: "Install NDrive", "Install Maps" and "Help". Choose
the first option and another menu will appear with three options: "Upgrade the NDrive through the
ActiveSync", "Reinstall the NDrive through theActiveSync" and "Install NDrive to Pocket PC/Symbian
on your computer". The right option is the third one, since you are installing the software for the first
time and will transfer data through a memory card reader.
Now click on "Open" and select where you want to save the folders that will be created (2577, NDrive,
System). We advise that you choose desktop. When the folders are extracted, you only need to copy
the three folders that were created and paste them inside the memory card.
c) Ready to navigate
You are now ready to navigate. The GPS should be recognized automatically and in a few minutes (5 minutes
maximum), you'll get the satellites' signal (place yourself with the GPS out of doors, in a large place this first time,
so that the satellites are easier to pick up). Use the tutorial to clear some additional doubt or continue to read this
guide.
In case you have problems with the GPS recognition, please contact us through the e-mail info@ndriveweb.com.
5

III - First impressions
The NDrive has two extremely important Windows:
- The map window, on which you may carry out any function on the map.
- The main window of the application, on which are presented all the functions' groups that may be
carried out in the NDrive.
To go to the main window of the application from the map you just have to click on the icon in inferior
right corner. To go back to the map just click on the "map" button that is at the inferior, right corner of
the main window. If you click on the "tutorial" button, at the inferior left corner of the main window,
you'll see a presentation with the basic functions of the NDrive.
Zoom in
Zoom out
GPS Signal
Block Screen
Context Menu
Main Menu
Navigation
Menu
GPS
Information
Settings
Search Menu
Navigates to
Home
Exit NDrive
6

IV - The Ndrive in detail
a) Map window
Whenever you start the NDrive, it is the map window that comes first.
At the screen centre, you also have a series of buttons:
- Red Colour - No GPS receptor was found. Make sure you have the pairing of your
Bluetooth GPS receptor correctly established or that the GPS receptor is on. If it is not
detected after this, please contact us by e-mail: info@ndriveweb.com;
- Blue Colour - The GPS receptor was detected but the signal is not enough to place the
current position on the map. Place the GPS receptor out of doors, near the vehicle
dashboard. Some vehicles own reflecting glasses that difficult the signal passage. Place
the GPS receptor out of those glasses range. If this is the first time you're trying the
connexion, it may take some time before you get the signal;
(superior left corner) Allows enlarging the map;
(inferior left corner) Allows reducing the map);
(superior right corner) Allows controlling the reception of the
satellite signal, with four expressions:
7

- Yellow color - The position has already been placed in the map, but thereare only three
satellites, which does not allow getting the altitude;
- Green Colour - The position has already been placed in the map and there are more
than three satellites sending the signal;
If you click here you maygetall the information related to the current position and satellite
signal: direction (compass), latitude, longitude, altitude, velocity, satellite signal and
number of satellites found.
(inferior right corner)Allows to execute an action over the active/selected map point, some of
those actions may be of navigation to that point, add to favourites or define the point as home.
(inferior right corner) Allows to go to the NDrive main window, where all the functions of the
application are presented.
(Right) Block the screen.
8

b) Find
When you click "Find" from the main menu, all the search possibilities are presented, which are:
- Home - Shows the residence location on the map. To define the residence location see point
f)
- Address - Allows an address search and its location on the map. The search is done in three
consecutive steps: search of city, street and door number (if it exists at the selected address).
The search isdone through thevirtual NDrive keyboard. This keyboard works as in the mobile
phones: click twice on theABC key to write a "B"or three times on the DEF key to write an "F".
When you are doing the street search, avoid using terms such as "Street", "Avenue" or any
other designation that is too common in an address. Use, instead, less common terms (such
as: when searching the Yellow Road Street,do the search using only "Yellow").
- Recent location- Allows the quick search of the last 18 searched places (Addresses and
POIs).
- Favourite - Shows the location, on the map, of points that were placed as favourites before.
These may be divided in different categories, that can be set by the user (personal,
work…)After selecting the category, choose the favourite that you wish to see on the map.
- POI -Allows the search of a Point of Interest (POI) and its location on the map. The search is
done in three consecutive steps: city search, POI category search (Tourism, Sports, Culture,
Health…) and POI. In Pocket PC the search is done trough the NDrive virtual Keyboard. This
keyboard works as in the mobile phones: click twice on the ABC key to write a "B" or three time
s on the DEF key to write an "F". When you are doing the POI search, avoid using terms such
as "Monument", "Pharmacy" or any other designation that is too common. Use, instead, less
common terms (such as: when searching the Pedroso Monastery, do the search using only
"Pedroso").
- Nearby POI - Allows seeing the POIs that are closer to the map current position. The current
position of themapisindicated by the GPSsignal,or, inlackof GPSsignal,by the centralpoint
on which the current map is. First select the POIs category (Tourism, Sports, Culture, Health…)
that you want to locate. Then the 18 places of this category that are nearby are shown. Click
in one of those places to see it on the map.
Find house
on the map
Recent
location
Point of
Interest
Search
Address
Search
Favourite
Search
Nearby POI
9

c) Navigation
The navigation with the NDrive is always made according to a starting point. That starting point is
given by the satellite signal. When there's no satellite signal, the starting point is given by the map's
central point.
Note: If you don't have a GPS signal and want to demonstrate a route from A to B,
do the search of a POI or an address (Starting Place). Return to the main menu and
navigate now to the point you wish to be your destiny.
Likewise, with no GPS signal, navigation is replaced by a route demonstration.
- Navigation window
The navigation window has some similarities with the map window but adds a bar at the top with
indications relating to navigation, namely, next route instruction, distance till the next route instruction,
total time to destination and total distance to destination. The window has also the capacity to make
"auto-zoom" (depending on the travel speed) and rotate (allowing the navigation to be done always
upwards, independently of the compass). By clicking the context and home buttons, the menus
presented are also different.
The context menu allows executing some settings that you may also define from the main menu settings
menu . The sole exception is the auto-zoom button, which can not be found on any other menu. The auto-
zoom button allows that the map, while navigating, adjusts to the most appropriate zoom to navigation if
activated. If you make a zoom in or a zoom out of the map, it will turn to the zoom considered ideal for
navigation in a few seconds.
Next route
instruction Total time to
destination
Total distance
to destination
Speed Limit
10

The home menu of the navigation window allows, among other options, to stop the navigation, exit the
NDrive or navigate to the nearest gas stations/ car-park.
- Stop navigation
d) Favorites and home
Favorites allow a quick navigation or search, from the menus "find" and "Navigate".
- Create favorites
It's quite simple to create a favorite. Do a search address or POI of the point you want to define as
favorite. Go to the map window, click on the context button and click on "add to favorites". Choose the
category on which you want to place the favorite and, then, put the favorite's name.
Note: If after you've chosen the category, you choose another while editing the favorite name, the
favorite is created in the new category (even if there is no category with that name).
- Edit Favorites
To edit a favorite, go to the menu "Find", followed by the "Favorite" button. Choose the category where
the favorite to edit is and click on the name of the favorite. Click on "Edit Favorite" to define the name
or category.
- Delete Favorite
To delete a favorite, go to the menu "Find", followed by the "favorite" button. Choose the category where
the favorite to delete is and click on the name of the favorite. Click on "Remove Favorite".
Note: If you've created a new category to place the favorites and then deleted all the favorites from that
category, the category is also deleted.
- Define Home
Defining the residence place allows you a quick navigation or search, from the menus "Find" and
"Navigate". The Icon "Nav. Home" is also present in the main menu. In other words, it is possible to
navigate to the residence place with a single click, from the main menu.
It is very simple to define the residence place. Make a search (address or POI) of the point you want to
define as home. Go to the map window, click on the context button and click on "set as home".
- Remove and edit home
The residence place is considered a favorite. So, to remove or edit it, you just have to follow the same
steps as to edit and remove favorites. This favourite is saved in the category "Personal" with the
representative icon of the residence.
11

- Add category
To add a category you must add a favourite, Click on the add button and choose one of the four
existing categories. By selecting one category, you will see a new screen, where the name of that
same category will be. To add this new one, you just need to replace the name of the existing
category by the new name.
In this manner, you have created a new category, as you may see on the next image.
New favourite window If you change category name, you will
create a new category.
New Category
created
12

e) Settings
At the main menu, click on "Settings". There are eight buttons:
- Speaker - Defines the sound volume, on a scale of 0 to 5;
- Light - Allows defining if the backlight of the PDA is always active through the navigation or not;
- POIs - Defines the categories of the POIs that can be seen on the map, the map window, or the
navigation window;
- Language - Allows the definition of the language on which the application is presented, from the
buttons' name to the vocal instructions;
- Alarm - Defines the velocity from which a sound warning of velocity goes off, from 60 to 160 km
(every 10km) or function turned off;
- Templates - Allows defining the colours' palette of the map that best adapts to your navigation,
since daily to nocturnal layouts;
- Kph/Mph - Defines the speed unit (kilometres per hour or miles per hour);
- Map - Alows to change the map in NDrive.
f) Buying and updating maps
You can install several maps in your memory card and switch between them. With a high capacity
memory card you can install all Europe maps in a single memory card.
You can buy new maps from www.ndriveweb.com. Several maps are available from the site.
You can update them from www.ndriveweb.com. If you choose to be notified at the registration
process, you will know when a new/updated map or software is available.
13

V - Tricks and tips
Backup and upgrades
Do a backup of the NDrive to your computer or to a memory card. In this way, if a problem with the
application reading occurs, delete the application and copy all the files that you had save to the root
of the memory card. The NDrive becomes totally operational again. You may also explore the NDrive
site (www.ndriveweb.com) to know if there's a more recent version of the application. To compare
with the version you have installed, verify the inferior corner during the initial message.
Note: Before deleting the former version of the NDrive, save the files "favourites" and "NDRI" at the
directory "NDrive" and then place them back in the new version.
Next instruction
Click in any heading area of the navigation window when you are navigating to hear again the next
instruction.
Improve your GPS reception
The GPS receiver must have, whenever it is possible, the best visual-field with the sky. In the car, it
must be set on the dashboard, as ahead as possible, to avoid signal blockage (athermic glasses
may also condition the signal reception). On the other hand, the buildings, the trees' leafage or the
fog worsen the reception signal, which results that in some days and places the signal may be
stronger than in other. If get bad signal, you must use an external antenna.
14

Quick Start Guide
Table des matières
I - Compatibilité et configuration requise...........................................
a) Configuration du PC*
II - Premiers pas....................................................................................
a) Sur le GPS
b) Installation du logiciel Ndrive
c) Prêt à naviguer
III - Premières impressions..................................................................
IV - Le Ndrive en détails.......................................................................
a) Fenêtre de la carte
b) Recherche
c) Navigation
d) Favoris et Maison
e) Configuraciones
f) Acquisition et actualisation des cartes
V - Trucs et astuces..............................................................................
15
16
16
18
19
27

I - Compatibilité et configuration requise
a) Configuration du PC*
- Système Opératoire Windows 98SE/Me/NT/2000/XP ou supérieur
- Lecteur de DVD-ROM (4x ou supérieur) ;
- Lecteur de cartes mémoire
* Configuration uniquement pour la version Ndrive en DVD-ROM. Les autres versions
n'exigent pas un PC pour pouvoir fonctionner, bien qu'il soit prudent de faire une copie de
sauvegarde de la carte mémoire du Ndrive pour l'ordinateur personnel ou pour une autre carte
mémoire.
II - Premiers pas
a) Sur le GPS
- Afin d'obtenir une localisation il faut au moins avoir trois satellites avec un bon signal (dans
l'application ils s'affichent avec un trait rouge dans la fenêtre du GPS).Avec 4 satellites ou plus vous
aurez une localisation et une altitude plus précises.
- La première fois que vous démarrez le GPS, ou après plusieurs jours sans l'avoir allumé, la
captation du signal est plus lente, pouvant mettre jusqu'à 20 minutes.
- Pour accélérer la captation, vous devez être arrêté et en champ ouvert. Si vous vous déplacez à
pied, vous retarderez la première localisation.
- Des nuages, des arbres, des immeubles et le brouillard détériorent considérablement la qualité et
l'intensité du signal, le système présente alors plus d'erreurs et démarre plus lentement.
16

b) Installation du logiciel Ndrive
Installation " via " Carte Mémoire
Cette option d'installation est disponible, aussi bien pour les Pocket PC que pour les équipements
Symbian compatibles avec le Ndrive. L'installation à partir de la carte mémoire est la plus simple, bien
qu'elle ait une exigence très importante : il est nécessaire d'avoir un lecteur de carte mémoire. Si
vous possédez un lecteur à cartes, afin de démarrer l'installation vous devez effectuer les démarches
suivantes : Insérez le DVD Ndrive dans le lecteur de DVD de l'ordinateur. Trois options s'afficheront
alors : " installer Ndrive ", " Installer des cartes " et " Aide ". Choisissez la première option et ensuite
apparaîtra un autre menu avec trois options : "Actualiser le Ndrive à travers l'ActiveSync ", " Installer
à nouveau le Ndrive à travers l'ActiveSync " et " Installer le Ndrive pour Pocket PC / Symbian dans
l'ordinateur local ". L'option à choisir sera la troisième, vu que vous êtes en train d'installer le logiciel
pour la première fois et les données seront transférées à travers un lecteur de carte mémoire.
Cliquez ensuite sur " Ouvrir " et sélectionnez l'endroit où vous souhaitez garder les répertoires que
seront créés (2577, Ndrive, System). Nous conseillons le choix du bureau. Après l'extraction des
fichiers, il suffit de copier les trois fichiers qui ont été créés et les placer dans la carte mémoire.
c) Prêt à naviguer
À partir de ce point, vous êtes prêt à naviguer. Le GPS devra être reconnu automatiquement et quelques minutes
après (5 minutes dansla pire des cas,à ciel dégagé) vous devez avoir unsignal satellite (au cours de la première
utilisation, gardez le GPS en plein air, pour que les satellites soient captés plus facilement). Utilisez le tutoriel pour
résoudre un éventuel problème ou continuez de lire ce guide.
Au cas où vous auriez des problèmes avec l'enregistrement ou la reconnaissance du GPS, contactez-nous à
17

III - Premières impressions
Le Ndrive présente deux fenêtres principales :
- La fenêtre de la carte où vous pouvez exécuter n'importe quelle fonction sur la carte.
- La fenêtre d'application sur laquelle tous les groupes de fonctions qui peuvent être exécutées sur
le Ndrive sont affichés.
Sur le Pocket PC, pour passer de la carte à la fenêtre principale de l'application, il suffit de cliquer
sur l'icône qui représente une " maison " (avec Symbian utilisez la touche côté gauche). Pour passer
à nouveau vers la carte, il suffit de cliquer sur la touche " carte " qui se trouve sur le coin inférieur
droit de la fenêtre principale. En cliquant sur la touche " tutoriel " sur le coin inférieur gauche de la
fenêtre principale, vous visualiserez une présentation des fonctions de base du Ndrive.
18

IV - Le Ndrive en détails
a) Fenêtre de la carte
Chaque fois que vous démarrez le Ndrive, c'est la fenêtre de la carte qui s'affiche d'abord.
Sur le Pocket PC, au delà du dessin de la carte, au milieu de l'écran, plusieurs touches sont visibles
(coin supérieur gauche) permet d'amplifier la ;
(coin inférieur gauche) permet de réduire la carte ;
(coin supérieur droit) permet de contrôler la réception du signal satellite, d'après quatre
expressions
- Pas de GPS - Aucun récepteur GPS n'a été trouvé. Vérifiez que la connexion de votre
récepteur GPS par bluetooth est correctement établie ou si le récepteur se trouve bien
branché. S'il n'est toujours pas trouvé, contactez-nous par e-mail : info@ndriveweb.com
- Satellite couleur rouge - le récepteur GPS a été détecté , mais il n'y a pas encore de
signal suffisant pour afficher la position actuelle sur la carte. Placez le récepteur GPS
dans un endroit ouvert, près du tableau de bord de la voiture. Quelques voitures ont des
vitres réfléchissantes qui gênent le passage du signal. Placez le récepteur GPS à
l'extérieur de ces vitres. Si vous établissez la liaison pour la première fois, il est normal
que cela prenne un certain temps jusqu'à l'obtention du signal.
19

- Satellite couleur jaune - la position sur la carte a déjà été placée, mais il n'y a que trois
satellites, ce qui empêchent l'obtention d'informations concernant l'altitude.
- Satellite couleur verte - la position a déjà été placée sur la carte et plus de trois satellites
envoient le signal.
En cliquant sur cette touche vous obtiendrez toute l'information concernant votre
localisation actuelle et le signal satellite : direction (boussole) , latitude, longitude, altitude,
vitesse, signal satellite et nombre de satellites reçus.
(coin inférieur droit) Permet d'exécuter un action sur un point de la carte sélectionné.
Quelques unes de ces actions pourront être de naviguer vers ce point, d'ajouter à la liste des
favoris ou de définir un point en tant que Maison.
(coin inférieur gauche) Permet de passer à la fenêtre principale de NDrive où sont
présentées toutes les fonctions de l'application.
20
This manual suits for next models
1
Table of contents
Languages: