Neil Pryde Sails Beneteau Oceanis 423 Quick start guide

1
INTERNATIONAL DESIGN AND TECHNICAL OFFICE
Headsail Tuning Guide for
the Beneteau 423
1, June 2003
Neil Pryde Sails Int.
354 Woodmont Road #18
Milford, CT 06460
Phone: 203-874-6984 • Fax: 203-877-7014
Email: admin@neilprydesails.com
Web: www.neilprydesails.com
All material herein
Copyright 2002-2003 Neil Pryde Sails International
All Rights Reserved

2
Overview:
The Beneteau Oceanis 423 built in the USA and supplied with Neil Pryde Sails is equipped with a 140% headsail.
The following features are built into this headsail:
• The genoa size is optimized to sheet correctly to the factory track when fully deployed and when reefed.
• The sails are equipped with the Neil Pryde Multi-Track Foam Luff System™, which allows for smooth and correctly
shaped sails when reefed. (See the Technical brief for details on this system)
• The sails are equipped with ‘buffer’ patches at both head and tack that are designed to distribute the loads on the sail
when reefed.
• The buffer patch at the tack is marked with three reefing bands that provide a visual cue for pre-setting the genoa lead
positions.
• Head and Clew areas of the sail are engineered in a radial
configuration that improves load distribution for a stronger,
smoother corner.
You will find that once the initial trim settings are made to the genoa
lead (car) position (which is critical to good performance) that the cars
will not require much movement fore and aft for different conditions.
The basic guidelines below will help you achieve proper upwind
sailing genoa trim.
There are several points to consider:
• We used the outer shroud where it intersects the deck as our
‘zero’ point in measuring the car location aft along the track.
Measure both sides when determining the location of the
cars.
• The front of the car has a lever that is lifted up to disengage
the pin that holds the car in place. When moving the car,
always move the ‘lazy’ sheet, so that there is no load on the
jib sheet or car when making adjustments. Lift the pin and
slide the car forward or aft. Note: this lever and pin should
always face forward, never aft.
• There are evenly spaced holes on the genoa track (fore and
aft) that the adjustment pin of the car will lock into place.
• Be prepared to mark the car location with permanent marker,
tape or adhesive marks. This is best done on the deck surface
as marks or tape on the track will be subject to chafe.
Marking the Lead Position:
When measuring out the lead positions (as described below) we
suggest that you mark the track at the forward edge of the genoa car.
You can do this with permanent marker, tape or some sort of self-adhesive ‘dots’. The marks should be on the deck as track
mounted tape/marks can be rubbed off by the car. Each new location of the cars will coincide with the reefing marks at the tack
of the genoa and will take the guesswork out of setting the leads when reefing. The lazy genoa cars can quickly and easily be
moved forward to a marked location and then during a slow tack the genoa is reefed to the coinciding mark at the tack and you
are off and sailing. Tuned and ready to go.
Shroud base
Marks located on deck and at front of car

3
LEAD POSTION:
Full Size:
When your genoa is completely unfurled for sailing, the forward edge of the genoa
car should be 9’-11” / 3022mm aft of the outer shroud. This will be your ‘all-
purpose’ lead position.
• This will be appropriate for wind strengths of 7-12 knots true wind.
• Sailing in less than 7 knots of true wind move the lead position forward
one hole making the genoa more powerful for these conditions.
• In more than 12 knots of wind, you may move the lead aft one hole (de-
powering the sail slightly) or begin to consider reefing the headsail.
• The genoa should be sheeted so that there is sufficient tension on the sail
to bring the leech to between 3”-6” / 100-200mm from the tip of the lower
spreader and the sail should be between 4”-9” / 125-250mm outside the
shroud base.
First Reef Mark:
With the genoa furled to the first ‘reefing’ mark just aft of the tack of the sail, the
lead car should be moved forward until it is 8-0” / 2438mm aft of the outer shroud.
The leech will be just aft of the spreader as shown below. Note that the sail is
equidistance from the spreader and shroud base.
Second Reef Mark:
With the genoa furled to the second ‘reefing’ mark just aft of the first mark, the
lead car should be moved forward until it is 7’-4” /2234mm aft of the outer shroud.
The leech will have moved even further forward of the spreader at this setting, so
the sheet tension should be adequate to keep the leech of the sail so that it appears
‘inside’ or even with the outer end of the shroud. This will be more difficult to
visualize as the leech will be well forward of the spreader.
Leech trim, closed hauled and with full size sail
Track location with full size sail
Car location when reefed to first mark
Sail at the first reef mark in 18 knots true

4
Third Reef Mark:
With the genoa furled to the third and deepest ‘reefing’ mark, the lead car should be moved forward until it is 6’-7” /2055mm aft
of the outer shroud.
Conditions that require this third reef will be quite windy and depending on your comfort level may be put in place anywhere
from 16 knots on up. This position will keep the foot of the sail quite tight, flattening the shape for good breezy performance.
Car location when reefed to second mark
Sail at the second reef mark in 19 knots true
Car location when reefed to third mark
Sail reefed to third mark in 22 knots true wind
5
Notes:
Generally, sail trim is a bit of science, a bit of feel and a bit common sense. As a basic rule, we like to say that if it looks right, it
probably is. As these sails are fine tuned to the specific boats you should be able to achieve proper trim using this guide.
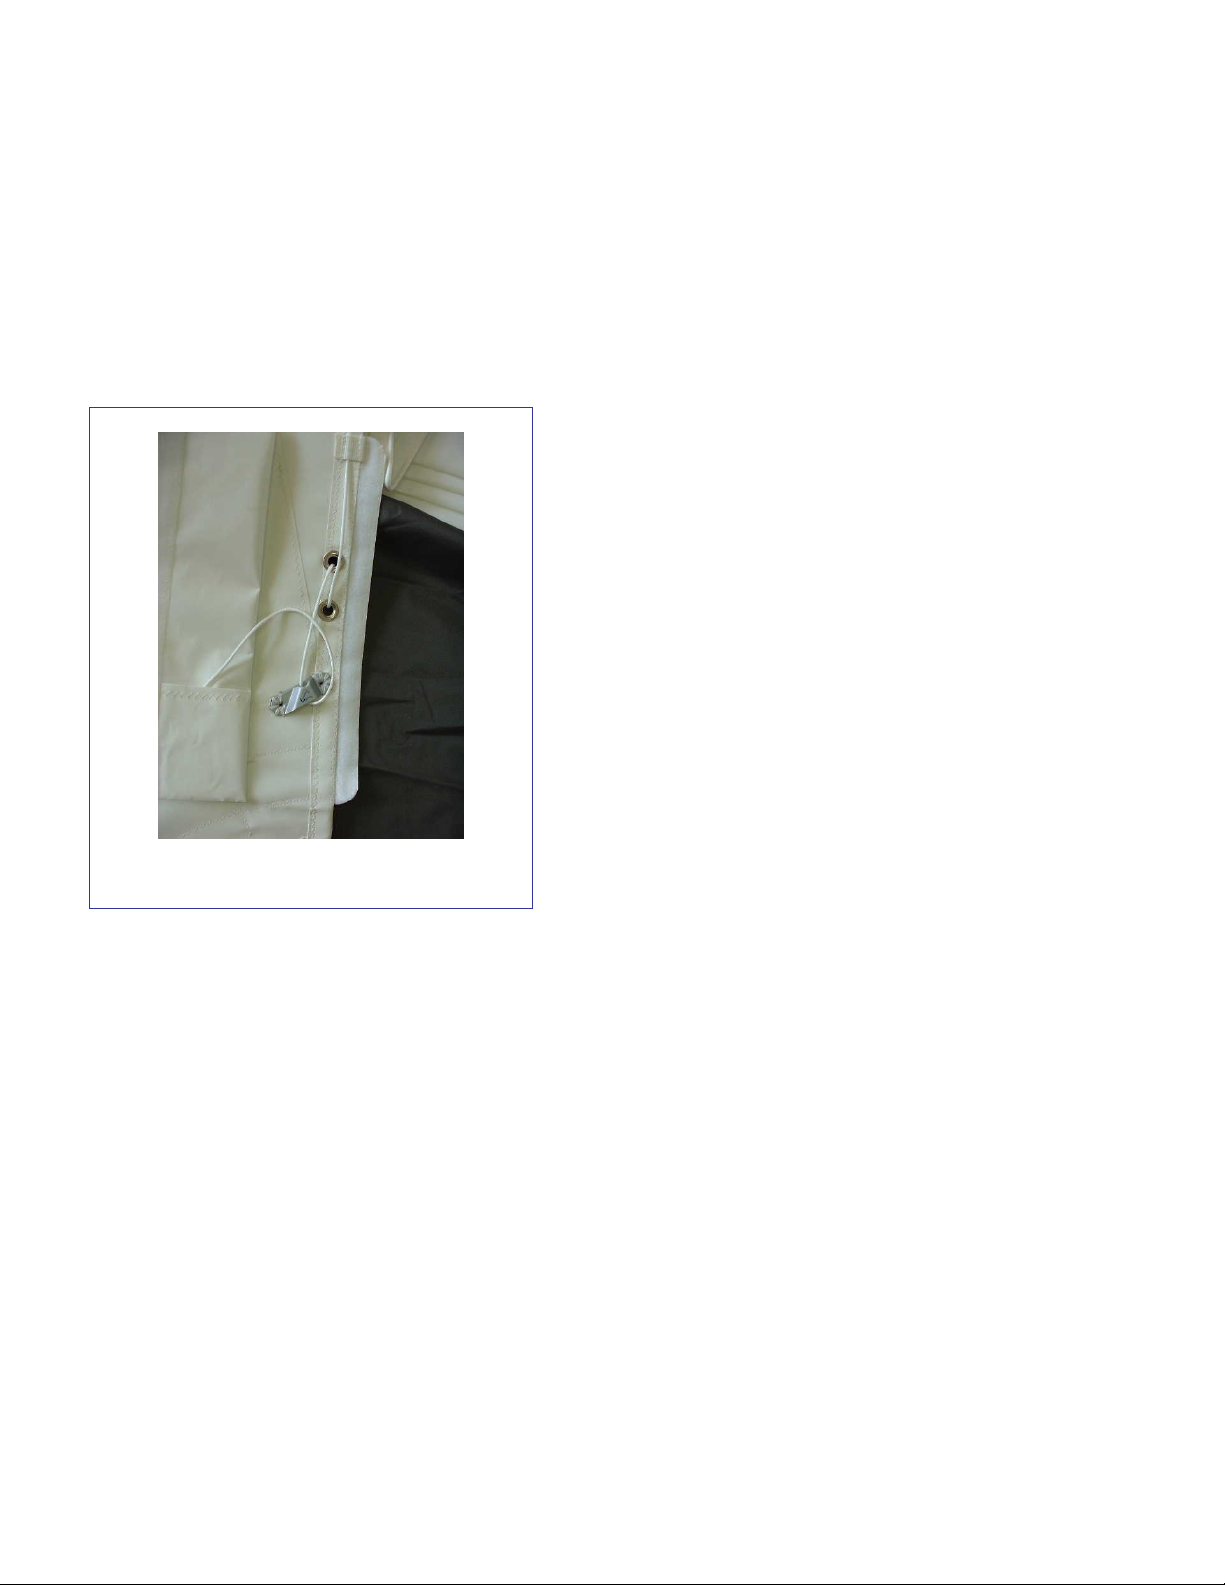
Occasionally, you find that the leech flutters a bit. If this happens, it’s usually that the sheet tension is not tight enough (you need
to winch the sail in a bit tighter). Assuming you have the leads in the right location and the sail still has a bit of flutter, you
should adjust the leechline to keep the leech from fluttering.
The first photo shows the leechline pocket opened up to reveal the leechline, snubbing eyes, cleat and the ‘tail’ pocket. The
snubbing eyes help to take the load from the line making cleating and un-cleating an easy task. The ‘tail pocket is on the inside
of the leechline cover and you can put the excess leechline tail into this pocket before closing the cover
Leechline, cleat and ‘tail’ pocket
** Special thanks to the owner of “Cheers” for the time and use of a fine 423.
Table of contents


