marinco AFI 33505 User manual

Retro Fit Windshield Washer Kit
for Marinco Deluxe Style Wiper Arms
Installation Instructions

www.marinco.com | 800.307.6702
Retro Fit Windshield Washer Kit
for Marinco Deluxe Style Wiper Arms
2
Please read through all instructions prior to assembly
Tools
• Phillips-head screwdriver
• 5/16· drill bit
• Electric drill
• Adjustable wrench, 12 mm open
end wrench or 12 mm deep
socket wrench
• Crimping/cutting pliers
• Needle nose pliers (optional)
• Small pan with hot water
(optional)
Required for Installation and Not Included With This Kit
• Black stranded wire for negative (see Wire Sizes Chart for proper gauge)
• White stranded wire for positive (see Wire Sizes Chart for proper gauge)
• 3 amp fuse and fuse carrier
• Momentary on/off switch or button rated for 3 amps minimum
• Butt connectors (2 pieces) for wire gauge you are using
• Marinco wiper arms & blades (Must have Marinco deluxe style wiper arms
and blades to ensure compatibility)
• 12 volt battery
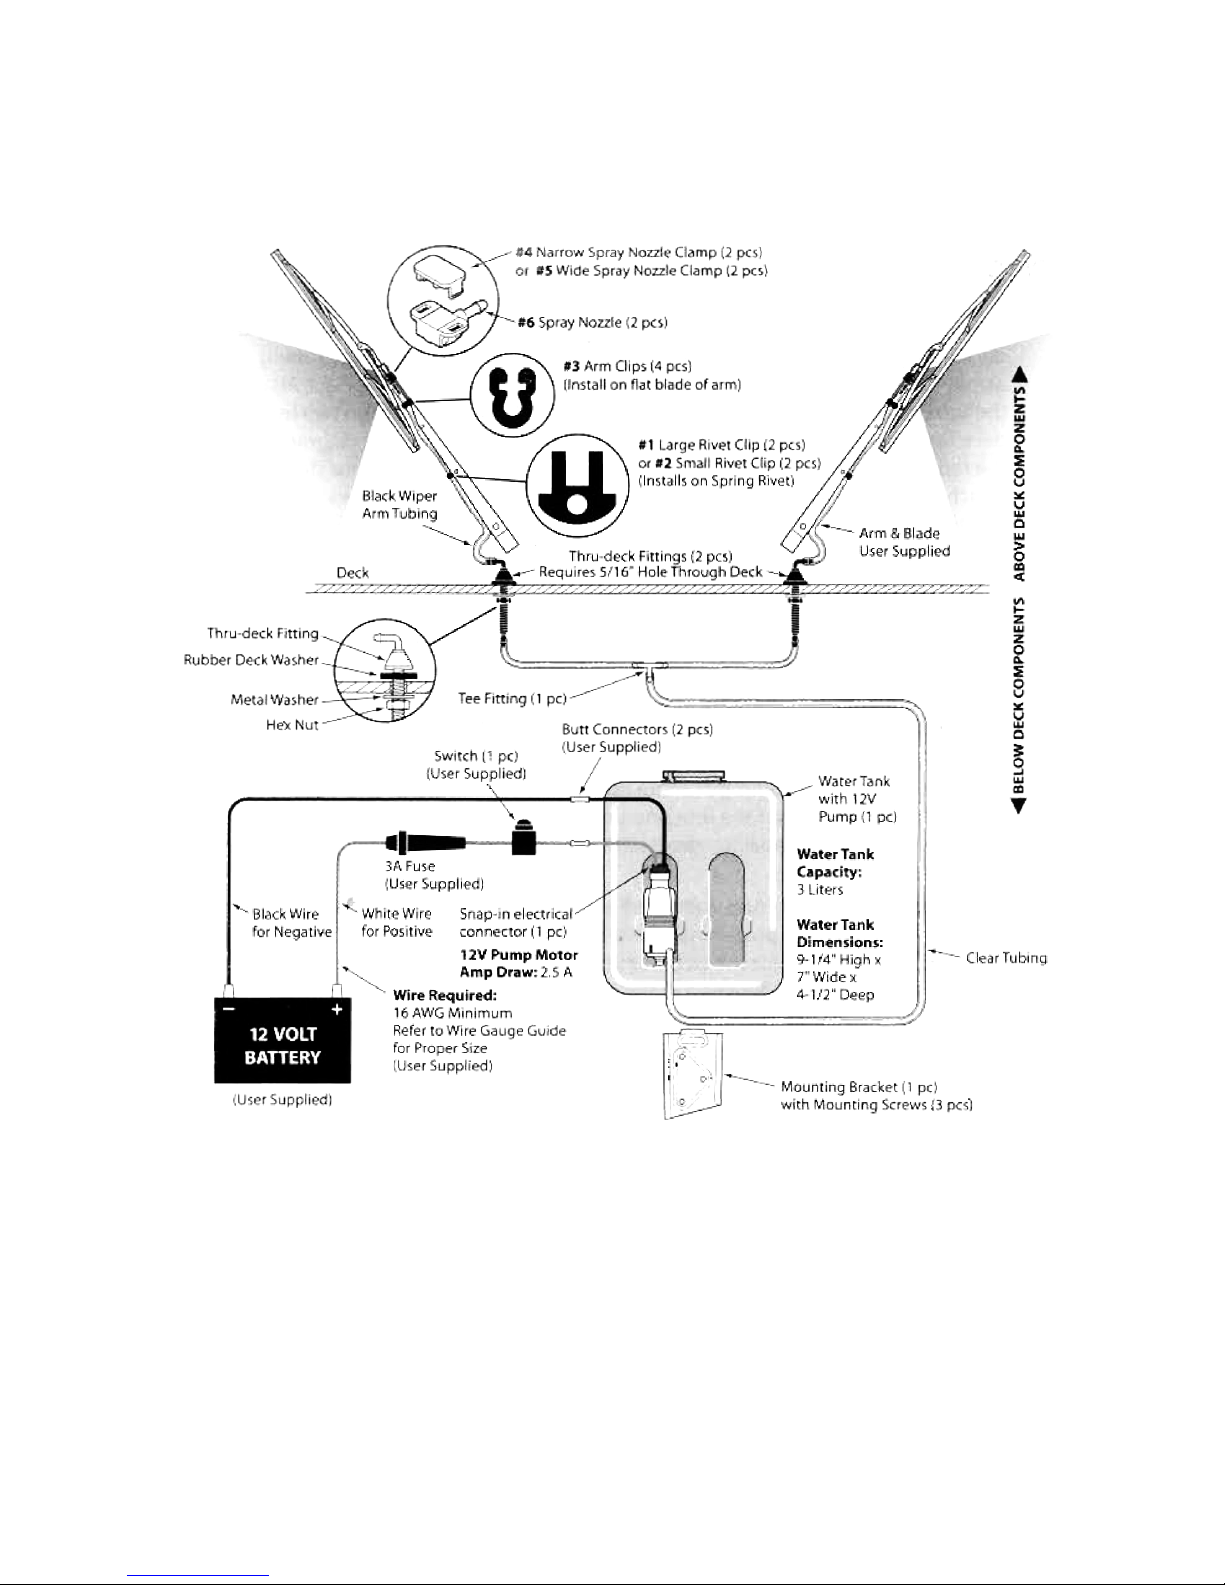
Components
• Water tank reservoir with snap-on
cap
• Reservoir pump with snap-in
electrical connector (1 piece)
• Mounting bracket with 3 #12 x 5/8”
long stainless steel Phillips-head
mounting screws
• Clear plastic tubing (16 ft.)
• Tee fitting
• Thru-deck fittings (2 pieces) with
metal washers (2 pieces), rubber
deck washers (2 pieces) and hex
nuts (2 pieces)
• Black wiper arm tubing (6 ft.)
• #1 Large rivet clip (2 pieces)
• #2 Small rivet clip (2 pieces)
• #3 Arm clips (4 pieces)
• #4 Narrow spray nozzle clamp (2
pieces)
• #5 Wide spray nozzle clamp (2
pieces)
• #6 Spray nozzle (2 pieces)

www.marinco.com | 800.307.6702
Installation Instructions
3
Above Deck Components
1) Determine the location of the thru-deck fittings. They should be positioned
close to the wiper arm, about 1” to 2” away from the wiper motor shaft. Be
sure you have plenty of clearance so that the wiper motor does not interfere
with the installation. The thru-deck fittings are long enough that they can be
installed in a deck up to 1-3/4” thick. For a thicker deck, counter-bore the
installation hole from below to accommodate the washer and hex nut. Drill a
5/16” diameter hole for each thru-deck fitting to be installed.
2) Insert the thru-deck fitting(s) through the installation hole(s).The rubber
washer should be positioned on top of the deck with the square flange
pointing up so that the thru-deck fitting nests inside the rubber washer.
Secure the thru-deck fitting from below with the metal washer(s) and hex
nut(s). Avoid over-tightening the nuts.
3) Next, install the clamp-on spray nozzles (part #6) onto the tip of the wiper
arm(s). Position the spray nozzle on the underside of the flat portion of the
wiper arm just below the wiper arm baton tip screw. Determine which of the
two sizes of clamps you need to use, #4 narrow clamp or #5 wide clamp,
based on the width of the flat portion of the wiper arm. Snap the clamp over
the arm onto the spray nozzle.
Note: Repeated snapping and unsnapping of the clamp can cause damage that
may prevent it from holding the spray nozzle in place.
4) After the spray nozzle(s) have been installed onto the tip of the wiper arm(s),
measure the distance from the spray nozzle to the thru-deck fitting and cut
the black rubber tubing to the appropriate length.
5) Determine the number of #3 arm clips needed to install the black rubber
tubing on the wiper arm(s).Short arms require one clip and long arms will
need two clips. Slide the rubber tubing through the hole in the arm clip(s).
insert the tubing into the spray nozzle fitting. Snap the arm clip(s) onto the flat
portion of the wiper arm. When using two clips,space them apart so that they
are located at opposite ends of the flat portion of the wiper arm.
6) To secure the rubber tubing to the lower wiper arm assembly, install the
optional rivet clip or feed through spring rivet. To install the rivet clip,
determine the size rivet clip for your wiper arm. Slide the rubber tubing
through the hole in the rivet clip and snap the clip onto the wiper arm spring
rivet. Use the large’ 1 rivet clip with the following Marinco Deluxe Wiper Arms:
33010A/33110A, 33014A/33114A, 33070A/33170A, 33032A/33132A or
33037A/33137A. Use the small #2 rivet clip with the following Marinco Deluxe
Wiper Arms: 33006A/33106A, 33007A/33107A or 33012A/33112A. To secure
the rubber tubing without using the rivet clip, feed the tubing under the wiper
arm spring rivet, behind the spring and back out through the side of the wiper
arm. Needle-nose pliers may be needed to perform this operation.
7) To complete the above deck installation, attach the end of the remaining
black rubber tubing onto the thru-deck fitting(s)

www.marinco.com | 800.307.6702
Retro Fit Windshield Washer Kit
for Marinco Deluxe Style Wiper Arms
4
Below Deck Components
1) To install the clear tubing below deck, press one end of the tubing onto
the thru-deck fitting. If you are installing two thru-deck fittings, stretch the
clear tubing across to the second thru-deck fitting and cut the tubing about
1” longer. Attach the tubing to the second thru-deck fitting. Cut the tubing
Joining the two thru-deck fittings in the middle and install the “T” fitting as
shown in the diagram. Install the remaining tubing to the “T” fitting. If you are
installing a single thru-deck fitting attach the tubing to the single fitting. Do not
trim the tubing to the water tank at this time.
2) Determine the location of the water tank. The water tank mounts on the
mounting bracket by sliding down over the bracket. Be sure you have proper
clearance. Mount the water tank in an upright position as close as possible
to the thru-deck fittings to minimize the delay time. Be sure the water tank is
mounted below the height of the spray nozzle(s) to prevent the free-flow of
water that has remained in the tubing. Install the mounting bracket with the
provided screws and slide the tank onto the bracket.
3) Trim the remaining clear tubing to the proper length and install on the fitting
at the base of the water pump. Be careful not to kink or squeeze the tubing.
The pump fitting is designed for a firm one-time fit. For an easier Installation,
heat the tubing end in hot (not boiling) water until it is soh and slide it on to
the water tank pump fitting.
4) Now connect the wiring, fuse and on/off switch to the water pump. Refer to
the hook-up illustration for proper installation. Be sure to observe correct
polarity (positive and negative) for the water tank pump. A snap-in electrical
connector is included to make the connection to the water tank pump. Select
the proper stranded wire size from the wiring chart below and cut wires of
sufficient length to avoid tension at the connecting points.
Wire Size Chart for 12V Installation
Length of Wire* Wire Size
0-20 Feet (0-5 Meters) 14 AWG (1.9 mm)
21-30 Feet (6-9 Meters) 12 AWG (2.3 mm)
31-50 Feet (10-15 Meters) 10 AWG (3.0 mm)
51-80 Feet (16-24 Meters) 8 AWG (4.0 mm)
Over 80 Feet (Over 24 Meters) 6 AWG (5.3 mm)
www.marinco.com | 800.307.6702
Installation Instructions
5

www.marinco.com | 800.307.6702
Retro Fit Windshield Washer Kit
for Marinco Deluxe Style Wiper Arms
6
Adjust Spray Heads
To adjust the four spray heads on each nozzle, insert a small pin into the spray
nozzle orifice and carefully rotate the nozzle to spray in the desired direction.
Troubleshooting
If the washer system does not operate, check the following:
1) Make sure there is windshield washer fluid in the tank. Allow a few moments
of Initial operation to let the water flow through all of the tubing.
2) Check the fuse to make sure it has not blown.
3) Check to make sure there are no clogs or kinks in the black above deck
tubing and the clear below deck tubing. The below deck tubing is clear to help
locate any clogs.
4) Check all wiring connections. Check that the water pump is functioning
by making sure there is 12 volts at the pump while the switch is in the on
position.
5) Determine that the on/off switch is functioning properly.

www.marinco.com | 800.307.6702
Installation Instructions
7

Retro Fit Windshield Washer Kit
for Marinco Deluxe Style Wiper Arms
Installation Instructions
www.marinco.com | 800.307.6702
12/2012 33505
Warranty information: www.marinco.com/limited-warranty
Table of contents
Other marinco Boating Equipment manuals

Popular Boating Equipment manuals by other brands


Dowco
Dowco V322 CC - 2019 installation instructions

Humphree
Humphree HCS-5 installation manual

Vetus
Vetus BOW4512D Operation manual and installation instructions

Dock Doctors
Dock Doctors SLIDING BOARDING STEP Assembly instructions

Mastervolt
Mastervolt Mass Combi 12/2000-100 Quick installation

Zattini Group
Zattini Group bamar BOXTRON E14S Use and maintenance instruction manual


