NEIL CAMPER 2023 Technical specifications
CONTACT INFORMATION
0800-222-0177 vent[email protected]om.ar www.neil.com.ar
USE AND INSTALLATION MANUAL
2023
USER MANUAL - CAMPER
INDEX
DECLARATION OF CONFORMITY. . . . . . . . . . . . . . . . . . . 2
UPDATED DIGITAL CONTENT . . . . . . . . . . . . . . . . . . . . . . 3
WARRANTY. . . . . . . . . . . . . . . . . . . . . . . . . . . . . . . . . . . . . . 4
TECHNICAL INFORMATION . . . . . . . . . . . . . . . . . . . . . . . .5
EXPLODED VIEW. . . . . . . . . . . . . . . . . . . . . . . . . . . . . . . . . .5
INSTALLATION SEQUENCE . . . . . . . . . . . . . . . . . . . . . . . . 6
PREVENTIVE MAINTENANCE. . . . . . . . . . . . . . . . . . . . . . 10
SOLUTIONS FOR LOW-PERFORMANCES. . . . . . . . . . . . 11
F.A.Q . . . . . . . . . . . . . . . . . . . . . . . . . . . . . . . . . . . . . . . . . . . 12
WATER TANK . . . . . . . . . . . . . . . . . . . . . . . . . . . . . . . . . . . . 13
EXTERNAL MEASUREMENTS . . . . . . . . . . . . . . . . . . . . . . 13
DEVICE/CONTROLLER FEATURES . . . . . . . . . . . . . . . . . 14
INDEX
DEVICE/CONTROLLER FEATURES . . . . . . . . . . . . . . . . . 14

USER MANUAL - CAMPER
DECLARACIÓN DE CONFORMIDAD
COMFORT SDN S.A., con domicilio social en Av. Bicentenario N° 459, Merlo, Buenos
Aires, Argentina, como fabricante de equipos enfriadores evaporativos para
vehículos marca Neil.
DECLARA: Que los equipos diseñados y fabricados por COMFORT SDN S.A. bajo las
especificaciones técnicas necesarias, una vez instalados en los vehículos, de
acuerdo a las instrucciones de montaje que lo acompañan , cumplen con las
directivas Europeas de nuevo enfoque sobre:
a) Compatibilidad Electromagnética: 72/245/CEE , 2006/28/CE
b) Bajo Voltaje: 72/23 EEC
c) Otros: 2011/65/EU
Que garantizan la seguridad de personas y bienes durante su instalación y
funcionamiento.
Buenos Aires, febrero de 2020
Lic. Neil Sebastian
Presidente Comfort SDN S.A.
DECLARATION OF CONFORMITY
COMFORT SDN S.A., with registered office at Av. Bicentenario N ° 459, Merlo,
Buenos Aires, Argentina, as a manufacturer of Neil brand evaporative cooling
equipment for vehicles.
DECLARES: That the equipment designed and manufactured by COMFORT SDN
S.A. under the necessary technical specifications, once installed in the vehicles,
according to the accompanying assembly instructions, they comply with the new
approach European directives on:´
a) Electromagnetic compatibility: 72/245/CEE , 2006/28/CE
b) Low voltage: 72/23 EEC
c) Others: 2011/65/EU
They guarantee the safety of people and goods during their installation and
operation.
Buenos Aires, February 2020
Lic. Neil Sebastian
Presidente Comfort SDN S.A.
DICHIARAZIONE DI CONFORMITÀ
COMFORT SDN S.A., con sede legale in Av. Bicentenario N ° 459, Merlo, Buenos
Aires, Argentina, come produttore di apparecchiature di raffreddamento evapora-
tivo a marchio Neil per veicoli.
DICHIARA: Che l'apparecchiatura progettata e prodotta da COMFORT SDN S.A.
secondo le specifiche tecniche necessarie, una volta installati sui veicoli, secondo le
istruzioni di montaggio allegate, si conformano al nuovo approccio delle direttive
europee su:
a) Compatibilità elettromagnetica: 72/245/CEE , 2006/28/CE
b) Basso voltaggio: 72/23 EEC
C) Altri: 2011/65/EU
Garantiscono la sicurezza di persone e merci durante l'installazione e il
funzionamento.
Buenos Aires, Febbraio 2020
Lic. Neil Sebastian
Presidente Comfort SDN S.A.
DECLARAÇÃO DE CONFORMIDADE
COMFORT SDN S.A., com sede na Av. Bicentenario N ° 459, Merlo, Buenos Aires,
Argentina, como fabricante de equipamentos de refrigeração por evaporação para
veículos da marca Neil.
DECLARA: Que o equipamento projetado e fabricado pela COMFORT SDN S.A. de
acordo com as especificações técnicas necessárias, uma vez instaladas nos
veículos, de acordo com as instruções de montagem que as acompanham,
cumprem a nova abordagem das diretivas européias sobre:
a) Compatibilidade eletromagnética: 72/245/CEE , 2006/28/CE
b) Baixa voltagem: 72/23 EEC
c) Outras: 2011/65/EU
Eles garantem a segurança de pessoas e mercadorias durante sua instalação e
operação.
Buenos Aires, febrero de 2020
Lic. Neil Sebastian
Presidente Comfort SDN S.A.
2

USER MANUAL - CAMPER
UPDATED DIGITAL CONTENT
Visit our website and find all the updated information about the installation and
maintenance of your Neil Evaporative Cooler.
https://neil.com.ar/en/technical-support/
You can find tutorial
videos about how you
can install the Evaporati-
ve Cooler in our website:
Access the maintenance
section in the website to
diagnose and fix any
technical problem:
Download the last ver-
sion of the manual in the
following link:
You can also find technical information about our products in other languages
Spanish Italiano Français Português Deutsche
neil.com.ar neil.com.ar/it neil.com.ar/fr neil.com.ar/po neil.com.ar/ge
3

USER MANUAL - CAMPER
WARRANTY
COMFORT SDN S.A., guarantees the devices in case of verified faulty materials or
manufacture of our Evaporative Coolers
COMFORT SDN S.A., will repair or replace based on its own technical criteria, the
faulty components or parts.
This warranty does not include the intentional or accidental damages caused by
inappropriate or incorrect use, and/or by modifications in the installation instruc-
tions and/or by changes in the specific materials of the product, and/or by any
other cause that is not attributable to the materials quality and/or manufacture
defect mentioned. As water pumps durability depend on the previous maintenan-
ce made by the user (periodic cleaning of the Evaporative Cooler) they are not co-
vered by the warranty.
Expenses outside the factory building by labor, shipping, packaging, transport or
products insurance and/or its parts to repair or replace by COMFORT SDN S.A., will
be charged to the customer
This warranty expires automatically 2 (two) years after the purchase.
CUSTOMER NAME:
SERIAL NUMBER OF THE EVAPORATIVE COOLER:
INSTALLATION DATE:
INSTALLED VEHICLE:
SELLER/INSTALLER:
KEEP THIS MANUAL TO MAINTAIN YOUR WARRANTY COVERAGE.
The warranty must be validated by the seller and/or the customer in the following link:
https://neil.com.ar/en/warranty/
SERIAL NUMBER
4

VERY IMPORTANT
Disconnect the terminals (-) and (+) from
the battery when welding on the vehicle.
USER MANUAL - CAMPER
5
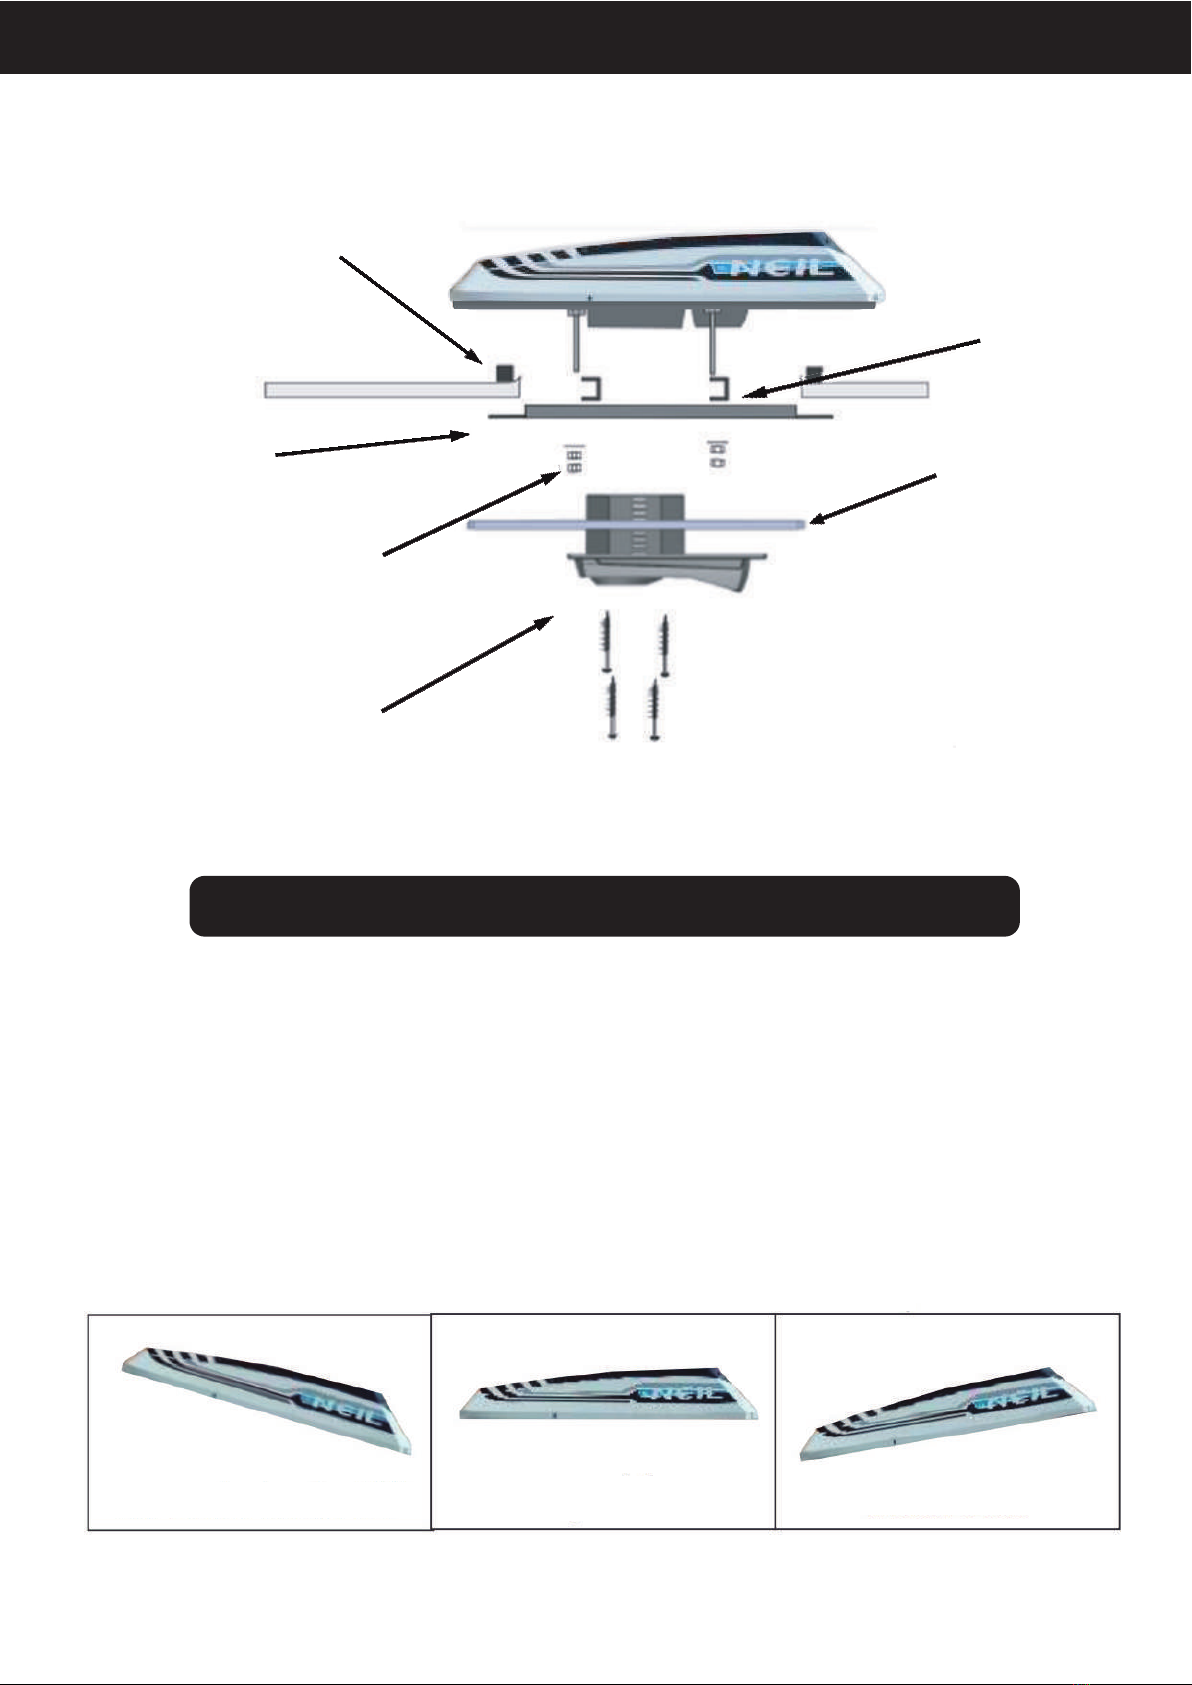
Irrigation tube
Condensate Pump Filter
Level sensors
Humidification
pump filter
Pre-cooling chamber lid
Universal base
Telescopic
bars
Universal frame
Control Panel
Cover
Evaporator
filter
Pre-cooling
chamber lid
Electro
fan
Control panel fixing screws
Negative black
cable (thick)
Positive red
cable (thick)
Negative black
cable (thin)
Positive red
cable (thin)
Water pump to the water
tank
Condensate Pump Filter
The electrical pump is
submersible and can be
placed inside the water tank
Fuse holder and fuse
+
Hose with electrical and
hydraulic connection

USER MANUAL - CAMPER
INSTALLATION SEQUENCE
PREPARING THE VEHICLE ROOF
A- ROOFS WITHOUT SUNROOFS:
When a choice is possible on where to perforate the roof, it is recommended to do
it on the driver seat line, as air distribution is optimal here. (IT IS ALWAYS MORE
EFFECTIVE TO GET COOL AIR FROM THE FRONT).
After defining the best spot, perforate a hole of 430 mm x 310 mm, forming the
radius with 30 mm radius. Then bend the metal upwards to give rigidity. (Approxi-
mately height 10mm all around the perimeter).
Put the weatherstrip all around the rectangular hole of 600 mm x 400 mm, taking
care that the upper surface be in a horizontal plane to obtain the right sustain of
the base of the Evaporative Cooler and prevent water and air from getting into the
cabin.
In case of a roof with gutters, they must be filled with a rubber or thin weatherstrip.
Once the roof is leveled, the self-adhesive weatherstrip included in the package
must be installed.
Place the neutral siliconized sealant on the weatherstrip and in the internal perime-
ter before placing the device.
You can find tutorial videos about how to correctly cut
the roof and also download the “roof cutting template”
in the following link:
https://neil.com.ar/en/installation-tutorials/
6
NO YES
Incorrect Correct

USER MANUAL - CAMPER
Set the device in the roof hole, center it and adjust the telescopic support bars as
shown in the following image:
The 4 stud screw must be adjusted in a cross and even way until making sure the
weatherstrip starts being pressed against the base, preventing water and air from
entering.
ADJUST THE DEVICE TO THE ROOF
B- ROOF WITH SUNROOF:
- Remove the sunroof
- If the sunroof frame doesn’t have a weatherstrip, put one all around the peri-
meter to obtain the correct support for the device base.
- Put neutral siliconized sealant on the weatherstrip before placing the device.
UNIVERSAL TELESCOPIC SUPPORT BARS:
PARTS OF EACH ROD
You can find tutorial videos about how to correctly
adjust the Neil Evaporative Cooler in the following link:
https://neil.com.ar/en/installation-tutorials/
7
USER MANUAL - CAMPER
With the Evaporative Cooler firmly adjusted to the roof, place the external frame
and the control panel. Before adjusting all the control panel screws, the electrical
connection with its corresponding fuses must be correctly connected. In case of an
internal hose installation, the electrical and hydraulic connection must be installed
before adjusting the screws.
FRAME AND CONTROL PANEL SETUP
The Evaporative Cooler must NOT be installed with a negative tilt
IF NEEDED, THE DEVICE CAN BE INSTALLED WITH
THE FRONT PART FACING THE BACK OF THE VEHICLE
Correct up to 22 degrees Acceptable Incorrect
Adjustable
stud screws
Internal Frame
Fixing screws of
the Control panel
Weatherstrip
Control panel
Telescopic
support bars
Washer, nut
and locknut
8
USER MANUAL - CAMPER
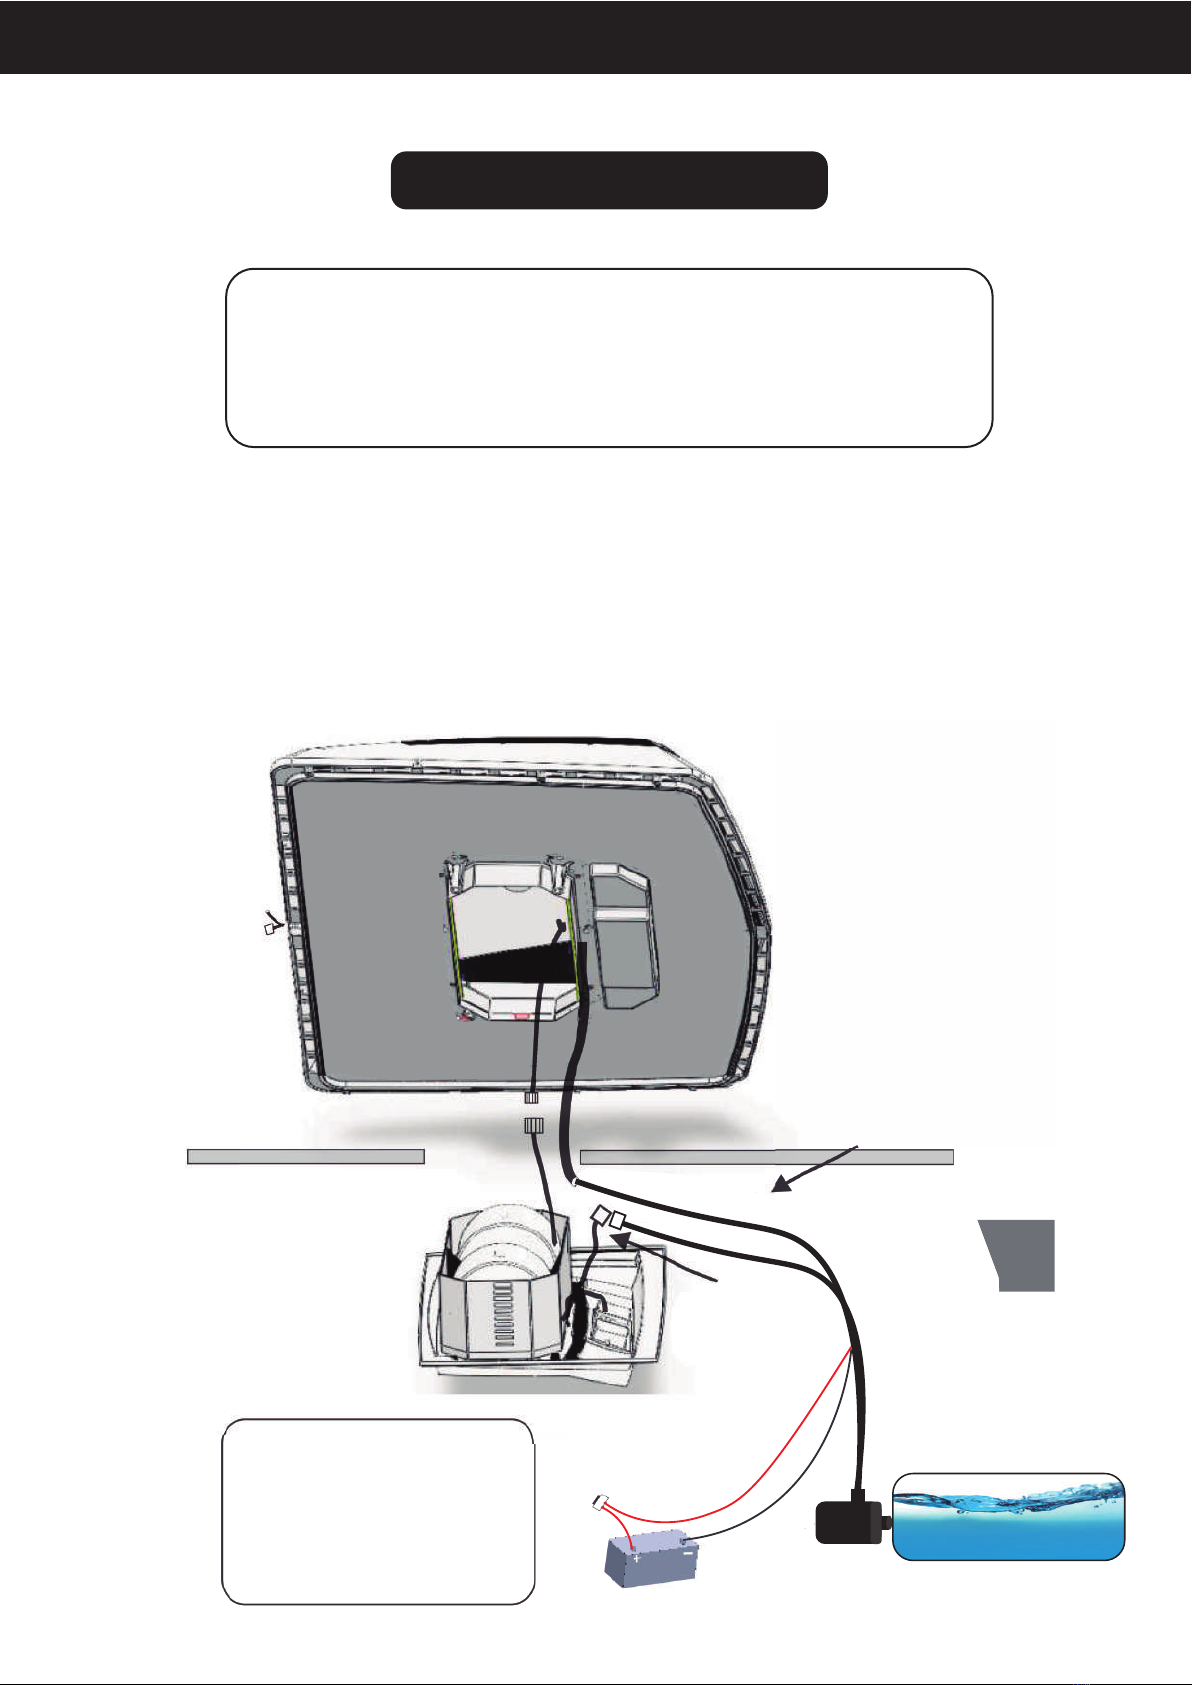
In vehicles where the water tank is placed inside the cabin, or a pre-existing water
tank is used, it is recommended to use an internal electrical and hydraulic connec-
tion.
ALL THE EVAPORATIVE COOLERS INCLUDE BOTH OPTIONS OF CONNECTION
(external and internal)
MOTORHOMES
INSTALLATION WITH INTERNAL HOSE
External
electrical
and
hydraulic
connection
ROOF
INTERNAL
HYDRAULIC
CONNECTION
INTERIOR OF
THE VEHICLE
BOMBA
REPOSITORA
GOMA DE
ACOPLE
AGUJERO
DE 9 mm
Positive red
cable (thick)
Negative
black cable
Cables
finos DEPÓSITO DE
AGUA NO
INCLUÍDO
BATTERY
The brushless pump is submersible
so this can be placed inside
the water tank. This can also
be placed in the exterior making
a small hole and using a rubber.
WATER TANK
NOT INCLUDED
You can find detailed information and tutorial videos
about how to install the Evaporative Cooler in a Motor-
home in the following link:
https://neil.com.ar/en/installation-tutorials/
9
INTERNAL
ELECTRICAL
CONNECTION

Every 300 hours of use it is recommended to do the following maintenance proce-
dure:
1 - Remove the white cover, taking out screws on the sides.
2 - The irrigation tube placed in the filter holder basket must have all its holes
unblocked. Compressed air can be used to remove any obstruction from
the “T” shape.
3- Remove the evaporator filter and rinse it with plenty of water. Every 900
hours of use, replace it with a new one.
4- Remove the pre-cooling chamber lid (adjusted with screws) and clean the
SENSORS and the condensate pump filter or replace it.
5- Check the functioning of the condensate pump as follow:
a . Turn on the device with the fan at its minimum speed.
b . Activate the pre-cooling system (Button 10).
c . When the condensate pump is working, the quantity of water that comes
out of the irrigation tube must be able to fill an equivalent of a cup of coffee
(100 ml).
d . If the water volume is less than 100 ml, replace the condensate pump for a
new one of equal voltage.
6- Reassemble all the pieces in their original place.
PREVENTIVE MAINTENANCE
BEFORE TURNING OFF THE DEVICE AND KEEP
IT WITHOUT USING IT FOR A LONG TIME, IT IS RECOMMENDED
TO LET IT WORK FOR 3 HOURS WITHOUT THE PRE-COOLING
SYSTEM IN ORDER TO DRY THE FILTER AND AVOID UNPLEASANT ODOURS.
USER MANUAL - CAMPER
Detailed information about your Evaporative Cooler
maintenance can be found in the following link:
https://neil.com.ar/en/maintenance/
10
1- ELECTRONIC BOARD
Make sure that the pre-cooling button “10”
(see page 14) is activated, and that there is
not a blinking light (lack of water). If the
button “10” (see page 14) is blinking and the
water tank still has water left, check the
water pump and the water hose.
2- WATER PUMP
Make sure that the water tank pump is not
burned or that its turbin is not loose (it can
make noise and still not pump water). Also
control that the electrical connection is not
sulfated.
3- WATER HOSE
Make sure that the hose is not pinched or
blocked.
4- CONDENSATE PUMP
Make sure that the condensate pump is not
burned or that the turbine is not loose.
Control that the irrigation tube has all its
holes unblocked and that the filter is damp
along its length.
5- DIRECT AUTOMATIC SYSTEM
If the previous 4 items are checked and the
Evaporative Cooler is still not working co-
rrectly (can’t cool the air as usual) program
the electronic board in direct automatic
system mode, so the device will keep coo-
ling elementally until checked by the techni-
cal service of the NEIL EVAPORATIVE COO-
LERS. (See “Electronic board”).
¿WHAT TO DO WHEN THE NEIL EVAPORATIVE COOLER
LOWERS ITS PERFORMANCE?
Detailed information about how to fix performance
problems of the Evaporative Cooler can be found in the
following link:
https://neil.com.ar/en/maintenance/
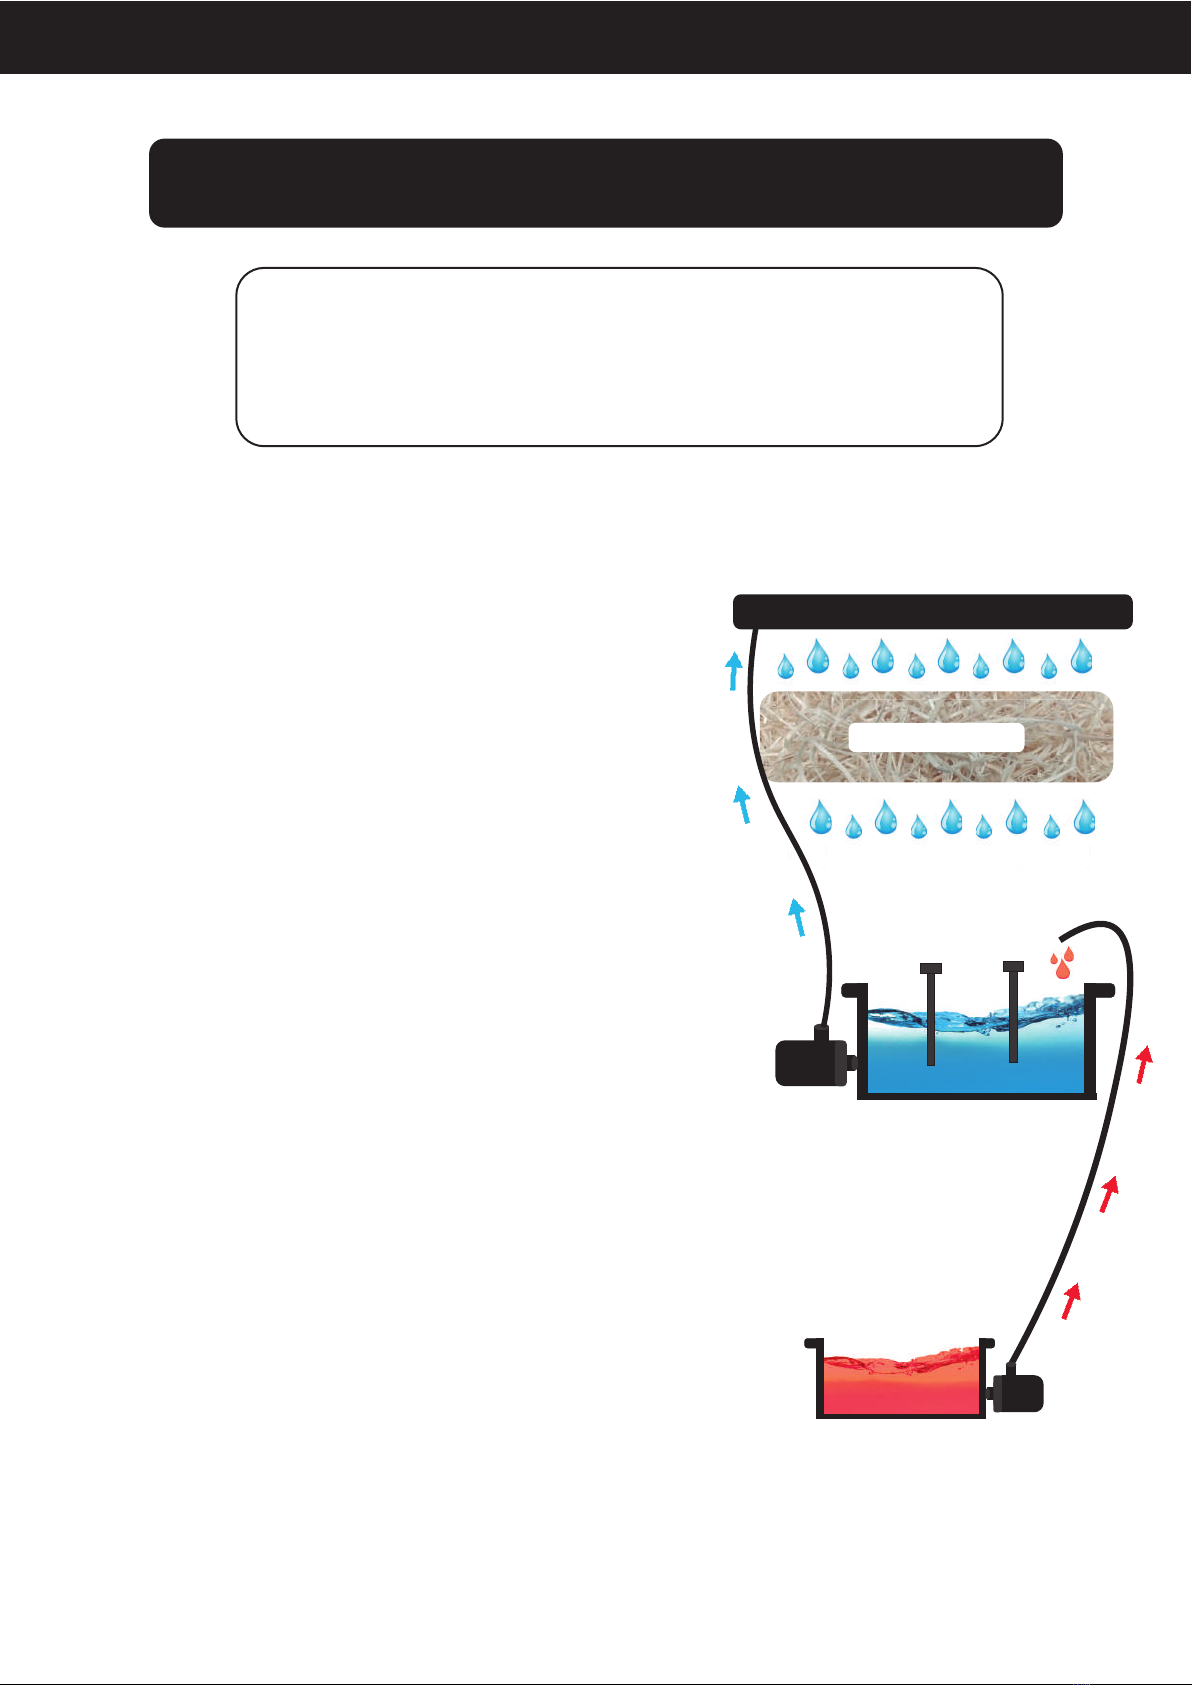
Basic components and operation Check-List
Irrigation Tube
Condensate
Pump
Sensor Sensor
Pre-cooling Chamber
(COLD WATER)
Water tank
(Higher temperature than the ambient temperature)
Water will fill the pre-cooling
chamber as it runs out of
water
Evaporative Filter
Water
Pump
USER MANUAL - CAMPER
11

USER MANUAL - CAMPER
How much does an Evaporative Cooler cool?
The performance of an Evaporative Cooler
depends on the ambient temperature and the
relative humidity. There is a table in our website
with information about the relationship
between the outlet air temperature from the
device, the humidity and the ambient tempera-
ture
https://neil.com.ar/en/how-does-it-work/
Does an Evaporative Cooler cool as an air con-
ditioner?
The air conditioner only cools with the vehicle
engine running or with a generator set. This
causes:
- Higher fuel consumption by losing power
when moving.
- Environmental contamination by com-
bustion gases coming from the exhaust.
- Disturbing noises from the engine or the
generator set.
- It is not recommended to let the engine
regulate the air conditioner while running as
this can cause premature wear.
The Evaporative Cooler works in both running
and parked vehicles. Its operation is only elec-
trical and consumes only water.
How many degrees can it cool down?
Evaporative Coolers work as they evaporate
water. The temperature decrease depends on
the climate (at a higher temperature and a
lower humidity, the cooling is greater). It can
decrease on average 10°C in warm climates and
relatively humid; and 20°C in warm but dry
climates.
Can I regulate the temperature?
In an air conditioner one can regulate the tem-
perature. In an evaporative cooler the outlet air
temperature depends on the climate condi-
tions.
Does it work in hot climates?
As a general rule, at a higher ambient tempera-
ture the humidity is lower so the evaporative
coolers will have a higher water evaporation
capacity and the cooling will be greater. 2200
BTU are estimated per liter evaporated per
hour.
F.A.Q
Is it more productive if I put ice in the water?
In the case of the NEIL Evaporative Cooler,
thanks to its pre-cooling system (patented),
the water temperature doesn’t affect the
outlet air temperature, and it is not necessary
to add ice to the water to lower the tempera-
ture (as in other coolers).
Does it moisturize the air?
Absolutely NOT. The cooling process is produ-
ced thanks to the moisture absorption capaci-
ty of the external air. This process takes place
inside the Evaporative Cooler, when the air is
ejected by the nozzles, it starts losing humidity
as it moves away from them, this leads to a
normal humidity rate inside the vehicle. Accor-
ding to research studies, high welfare condi-
tions, performance and attention in human
beings are given between 18°C and 27°C with
ambient relative humidity between 40% and
60%; these conditions are given by the NEIL
Evaporative Coolers.
Can I use air fresheners or scents in the water?
We only recommend using 3 drops of bleach
per liter of water.
Can I use a 220v to 12v converter as a power
source?
Yes, this must provide at least 10 amps for 12
volts and 5 amps for 24 volts.
Can 12 volts devices be installed in a 24 volts
vehicle battery?
No, because this leads to an imbalance in the
battery charge.
Does the Evaporative Cooler start cooling as
soon as it is turned on?
The device will take a time to cool until the
evaporative filter is totally damp.
12

USER MANUAL - CAMPER
The pre-cooling system admits any water tank placed in any part of the vehicle (below the level
of the Evaporative Cooler in any position (horizontally or vertically)).
In MOTORHOMES the pre-existing water tank can be used for the Evaporative Cooler
WATER TANK
EXTERNAL MEASUREMENTS
OF THE CAMPER MODEL
9 cm / 3.54 in
6 cm / 2,36 in 88 cm/ 34,6 in
70 cm/ 27,6 in
13

MANUAL DE USO -
CAMPER
MICROPROCESADOR PREMIUM
1. DISPLAY ALFANUMÉRICO
2. AUMENTO VELOCIDAD DEL AIRE
3. DISMINUCIÓN VELOCIDAD DEL AIRE
4. SENSOR DEL CONTROL REMOTO
5. DISPLAY DE CLIMATIZACIÓN
6. TIMER
7. ILUMINACIÓN INTERNA
8. ON-OFF CLIMATIZADOR
9. ILUMINACIÓN EXTERNA (modelo viejo)
10. SISTEMA DE PRE-ENFRIADO
ILUMINACIÓN DE TECLAS
La luz de fondo del teclado es ámbar y cambian a color azul cuando son presionadas. La tecla 9
toma el color de la luminaria externa ( modelo COOL FLAT PREMIUM).El nivel de luminosidad del
teclado se puede regular con las teclas 3 y 2 cuando todas las otras funciones están desconecta-
das. Cuando se activa una función, la alarma o el indicador de falta de agua, las teclas se iluminan
al máximo por 14 segundos, luego vuelve a la luminosidad programada.
CLIMATIZACIÓN
El climatizador se enciende o apaga desde la tecla 8. Para aumentar o disminuir la velocidad del
aire, se utilizan las teclas 2 y 3 que permiten 10 diferentes niveles. El sistema de pre-enfriado
puede ser conectado o desconectado con la tecla 10.
Puede encontrar un video explicativo del uso del
controlador y sus funciones ingresando en:
https://neil.com.ar/es/soporte-tecnico-es/guia-de-uso-rapido/
14
CONNECT CONTROLLER
The Connect controller allows you to control
the functionalities of the evaporative cooler
from an APP that must be downloaded to your
cell phone, by scanning the following QR code
or by going to the web:
neil.com.ar/app
WHAT FUNCTIONS DOES THE APP OFFER ME?
ON/OFF
INCREASE AIR SPEED
AIR SPEED DECREASES
GO TO THE SECOND SCREEN
GO BACK TO THE
PRINCIPAL SCREEN
TIMER
ACTIVATE/DEACTIVATE
COLD MODE
7
1. On/O
2. low air speed
3. Increase Airspeed
4. Bluetooth connection indicator
5. Lack of water indicator
6. Timmer On Indicator
7. Remote Sensor
23
6
5
4
1
USER MANUAL - CAMPER
MICROPROCESSOR
1 - ALPHANUMERIC DISPLAY
2 - FAN SPEED UP
3 - FAN SPEED DOWN
4 - REMOTE CONTROL SENSOR
5 - COOLER DISPLAY
6 - TIMER
7 - INTERNAL LIGHTING
8 - COOLER ON-OFF
9 - EXTERNAL LIGHTING (old model)
10 - PRE-COOLING SYSTEM
LIGHTING KEYS
The keys backlight is amber and they change to blue when pressed. The button 9 takes the same
color as the external lighting (COOL FLAT PREMIUM model). The level of lighting of the keys can
be regulated with the keys 3 (-) and 2 (+) when the cooler is turned off. When a button is pressed,
a feature is activated, the alarm clock or the lack of water indicator, the keys are illuminated at
maximum for 14 seconds, then they go back to programmed lighting.
COOLING
The Evaporative Cooler is turned ON and OFF with the button 8. To increase or lower the fan
speed use the buttons 2 and 3 that let you choose from 10 different levels. The pre-cooling
system can be turned ON-OFF with the button 10.
An explanatory video about how to use the controller
and its features can be found in the following link:
https://neil.com.ar/en/quick-start-guide/
14
PROGRAMING DISPLAY
EXTERNAL LIGHTING
INTERNAL LIGHTING
SOUND CLOCK
REMOTE CONTROL
ON-OFF AUTOMATIC
ALARM CLOCK
DIGITS
DIGITS
BATTERY LEVEL
COOLING DISPLAY
FAN
LACK OF WATER SIGNAL
ELECTRICAL OVERLOAD
OR SHORT CIRCUIT
ELECTRONIC BOARD
TEMPERATURE SENSOR
FAN SPEED LEVEL
TIMER
Los 4 dígitos siempre muestran la HORA actual, excepto cuando se esta programando el DES-
PERTADOR, la ALARMA o la configuración del SONIDO. Los iconos iluminados indican que fun-
ción esta activada. Presionando la tecla 6 se enciende el icono DESPERTADOR y los dígitos indi-
can el tiempo programado para ese items. Si se presiona nuevamente la tecla 6, se enciende el
icono de ALARMA y el display muestra el ultimo horario programado para que suene. Siempre
que la tecla 6 permanezca sin ser presionada por 5 segundos, el display volverá a indicar la hora
actual y el icono iluminado será el RELOJ.
PROGRAMACIÓN DEL RELOJ
Al presionar y mantener presionada la tecla 6 por 3 segundos, los 2 primeros dígitos ( hora) del
display comienzan a titilar. Usando las teclas 2 y 3 se ajusta la hora actual, luego presionar la tecla
8 y pasan a titilar los otros 2 dígitos (minutos) para ajustarlos. Por ultimo, se vuelve a presionar la
tecla 8 y después de 5 segundos los dígitos indicaran la hora actual y el icono de RELOJ quedará
iluminado.
PROGRAMACIÓN DEL ON-OFF AUTOMÁTICO
Con el climatizador encendido, presionando la tecla 6 , queda iluminado el icono ON-OFF AUTO-
MÁTICO y los dígitos comienzan a titilan para poder programar la hora deseada de apagado con
las teclas 2 y 3.Luego presionar la tecla 8 y el display vuelve a mostrar la hora actual, quedando
el icono ON-OFF AUTOMÁTICO encendido. Para desactivar esta función se presiona la tecla 6 y
se busca con las teclas 2 o 3 la palabra OFF en el display, y luego se presiona la tecla 8.
Si el climatizador esta apagado, lo que se programa es la hora del encendido automático.
PROGRAMACIÓN DE LA ALARMA
Al presionar la tecla 6 dos veces, comienzan a titilar los 2 primeros dígitos del display ( hora) y el
cono de ALARMA se enciende .Para ajustar la hora de la alarma se utilizan las teclas 2 y 3 y se pre-
siona la tecla 8, para luego ajustar los minutos con las teclas 2 y 3 , finalmente presionando la
tecla 8 empezara a titilar en el display la palabra ON o la palabra OFF. Nuevamente con las teclas
2 o 3 escojo si quiero activar (ON) o desactivar (OFF) la alarma y por ultimo presiono la tecla 8 y
el display mostrará la hora actual y el icono de la alarma permanecerá encendido o apagado,
según haya seleccionado ON u OFF. A diferencia del ON-OFF automático, la alarma no se desco-
necta automáticamente cuando se cumple el horario programado, sino que volverá a sonar al
día siguiente si no es desactivada.
AJUSTE DE POTENCIA DE BOMBA REPOSITORA
Dependiendo de la distancia entre el deposito de agua y el climatizador, se necesita mayor o
menor potencia en la bomba repositora. De origen viene ajustada al 50%, que corresponde a 2
metros de manguera aproximadamente. Si se utiliza 9 metros de manguera puede hacer falta
programar a un 100%. Para regular la potencia se apaga el climatizador y se presiona la tecla 10
por 8 segundos, y aparecerá en el display derecho el nivel de potencia, luego de seleccionar uno
con las teclas 2 o 3 , volver a presionar la tecla 10. Si se desconecta el equipo de batería, hay que
volver a programar.
MANUAL DE USO -
CAMPER
15
https://youtu.be/pQ-SH2AVrJA
VER VIDEO
1Download and Install Neil's APP on your cell phone.
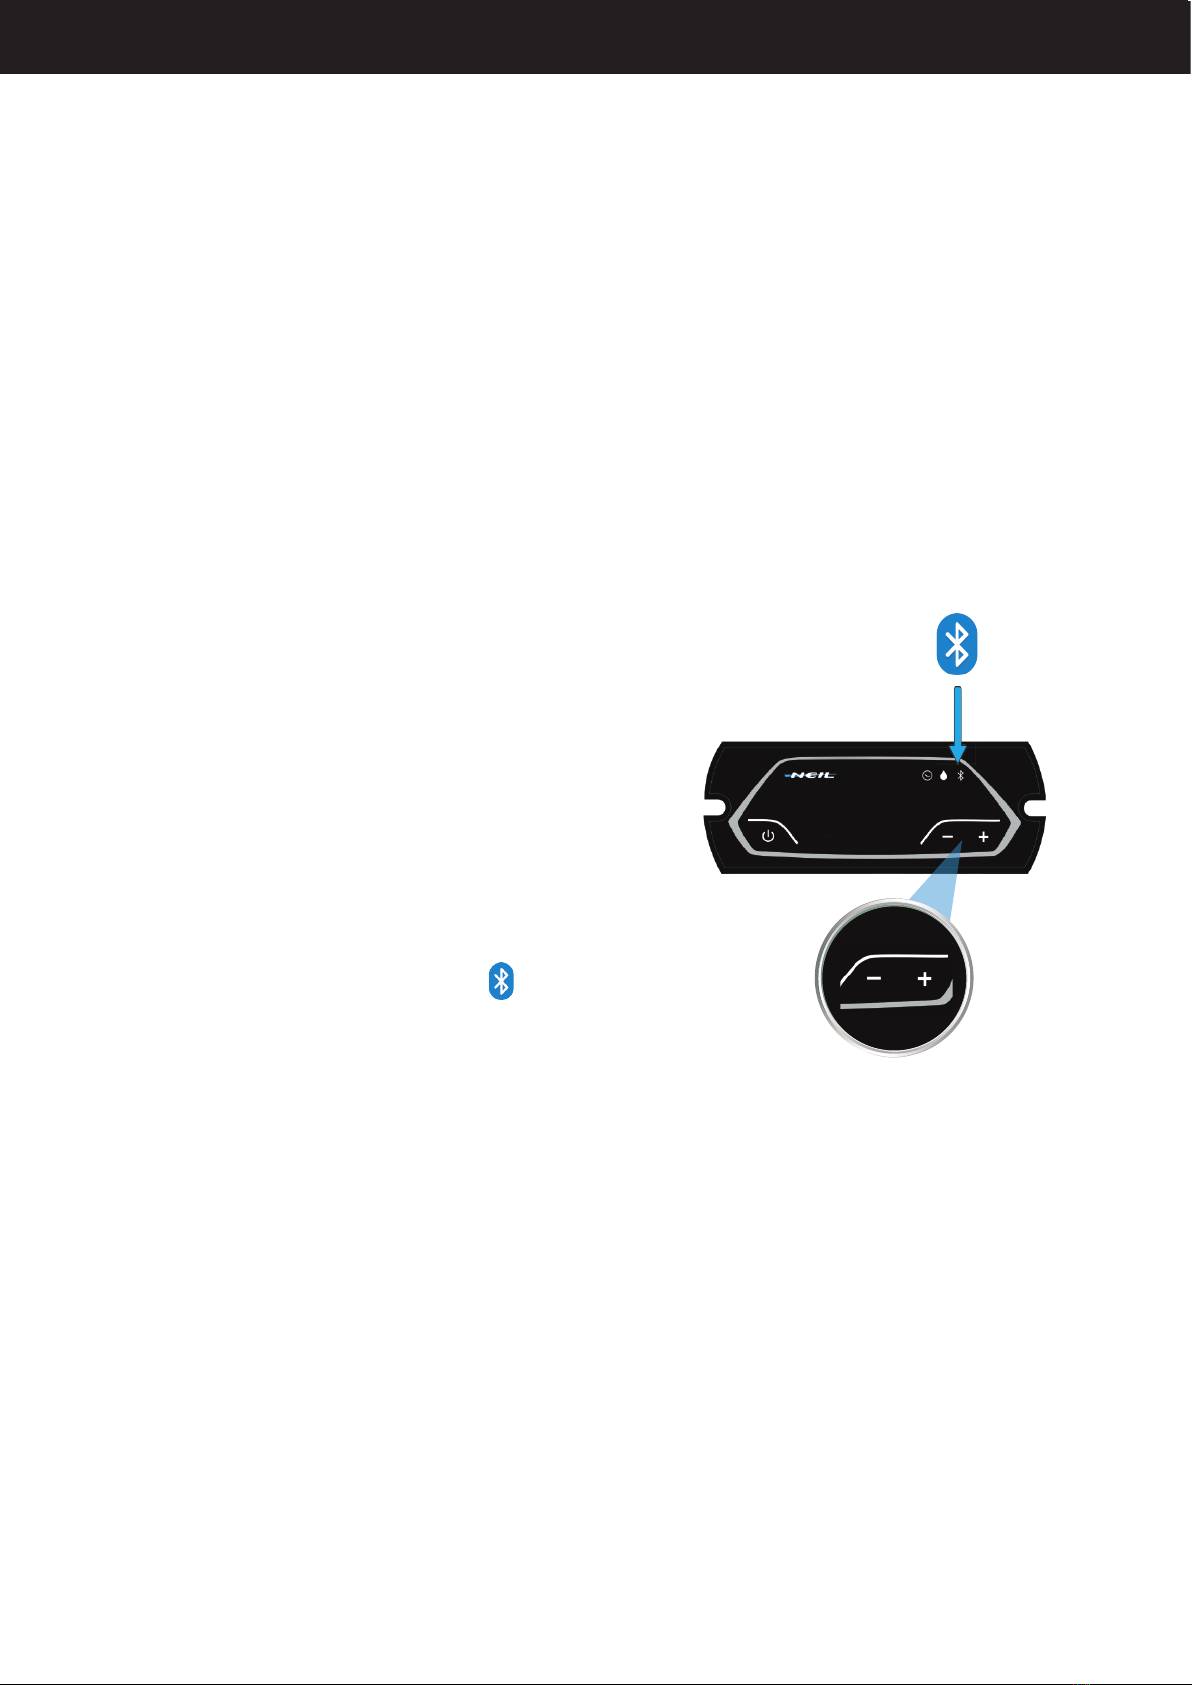
2Complete the form with
your data
3On your cell phone make
sure you have bluetooth
activated. On the dash-
board, with the evapora-
tive cooler turned off,
press the + and – buttons
at the same time for 5
seconds, you will see that
the command starts
blinking.
4When the evaporative cooler appears on the screen,
press “Connect”
5On the main screen, you can turn the evaporative
cooler on and off and increase or decrease the air
speed. Pressing the icon below will access more
functions.
neil.com.ar/app
HOW TO PAIR THE APP WITH
THE NEIL EVAPORATIVE COOLER
TIMER
The 4 digits always show the current TIME, except when an ALARM CLOCK or the SOUND are
being programmed. The illuminated icons show that the feature is activated. Pressing the
button 6, the ALARM CLOCK icon is illuminated and the digits indicate the programmed time for
that item. If the button 6 is pressed again, the ALARM icon is illuminated and the display shows
the last programmed time for it to ring. Anytime the button 6 is not being pressed for 5 seconds,
the display will show again the current time and the icon that is illuminated will be the CLOCK.
TIME SETTING
While pressing and holding down the button 6 for 3 seconds, the first two digits (hour) of the
display start blinking. Using the buttons 2 and 3 it is possible to adjust the current time, then
press the button 8 and the other two digits (minutes) will start to blink to adjust them. The last
step is to press and hold the button 8 for five seconds, the digits will show the current time and
the CLOCK icon will stay illuminated.
AUTOMATIC ON-OFF SETTING
With the Evaporative Cooler turned ON, press the button 6 so the AUTOMATIC ON-OFF icon is
illuminated, the digits will start to blink to program the turned OFF time with the buttons 2 and
3. Then press 8 and the display will show the current time, the AUTOMATIC ON-OFF icon will stay
illuminated. To deactivate this feature press 6 and search with the buttons 2 and 3 the word
“OFF” in the display, then press 8. If the cooler is turned OFF, the turn ON time is going to be pro-
grammed.
ALARM CLOCK SETTING
If the button 6 is being pressed twice, the first two digits in the display (hour) will start to blink
and the ALARM CLOCK icon will be illuminated. To adjust the alarm clock timer, buttons 2 and 3
are being used. Then press 8 to adjust the minutes with buttons 2 and 3. Pressing the button 8
the words “ON” and “OFF” will start blinking. Once again, with the buttons 2 or 3 choose if you
want to activate (ON) or deactivate (OFF) the alarm clock. Press 8 so the display shows the
current time and the alarm clock icon will stay illuminated or not, depending on your previous
choice. Opposite to the AUTOMATIC ON-OFF feature, the alarm clock will not be automatically
disconnected when the programmed time setting is accomplished. The alarm clock will ring
again the next day if it is not deactivated.
WATER PUMP POWER SETTING
Depending on the distance between the water tank and the cooler, more or less power will be
needed in the water pump. The water pump is programmed in 50% by default, this corresponds
to a 2 meter long hose approximately. If a 9 meter long hose is being used, the water pump
power can be changed to 100%. To regulate the power, turn off the cooler and press 10 for eight
seconds, the display will show the power level, then select the power level with buttons 2 or 3
and press 10 again to finish the setting. If the battery is disconnected, set it again.
USER MANUAL - CAMPER
15
https://youtu.be/pQ-SH2AVrJA
SEE VIDEO

MANUAL DE USO -
CAMPER
PROGRAMACIÓN A SISTEMA DE HUMECTACIÓN DIRECTO
Si por alguna razón los sensores de la camara de pre-enfriado dejaran de funcionar, se puede
programar el climatizador para que funcione en forma directa hasta que se pueda acudir al servi-
cio técnico. La forma de activarlo es la siguiente:
Con el climatizador encendido, presionar la tecla 10 por 8 segundos y ésta comienza a titilar len-
tamente. Para desconectar el sistema basta presionar la tecla 10 o apagar el equipo.
LUMINARIA
A través de las teclas 7 y 9 es posible encender o apagar la luminaria interna del climatizador.
Para apagar las luminarias basta con presionar la tecla correspondiente.
SEÑALIZACIÓN DE FALTA DE AGUA
La falta de agua en el depósito del climatizador es señalizada haciendo titilar la tecla 10.
CONTROL REMOTO
A través del control remoto es posible controlar la luminaria interna, el sistema de pre-enfriado,
encender o apagar el equipo, variar las velocidades de aire y ajustar el ON-OFF automático.
PARA QUE EL COMANDO BAJE SU NIVEL DE LUMINOSIDAD
ES NECESARIO, CON EL COMANDO APAGADO, PRESIONAR EL BOTÓN - (MENOS)
VARIAS VECES HASTA QUE DISMINUYA EL BRILLO.
16
Problem_01:
When you hold down the (+) and (-)
buttons on the command, the
bluetooth logo does NOT
start blinking.
Solution:
1. Make sure the evaporative cooler is
turned off (NEIL logo should NOT be
illuminated)
2. Turn off Bluetooth on your phone and any other phones you have
previously used to connect to the evaporative cooler.
3. Again press and hold the (+) and (-) buttons at the same time for 5
seconds. You should see the bluetooth logo begin to blink.
4. Turn Bluetooth on your phone back on and try connecting again.
Problem 2: The bluetooth icon flashes on the controller, but the
evaporative cooler does NOT appear in the App.
1. Make sure your phone's bluetooth is turned on.
2. Uninstall and reinstall the App, making sure that when installing it you
accept all the permissions that are requested.
3. Try again to pair the APP with the evaporative cooler.
If it still doesn't work, try the following:
1. Hold down the Neil APP icon (on your cell phone) select “Info. of the
application”, in the window that opens, go to the bottom of everything
and press “Clear Data” (it may vary slightly depending on the version of
Android used).
2. Uninstall the APP
3. Re-install the app and try again.
CONNECTION PROBLEMS
(APP-EVAPORATIVE COOLER)?
USER MANUAL - CAMPER
DIRECT MOISTURIZER SYSTEM SETTING
If by any reason the pre-cooling chamber sensors stop working, it is possible to program the
device to work directly until the technical service can check it. It can be activated by following
this steps:
With the device turned on, press the button 10 for eight seconds, it will start to slowly blink. To
disconnect the system press 10 or turn off the device.
LIGHTING
With the buttons 7 and 9 it is possible to turn on and turn off the internal lighting. To turn off the
lights press the corresponding button.
LACK OF WATER SIGNAL
The lack of water in the water tank is indicated by a blinking 10 button.
REMOTE CONTROL
With the remote control it is possible to control the internal lighting, the pre-cooling system,
turn on and off the device, change the fan speed and set the automatic ON-OFF
TO LOWER THE REMOTE CONTROL LIGHTING, WITH IT TURNED OFF,
PRESS THE BUTTON DOWN (-) SEVERAL TIMES UNTIL BRIGHTNESS IS DECREASED.
16
1- COOLER ON-OFF
2- SPEED DOWN
3- EXTERNAL LIGHTING ON-OFF
4- TIMER
5- FLASHLIGHT
6- SPEED UP
7- PRE-COOLING SYSTEM ON-OFF
REMOTE CONTROL
BATTERY IS NOT INCLUDED
Table of contents


