Neilsen CT0879 User manual

AIR SANDER CT0879
ORIGINAL INSTRUCTIONS
SAVE THESE INSTRUCTIONS AND PRECAUTIONS.
READ ALL PRECAUTONS AND INSTRUCTIONS BEFORE USE.
Cannon Tools Limited
Address: 20 Station Road, Rowley Regis, West Midlands, B65 0JU.U.K.

2
EC DECLARATION OF CONFORMITY
We CANNON TOOLS LTD
20 Station road, Rowley Regis, West Midlands,B65 0JU.U.K.
Declare that the following machine complies with the appropriate basic safety and
health requirements of the EC Directive based on its design and type, as brought
into circulation by us.
In case of alteration of the machine, not agreed upon by us, this declaration will
lose its validity.
Product description: AIR SANDER
Model: CT0879
Applicable EC Directives:
EC Machinery Directive 2006/42/EC
Harmonized standards
EN ISO 11148-8:2011
20 Station Road, Rowley Regis, West Midlands, B65 0JU.U.K.
Mr. Gurcharan Tony Singh Sanghera
Managing Director
CANNON TOOLS LTD
2020-07-116

3
IMPORTANT SAFETY INFORMATION
WARNING! Read this manual and general safety instructions carefully before using
the appliance, for your own safety. Your power tool should only be passed on together
with these instructions.
1. Keep work area clean. Cluttered areas invite injuries.
2. Observe work area conditions. Do not use machines or power tools in damp or wet
locations. Don’t expose to rain. Keep work area well lighted. Do not use electrically
powered tools in the presence of flammable gases or liquids. Do not bring combustible
materials near the tools.
3. As with any tool, use common sense when operating. Do not wear loose clothing or
jewelry that could become caught by moving parts, causing injury. Operate tool a safe
distance from yourself and others in the work area.
4. Keep children away. Children must never be allowed in the work area. Do not let them
handle machines, tools, hoses or extension cords.
5. Store idle equipment. When not in use, tools must be stored in a dry location to inhibit
rust. Always lock up tools and keep out of reach of children and other untrained
persons. Switch off all unused electrical tools when stored. Tools are dangerous in the
hands of untrained users.
6. Always wear approved eye protection when using tools. If raising dust, wear a suitable
mask.
7. Work Safe. When wearing gloves to operate the tool, make sure that the gloves do not
interfere with operating the Trigger. Test your gloves with the Trigger before attaching
the unit to an air source. Keep your finger away from the Trigger until you are ready to
work. Never start the tool unless you have a firm grip with both hands and you are
positioned at your work piece or area. Before using the tool, know what is directly
underneath the work area or work piece. The tool can quickly penetrate material. If
working directly on the ground, make sure you are not directly above shallow cables,
lines, or pipes. Keep your limbs and body clear of the tool. If an accessory or
attachment breaks off, the tool tends to surge forward suddenly. Operate tool a safe
distance from yourself and others in the work area. Make sure the immediate area is
clear of other people or animals. Spectators must stay at a safe distance. Never point
the tool or the air hose (not included) at anyone. Keep proper footing and balance at
all times. Do not reach over or across running machines, hoses, etc.
8. Do not operate any tool if under the influence of alcohol or drugs. Read warning labels
on prescriptions to determine if your judgment or reflexes are impaired while taking
drugs. If there is any doubt, do not operate any tool.
9. Be sure air is in OFF position when connecting tool to air supply.
10. Use only those accessories that are designed for use with tools. For example, with
impact wrenches do not use ordinary sockets. Use impact sockets for all air tools.
11. Be sure to disconnect tool from air supply before changing accessories, performing
service on tool and when not in use.
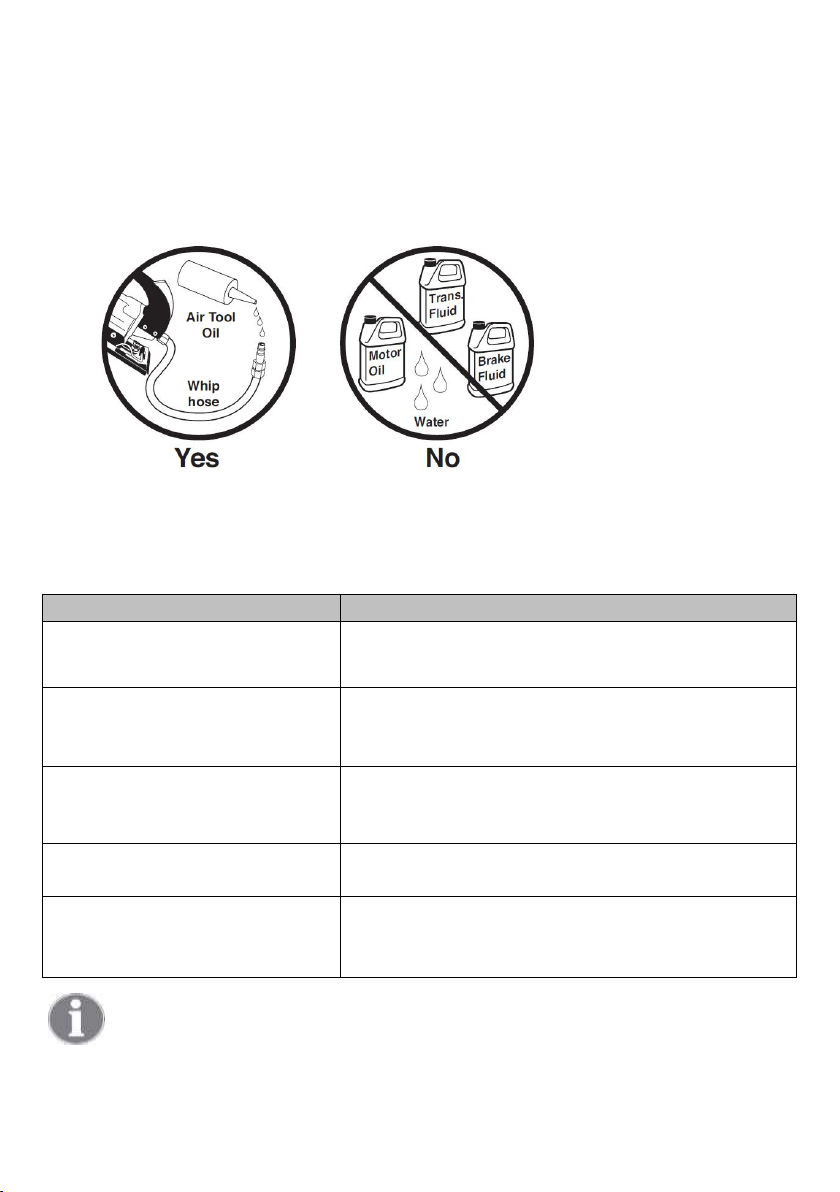
12. Follow air source manufacturers' directions for connection of regulators, filters, and
other accessories to air source. Do not install quick couplers directly on tool as they
put unnecessary strain on the air inlet threads possibly causing them to wear out

4
prematurely. Instead, install them on a short length of air hose attached to the tool.
13. Check for damaged parts. Before using any tool, any part that appears damaged
should be carefully checked to determine that it will operate properly and perform its
intended function. Check for alignment and binding of moving parts; any broken parts
or mounting fixtures; and any other condition that may affect proper operation. Any
part that is damaged should be properly repaired or replaced by a qualified technician.
14. Maintenance. For your safety, maintenance should be performed regularly by a
qualified technician using original CANNONTOOLS replacement parts.
Failure to do so can lead to accidents for the operator. Use of any other parts will void
the warranty. Only use accessories intended for use with this tool. Use only accessories that
are recommended by the manufacturer for your model. Accessories that may be suitable
for one tool may become hazardous when used on another tool.
WARNING: Repetitive motions or exposure to vibration may be harmful to your hands and arms.
WARNING: The warnings, cautions, and instructions discussed in this instruction manual cannot cover all possible
conditions and situations that may occur. It must be understood by the operator that common sense and caution
are factors which cannot be built into this product, but must be supplied by the operator.
ASSEMBLY / INSTALLATION
1. You will need to prepare the 1/4" Quick-disconnect Coupler Plug to connect to the air
inlet on the sander. Wrap the Coupler Plug with pipe thread seal tape before threading it
into the Air Inlet. Connect the a Quick-Disconnect coupler on a 3/8" ID Air Source Hose
to the tool.
Note: If you are not using an automatic oiler system, before operation, add a few drops of
Pneumatic Tool Oil to the airline connection. Add a few drops more after each hour of
continual use.
2. Set the air pressure on your compressor to 6 bar. Do not exceed the recommended air
pressure of 6 bar.
3. Check the air connection for leaks. Once you are satisfied there are no leaks, turn off the
air compressor and disconnect the tool.
AIR SOURCE
Clean air of correct air pressure is recommended for the power supply for this tool. A
maximum of 6 bar at the tool is recommended for most air tools of this class. Check
specifications section for recommended pressure. (Depending on length of air hose and
other circumstances, air pressure at compressor may need to be increased to 100 PSI to
ensure 90 PSI at the tool.)
Water in the air hose and compressor tank contributes to reduced performance and
damage of the air tool. Drain the air tank and filters before each use and as necessary to
keep the air supply dry.
Hose length over 25’ causes loss in line pressure. Increase hose I.D. or increase
compressor pressure to compensate for the pressure loss. Use an in-line pressure
regulator with gauge if air inlet pressure is critical.

5
OPERATION
ATTACHING SANDPAPER
Note: Sandpaper is not included.
Note: The Sander must be disconnected from the air hose before attaching sandpaper.
1. Push down on the Clamp Lever and it will release the Paper Clamp. See FIGURE 1.
2. Insert one end of the sandpaper under the Paper Clamp and snap it closed. Repeat he
process with the rear Paper Clamp.
FIGURE 1
3. Check that the sandpaper fits snugly against the Sanding Pad. If not, repeat the process
above and pull the sandpaper more tightly against the Sanding Pad.
4. Connect the sander to the air compressor.
5. Set the compressor to 90 PSI. Do not exceed 100 PSI.
6. If applicable, secure your workpiece. Use appropriate clamping devices if applicable.
7. Before starting the Sander, place it on the workpiece. If you start the
Sander before you contact the workpiece, the Sander may vibrate out
of your hand once you contact the workpiece.
8. To operate, press the Lever with the palm of your hand while using your fingers to grasp
the Sander. See FIGURE 1. The further you press down on the Lever, the faster the
Sander will rotate. For fine tuning the air pressure, adjust the Regulator Knob.
9. Do not apply force or pressure. Allow the Sander to do the work for you.
Note: During operation, use your other hand to keep the air hose clear of the Sander.
10. When finished, release the Lever and disconnect the air hose from the Sander.
WARNING: Some dust created by power sanding, sawing, grinding, drilling, and other construction activities.
Please work in a well ventilated area, and work with approved safety equipment, such as those dust masks
that are specially designed to filter out microscopic particles.
TECHNICAL D
AT
A
Model CT0879
Air pressure 6.0 bar
Free speed 8000rpm
Avg. air consumption 171 l/min
Air inlet size 1/4”
Hose size 3/8”

6
LUBRICATION & MAINTENANCE
Oil tool before each use. 4 to 5 drops of a good grade Air Tool Oil placed in the air inlet is
sufficient. Use proper air pressure and CFM rating listed for this tool.
Drain water from hoses and compressor tank. Water in the air supply line will cause
gumming and loss of power. Clean the air filter on the supply line and flush the tool with
gum solvent or a 50/50 mix of air tool oil and kerosene. It may be necessary to
disassemble the tool to properly clean and re-lubricate.
TROUBLESHOOTING
Insufficient Power:
Possible Causes Likely Solutions
Dirty or clogged air passages Flush and lubricate tool, drain air tank and supply line
Insufficient air supply Increase line pressure, Make sure compressor
matches
tool's air pressure and consumption needs
Air leakage Use PTFE tape at all fittings and joints. Check tool for
worn or damaged O
-rings & seals.
Worn/damaged wear & tear parts
Replace as necessary.
Tool matching Be sure you are using a tool suited for the torque
requirements of the job at hand.
Note: Repairs should be carried out by a qualified person

7
ASSEMBLY DIAGRAM AND PARTS LIST

8
CANNON TOOLS LTD
Add: 20 station road, Rowley Regis, west midlands,B65 0JU.U.K.
Made in China
Table of contents
Other Neilsen Sander manuals