NELO 7 User manual


Congratulaons, you just acquired an incredible boat. We are
extremely proud on having developed this amazing product and we
hope it exceeds your expectaons.
Thanks for trusng our work!

1. BOAT ID
2. PADDLER ID
3. ABOUT YOUR BOAT
4. FITTINGS
5. WARRANTY
6. MAINTENANCE
7. ABOUT US
8. SHOP
CONTENTS

PHOTO
First Name
Surname
Date of Birth
Best Results
Country
www.nelo.eu/kayaks/id/
This card is only valid from the
moment you register your boat.
02-2015
111084
SCS 12 kg
K1 CINCO L
FOR MY FUTURE
1. BOAT ID | 2. PADDLER ID
PADDLER ID

3. ABOUT YOUR BOAT
BOAT LAYUPS
RIVER SPRINT SPRINT SPRINT MARATHON
WWR FGSCSE
K1
K2
K4
BOAT WEIGHT
10 kg
16 kg
11 kg
17 kg
11 kg
17 kg
28 kg
11kg
17 kg
28 kg
7 kg
11 kg
60 10070 80 90
K1
K2
K4
S
M
ML
L
XXL
XXXL
140 160 180
SML
XXL
320
M L
ATHLETES WEIGHT RANGE (KG)
BOAT MODEL
ML
65 75 85 95
280 360
120
XXXL
XXL
130 150 170
M
190
L
240
260 300 340
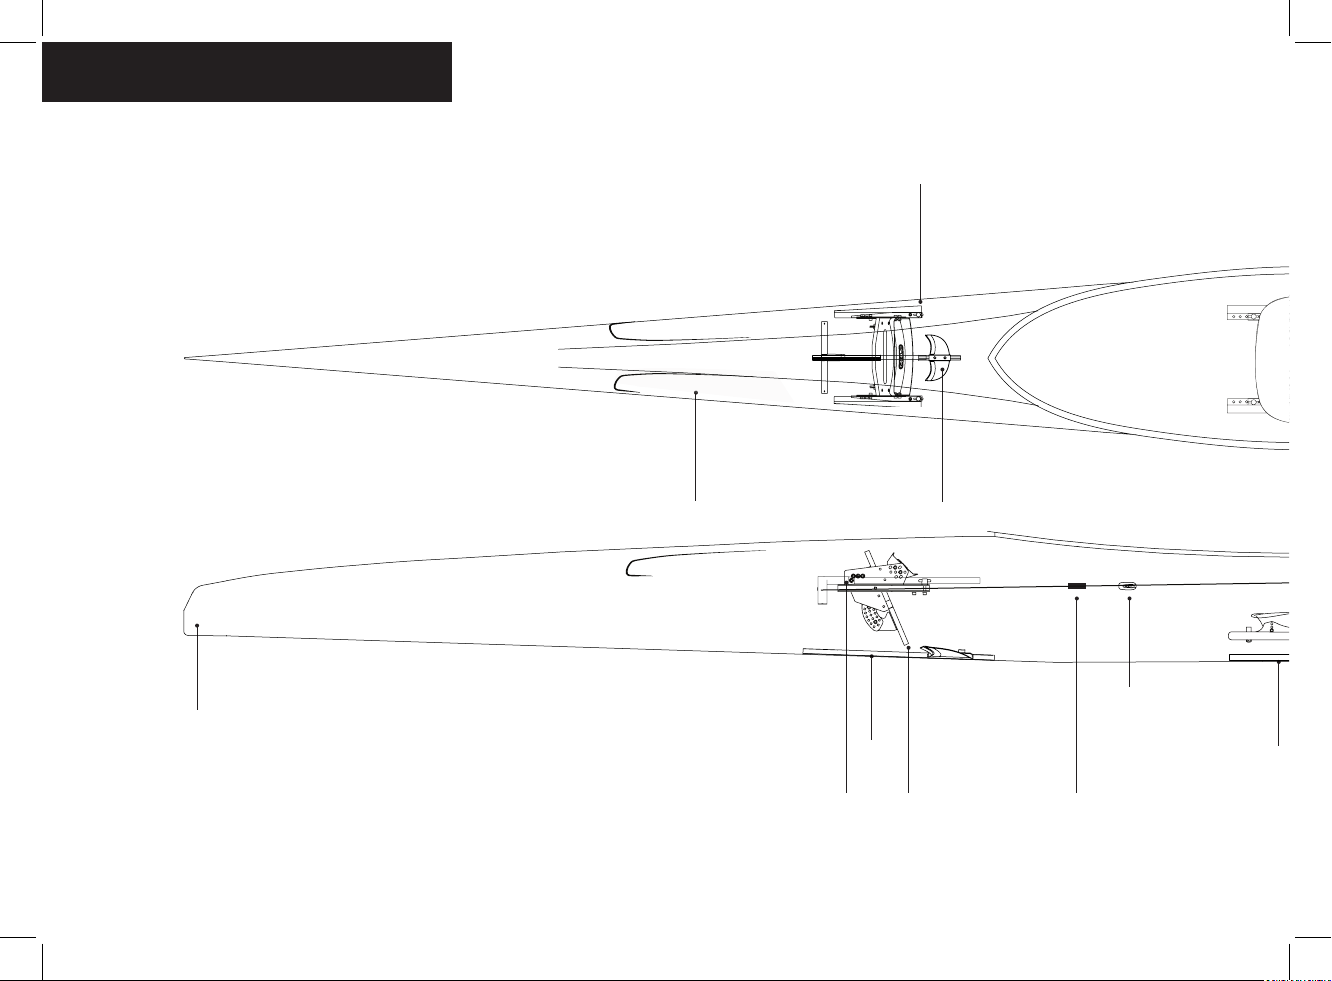
3. ABOUT YOUR BOAT
Footrest support rails
Footrest
Heel support
Cable Guides
Paddle Protecon
T-Bar
Front Rail
Central Rail
Rudder Tuner
Bow

Seat Number Holder Rudder Hatch
RudderSeat Plataform
Rim
Heel support
Cable Guides
Central Rail
Rudder Crosspiece
Stern
Rudder Cable
Rudder Tuner

PADDLE PROTECTION
Not all strokes are 100% perfect, specially
when applying maximum power, and
everyone wants to keep the boat as prisne
as possible, we developed an
adhesive transparent boat protecon to
discreetly protect the boat from hard blade
hits.
4. FITTINGS
How to apply
1 - Clean and dry the area well before applying the Paddle
Protecon .
2 - Peel the white paper backing o the scker
3 - Slowly lower the scker onto the boat and rub it in
place rmly with a squeegee or credit card to avoid air
bubbles.

4. FITTINGS
FRONT OR/AND LAND CENTRAL RAIL
This is xed at the boom of the boat, in
front of the footrest or/and under the seat.
It is specially designed to aach accessories
like weight kits or heel support.
It is 100% aluminum.
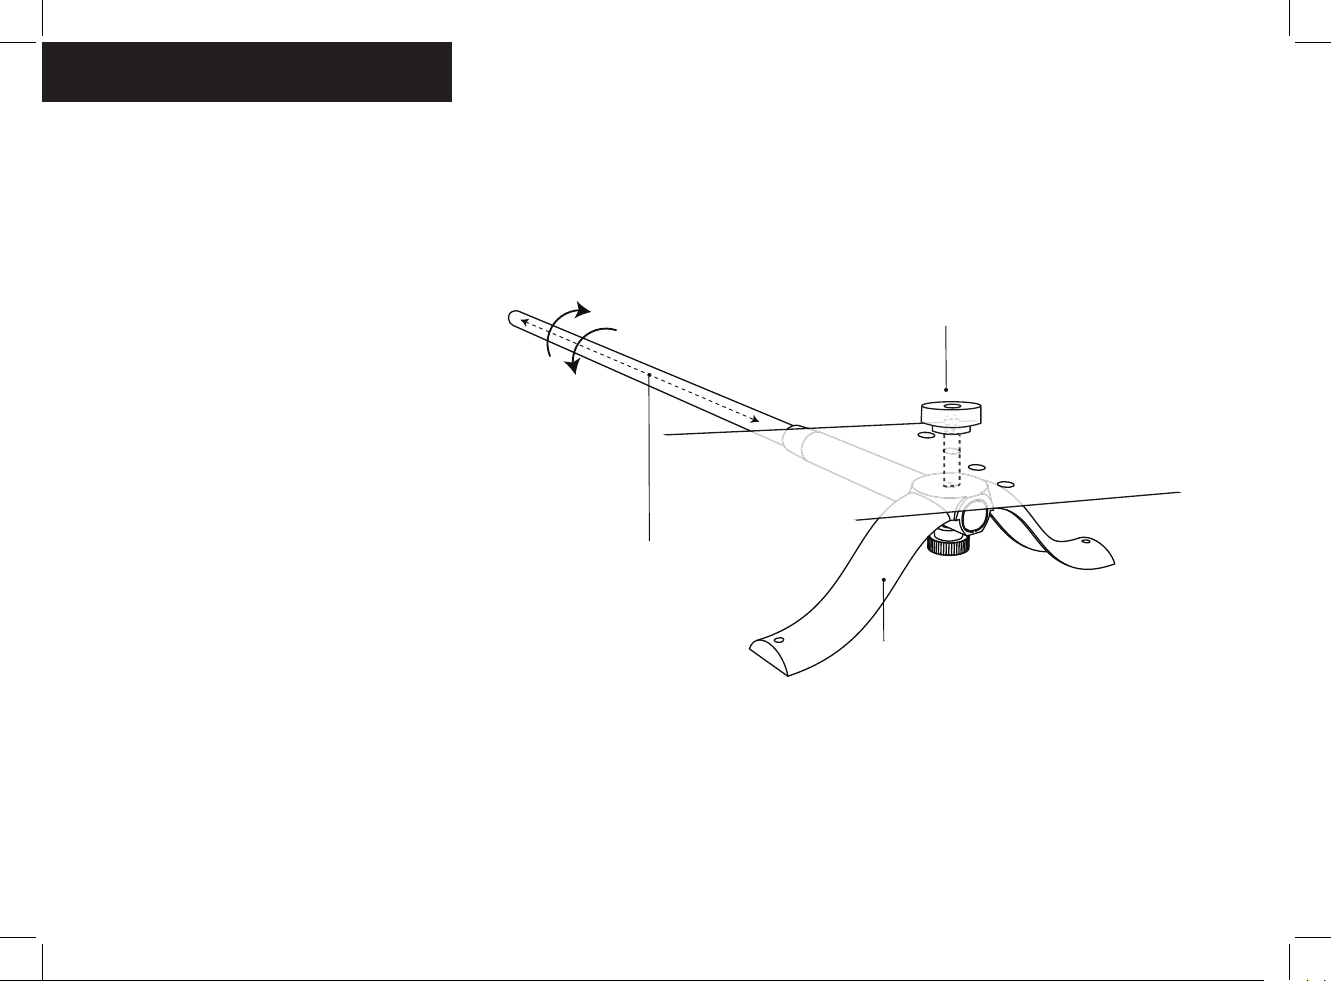
4. FITTINGS
T- BAR
It is the “steering wheel” of the boat.
The cables are aached to the T-Bar which
controls the rudder.
The tube has telescope length adjustment so you can set
it precisely for your ng in a snap.
Larger adjustments also easily available through the support plate holes.
unlock
lock
use the holes on the support plate
for larger adjustments
each step is separated by 4cm
easy telescopic length adjustment
T-BAR
SUPPORT PLATE

4. FITTINGS
FOOTREST
The footrest is an essenal piece of
outng on your boat.
It provides a contact point where you can
transfer the energy you get from your
paddle into the movement of the kayak
using all the power of your lower body.
Nelo footrest oers a few congurable
opons such as angle and depth
adjustments. And now it oers more strap
opons.
HOW TO REMOVE THE BOTTOM PLATE
By default, all footrests come congured with the full
footplate. To remove it you just got to
release four screws placed at the back of the footrest.
REMOVE TO RELEASE
unlock
lock
use the holes on the support plate
for larger adjustments
each step is separated by 4cm
easy telescopic length adjustment
T-BAR
SUPPORT PLATE

4. FITTINGS
SETTING UP THE FOOTREST
Nelo footrests have many adjustable
sengs for total confort and control.
To set up you just need to loosen some
screws and smoothly adjust the plates to the
posion that you want.
When you nish remember to ghten the
screws again.
SETTING UP PULL BAR OR FOOT STRAP
You can add a pull bar or a foot strap.
You just have to x it with four screws (two
in each side) as the image suggests.

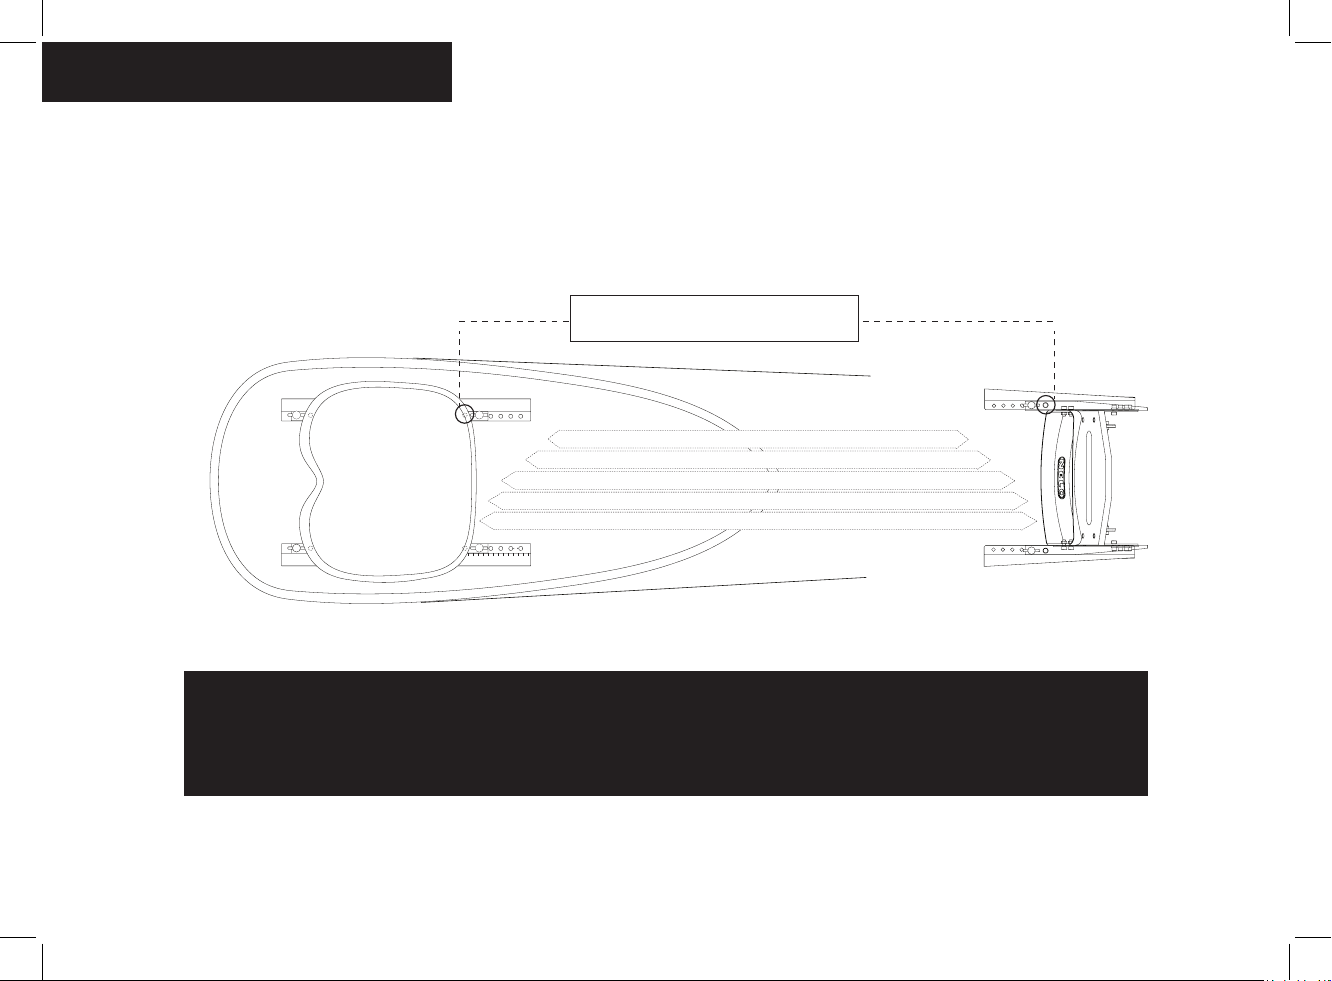
4. FITTINGS
How to put the footrest on the boat
Footrest is xed to the boat sliding it in the footrest rails
and aaching two screws (one in each side) when it’s on
the right place1.
1See
HOW CAN I FIND THE RIGHT POSITION
p.
1 2 3 4 5 6 7 8 9 10 11 12 13 14 15
1.5 cm
2.25 cm
Use this posion to move 1cm forward or backward
Use this posion to move 0.75cm forward or backward

Ultra Low
Flat and long classic
design.
SEAT PLATFORM
It’s where the seat will slide to be xed at
the right posion.1
1See
HOW CAN I FIND THE RIGHT POSITION
p.
How it works
Inserng in the Seat Plaorm
1- Slide the seat through the seat rails unl your right
paddling posion1.
1See
HOW CAN I FIND THE RIGHT POSITION
p.
4. FITTINGS
SEAT
Nelo oers ve dierent seat models so you
can choose which is more comfortable for
you and your paddling style.
All models are congurable in many dierent
height and angle posions.
All seat models
Standard
Low back and
classic design.
Nelo Seat
Beer grip on the
back of the seat.
Rotox
Beer grip and
extra confort.
Rotang
High back
rotang seat.
0
1
2
3
4
5
6
7
8
9
10
11
12
13
14
15
16
17
18
19
20
7.5mm
Use this posion to move 1.5cm forward or backward
Use this posion to move 0.75cm forward or backward

4. FITTINGS
How it works
Adjusng the seat height and angle
1 - Remove your seat from your boat (if it’s installed)
2- The seat and the seat rails* have a few adjustable
opons
3 - Loosen the 4 screws that are aached to the seat and
choose the right height and angle posion
4- When done ghten well the 4 screws again.
5- Put the seat on the boat.
* SEAT RAILS
-1
0
1
2
-1
0
1
2
-1
0
1
2
-1
0
1
2
You can adjust the seat height in four
different posions.
From an ultra low posion (-1) to a higher one (2).
Each step is 1cm.
FROM -1 to 2
4. FITTINGS
0
1
2
3
4
5
6
7
8
9
10
11
12
7.5mm
1 2 3 4 5 6 7 8 9 10 11 12 13 14 15
M | ML - 70 cm
L - 75 cm
XXL - 80 cm
S - 65 cm
XXXL - 85 cm
By using the “middle” posion you can get precisely 0.75cm .
This may help you get an extra
comfort and find your perfect paddling posion.
0.75cm that make the difference
TIP - THE SAME ADJUSTMENT
Moving the seat and the footrest so it’s equal. For example, if you move the seat one posion to front, you need to do the same in the
footrest to keep the same distance.

4. FITTINGS
HOW TO FIND THE RIGHT POSITION
STEP ONE
Start with the seat in the middle posion.
In the middle posion the distance beetwen
the seat and the footrest varies beetwen
65cm in the S model and 85cm in XXXL
model.
STEP TWO
Move the footrest to t you.
By using the full or “middle” adjustment
posions you can get a large range of
adjustments opons.
STEP THREE
The seat plataform and the seat rails oers
a wide interval of adjustment opons too.
This and the footrest sengs allows the
ideal conguraon to the perfect paddling
posion.
STEP FOUR
Check the behaviour of the boat at
compeon speed. The bow should be just
touching the water. In a stopped
posion the bow should be under
water.
STEP FIVE
You should move your seat and footrest
together unl your boat is performing as
described at the previous point.
NOTE
This is just one of many methods of
nding the best posion, though it
always changes slightly from person to
person, but these are the basic rules.
Compeon Speed - just touch the water
Stopped - under water
Bow

RUDDER CROSSPIECE
It’s where the rudder cables are aached
wich makes it possible for the rudder to tun.
It gives a sensive, smoother control thanks
to the new design.
RUDDER ( Sete | Marathon )
It allows you to turn the boat.
Sete Rudder (6mm)
100% carbon. Ideal for sprint use.
Marathon Rudder (6mm) -
Specic for marathon. 100% Nylon
for impact resistance.
How it works
1 - Insert the rudder through the hole in the
hull.
2 - Insert the sha into the crosspiece hole.
The arrow on the crosspiece should point forwards.
3 - It only ts in one way, so don’t worry if
it’s ok. It will be.
4 - Tighten the rudder crosspiece screw.
NUMBER HOLDER
This is where you place the compeon
number or lane number. It is made of 100%
plasc and xed only with two simple nuts.
How it works
1 - Right and le rudder cables are aached
to it with knots.
2 - Rudder enters in the one way channel and it’s
ghtened with a simple screw.
How to replace
1- Remove old Number Holder from your boat unscrewing
old screws.
2 - Put the new Number Holder at the same place and
ghten the new nuts.
4. FITTINGS
CABLE GUIDES
Are used to guide the rudder cables to the
crosspiece. They are low fricon so you can
have a smooth boat control.
RUDDER CABLES
The rudder cables make the connecon
between T-Bar and Rudder Crosspiece and
allows the rudder to work, so your boat will
turn correctly.
RUDDER ADJUSTING SYSTEM
It is used to ghten the rudder cables, in a
quick way, which allows the rudder to turn
beer.
1. Hold rudder straight
2. Adjust the cables at the new adjusng system
3. Unl t-bar stands straight at the middle
How it works
Thanks to its easy pulling system you just need to pull to
ghten or extend the rudder cables unl they are as you
want.
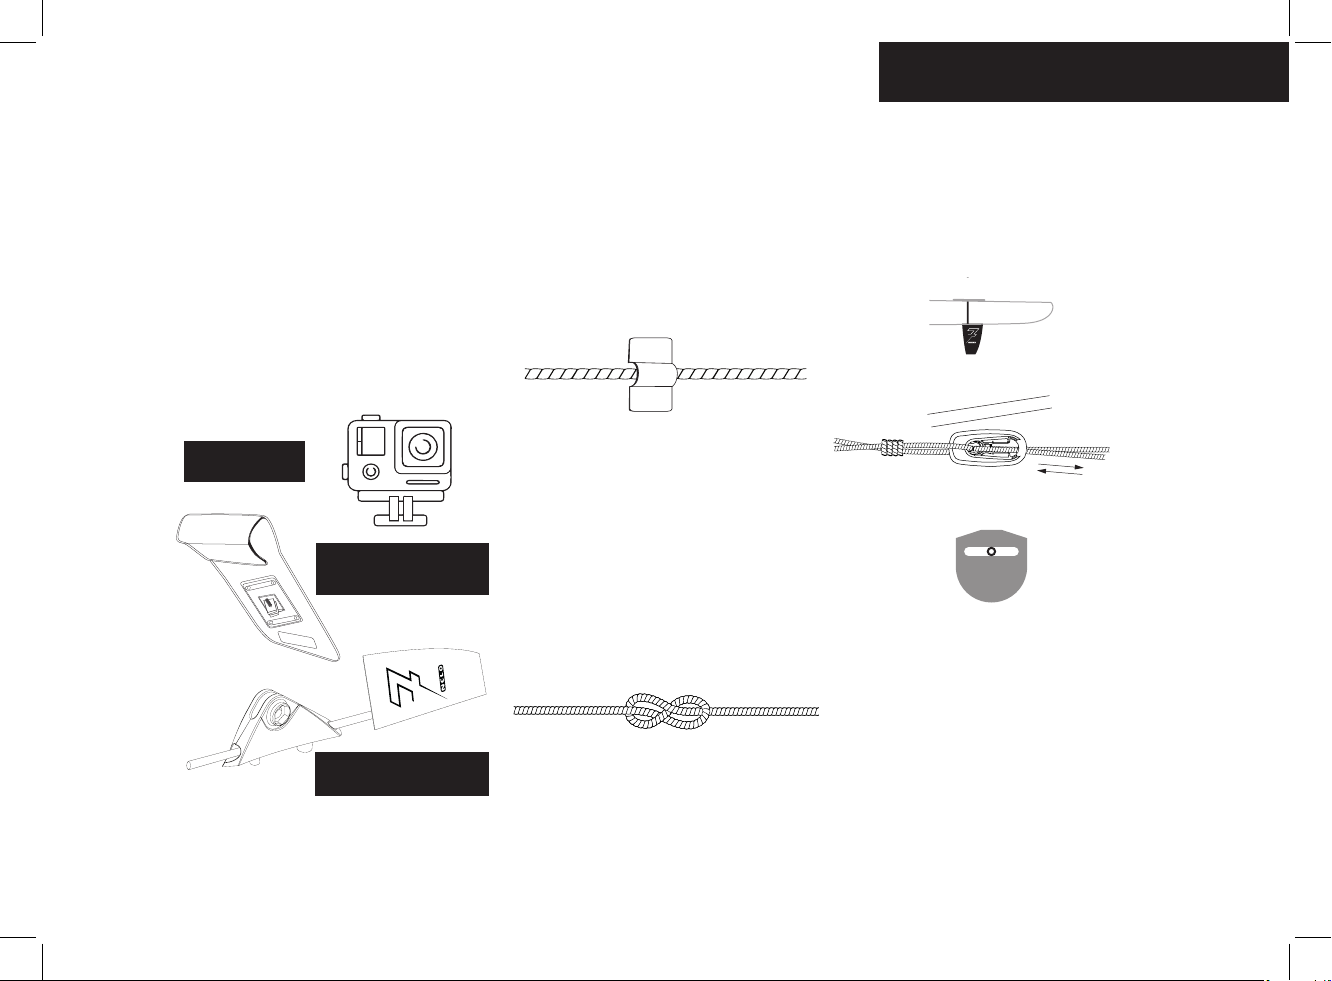
4. FITTINGS
NOT JUST A NUMBER HOLDER
You can use the Number Holder to x some
useful tools.
The number holder it’s compable with
GoPro mount system so you can place here,
for example, your camera or a Nelo
Waterproof Phone Bag.
It’s also a comfortable bed for your rudder
when you’re in travel.
Nelo Waterproof Phone Bag
available at shop.nelo.eu
Be creave with
the Number Holder
NEW ADJUSTING SYSTEM
During the transportaon use
it to keep your rudder safe.

5. GENERAL WARRANTY CONDITIONS
NELO KAYAKS WARRANTY TERMS
This document sets out the sole and limited warranty which Nelo is
giving on Kayaks. This warranty should be reviewed carefully,
together with the User Manual.
BASIC WARRANTY
Nelo warrants the boat, except for excluded items, and when
properly used, will be free of defects in materials or workmanship
for a period of 24 months from the me of delivery of the boat.
Warranty on other Composite Parts
The following parts: Seat, Foot Rest, Rudder, Hatch and Hold Num-
ber warranted to be free of defects in materials or workmanship for
a period of 24 months from the me of delivery of the boat. War-
ranty is valid only when the products are properly used.
Transfer of Warranty
If you sell the boat during warranty period, your buyer may receive
the benet of the balance of the warranty by agreeing to be bound
by its terms.
Authorized Dealers
To obtain a list or conrm that you are dealing with an Authorized
Dealer contact Nelo.
Excluded Items
Nelo gives no warranty of the following:
-Any components manufactured other than by Nelo.
- Sun damage - If the boat is exposed to the sunfor long periods
of me it may cause some damages to the
composite material.
In that case, the warranty shall be voided.
- Osmoc Blistering: A primary factor in the design of the boats
is high performance, top speed and trailing
ability.
The vast majority of the boats are dry sailed
and as a result surface coangs and the
thickness thereof were chosen with respect
to their potenal performance characteriscs.
If the boat is le in a wet cover wet, the
osmosis warranty shall be voided.
Table of contents
 instructions")


