Nemco CanPRO 56050-() User manual
56050 - ( ) CanPRO
OPERATING INSTRUCTIONS
Important
1. To get the best operation and life from your machine, please read and comply with these instructions.
2. Clean machine thoroughly before and after each use using cleaning instructions below.
3. Minimize the use of alkaline cleaners as they may cause pitting and dulling of the finish.
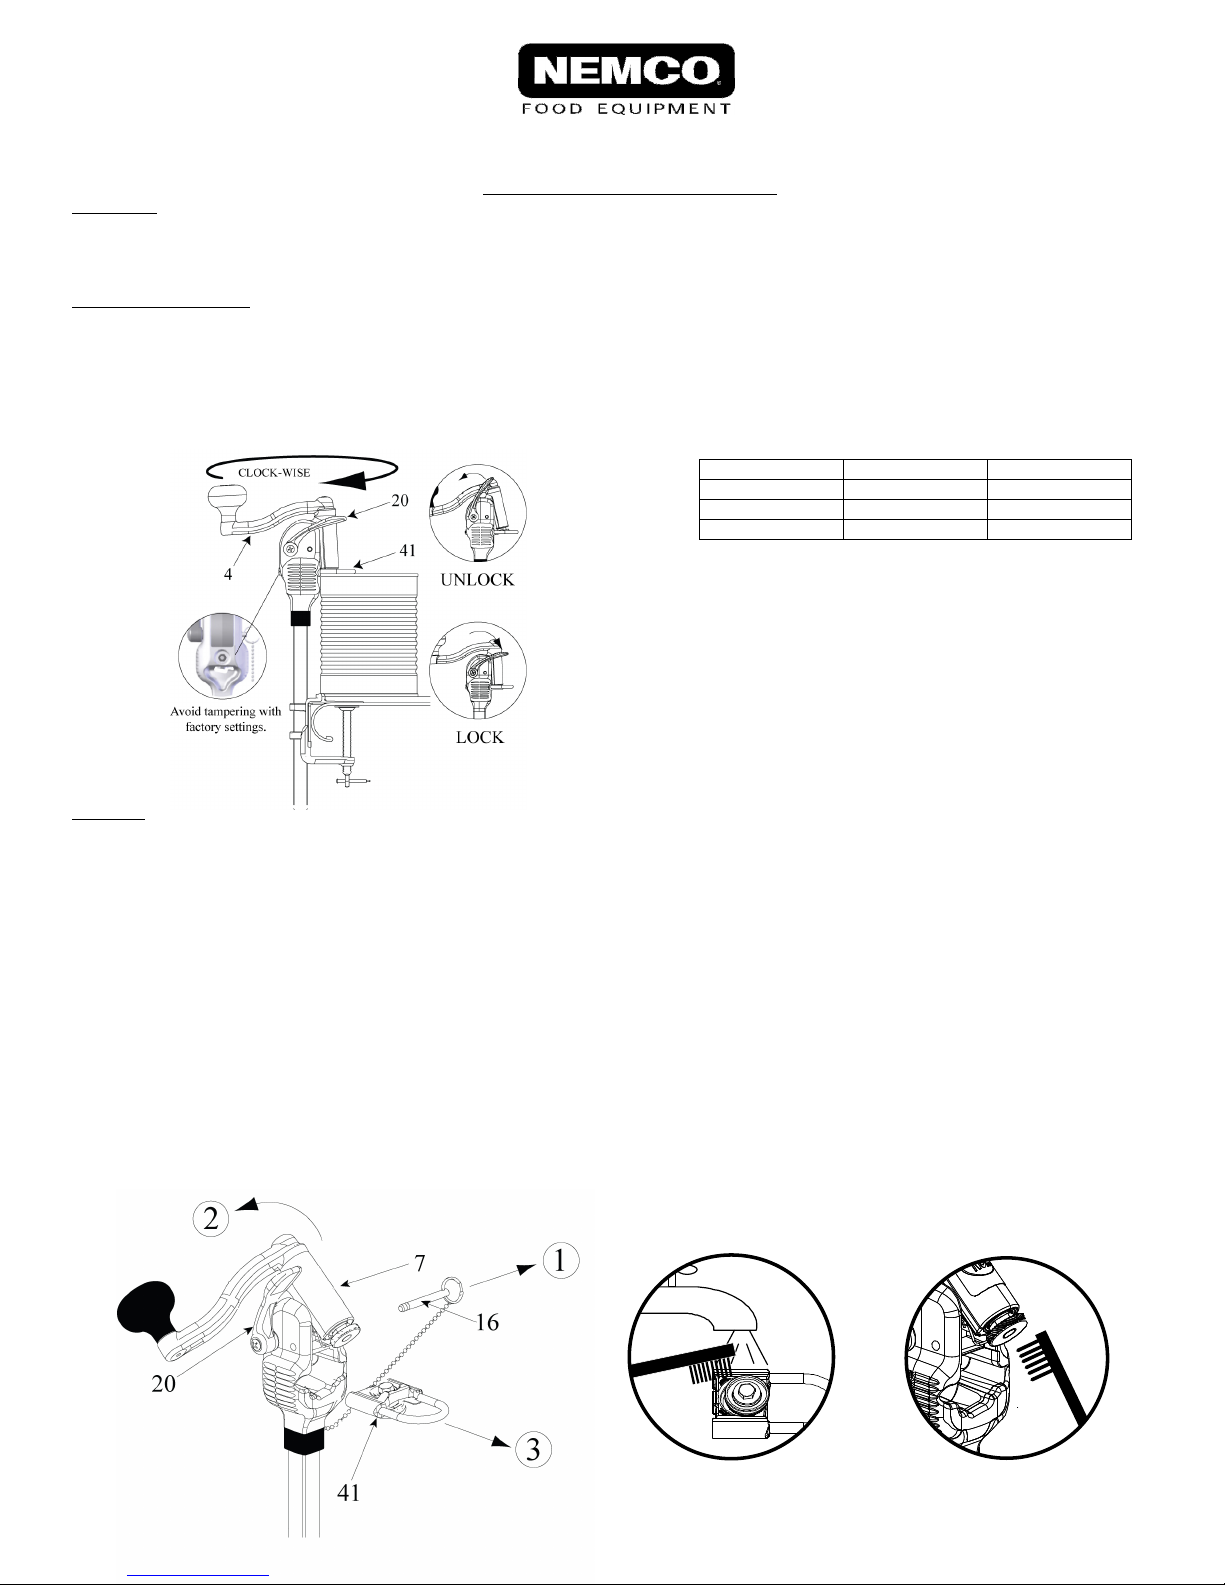
Operation of CanPRO
1. et side handle #20 in the unlock position.
2. Place can on the Table Base Can itter and gently lower the U-shaped pin of the Cutter Housing Assembly #41 is over the lid. Be sure
that the can is against the face of the can opener.
3. Lock the can in place by pushing down on the ide Handle. Turn Top Handle #4 in a CLOCK- ISE direction to open can. arning:
Over-rotating beyond the initial seam cut may cause metal slivers. Incision point may be sharp. Train operators when to stop cutting and
how to remove lid safely.
Recommended Handle Turns:
Can Size Diameter Handle Turns
#2 3" 3 Revolutions
#5 5" 5 Revolutions
#10 6" 6 Revolutions
To Clean
WARNING: Cutting area must be kept clean at all times as indicated in the "CLEANING INSTRUCTIONS – USE OF BRUSH." Inspect and
clean the cutter and gripper with the included brush after each use to ensure proper operation. Failure to follow the included "Cleaning
Instructions" will cause damage and VOID ARRANTY.
Disassemble for Cleaning.
1. UNLOCK IDE HANDLE #20. lightly press Gripper Housing #7 face to pull out ide Locking Pin #16.
2. Tilt back Gripper Housing #7.
3. IMPORTANT: Pull out Cutter Housing Assembly #41 and clean with brush. Use brush provided to clean around outside of Cutter
Housing and inside the Mechanism Housing. Also use brush to clean all debris from around the Gripper.
4. After cleaning with brush, rinse off residue. SEE SEPARATE “CLEANING INSTRUCTIONS – USE OF BRUSH” FOR LOCATIONS
Reassemble.
5. Insert Cutter Housing Assembly #41.
6. Return Gripper Housing #7 to closed position.
7. lightly press Gripper Housing #7 face to re-insert the ide Locking Pin #16. (Ensure side handle #20 is unlocked.)
Note:
1. If cleaned in DISH ASHER, disassemble and clean with brush per above instructions.
2. Proper cleaning maximizes the life of the parts.
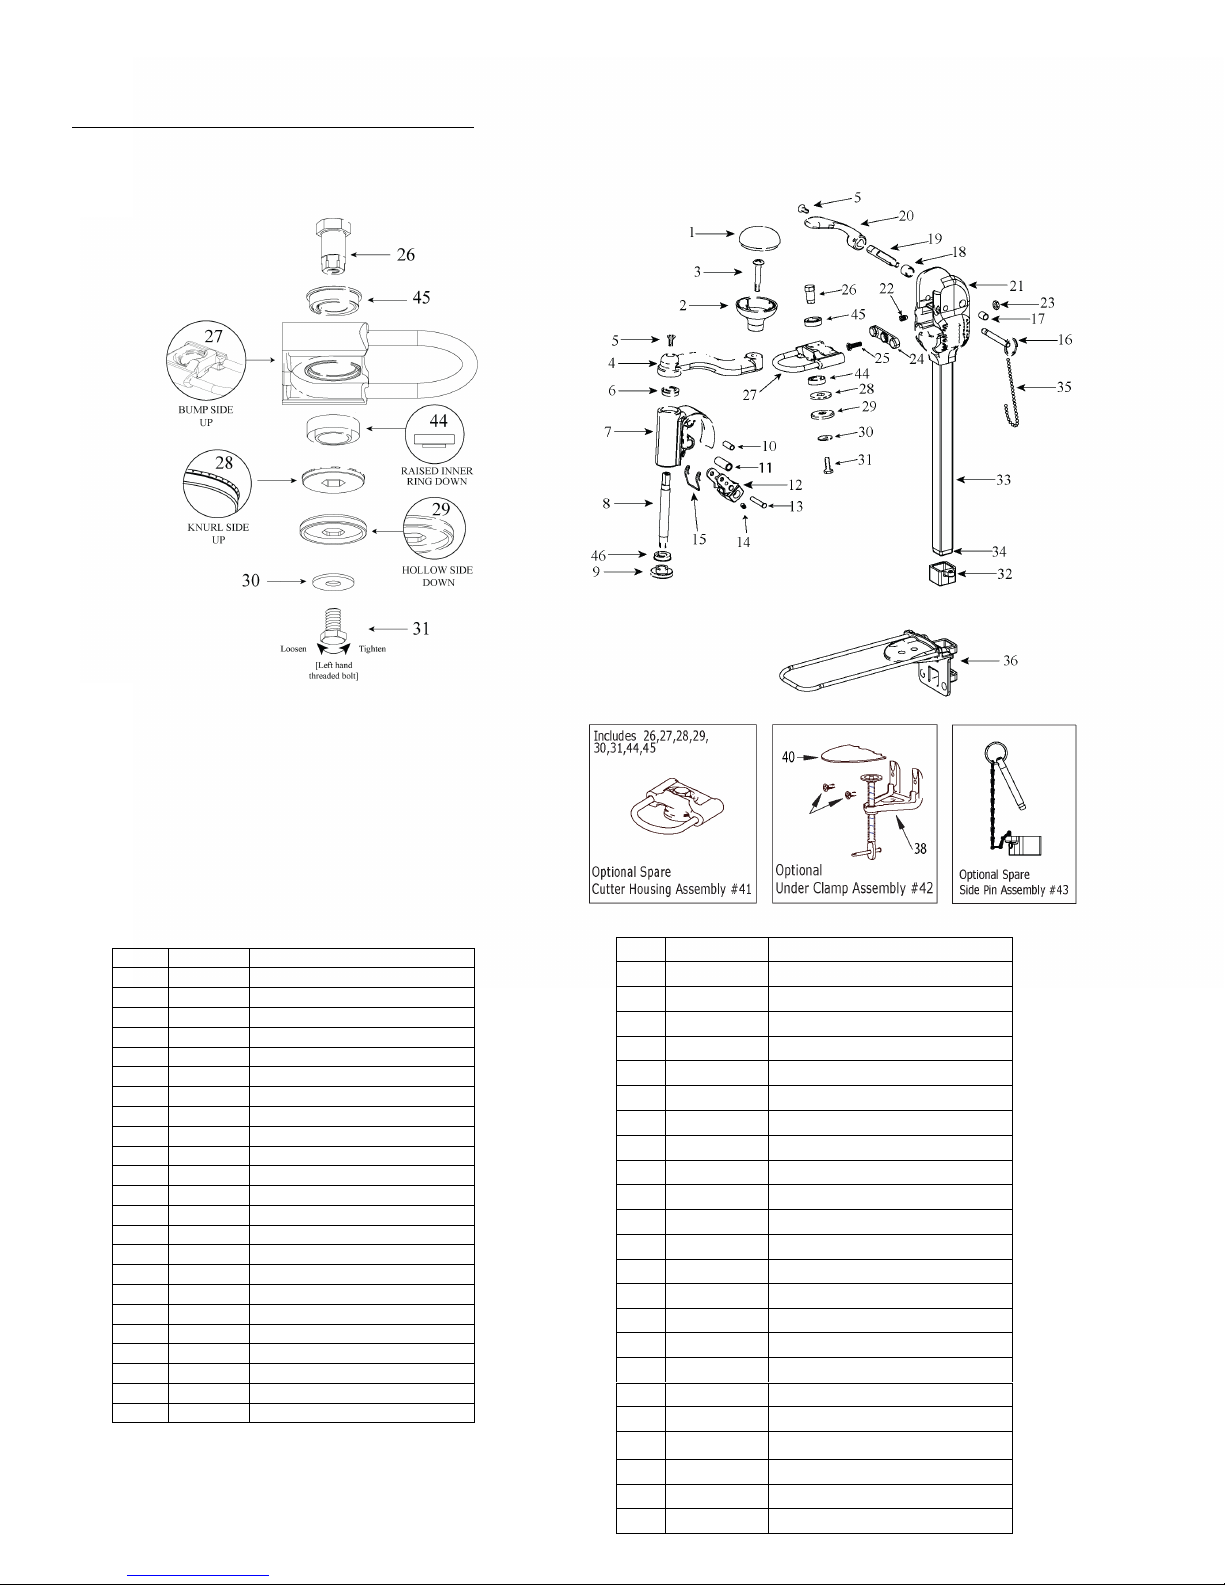
Replacing Cutter from Cutter Housing Assembly
1. Hold Cutter haft #26 with wrench and loosen Cutter Locking Bolt #31 (left hand thread) with another wrench by turning clockwise.
2. Remove Cutter Washer #30 and Cutter pacer #29 and Cutter #28.
3. Replace with new Cutter.
4. Reverse steps 2 and 1 to re-assemble.
No. Part # Description
24 56052 Rubber Depth Control
25 56053 Adjusting crew
26 56054 Cutter haft
27 56055 Cutter Housing
28 56029 Cutter
29 56024 Cutter pacer
30 56056 Cutter Washer
31 56057 Cutter Locking Bolt
32 56058 Rubber Pipe Bumper
33 56059 quare Pipe
34 56060 Plastic Pipe End
35 56043 Pin & Chain Assembly
36 56070 Table Base Assembly
38 56063 Under Clamp
39 56064 Table Base crew
40 56065 Anti- lip Rubber Pad
41 56022 Cutter Housing Assembly
42 56023 Under Clamp Assembly
43 56068 ide Pin Assembly
44 56027A-B Bottom Cutter Bearing
45 56027A-T Top Cutter Bearing
46 56215 Gripper Bearing
No. Part # Description
1 56030 Top Handle Knob Cover
2 56031 Top Handle Knob
3 56032 Top Handle Knob crew
4 56033 Top Handle
5 56034 Handle crew
6 56027 Top Handle Bearing
7 56035 Gripper Housing
8 56036 Gripper haft
9 56028 Gripper
10 56037 Bushing
11 56038 Bushing
12 56039 Locking Mechanism
13 56040 Locking Pin
14 56041 Allen et crew
15 56334 Gripper Housing pring
16 56026 ide Locking Pin
17 56044 Bushing
18 56045 Bushing
19 56046 ide Handle haft
20 56216 RH ide Handle
21 56048 Mechanism Housing
22 56049 Ball End et crew
23 56051 Adjusting Nut
CanPro Replacement Parts
Model Numbers : 56050- ( )

Product arranty
Except as otherwise provided below, Nemco Food Equipment, LLC ("Nemco") warrants, to the original user, its can opener products (other
than cutters, bearing, and gripper) to be free of mechanical defects in the material and workmanship under "normal use" (define below) for the
shorter of the following periods: (a) one (1) year from the date placed in service by the original use, or (b) 18 months from the date of shipment
from its factory. The warranty provided herein shall be limited to parts and labor. Any determination that a product is defective or covered by
this warranty shall be made by Nemco, in its sole discretion. The determination of whether to repair or replace a defective, covered product, or
to refund the purchase price for the product, will be at Nemco's sole discretion. The warranty does not cover products used outside the United
tates, or damages caused by accidents, misuse, negligence of and person other than Nemco, fire, flood, or other casualty. Any alteration to
the product or unauthorized repair voids this warranty. For purposes of this warranty, the phrase, "normal use" shall mean the use of the
product in connection with food in accordance with the product manual accompanying the product.
Nemco shall be responsible only for repairs or replacements of defective parts performed by Nemco's authorized service personnel. Authorized
service agencies are located in principal cities throughout the continental United tates, Alaska, and Hawaii.
THE FOREGOING WARRANTY I EXCLU IVE AN IN LIEU OF ALL OTHER WARRANTIE , EXPRE OR IMPLIED. NEMCO EXPRE LY
DI CLAIM ANY IMPLIED WARRANTY THAT ANY OF IT PRODUCT I MERCHANTABLE, FIT FOR A PARTICULAR PURPO E, OR DOE
NOT INFRINGE ON THE RIGHT OF ANY THIRD PARTY. THE FOREGOING WARRANTY HALL BE NEMCO' OLE AND EXCLU IVE
OBLIGATION. ANY PER ON' (BUYER, U ER OR OTHERWI E) EXCLU IVE REMEDY AGAIN T NEMCO AND NEMCO' OLE OBLIGATION,
FOR ANY AND ALL CLAIM , WHETHER FOR BREACH OR CONTRACTM WARRANTY, TORT (INCLUDING WITHOUT LIMITATION
NEGLIGENCE), OR OTHERWI E, HALL BE LIMITED TO NEMCO REPAIRING OR REPLACING THE PRODUCT, OR, AT NEMCO' OPTION,
REFUNDING THE PURCHA E PRICE THEREFORE, IN NO EVENT HALL NEMCO HAVE ANY LIABILITY FOR INCIDENTAL, PECIAL PR
CPN EQUENTIAL DAMAGE . Any person desiring to make any claim against Nemco must do so within six (6) months after expiration of the
applicable warranty period, or such claim shall be forever barred.
Limited Warranty applies if the following instructions are followed.:
1. For foodservice use only.
2. Inspect and change cutter regularly.
3. Cutter must be kept clean at all times as indicated in the "Cleaning Instructions." Inspect and clean the cutter and gripper with the
included brush AFTER EACH USE to ensure proper operation. Failure to follow the included "Cleaning Instructions" will cause
damage and VOID ARRANTY.
4. Do not over rotate top handle to cut beyond the initial seam cut as this may cause metal slivers. If on the first cut the lid does not
open (check carefully as lid me be opened, however, due to the lid vacuum sealed it may be difficult to lift lid off) do not continue to
rotate handle.
5. Recommended Daily Use - maximum up to 50 cans per day depending on the usage (type of cans being opened up to No. 10 can
size)>
6. If used according to the recommended daily use and manual instructions, the cutter should last up to 2500 - 5000 cans depending
on handling and actual cans used. Note: If you open both ends of the can for recycling, please double you usage figure.
NEMCO FOOD EQUIPMENT
301 Meuse Argonne, Hicksville, OH 43526
Phone: (419) 542-7751 Fax: (419) 542-6690 Toll free: 1-800-782-6761
www.nemcofoodequip.com
9-18-13

56050 - ( ) CANPRO – CAN OPENER
Cleaning Instructions –Use of Brush
NOTE: Use the Brush, #47710, included in this package to clean the areas of the CANPRO that are shown in the
picture below. Refer to operating instructions for complete cleaning instructions.
ARNING
Cutting area must be kept clean at ALL times. Inspect and clean cutter and gripper with included brush after
each use
to ensure proper operation. Failure to follow cleaning instructions will cause damage and
VOID ARRANTY.
NEMCO FOOD EQUIPMENT
301 Meuse Argonne, Hicksville, OH 43526
Phone: (419) 542-7751
Fax :(
419) 542-6690 T
oll Free:
1-800-782-6761
47998
www.nemcofoodequip.com 9-5-2012
USE BRUSH TO CLEAN AROUND THE
OUTSIDE OF THE CUTTER HOUSING.
USE BRUSH TO CLEAN ALL DEBRIS
FROM AROUND GRIPPER.
USE BRUSH TO CLEAN ALL DEBRIS
FROM THE INSIDE OF THE HOUSING.
USE BRUSH TO CLEAN ALL DEBRIS
FROM THE CUTTER.

NEMCO Food Equipment
301 Meuse Argonne Road
Hicksville, OH 43526
419-452-7751
1-800-782-6761
419-542-6690 FX
CanPRO Compact
Model 56050-1
Basic mount
Prior to Base Installation:
Think about the "ideal" location for the can opener.
1. Be certain that there is enough room for the operator to comfortably and efficiently turn the handle.
2. Is the can opener in a position where it will not "block" frequently used counter space?
3. Is the opener located in an area where the movement of opened and unopened cans will be kept to a minimum. (Why carry cans from a
storage area, to the opener, and then moved again to a preparation area?)
4. To what type of table or counter are you attaching the base? You will need to know this for the size of bolts or screws to use in the
attachment process.
Installation:
1. Measure the thickness of the table or shelf where you are mounting the base.
2. Obtain two 1/4" (or 5mm) bolts with washer and nut. Purchase bolts about 1/2" (12mm) longer than the thickness of the table. (If you
wish, a wingnut maybe used inplace of the regular nut for ease in attaching the bolt to the table.)
3. Place the base on the table in the position selected for the final installation and mark the center of the two holes located on the top of the
rounded portion of the base. (Check under the table or shelf to see if there are any obstructions or features that will cause problems drilling
the holes.)
Holes on top of base used for installation
4. Remove the base, take a drill with a 1/4" drill bit and carefully drill the two marked locations.
5. Position the base on the table lining up the holes with the drilled holes. Place a washer onto each bolt and insert them into the base and
table.
6. Take another washer slide it onto the bottom of the bolt and then attach the nut to the bolt. Repeat this procedure with the second bolt.
Tighten the nuts to prevent movement of the base unit on the table.
12/2009 Printed in USA
Table of contents


