NeoCharge Smart Splitter User manual
Smart splitte
User Manual
™

Welcome to NeoCharge! As EV drivers, we understand the headaches
that come with home charging. Costly rewiring and limited options
prompted us to find a better solution for charging at home - one that is
easier, more cost-effective, and doesn't require e pensive panel
upgrades
Our journey led us to collaborate with industry e perts, engineers,
utilities, and electricians, resulting in the birth of the Smart Splitter -
the first product to enable safe, cost-effective, and effortless home
EV charging access, without rewiring. It's a significant stride towards
making the electrification of homes more affordable and contributing
to our climate goals
But we didn't stop there. We’re now focused on optimizing your entire
home's energy usage for increased savings, insights, and control
starting with your EV charging. Don’t forget to scan the QR code on
the large postcard for exclusive early access to the new
NeoCharge Connect app
We are truly thankful to have earned the trust of tens of thousands of
EV drivers across North America, and we e tend that gratitude to you
for becoming part of our community as well.
Spencer Harriso
Co-Founder and CEO
Akhil Velur
Co-Founder and CTO

Contents
What's in the Box Page 03
Page 04How it Works
Page 05Cautionary Advice
Page 07Configuration
Page 08Installation Instructions
Page 12LED Indicators
Page 13Troubleshooting
Page 14Warranty
Page 14Support
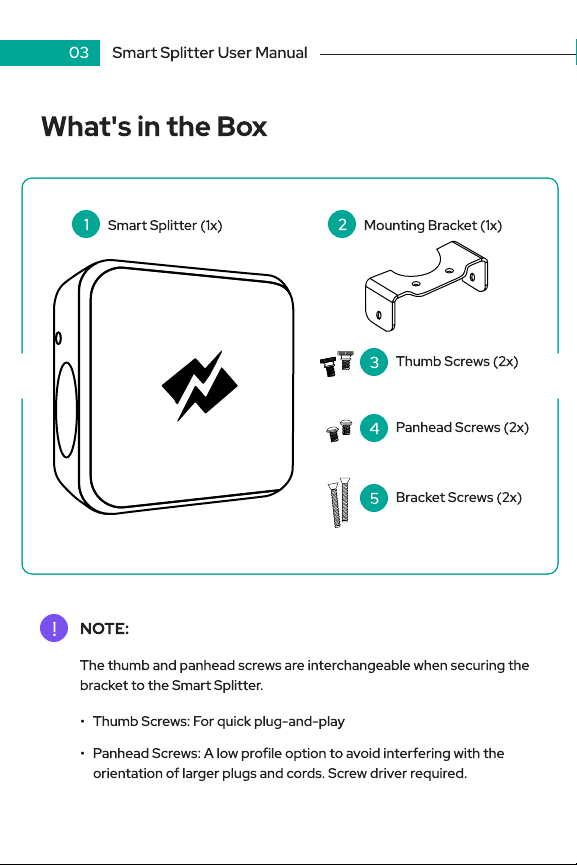
What's in the Box
!
Mounting Bracket (1x)
Thumb Screws ( x)
3
Bracket Screws ( x)
5
Panhead Screws ( x)
4
NOTE:
The thumb and panhead screws are interchangeable when securing the
bracket to the Smart Splitter.
Thumb Screws: For quick plug-and-play
Panhead Screws: A low profile option to avoid interfering with the
orientation of larger plugs and cords. Screw driver required.
03 smart splitter user manual
Smart Splitter (1x)1
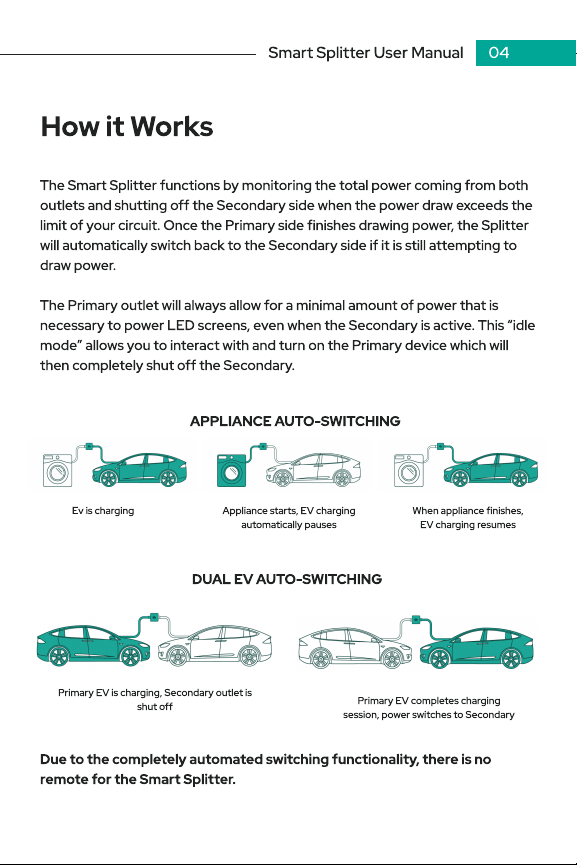
How it Works
The Sma t Splitte functions by monito ing the total powe coming f om both
outlets and shutting off the Seconda y side when the powe d aw exceeds the
limit of you ci cuit. Once the P ima y side finishes d awing powe , the Splitte
will automatically switch back to the Seconda y side if it is still attempting to
d aw powe .
The P ima y outlet will always allow fo a minimal amount of powe that is
necessa y to powe LED sc eens, even when the Seconda y is active. This “idle
mode” allows you to inte act with and tu n on the P ima y device which will
then completely shut off the Seconda y.
Due to the completely automated switching functionality, there is no
remote for the Smart Splitter.
sma t splitte use manual 04
APPLIANCE AUTO-SWITCHING
Appliance sta ts, EV cha ging
automatically pauses
Ev is cha ging When appliance finishes,
EV cha ging esumes
DUAL EV AUTO-SWITCHING
P ima y EV is cha ging, Seconda y outlet is
shut off P ima y EV completes cha ging
session, powe switches to Seconda y
05 smart splitter user manual
Cautionary Advice
Only use your Smart Splitter within the speci ied operating parameters.
Do not set your EV charging amperage:
>40 Amps on a 50A breake
>24 Amps on a 30A breaker
Do not use (or discontinue using) the NeoCharge i it is de ective,
appears cracked, rayed, broken or otherwise damaged, or ails to
operate.
Do not use the NeoCharge in any outlet or which it is not designed.
Do not attempt to open, disassemble, repair, tamper with, or modi y
your Smart Splitter. Your device is not able to be serviced by the user.
Please contact NeoCharge Support or any repairs.
Do not disconnect your Smart Splitter when it is supplying power to
either output.
Do not plug the NeoCharge into a damaged, loose or worn power outlet.
Ensure that the prongs on your device it snuggly into your wall outlet.
Do not expose your unit to lammable or harsh chemicals or vapors.
Do not use or store your device in a recessed area or below loor
level. When using your Smart Splitter indoors, ensure that the device
is positioned at least 18 inches (46 cm) above the loor.

smart splitter user manual 06
Avoid and prevent your Smart Splitter from foreign objects as well as
moisture and water at all times. If any sort of corrosion or damage is
suspected discontinue use immediately. If rain falls during charging, do
not allow rain water to run along the length of the charge cable plugged
into your device.
Do not plug your Smart Splitter into an electrical outlet that is
submerged in water or covered in snow. In the event of this situation,
turn off your breaker and then unplug your device.
Do not touch the Smart Splitter's end terminals with sharp metallic
objects such as wire, tools or needles. Do not insert any foreign objects
into any part of your device. Avoid the use of cleaning solvents with
your device.
Do not use private power generation as a source for charging.
Do not operate your Smart Splitter in temperatures outside of its
operating range of -22º F to 122º F (-30º C to 50º C).
Store your device in a clean and dry place inside the temperatures of
-40º F to 185º F (-40º C to 85º C).

07 smart splitter user manual
The max charging amperage you can utili e as a continuous load is 80% of
your breaker rating (US and Canada Electrical Codes).
Ensuring Your Setup Meets Safety Guidelines
Simultaneous EV Charging (50A Breaker Only)
If you have two EVs/EVSEs with adjustable amperage capabilities, you have
the option to charge both EVs simultaneously at half power. As long as the
total load from both sides does not exceed the Smart Splitter's switching
limits, both cars will receive power.
To Enable Simultaneous Charging: Set both EVs to charge at 20A or less, so
the total amperage does not exceed 40 Amps.
Charge two EVs simultaneously at half speed
SIMULTANEOUS EV CHARGING
Circuit Breake
Amperage
50 Amp Breaker
30 Amp Breaker
40 Amp or less
24 Amp or less
Charg
Amperage
!
Configuration
P
RO TI
P
:
Y
our charging amperage can be adjusted in most
newer EVs and EVSEs (Electric Vehicle Supply E
q
uipment)

Installation Instructions
smart splitter user manual 08
Step 1 - Turn Breaker ff
Turn off the breaker to your 240v outlet then unplug your appliance or EV
charger that is currently occupying it.
Step 2 - Install Mounting Bracket
Remove the existing screws from the outlet faceplate.
Screw in the mounting bracket using the bracket screws (2x) so the mounting
bracket is flush with the faceplate.
Ensure that the mounting bracket is in alignment with the gold colored
mounting points on your Smart Splitter. See pictures on page 9 for the
correct bracket orientation for each outlet.
!
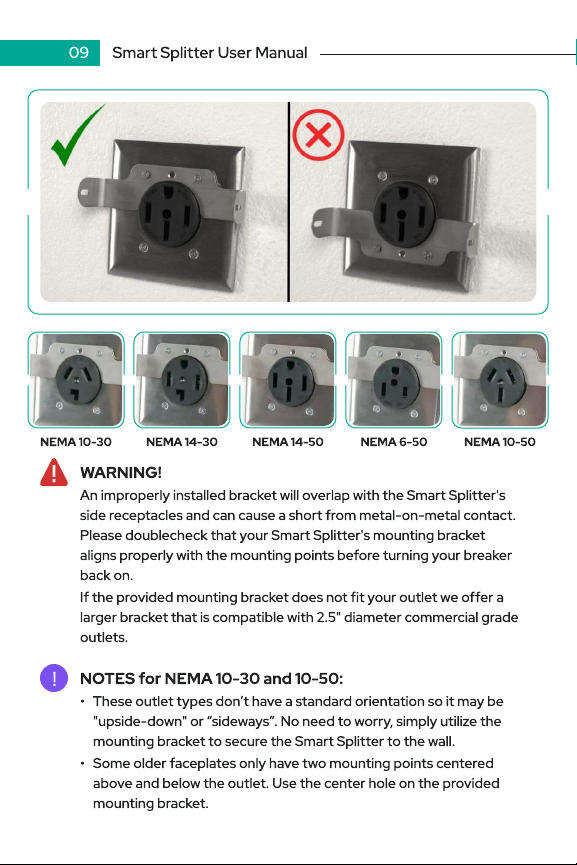
09 smart splitter user manual
!Notes for NEMA 10-30 and 10-50:
These outlet types don’t have a standard orientation so it may be
"upside-down" or “sideways”. No need to worry, simply utilize the
mounting bracket to secure the Smart Splitter to the wall.
Some older faceplates only have two mounting points centered
above and below the outlet. Use the center hole on the provided
mounting bracket.
An improperly installed bracket will overlap with the Smart Splitter's
side receptacles and can cause a short from metal-on-metal contact.
Please doublecheck that your Smart Splitter's mounting bracket
aligns properly with the mounting points before turning your breaker
back on.
If the provided mounting bracket does not fit your outlet we offer a
larger bracket that is compatible with 2.5" diameter commercial grade
outlets.
WARNING!
NEMA 10-30 NEMA 14-50 NEMA 6-50 NEMA 10-50NEMA 14-30

smart splitter user manual 10
Step 3 - Pl g in Smart Splitter
Plug in your Smart Splitter (it feels good, we know) and secure to the
mounting bracket using the thumb screws (x2). Alternatively, you may also use
the provided panhead screws (x2) if you would prefer a lower profile or the
thumb screws interfere with any of your cables.
Step 4 - Pl g in Yo r Primary Device
Plug your priority appliance or EV into the Primary Output (left side) of your
Smart Splitter. Primary is indicated with PRI on the side of the Smart Splitter
next to the LED indicator.
The device plugged in to the Primary side will always take priority over the
device plugged into the Secondary side. This is typically your appliance, or if
charging two EVs, the Primary should be the EV you want to charge first.
11 smart splitter user manual
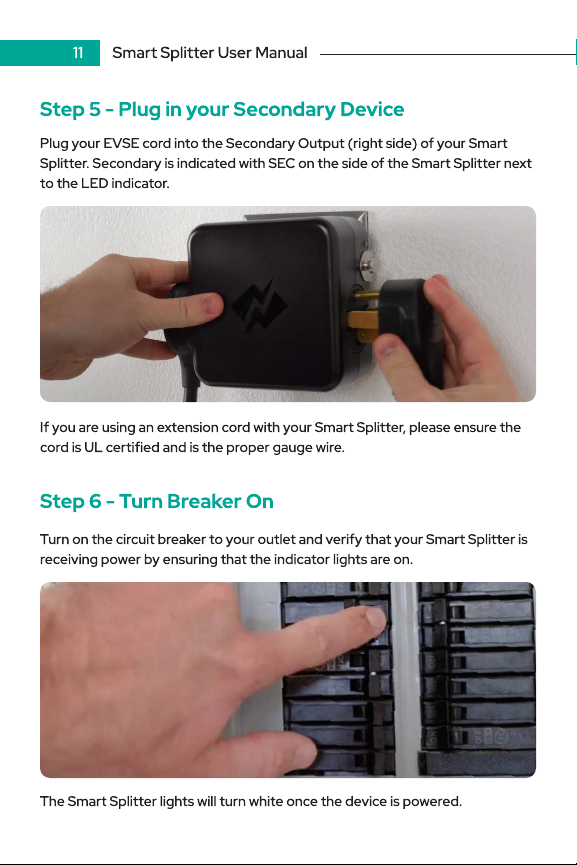
St p 5 - Plug in your S condary D vic
Plug your EVSE cord into the Secondary Output (right side) of your Smart
Splitter. Secondary is indicated with SEC on the side of the Smart Splitter next
to the LED indicator.
If you are using an extension cord with your Smart Splitter, please ensure the
cord is UL certified and is the proper gauge wire.
St p 6 - Turn Br ak r On
Turn on the circuit breaker to your outlet and verify that your Smart Splitter is
receiving power by ensuring that the indicator lights are on.
The Smart Splitter lights will turn white once the device is powered.

smart splitter user manual 12
LED Indicators
White – Idle On
Green – Receiving power
Yellow – Charging paused
Blue (flashing) – WiFi Pairing Mod
Pairing mode is active for the first 5 minutes after
the device is power cycled
Red – Error; Charging stopped (lower the current limit)

13 smart splitter user manual
Troubleshooting
Having issues with your Smart Splitter? Worry not; we're here to guide you
through the troubleshooting pro ess. Follow these simple steps to address
ommon on erns:
Begin by ensuring that your Smart Splitter is orre tly onne ted to your
power sour e and devi es, and that your ir uit breaker is turned on.
For more omprehensive troubleshooting assistan e, please go to our website
at getneo harge. om. For qui k help, s an the QR ode below.
On our website, you'll spot a chat button onveniently lo ated in
the lower right orner. Cli k it to initiate step-by-step
troubleshooting flows tailored spe ifi ally to your Smart Splitter
issue
Basic Checks:
Visit our Website:
Follow Troubleshooting Flows
If you still need help, our knowledgeable support staff of EV
harging experts will step in to best assist you.
Support Chat
smart splitter user manual 14
Warranty
ll Smart Splitters are covered with a 2 year limited warranty from the date of
purchase.
NeoCharge warrants the Smart Splitter product against defects in materials
and workmanship under normal use for two years from the date of purchase. If
a Smart Splitter is deemed defective, NeoCharge will repair or replace, at no
charge, the Smart Splitter or parts of the Smart Splitter that prove defective.
fter receiving a customer notice, the NeoCharge Customer Support team will
help troubleshoot and, if defective, issue a return/replacement.
*NeoCharge shall make the final decision, with fairness to all parties, as to the
legitimacy of the claim to this warranty.
The warranty includes:
The warranty excludes:
Defects in materials and workmanshi
Shipping damag
ny material, equipment, tools, and incidentals
necessary to complete repairs including replacement
Supplier or manufacturer upgrades
If the device has been opened, altered, abused, or
misused by the owner
Support
We are always ready to help! If you have any questions, you can contact us via
the contacts below:
support@getneocharge.com
805-622-2783 (T
e
x
t
O
n
l
y
)
www
.getneocharge.com

Table of contents


