Neogen Corporation 4700 User manual
Designed for use with Neogen’s Veratox®, BioKits and
GeneQuence®microwell test kits
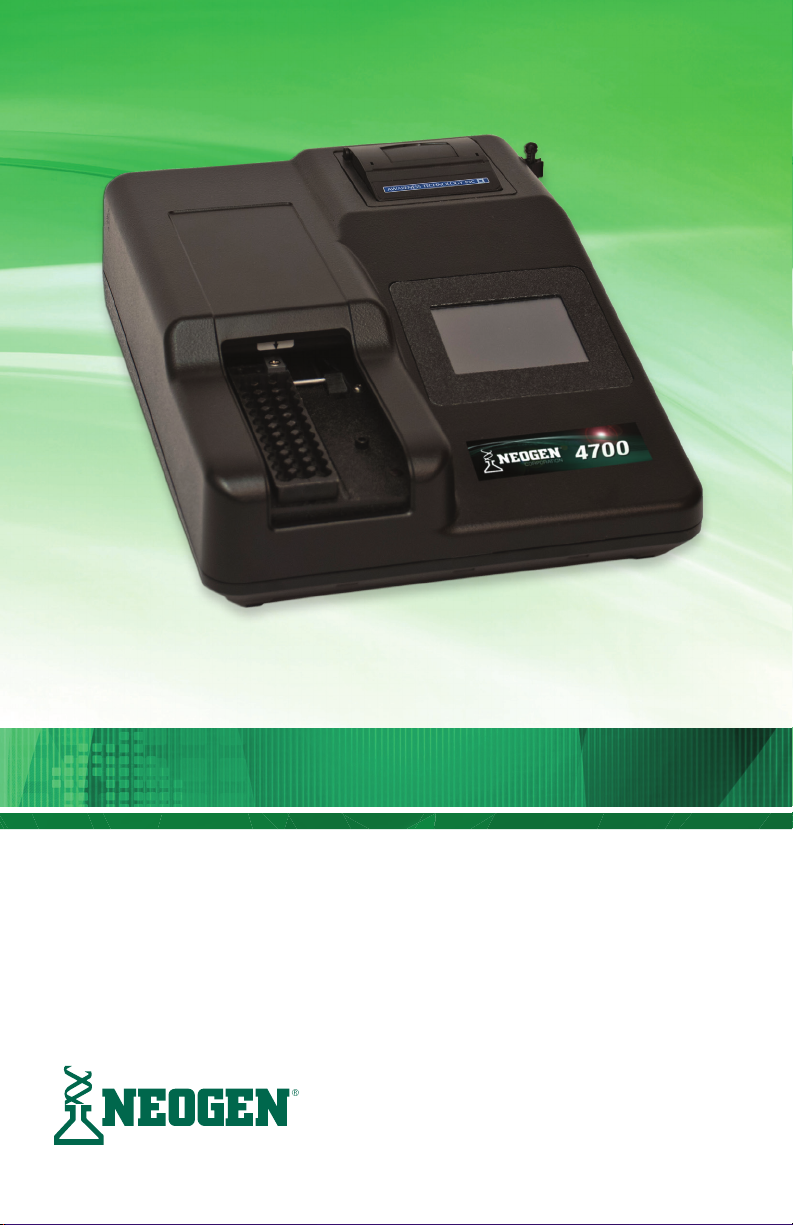
The 4700 Reader is a compact, economical, stand-alone microstrip reader. Its streamlined design
offers a touch screen interface, superb optics, onboard curve-fitting software, and built-in printer
to meet the requirements of modern laboratories.
4700 Reader User’s Manual

2User’s Manual •Neogen 4700 Reader

3Questions? Call Neogen at 800-234-5333 or 517-372-9200
Table of contents
Section 1: Installation......................................................................................................... 4
1.1 Unpacking and installation....................................................................................... 4
1.2 Load paper................................................................................................................. 4
Section 2: Set up ..................................................................................................................... 5
2.1 Starting the reader.................................................................................................... 5
2.2 Using the touch screen............................................................................................. 5
2.3 The home screen....................................................................................................... 5
2.4 Utility menu ............................................................................................................... 5
Section 3: Running the test .................................................................................................... 6
Section 4: Reading and calculating results........................................................................... 6
Section 5: Reading and calculating GeneQuence results..................................................... 8
Section 6: Maintenance .......................................................................................................... 8
Section 7: Settings ............................................................................................................. 8
7.1 Printer setup ......................................................................................................... 8
7.2 Adjust date and time............................................................................................. 9
7.3 Lamp control......................................................................................................... 9
7.4 Laboratory name................................................................................................... 9
7.5 Strip format........................................................................................................... 9
7.6 Sound settings .................................................................................................... 10
7.7 External output.................................................................................................... 10
Section 8: Cloning tests.................................................................................................... 10
Section 9: Editing preprogrammed tests.......................................................................... 10
Section 10: Programming new test parameters .............................................................. 12
Section 11: Deleting tests................................................................................................. 12
Section 12: Restoring tests .............................................................................................. 12
Section 13: Modes............................................................................................................ 13
Section 14: Troubleshooting............................................................................................. 13

4User’s Manual •Neogen 4700 Reader
Section 1. Installation
1.1 Unpacking and installation
1. Carefully unpack the instrument, removing it from its plastic bag. Report any damage
to the freight carrier at once. NOTE: Retain the original packing material for future
use in the event that the instrument is shipped to another location or returned for
service.
2. Place the instrument on a flat working surface capable of safely supporting the
weight of the instrument (approximately 5 lbs. (2.3 kg)). A clearance of at least 3
inches around the instrument is required to ensure optimal ventilation. The instru-
ment should be operated within an ambient temperature range of 18–35°C and at
humidity of less than 85%.
3. Ensure the power switch on the back of the unit is in the off (down) position before
connecting the power cord to the power supply.
4. With the power switch in the Off (down) position, insert the DC connector attached
to the end of the power supply module cable to the instrument. Insert the mating end
of the AC power cord to the inlet of the power supply module, and plug the other end
of the AC power cord into an AC outlet. Use only the power cord and supply module
specified for this product and certified for the country of use.
• For 110–120 V used in the United States, use the supplied UL listed cord set
consisting of an 18 AWG, Type SPT-1 two conductor cord maximum 3 meters
(10 feet) in length, rated 7 A, 125 V, with a polarized parallel blade type attach-
ment plug.
• For 220–240 V used inside the United States, use a UL listed cord as above,
except rated 250 V.
• For other locations, use the power cord certified for the country of use.
1.2 Load paper
1. Locate the roll of thermal printer paper
(Neogen item 9319).
2. Lift the printer paper compartment lid
and open the printer compartment.
3. Place the paper roll in the well so the
leading edge of the paper feeds toward
the front of the printer from the bottom
of the paper roll.
4. Pull up at least 1 inch of paper and then press the compartment cover down until it
snaps closed.
5Questions? Call Neogen at 800-234-5333 or 517-372-9200
Section 2. Set up
2.1 Starting the reader
1. Turn the power switch, which is located on the power supply module, On. The printer
will print several lines. If the reader does not print, then the internal printer is disabled.
To enable printing, go to Settings to turn printer On.
2. Refer to the Veratox Software for Windows instruction manual version 3.3 or newer
for setting up the USB connection.
2.2 Using the touch screen
The touch screen can be manipulated using the stylus or by touch. Icons also can be
selected by tapping the stylus on the screen.
2.3 The home screen
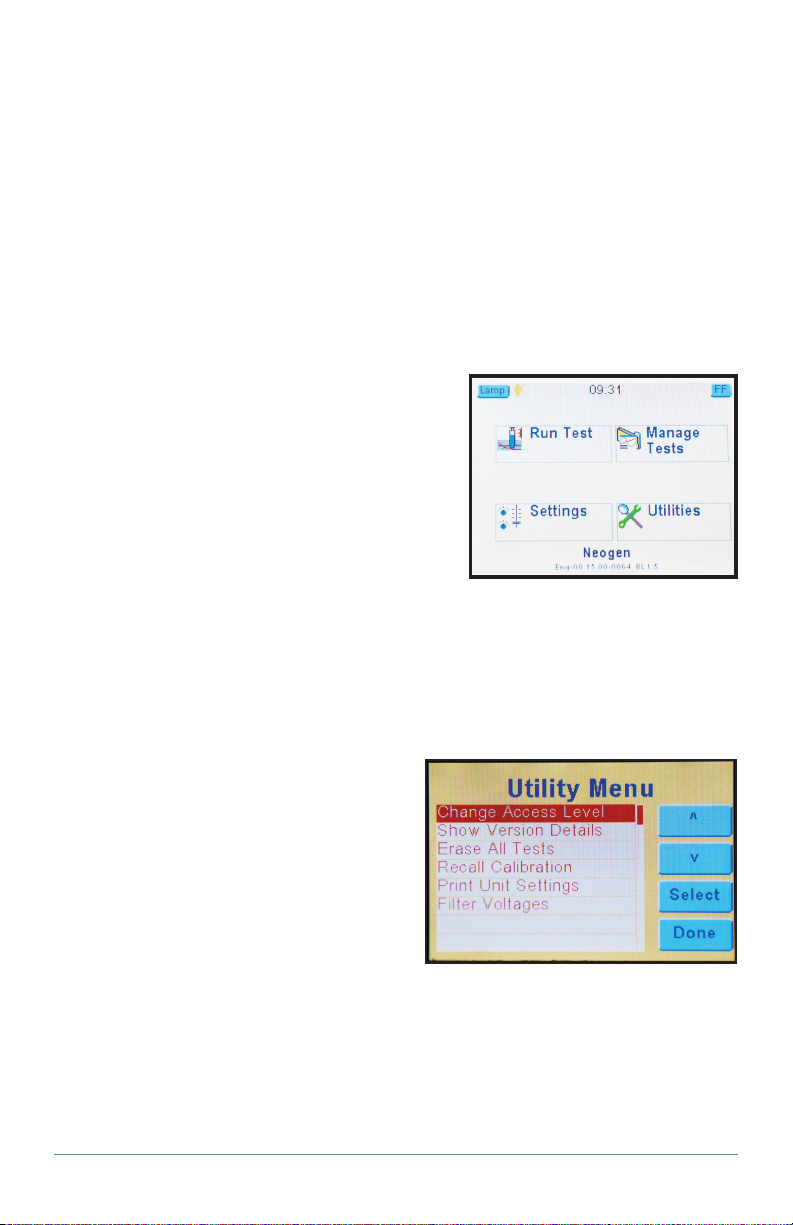
The home screen has several icons:
1. Run test: Contains preprogrammed tests
used to read samples.
2. Manage tests: Contains options for creat-
ing, editing, restoring and deleting tests.
3. Settings: Contains time and date, printer
and strip format settings.
4. Utilities: Contains options to erase all tests, change access levels, adjust filter volt-
ages and recall calibration.
5. Lamp: Touching this icon will turn the lamp on or off.
6. FF: Touching this icon will feed paper through the slot.
2.4 Utility menu
1. Change access level: To change the
access level, contact Neogen Techni-
cal Services for a passcode.
2. Show version details: Touching this
icon will display the current firmware
version, model, serial number, build
date and current time.
3. Erase all tests: Touch this icon to erase all tests. The reader will prompt the user to
“Please confirm: Erase all tests?” CAUTION: Selecting OK will delete all tests.
4. Recall calibration: Allows user to restore the original factory settings, including
calibration.

6User’s Manual •Neogen 4700 Reader
5. Print unit settings: Prints all information about an individual instrument’s calibra-
tion settings and other information.
6. Filter voltages: Displays real-time filter wheel voltages with an option to print them.
Section 3. Running the test
1. Run the assay according to the Directions for use supplied with the test kit. Results
should be processed by the reader within 20 minutes of completion of the test to
ensure accuracy.
Section 4. Reading and calculating results
1. Wipe bottom of microwells clean before reading.
2. Insert wells into the far right slot of the well holder with the zero in the top position.
Place any additional strips in positions B and C.
3. Position the carrier to the left so strip A is in the center of the track.
4. Use the Run Test key to access the user test menu. The instrument will display
the 33 preprogrammed tests. Arrow up “^” or down “v” to scroll, and page forward
using“>>” or page back using“<<” to move through the list. Or select “By #,” and
enter the test number and press Enter.
5. Confirm the test selection or press No to select a different test.
6. To print the test menu select the Manage Tests icon then Print Test List.
7. One curve may be used to calculate up to 24 wells, but under no circumstances
should a curve from one run be used to calculate samples that have not been run at
the same time as the standard curve.
8. After selecting a test there will be three options — accept the test selected, limit the
number of wells to read, or quit the test.
9. If the correlation coefficient is < 0.980, the message “Invalid! r < 0.98” will be
printed at the end of the run. Results should be considered invalid if this message
appears.
7Questions? Call Neogen at 800-234-5333 or 517-372-9200
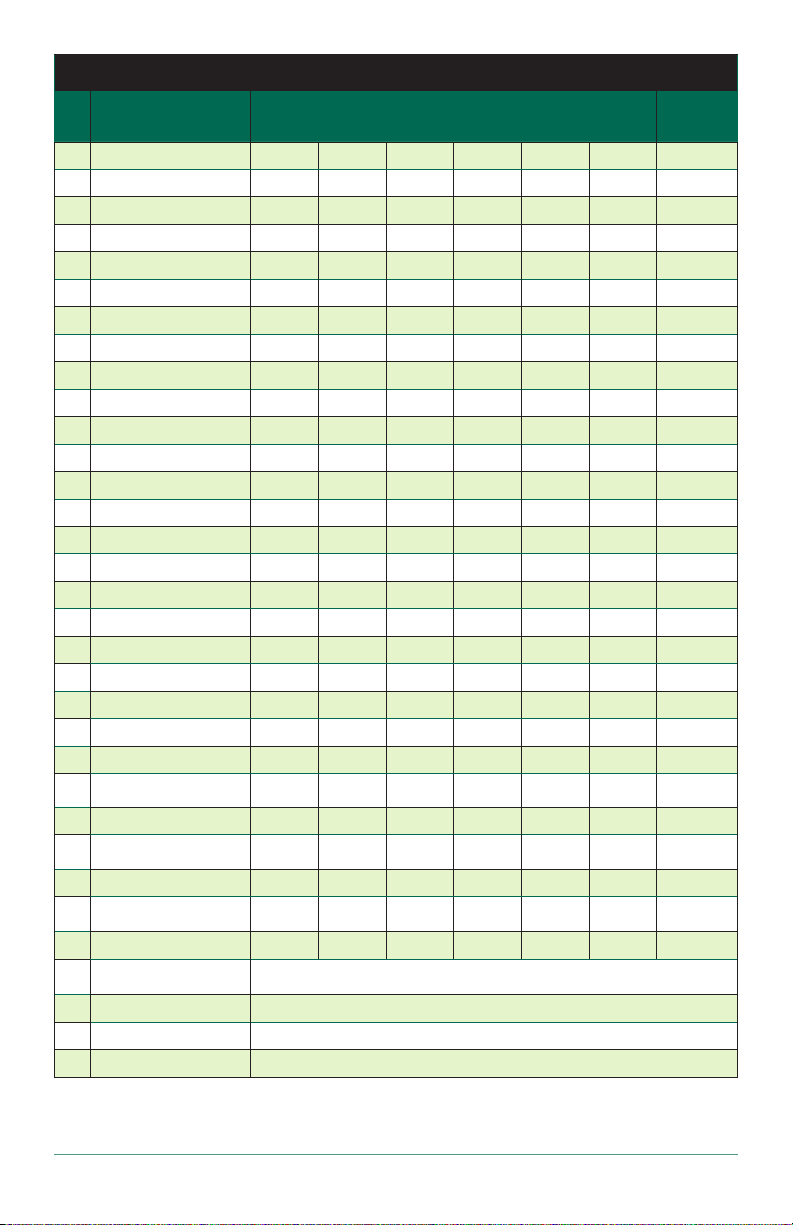
Neogen Menu
Test name Control values Unit of
measure
1 Aflatoxin 0.0 5.0 15.0 50.0 — — ppb
2 Aflatoxin HS 0.0 1.0 2.0 4.0 8.0 — ppb
3 Aflatoxin M1 0.0 5.0 15.0 30.0 60.0 100 ppt
4 Aflatoxin HS MAX 0.0 1.0 3.0 5.0 10.0 — ppb
5 DON 0.0 0.5 1.0 2.0 6.0 — ppm
6 DON HS 0.0 25.0 50.0 100.0 250.0 — ppb
7 DON NE 0.0 0.25 0.5 1.0 2.0 — ppm
8 Fumonisin 5/10 0.0 0.25 1.0 3.0 6.0 — ppm
9 Fumonisin 10/10 0.0 1.0 2.0 4.0 6.0 — ppm
10 Fumonisin HS 0.0 50.0 100.0 300.0 600.0 — ppb
11 Zearalenone 0.0 25.0 75.0 150.0 500.0 — ppb
12 T-2/HT-2 Toxins 0.0 25.0 50.0 100.0 250.0 — ppb
13 Ochratoxin 0.0 2.0 5.0 10.0 25.0 — ppb
14 Histamine 0.0 2.5 10.0 20.0 50.0 — ppm
15 Peanut Allergen 0.0 2.5 5.0 10.0 25.0 — ppm
16 Almond Allergen 0.0 2.5 5.0 10.0 25.0 — ppm
17 Egg Allergen 0.0 2.5 5.0 10.0 25.0 — ppm
18 Total Milk Allergen 0.0 2.5 5.0 10.0 25.0 — ppm
19 Casein Allergen 0.0 2.5 5.0 10.0 15.0 — ppm
20 Gliadin 0.0 5.0 10.0 20.0 50.0 — ppm
21 Soy Allergen 0.0 2.5 5.0 10.0 25.0 — ppm
22 Hazelnut Allergen 0.0 2.5 5.0 10.0 25.0 — ppm
23 Giladin (2.5–40) 0.0 2.5 5.0 10.0 20.0 40.0 ppm
24 Gliadin (5–40) 0.0 5.0 10.0 20.0 40.0 — ppm
25 Coconut 0.0 1.0 2.5 5.0 10.0 25.0 ppm
26 Mustard Allergen 0.0 2.5 5.0 10.0 25.0 — ppm
27 Crustacea Allergen 0.0 2.5 5.0 10.0 25.0 — ppm
28 Veratox Sesame 0.0 2.5 5 10 25 — ppm
29 BioKits Walnut 0.0 2.4 6.0 12.0 60.0 120.0 ppm
30 GeneQuence See Section 5
31 Absorbance 450 nm
32 Absorbance 650 nm
33 Dri Dye
NOTE: Neogen’s Veratox format tests have been preprogrammed for convenience. To enter new
test parameters or change an existing test, see Sections 8 and 9.

8User’s Manual •Neogen 4700 Reader
Section 5. Reading and calculating GeneQuence results
1. From the Home screen, select Run Test. Select GeneQuence and confirm the se-
lection.
2. Press Accept. The reader then will prompt the user to “Set the carrier to the first
strip, then press OK.” Once the carrier is set, press OK.
3. If NC > 0.15, the test will be invalid.
4. If PC < 1.0, the test will be invalid.
Section 6. Maintenance
It is important to follow the installation instructions carefully, using only a suitable power
supply, surge protector and placing the instrument with the proper clearance for good air
circulation around it. Excessive vibration should be avoided. During shipments, use the
original packing material or other suitable protective foam.
The Neogen 4700 Reader essentially is a maintenance-free instrument. To ensure maxi-
mum trouble-free operation, the instrument need only be kept dry. Although the filters are
well sealed, their life may be decreased if the instrument is maintained in a very humid
environment (greater than 80% humidity). Using the instrument in an air-conditioned
room is recommended for humid climates. Extreme temperature shock also is harmful to
the filters. Maximum changes of 5°C per minute are recommended especially at the lower
limits of -50°C, where permanent damage may occur. The reader is designed for use at
20°C and performs according to specifications in the range of 10–50°C.
Cleaning should be done only when obviously necessary. Use a dry cloth or duster to
remove dust and dirt. Use a slightly damp, soft cloth to clean up spills. Water or 70%
isopropanol may be used to dampen the cloth. Use of other chemicals or abrasive scrub-
bing may damage the cover.
Section 7. Settings
7.1 Printer setup
For paper loading instructions, see Section
1.2. If the printer does not print several lines
upon turning on the Neogen 4700 Reader,
the printer is disabled. To enable the printer,
go to Settings, followed by Printer Setup.
The touch screen will present an On and Off
option as well as the current status of the
printer. To enable the printer, touch On using
the provided stylus, followed by Save.

9Questions? Call Neogen at 800-234-5333 or 517-372-9200
To print a list of test options, touch the Manage Tests icon. Press the Print Test List
icon. The reader will print a list of the programmed tests along with their assigned test
number.
7.2 Adjust date and time
To set the correct time and date, touch the Settings icon on the home screen. Once in
Settings, touch the Adjust Date and Tme icon and hit Select. To edit the hour, minute
and seconds fields, touch the stylus to the desired field. The screen will show the selected
field. Touch the correct number and hit Enter. To erase an existing number use the back-
space icon (<–) or the Clear icon. Once the desired number is in the field, press Enter.
Do the same to set the month, date and year, which is located below the time settings in
the Set Time window. Once back in the Set Time window, press Save to allow changes
to take effect.
The Set Time window also allows users to switch the format of date between U.S. and
European formats. To change the style, touch Date Style in the Set Time screen. The
date will be displayed in the desired format next to the Date Style icon. Press Save for
the changes to take effect.
The Set Time window also has a Set Both option. This allows users to input the month,
day, and year in a MMDDYY format. After entering the numbers in the Set Both screen,
press Enter followed by Save on the Set Time screen.
The Edit icon in the Set Time screen also allows users to change time and date settings.
7.3 Lamp control
The length of time the lamp will remain on before it turns off and the minimum warmup
time can be adjusted by touching the Settings icon, followed by the Lamp Settings.
Touch the desired fields to edit the time in seconds. Touch Save to implement the new
settings.
7.4 Laboratory name
Users can change the name of the laboratory, which is printed upon startup. From the
Home screen, touch Settings, followed by Laboratory name.
Press Edit to change the name. Once finished, touch Enter. To implement the name,
press Save. To exit the menu, press Cancel.
7.5 Strip format
To change the strip format between 8 wells and 12 wells, touch Settings, followed by
Strip Format. Touch either 8 well or 12 well, followed by Save to implement the
change.

10 User’s Manual •Neogen 4700 Reader
7.6 Sound settings
To access the sound settings, touch Settings, followed by Sound Settings. From here,
users can turn on or off the startup sounds, icon press and release sounds, and other
sounds. Users also can change the volume by touching the appropriate field. Press Save
to implement changes.
7.7 External output
Neogen’s Veratox software can be used
to store and transmit data from the Neo-
gen 4700 Reader.
To configure external output settings,
touch the Settings icon, followed by Ex-
ternal Output. Press Select. In the Ex-
ternal Output menu, select On. Press
Save to implement the changes.
Connect the smaller end (Type B) of USB cable to the type B port on the lower left back-
side of the reader as shown above.
Turn on the computer. Connect the larger end (Type A) of the USB port to the USB port
on the computer.
For instructions on using Veratox software, see the software manual.
Section 8. Cloning tests
The clone function allows users to duplicate an existing test and assigns the next available
test slot number, which allows the test to be stored.
1. From the Home screen, touch the Manage Tests icon.
2. Touch the Clone Test icon.
3. Select the test to be cloned from the list and press Select. The reader will ask the
selection to be confirmed. Touch Yes to continue or No to return to the list.
4. The reader will indicate that “Test # was cloned into Test #.”
5. To edit the name of the cloned test and to alter the control values, return to the Man-
age Tests screen and select the Edit icon. See Section 9 for additional instructions.
Section 9. Editing preprogrammed tests
To change the settings on an already established test, follow the directions below:
1. From the Home screen, touch the Manage Tests icon.
2. Touch the Edit icon.

11Questions? Call Neogen at 800-234-5333 or 517-372-9200
3. Select which test to edit by touching the test name and then Select. The reader will
ask for the selection to be confirmed. Touch Yes to continue or No to return to the
selection screen.
4. On the first screen, the reader will display the Test Definition screen where the
test name, mode, filters and blanks can be edited. To edit the fields, either touch
the desired field with the stylus or use the Edit icon. Once finished editing the fields,
touch the double arrow icon to move to the next page. The reader will save any
changes that have been made.
a. Enter the name of the test (e.g., Aflatoxin test). Touch Enter to submit the name.
b. Touch the Mode field. Select the desired test mode by touching the appropriate
field and then hitting Select. (For more information on the different modes, see
Section 13 ).
c. Select the filters by touching the Primary Filter and the Differential Filter
icons and choosing the appropriate number. Touch Select to implement.
d. Choose whether blanks will be used and the number of replicates by touching the
Blank field. After choosing the desired settings, touch Select.
On the second screen:
a. Standards: Select the number of standards for the new assay.
b. # Std. replicates: If the assay will run standards in duplicate, select “2”. Other-
wise, the default “1” will be used.
c. Axes: The default will set absorbance on the Y axis and the concentration on the
X axis.
d. Normal control, abnormal control and other control: These functions are
parameters set up for control tolerances. It is recommended these functions re-
main disabled.
On the third screen:
a. Interpretation mode: This allows the user to input acceptable ranges for opti-
cal density. It is recommended these fields are left blank.
b. Units: Select the appropriate unit of measure (ppm or ppb) for the assay.
c. Decimals: Select the desired amount of figures to display after the decimal.
d. # sample replicates: Select the number of sample replicates used in the assay.
The default assumes running only one sample per microwell.
12 User’s Manual •Neogen 4700 Reader
5. If using the test setting only once, touch Run to activate the test. To save the setting
to the list of preprogrammed tests, touch the Save icon (a window will pop up indi-
cating the test has been saved under a new test number). To Print the test settings,
touch the Print icon.
6. To return to the Home screen, touch Exit. NOTE: To save test settings, make sure
to touch Save before exiting.
Section 10. Programming new test parameters
1. For ease of use, Neogen recommends users clone tests rather than programming
new parameters. For details on cloning tests, see Section 8.
Section 11. Deleting tests
1. From the Home screen, touch the Manage tests icon.
2. Select Delete test.
3. Select a test from the list to delete by touching the desired test name.
4. The reader will ask the selection be confirmed. Touch Yes to continue or No to return
to the list.
5. The reader will indicate that “Test # has been deleted.”
Section 12. Restore tests
Users can choose to restore one of the preprogrammed tests or to restore all of the
preprogrammed tests if they have been deleted. NOTE: If a user-programmed test exists
in place of preprogrammed test, the restore function will overwrite the user programmed
test.
1. From the Home screen, touch the Manage tests icon.
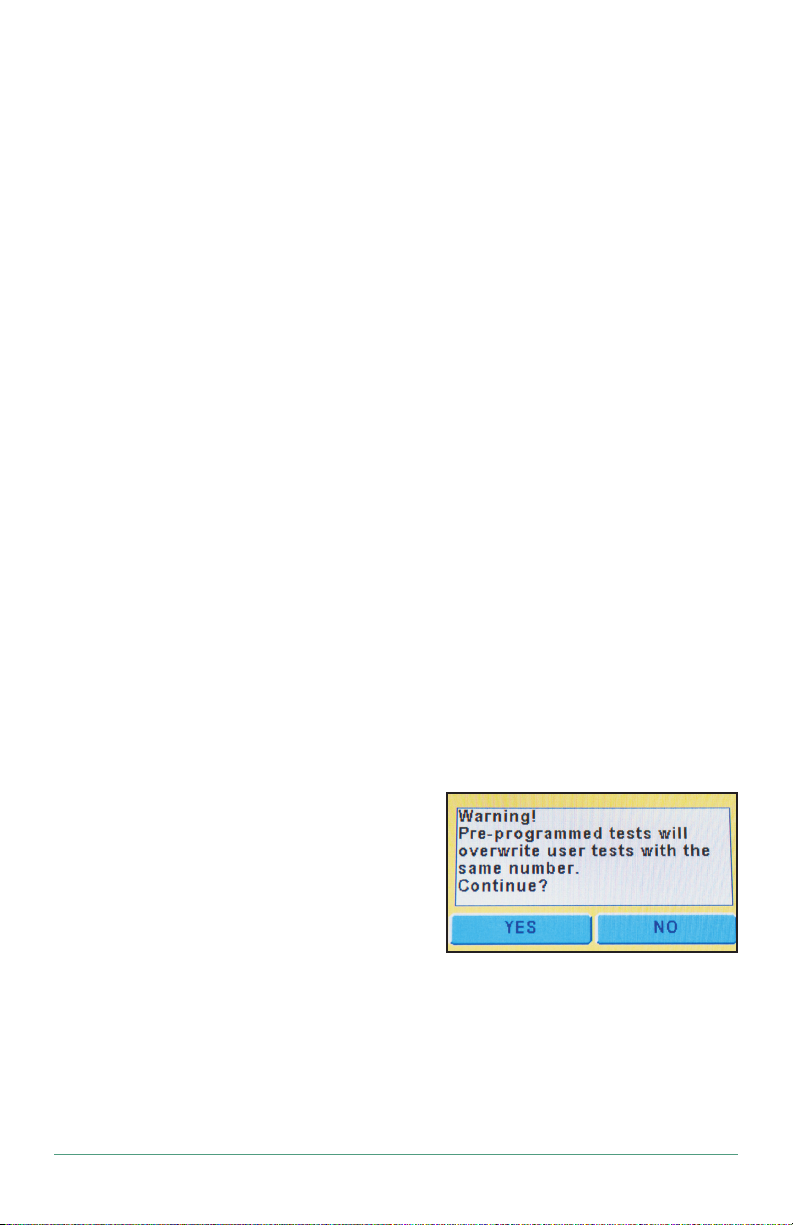
2. Select Restore tests. A message will ap-
pear reading, “Warning! Preprogrammed
tests will overwrite user tests with the
same number. Continue?” Touch Yes to
continue or No to return to the Manage
Tests screen.
3. The user then will be prompted to, “Restore just one test?” To choose, touch Yes.
To restore all tests, press No. If No is chosen, the reader then will restore all prepro-
grammed tests.
4. If only restoring one test, the reader will ask for the number of the test to be restored.
Input the number of the test to restore and press Enter.

13Questions? Call Neogen at 800-234-5333 or 517-372-9200
Section 13. Modes
For more detail on using each mode, please reference the additional Neogen 4700 Reader
manual that came with the reader.
1. Absorbance: This mode reads and prints the monochromatic or bichromatic
differential absorbance at the user-selected wavelengths. Blanks are optional. Most
assays require a mode other than absorbance mode as no calculations are made in
this mode —only absorbance values are reported.
2. Factor: In this mode, the endpoint absorbance readings will be multiplied by a user-
entered factor to calculate a result.
3. Single standard: This mode reads a calibrator and calculates concentrations based
on a single point standard curve passing through the point (0,0). A blank is required
to determine the (0,0) point. A factor (equal to the concentration of calibrator plus
the absorbance of calibrator) is generated in this mode, and then multiplied by sub-
sequent absorbance readings to determine concentrations.
4. Point-to-point: The microstrip reader accepts a number of calibrators and calcu-
lates concentrations based on the point-to-point calibration curve. Calibrator materi-
als of known concentrations are used to calibrate the reader so concentration of
unknown samples may be calculated.
5. Regression: In this mode, the instrument accepts a number of calibrators and cal-
culates concentration values based on a best-fit curve (linear regression).
6. Cubic spline: Cubic spline mode accepts a number of calibrators and calculates
concentrations based on the cubic spline (constrained) calibration curve. Calibrator
material of known concentrations are used to calibrate the reader so concentrations
of unknown samples are calculated from the generated curve. The resulting curve is
a smooth curve connecting the calibrator points, which may be entered in ascending
or descending order of absorbance.
Section 14. Troubleshooting
For error message definitions and common questions, see the additional Neogen 4700
Reader owners manual that came with the reader.

14 User’s Manual •Neogen 4700 Reader
_________________________________________________________
_________________________________________________________
_________________________________________________________
_________________________________________________________
_________________________________________________________
_________________________________________________________
_________________________________________________________
_________________________________________________________
_________________________________________________________
_________________________________________________________
_________________________________________________________
_________________________________________________________
_________________________________________________________
_________________________________________________________
_________________________________________________________
_________________________________________________________
_________________________________________________________
_________________________________________________________
_________________________________________________________
_________________________________________________________
_________________________________________________________
_________________________________________________________
_________________________________________________________

15Questions? Call Neogen at 800-234-5333 or 517-372-9200
_________________________________________________________
_________________________________________________________
_________________________________________________________
_________________________________________________________
_________________________________________________________
_________________________________________________________
_________________________________________________________
_________________________________________________________
_________________________________________________________
_________________________________________________________
_________________________________________________________
_________________________________________________________
_________________________________________________________
_________________________________________________________
_________________________________________________________
_________________________________________________________
_________________________________________________________
_________________________________________________________
_________________________________________________________
_________________________________________________________
_________________________________________________________
_________________________________________________________
_________________________________________________________

©Neogen Corporation, 2019. Neogen, GeneQuence, and Veratox are registered trademarks of Neogen Corporation, Lansing, MI, 48912.
Neogen’s 4700 Reader microwell reader is manufactured by Awareness Technology, Inc., Palm City, FL. All other brand and product names
are trademarks or registered trademarks of their respective companies.
FD327-0519
9639C
North America
Neogen Headquarters
800/234-5333 (USA/Canada)
foodsafety.neogen.com
Europe, Middle East and Africa
Neogen Europe
+ 44 (0) 1292 525 600
foodsafety.neogen.com/uk/
Mexico
Neogen Latinoamerica
+52 (55) 5254-8235
foodsafety.neogen.com/sp/
Brazil
Neogen do Brasil
+55 19 3935.3727
foodsafety.neogen.com/pt/
China
Neogen Bio-Scientific Technology
+86 21 6271 7013
www.neogenchina.com.cn
India
Neogen Food and Animal Security
+91 484 2306598, 2301582
www.neogenindia.com
Table of contents
Popular Laboratory Equipment manuals by other brands


Thermo Scientific
Thermo Scientific Vitrobot Mk IV user manual

Thermo Scientific
Thermo Scientific iCAP RQ ICP-MS Pre-installation requirements guide

Oxford Instruments
Oxford Instruments Cypher SPM user guide

Thermo Scientific
Thermo Scientific Labofuge 200 Operating lnstructions

Waters
Waters ACQUITY APC XT 45 Care and use manual

SciCan
SciCan Statim 5000 Operator's manual