Neogen Corporation PRIMA MARC User manual
D
E
REMOTE
DRAW-OFF
SPIKE
FEED LINE
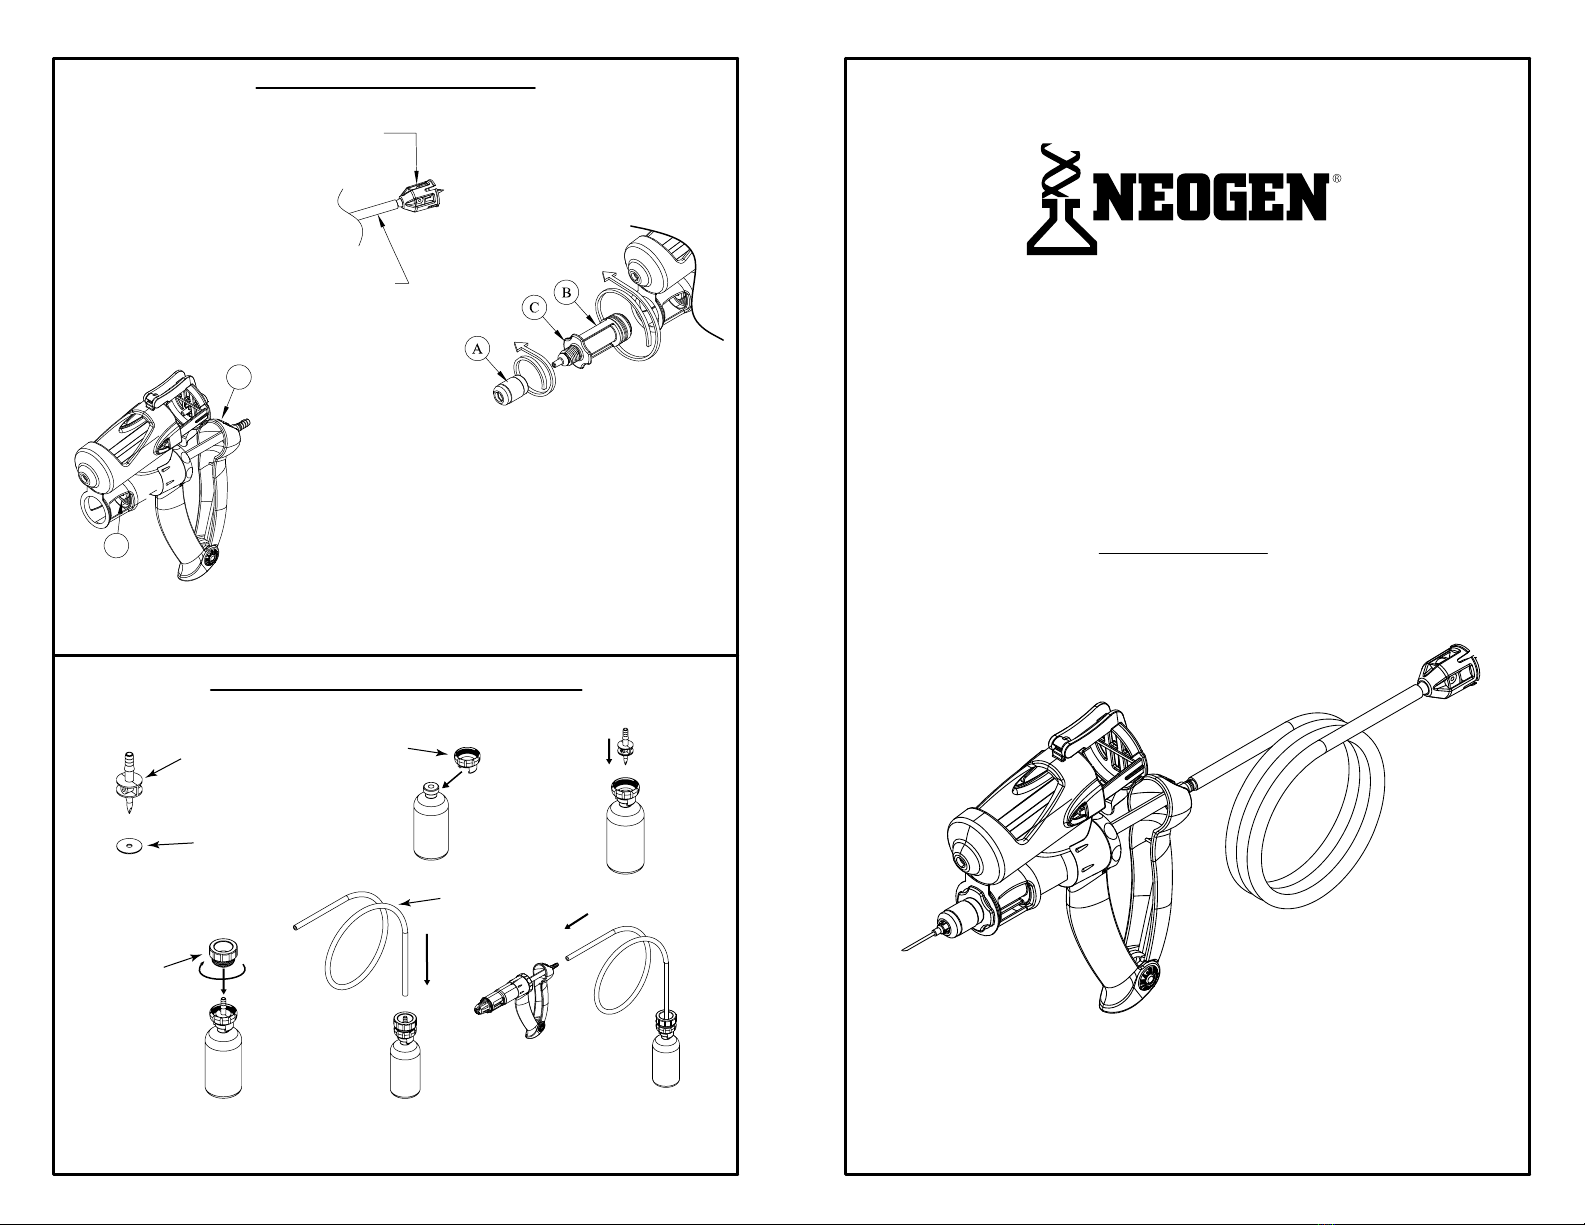
PRIMA MARC
INSTRUCTION MANUAL
1.) LINE CLEANING: Before
disassembling the vaccinator for
cleaning, clean the line. Partially fill a
sink or small container with hot, soapy
water. Hold the remote draw-off spike
underneath the water in one hand while
holding the vaccinator in the other.
Continuously squeeze the vaccinator,
pumping water through it until clean.
To rinse, repeat with clean water.
2.) BARREL REMOVAL: Unscrew the
needle nut (A) from the barrel (B). Next,
unscrew the barrel, turning it by the barrel
flange (C) remove enitre barrel from
vaccinator. Wash the all parts in hot, soapy
water, then rinse. Use the supplied brush to
remove any remaining contaminants from
barrel.
3.) HANDLE CLEANING: Remove the feedline from the vaccinator. At this
point, the remaining handle assembly(D) should be washed or allowed to soak in
hot soapy water, then rinsed and allowed to dry. Before reinstalling the barrel
assembly, apply 1 or 2 drops of food-grade lubricant to the piston o-ring (E).
Squeeze the handle to move the piston forward, making it more accessable.
4.) REASSEMBLY: Reinstall the needle (A) nut onto the barrel (B) and resintall
barrel onto handle assembly-hand tighten only.
!!CAUTION!! DO NOT OVER TIGHTEN NEEDLE NUT OR BARREL! FINGER
TIGHTEN ONLY! OVERTIGHTENING CAN CAUSE BARREL BREAKAGE!
DO NOT PLACE ANY PART OF THE VACCINATOR IN A MICROWAVE OVEN
OR NEAR A HEAT SOURCE!
*PRIMA TECH
CLEANING KIT
PART# 341013.*
CLEANING INSTRUCTIONS
UNI-LOCK ASSEMBLY INSTRUCTIONS
1. Place rubber flat
washer onto spike.
Spike
Rubber flat
washer
2. Place spike
collar onto
bottle.
Spike Collar
4. Attach
spike collar
lock to spike
collar by
rotating
clockwise.
Spike Collar
Lock
3. Insert
spike into
bottle.
5. Insert
tubing
onto spike
hose barb.
Flexible
Tubing
6. Attach syringe to free end of
tubing. The assembly is ready
for use.
Prima Tech instruction form #340894-A
English 1-2019 English 1-2019
Neogen Corporation
944 Nandino Blvd • Lexington, KY 40511
800-525-2022 • 859-254-1221
www.neogen.com
METAL
NEEDLE
NUT
NEEDLE
HUB
SAFETY
COVER
PLASTIC
NEEDLE
NUT
NEEDLE
HUB
SAFETY
COVER
REMOTE
DRAW-OFF
SPIKE
HOSE ARMOR
SPRING
CAN ADJUSTER
LOCKING TABS
MARKING
CAN
PLUNGER
BARB
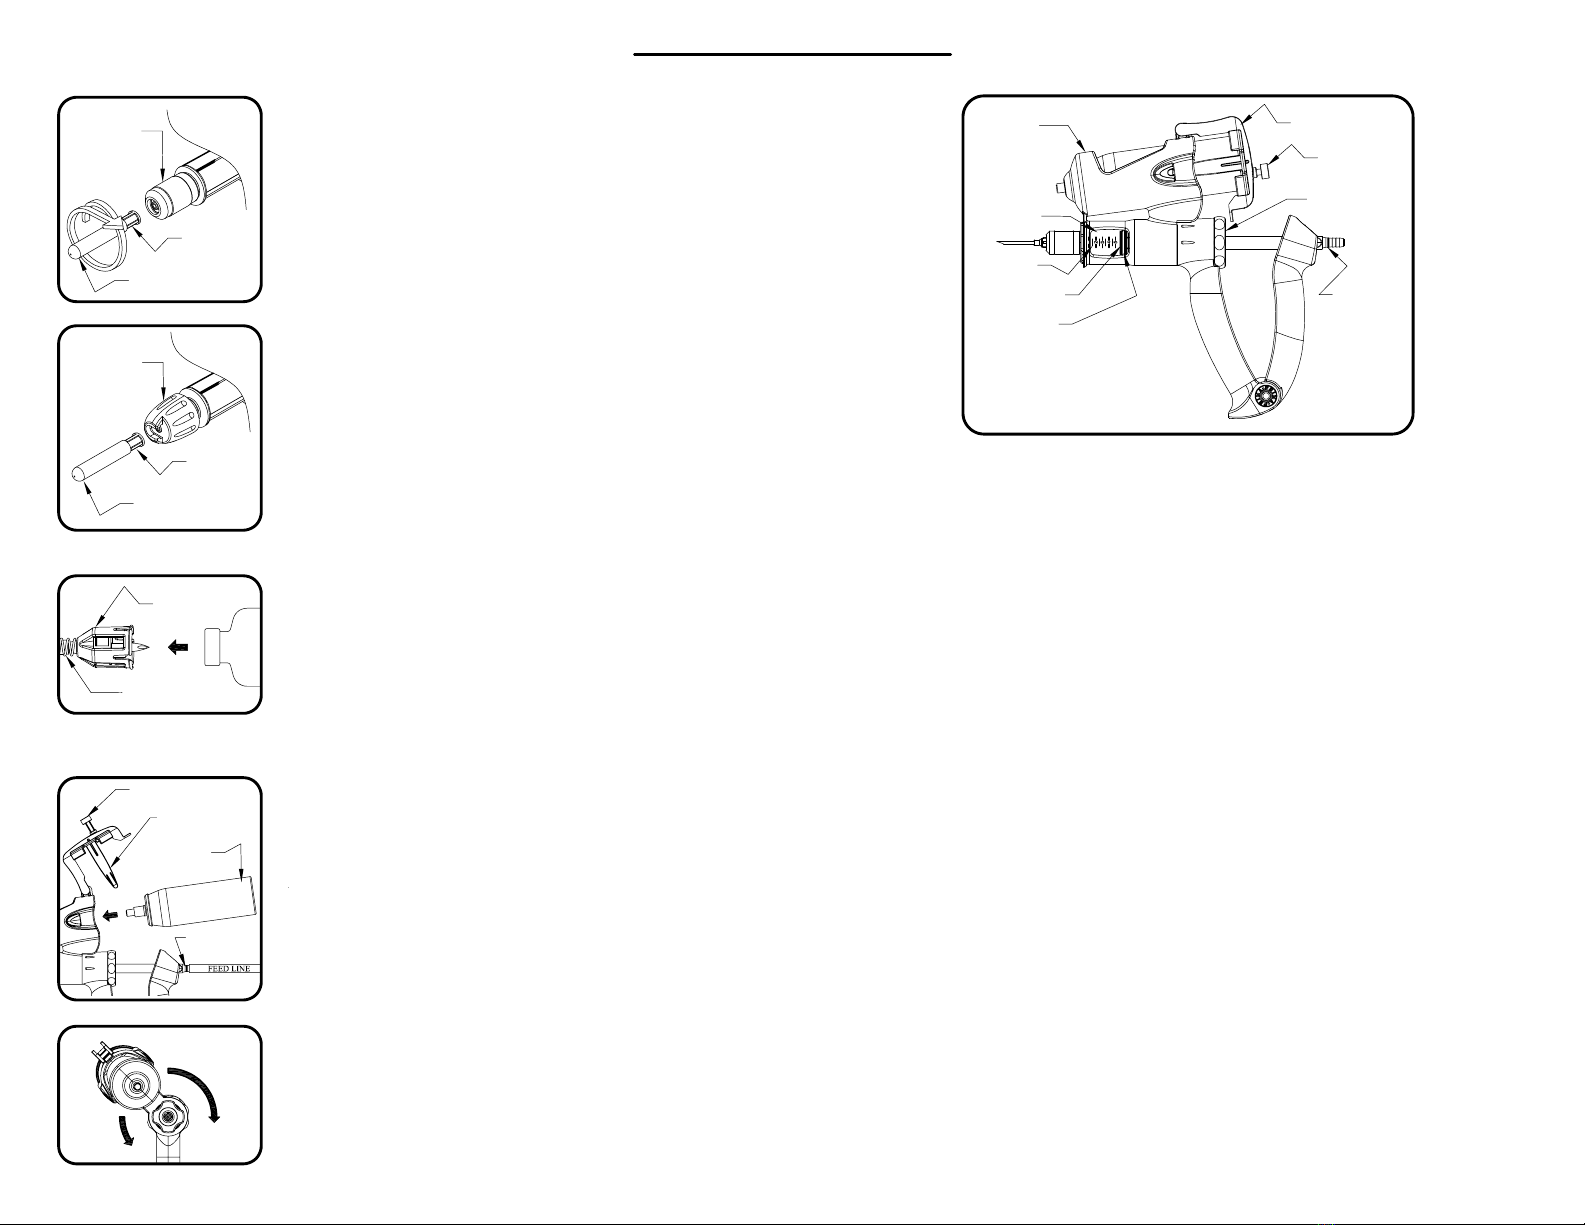
FRONT VIEW OF VACCINATOR
CAN
HOLDER
CAN HOLDER
DOOR
CAN
ADJUSTER
DOSAGE
ADJUSTER
PLUNGER
BARB
PISTON
O-RING
PISTON
DOSAGE
SETTINGS
BARREL
INSTRUCTIONS FOR USE
TO FIT NEEDLE WITH METAL LEUR NEEDLE NUT:
TO FIT NEEDLE WITH PLASTIC NEEDLE NUT:
BOTTLE ATTACHMENT:
TO INSTALL MARKING CANS:
TO ROTATE CAN HOLDER:
*Some units are equipped with a plastic "T"-slot type needle nut. If your vaccinator has this
type of needle nut, please use the instructions under the next section.
1.) For safety, leave protective cover on needle until ready to prime vaccinator.
2.) Make sure metal needle nut is finger tight. DO NOT TIGHTEN WITH PLIERS OR
OTHER TOOLS. THIS CAN CAUSE BARREL BREAKAGE.
3.) Push needle hub into needle nut and twist clockwise until needle locks in place. Remove
safety cover when ready to prime vaccinator by continuing to twist clockwise. The safety
cover will twist off, exposing the needle. (KEEP COVER FOR NEEDLE REMOVAL.)
4.) To remove needle. Replace safety cover onto needle and twist counter-clockwise. Needle
will twist out. Discard needle in bio-safe container. DO NOT REMOVE NEEDLE NUT TO
REMOVE NEEDLE. THE NEEDLE NUT WILL STAY IN PLACE.
1.) For safety leave protective cover on needle until ready to prime vaccinator.
2.) Loosen plastic needle nut until nib is below cut-out "T"-slot section as shown.
3.) Insert needle base into cut-out "T"-slot section and screw needle nut firmly onto barrel.
DO NOT TIGHTEN WITH PLIERS OR OTHER TOOLS. THIS CAN CAUSE BARREL
BREAKAGE.
4.) Remove safety cover when ready to prime vaccinator by twisting safety cover
clockwise. The safety cover will twist off, exposing the needle.
5.) To remove needle. Replace safety cover onto needle. Partially unscrew needle nut until
needle can be removed. Discard needle in bio-safe container.
* There are 3 sizes of draw-off spikes. There is a draw-off for 100ml bottles (20mm),
another for 250ml bottles (30mm) and a third for bottles with a 33mm cap. Attatch one end
of the feed line to the plunger barb. Find the size draw-off spike that fits the bottle you are
using and attatch it to the opposite end of the feed line.
1.) TO ATTACH BOTTLE:
A.) After piercing rubber stopper, hold bottle at base in one hand. Hold draw-off spike with
the other.
B.) Align pierced rubber stopper with draw-off spike and press firmly togetherm making
sure that the hose-armor spring is pulled up to the draw-off spike. *DO NOT TWIST
BOTTLE!*
2.) TO REMOVE BOTTLE:
A.) Using the thumb and forefinger of one hand, squeeze the draw-off spike firmly.
B.) Using the other hand, grasp the bottle by the bottom and pull firmly out.
1.) Squeeze the locking tabs on each side of the can holder door to open.
2.) Screw out the can adjuster until the end of the screw is nearly flush, being careful not to
screw it all the way out.
3.) Carefully insert the marking can into the can holder and close door, ensuring that the
locking tabs snap back into place.
4.) Squeeze the vaccinator handle to ensure the marking can is activating. If not, squeeze
the handle firmly and scew in the can adjuster until the marking can begins to spray. Do
not adjust any further. Over adjusting will cause the can to spray a constant stream.
5.) Release the handle and give a squeeze or two to ensure marking spray is spraying when
the handle is squeezed and stopping when the handle is released.
1.) The can holder can be rotated to suit individual user preferences. To rotate, simply push the can
holder in either direction to the desired position.
TO PRIME VACCINATOR:
1.) Remove protective cover from needle.
2.) Align front of piston with the line of the largest dose setting. *NOTE: SOME VACCINATORS ARE FIXED-DOSE
ONLY. THIS MEANS THAT THE DOSE SETTING CANNOT BE ADJUSTED (EVEN THOUGH THE ADJUSTER WILL
TURN). ADJUSTABLE DOSE VACCINATORS WILL HAVE GRADUATED DOSAGE SETTINGS PRINTED ON THE
BARREL AS SHOWN. FIXED, NON-ADJUSTABLE VACCINATORS WILL HAVE BARRELS PRINTED WITH ONE
DOSE SETTING ONLY, WHICH REPRESENTS THE DOSAGE TO WHICH THE VACCINATOR IS FIXED. IF YOU
ARE USING A FIXED-DOSE VACCINATOR SKIP THIS STEP AND GO TO STEP #3.
3.) Tip vaccinator up at a slight angle, with the needle pointing up. Top of vaccine bottle must be pointed downwards such as
when hanging in a VAC-PAC carrier.
4.) Squeeze vaccinator handle, then release quickly to draw fluid into the barrel.
5.) Remove any air bubbles from the barrel by repeating step 4 being careful not to waste fluid.
TO SET DOSAGE:
Align front of piston with the line of the largest dose setting using the dose adjuster. *NOTE: SOME VACCINATORS ARE
FIXED-DOSE ONLY. THIS MEANS THAT THE DOSE SETTING CANNOT BE ADJUSTED (EVEN THOUGH THE
ADJUSTER WILL TURN). ADJUSTABLE DOSE VACCINATORS WILL HAVE GRADUATED DOSAGE SETTINGS
PRINTED ON THE BARREL AS SHOWN. FIXED, NON-ADJUSTABLE VACCINATORS WILL HAVE BARRELS
PRINTED WITH ONE DOSE SETTING ONLY, WHICH REPRESENTS THE DOSAGE TO WHICH THE VACCINATOR
IS FIXED.
LUBRICATION:
If vaccinator becomes sluggish, clean thoroughly using the cleaning instructions on back. You will need to remove the barrel
assembly, clean and apply a couple of drops of Prima Tech lubricant to the piston o-ring. Many times, product failure is due to
insufficient cleaning. For complete cleaning instructions, please see back panel.


