Neptune Systems EnergyBar 832 User manual

EnergyBar 832 User Guide
EnergyBar 832 - User Guide Page 1
IMPORTANT SAFETY INSTRUCTIONS
READ AND FOLLOW ALL SAFETY INSTRUCTIONS
WARNING – To guard against injury, basic safety precautions should
be observed, including the following:
•DANGER – To avoid possible electric shock, special care should be taken since
water is employed in the use of aquarium equipment. For each of the following
situations, do not attempt repairs by yourself; return the EnergyBar 832 to
Neptune Systems or an authorized service facility for service, or discard the
EnergyBar 832:
oIf the EnergyBar 832 falls into the water, DON’T reach for it! First unplug
it and then retrieve it.
oIf electrical components of the EnergyBar 832 get wet, unplug the
EnergyBar 832 immediately. Carefully examine the EnergyBar 832 after
installation. It should not be plugged in if there is water on parts not
intended to be wet.
•Do not operate any EnergyBar 832 if it has a damaged cord or plug, or if it is
malfunctioning or has been dropped or damaged in any manner.
•Always unplug an EnergyBar 832 from an outlet when not in use, before
putting on or taking off parts, and before cleaning. Never yank cord to pull
plug from outlet. Grasp the plug and pull to disconnect.
•Do not use an EnergyBar 832 for other than intended use. The use of
attachments not recommended or sold by Neptune Systems may cause an
unsafe condition.
•Do not install or store the EnergyBar 832 where it will be exposed to the
weather or to temperatures below freezing.
•Close supervision is necessary when this or any appliance is used by or near
children.
•Read and observe all the important notices on the EnergyBar 832.
SAVE THESE INSTRUCTIONS

EnergyBar 832 - User Guide Page 2
INTRODUCTION
Congratulations on your purchase of the Apex EnergyBar 832!
The EnergyBar 832 allows the Apex system to control up to eight 120VAC items such as
lights, pumps, fans, heaters, a chiller, and other aquarium equipment, as well as
provides 24-volt DC power to compatible Neptune Systems Apex accessories and
expansion modules.
The EnergyBar 832 is intended for indoor use only in North America and other locations
which have 120VAC 60Hz electricity.
A Neptune Systems Apex controller is required to utilize the EnergyBar 832 (EB832); it
cannot function as a standalone power strip.
Note that the EnergyBar 832 is for use only with the Apex controller; it is not
backward-compatible with Apex Classic and Apex Jr controller models.
ENERGYBAR 832 FEATURES AND SPECIFICATIONS
•(8) relay-switched programmable 120VAC outlets for controlling power to pumps,
lighting, heaters, a chiller, and other aquarium equipment
•Heavy-duty power grounded cord, 6 feet in length
•Each 120VAC outlet has a rated load capacity of 7 Amps
•(3) 1LINK ports for connection of Neptune Systems peripherals such as the DŌS
Dosing and Metering System and WAV powerheads
•(2) DC24 outlets providing switched 24VDC power (up to 30 watts each) to
Neptune Systems 24VDC accessories.
•Status LEDS for AC outlets and DC24 ACC outlets
•3-port AquaBus hub for Apex system interconnection
•Per-outlet monitoring of Amps and watts on the (8) AC outlets
•Voltage monitoring
•Per-outlet overcurrent warnings through the Apex system and via flashing of the
AC outlet status LEDs
•15 Amp circuit breaker for overcurrent protection
•Active electrical current monitoring and logging through the Apex
EnergyBar 832 - User Guide Page 3
•Fallback fail-safe setting. If communication failure occurs between the Apex and
the EnergyBar 8, each outlet can be configured to revert to a user-configurable
default setting
•High reliability direct wired connection to the Apex System through the AquaBus
IMPORTANT USAGE INFORMATION
WARNING – DO NOT EXCEED ELECTRICAL RATINGS:
•The maximum load rating of each individual AC outlet is 7 amps; do
not exceed this.
•The total current/power draw for all active outlets must not exceed
15 amps or 1500 watts, whichever is less.
•The combined total maximum load on the (2) DC24 outputs and the
(3) 1LINK ports must not exceed 100 watts.
WARNING: The Energy Bar 832 contains no fuses or other user-
serviceable parts. Do not attempt to perform any repairs or modifications
to the Energy Bar 832. If the power cord is damaged, it must be replaced
by Neptune Systems, its service agent or similarly qualified persons in
order to avoid a hazard.
The EnergyBar 832 is intended for indoor use only.
The EnergyBar 832 is not intended for use by persons (including children) with reduced
physical, sensory or mental capabilities, or lack of experience and knowledge, unless
they have been given supervision or instruction concerning use of the appliance by a
person responsible for their safety.
Children should be supervised to ensure that they do not play with the appliance.

EnergyBar 832 - User Guide Page 4
GET TO KNOW YOUR ENERGYBAR 832

EnergyBar 832 - User Guide Page 5
PHYSICAL INSTALLATION
The EnergyBar 832 must be securely mounted in an indoor location free from moisture.
The EB832 uses an innovative mounting system which provides safe secure mounting
yet allows easy removal of the EB832 from the mounting plate. The EB832 must be
mounted on a vertical surface such as a wall, an upright mounting board, or the side or
back of your aquarium stand. Use the included screws to mount the EB832 mounting
plate, then slip the EB832 over the mounting plate and press downward to firmly seat
the EB832 on the mounting plate. If mounting on drywall, use drywall anchors (screws
and anchors not included). A printable mounting template is available HERE. The
mounting template contains additional mounting guidelines.
•Be sure to utilize drip loops on all power cords and AquaBus cables plugged in to
the EnergyBar 832.
•Leave at least 1” of clearance to the right side of the EB832 to allow for proper
ventilation.
•The EB832 should not be mounted directly above an open vessel containing water
such as an aquarium or sump.
EnergyBar 832 - User Guide Page 6
•The EnergyBar 832 should be grounded to minimize the possibility of electric
shock. It is equipped with an electric cord having an equipment grounding
conductor and a grounding type plug. The plug must be plugged into an outlet
that is installed and grounded in accordance with all appropriate codes and
ordinances.
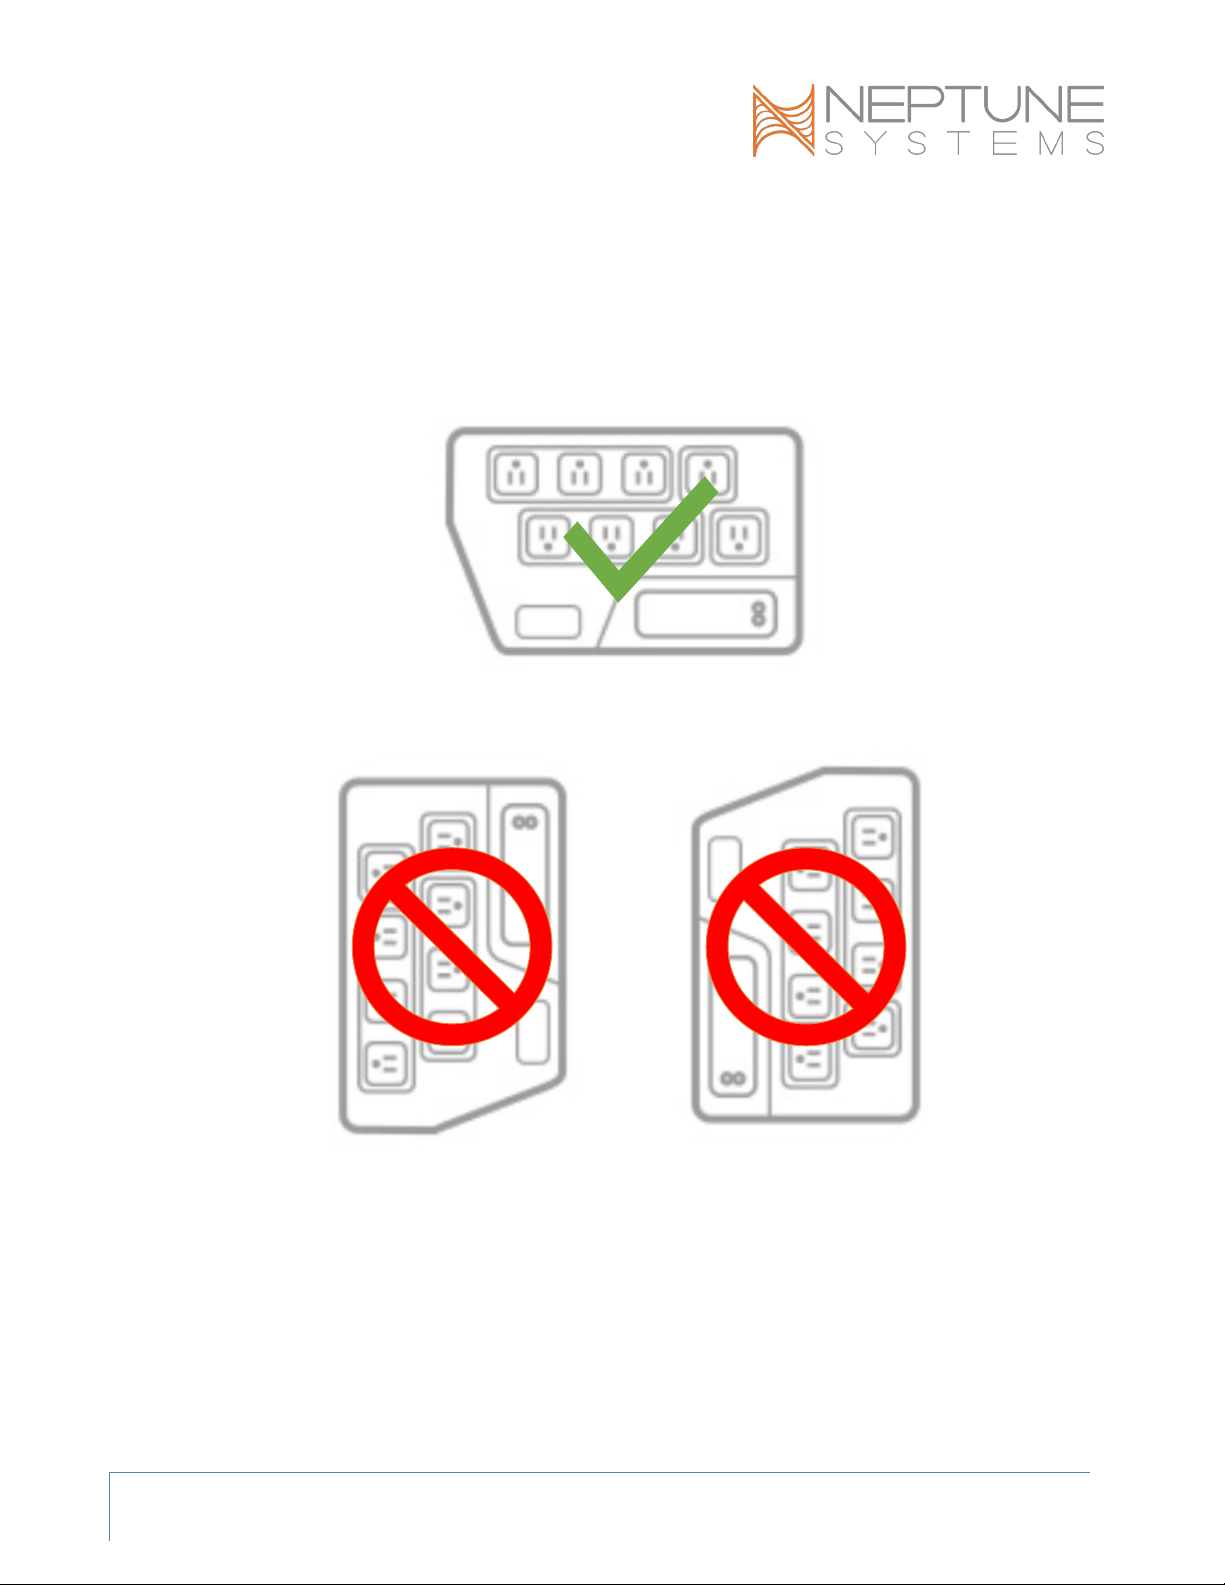
•The EB832 must be mounted in a horizontal and upright orientation as shown:
After mounting, plug the EnergyBar 832 power cord into a grounded receptacle
supplied electrical power by a 15 ampere or 20 ampere branch circuit which is
protected by a Ground Fault Circuit Interrupter (GFCI) or Residual Current Device
(RCD).

EnergyBar 832 - User Guide Page 7
WARNING: Water damage will void the warranty! Mount the EnergyBar in a
location safe from any form of moisture exposure – drips, splashes, etc.
AQUABUS CONNECTORS
The EnergyBar 832 communicates with and provides power to the Apex base and Apex
accessory modules through the AquaBus connectors. The EnergyBar 832 has three
connectors which may be utilized to connect the EnergyBar to the Apex base unit and to
connect to other AquaBus accessories. There are no limitations on the order AquaBus
accessories can be connected or to which AquaBus ports accessories must be connected.
The total length of all AquaBus cables should be limited to 200 feet. Refer to the Apex
Started Guide for more information.
WARNING: NEVER plug standard USB devices into any AquaBus connector
or connect AquaBus accessories into computer USB ports. Damage to the
AquaBus accessory and/or USB device may result.
ENERGYBAR 832 STATUS LED PANEL
The Neptune System logo on the face of the EB832 is a LED panel which indicates the
status of the EnergyBar 832.
There are four possible states of the LED panel:

EnergyBar 832 - User Guide Page 8
Not Lit
The EnergyBar 832 has no AC input power or AquaBus power from
other EnergyBars
Solid Orange
The EnergyBar 832 is operating normally and is communicating
with the Apex base unit
Flashing Orange (rapid)
The EnergyBar 832 is in bootloader mode and is attempting to
communicate with an Apex base unit
Blinking Orange (slow)
The EnergyBar 832 is in Fallback mode
ENERGYBAR 832 OUTLET STATUS LEDS
LEDs numbered 1through 8indicate the state of the corresponding 120VAC outlet.
Not Lit
The AC outlet is OFF
Solid Orange
The AC outlet is ON
Flashing Orange
(rapid)
The AC outlet is ON and the load on that outlet exceeds 7 Amps;
this indicates an overcurrent condition which must be addressed
immediately.
The LEDs labeled Aand Bindicate the state of the corresponding DC24/ACC output.
Not Lit
The DC24/ACC output is OFF
Solid Orange
The DC24/ACC output is ON

EnergyBar 832 - User Guide Page 9
ENERGYBAR 832 CIRCUIT BREAKER
The 15 Amp circuit breaker is located inside the EnergyBar 832; a yellow status/reset
button is visible on the rear of the EB832.
The yellow button will normally protrude from the back of the EB832 case by
approximately 1.5-2mm. If the circuit breaker has been tripped, the yellow button will
extend farther out, approximately 3mm. This may be seen in the images below.
Normal
Tripped
To reset a tripped circuit breaker, press the yellow button inward. Before resetting the
breaker, identify and resolve the cause of the overload condition which resulted in the
circuit breaker being tripped.

EnergyBar 832 - User Guide Page 10
ADDITIONAL INFORMATION
Programming your Apex system and managing and monitoring the EB832 is beyond the
scope of this guide. Please refer to these sources of information about programming
EB832 outlets, monitoring of voltage, amps, and watts, and other EB832 usage via the
Apex user interfaces:
Apex Get Started Guide
Apex Documentation
For details about using the DC24 outlets, please refer to the DC24 FAQ on the Neptune
Systems Community Forum.

EnergyBar 832 - User Guide Page 11
NEPTUNE SYSTEMS LIMITED WARRANTY
Neptune Systems warrants this product to be free from defects in material and
workmanship for a period of 1 year from the date of purchase. If repair or adjustment is
necessary and has not been the result of abuse, Neptune Systems warrants this product
to be free from defects in material and workmanship for a period of 1 year from the date
of purchase. If repair or adjustment is necessary and has not been the result of abuse,
misuse, or accidental damage, within the 1-year period, please return the product with
proof of purchase, and correction of the defect will be made without charge.
For your protection, items being returned must be carefully packed to prevent damage in
shipment and insured against possible damage or loss. Neptune Systems will not be
responsible for damage resulting from careless or insufficient packaging. Before
returning please obtain a return authorization (RMA) number from Neptune Systems.
Returned merchandise will not be accepted without a RMA number. To obtain assistance
with your Neptune Systems product, contact Neptune Systems technical support by
phone or via the Technical Support Contact Web Page at
https://www.neptunesystems.com.
Except for the warranty set forth above, Neptune Systems is not responsible for any
damages including, but not limited to, consequential damage occurring out of or relating
to the delivery, use or performance of Neptune Systems’ products. Buyer’s remedies for
breach of warranty shall be limited to repair, or replacement and full or partial
adjustment to purchase price.
Neptune Systems
15750 Vineyard Blvd, Suite 150
Morgan Hill, CA 95037
USA
www.neptunesystems.com
support@neptunesystems.com
Phone +1 408-779-4090 Fax +1 408-762-2042
©2018 Neptune Systems - All Rights Reserved
EnergyBar 832 User Guide v1.5

EnergyBar 832 - User Guide Page 12
The symbols to the right mean that according to local laws and
regulations your product should be disposed of separately from
household waste. When this product reaches its end of life,
take it to a collection point designated by local authorities.
Some collection points accept products for free. The separate
collection and recycling of your product at the time of disposal
will help conserve natural resources and ensure that it is
recycled in a manner that protects human health and the
environment.
Table of contents
Popular Portable Generator manuals by other brands


ScienTECH
ScienTECH Caddo 4065 operating manual

iPower
iPower SUA7600iED quick start guide

A2Z Ozone
A2Z Ozone A-3500 operating manual

Parker
Parker Oildyne 550 Series instruction manual

Könner & Söhnen
Könner & Söhnen KS 2100i S owner's manual

Elektro-Automatik
Elektro-Automatik EL 3000A Series instruction manual