Nero 743221 User manual

1
BLUETOOTH DIGITAL DUAL ALARM FM CLOCK RADIO
Product Number 743221
INSTRUCTION MANUAL
Read this manual carefully to get the best performance from this unit.
WARNING: TO REDUCE THE RISK OF FIRE OR ELECTRIC SHOCK, DO NOT EXPOSE THIS APPLIANCE TO RAIN
OR MOISTURE.
CAUTION: THE CLOCK RADIO MUST NOT BE USED IN ANY ENVIRONMENT WHERE IT MAY BE SUBJECT TO THE
DRIPPING OR SPLASHING OR WATER OR OTHER LIQUIDS.
DO NOT CONNECT THE ANTENNA WIRE ON THE BACK OF THIS SET TO ANY OUTDOOR ANTENNA
IMPORTANT
⚫Read these instructions.
⚫Heed all warnings.
⚫Follow all instructions.
⚫Do not block any ventilation openings, Install in accordance with the manufacturer’s instructions.
⚫Do not install near any heat sources such as radiators, heat registers, stoves, or other apparatus
(including amplifiers) that produce heat.
⚫Only use attachments/accessories specified by the manufacturer.
⚫Unplug this clock radio during lightning storms or when unused for long periods of time.

2
⚫This clock radio shall not be exposed to dripping or splashing.
⚫Do not place any sources of danger on the clock radio (e.g. liquid filled objects, lighted candles).
⚫Attention should be drawn to the environmental aspects of battery disposal. Don’t throw used
batteries in dustbin. Please contact your retailer in order to protect the environment.
(Batteries pack or batteries installed) shall not be exposed to excessive heat such as sunshine, fire
or the like.
LOCATION OF CONTROL
1. VOLUME + / AL2 11. AL2 INDICATOR
2. VOLUME - / AL1 12. DIGITAL DISPLAY
3. TUN-/ 13. DC INPUT

3
4. SNOOZE/DIMMER/SLEEP/NAP 14. USB OUT 5V 1A
5. MEMORY / TIME SET/ 15. FM ANTENNA WIRE
6. /FUNCTION
7. TUN+/
8. AL1 INDICATOR
9. PM INDICATOR
10. BLUETOOTH INDICATOR
CONNECT POWER
CAUTION
⚫Risk of product damage! Ensure that the power voltage corresponds to the voltage printed on the back or
underside of the clock radio.
⚫Risk of electric shock! When you unplug, always pull the plug from the socket. Never pull the cord.
BOTTOM OF CLOCK RADIO
Battery compartment 1.5 volt 2AA batteries not included for temporary power back up.
SET TIME
Press and hold TIME SET for two seconds.
1. Preset 24 shows 24 hour mode.
2. Press TUNING + - to select 24 or 12 hour mode.
3. Press TIME SET to confirm 24 or 12 hour mode.
➢[0:00] Hour digit begins to flash or [12:00] Hour digit flashes
4. Press TUNING - to set Time when finished press Time set
5. Select minutes then Minutes will begin to flash press tuning + when finished press time set
LISTEN TO FM RADIO
For better reception, fully extend and adjust the position of the FM antenna wire.
1. Press / FUNCTION to turn on FM radio.
➢[FM frequency] is displayed and FM indicator will light up.
2. Press TUNING + - for two seconds.
➢The FM Tuner tunes to a station with strong reception automatically.
To search for a radio station manually:
Press TUNING+/- repeatedly to tune to a radio station
STORE FM RADIO STATIONS
You can store up to 20 FM radio stations in preset channel automatically or manually.
STORE FM RADIO STATIONS AUTOMATICALLY (AUTO SCAN)
1. Press / FUNCTION to turn on FM radio for 2 seconds.
1. Your clock radio will automatically scan & store up to 20 stations.

4
2. Tune to an FM radio station.
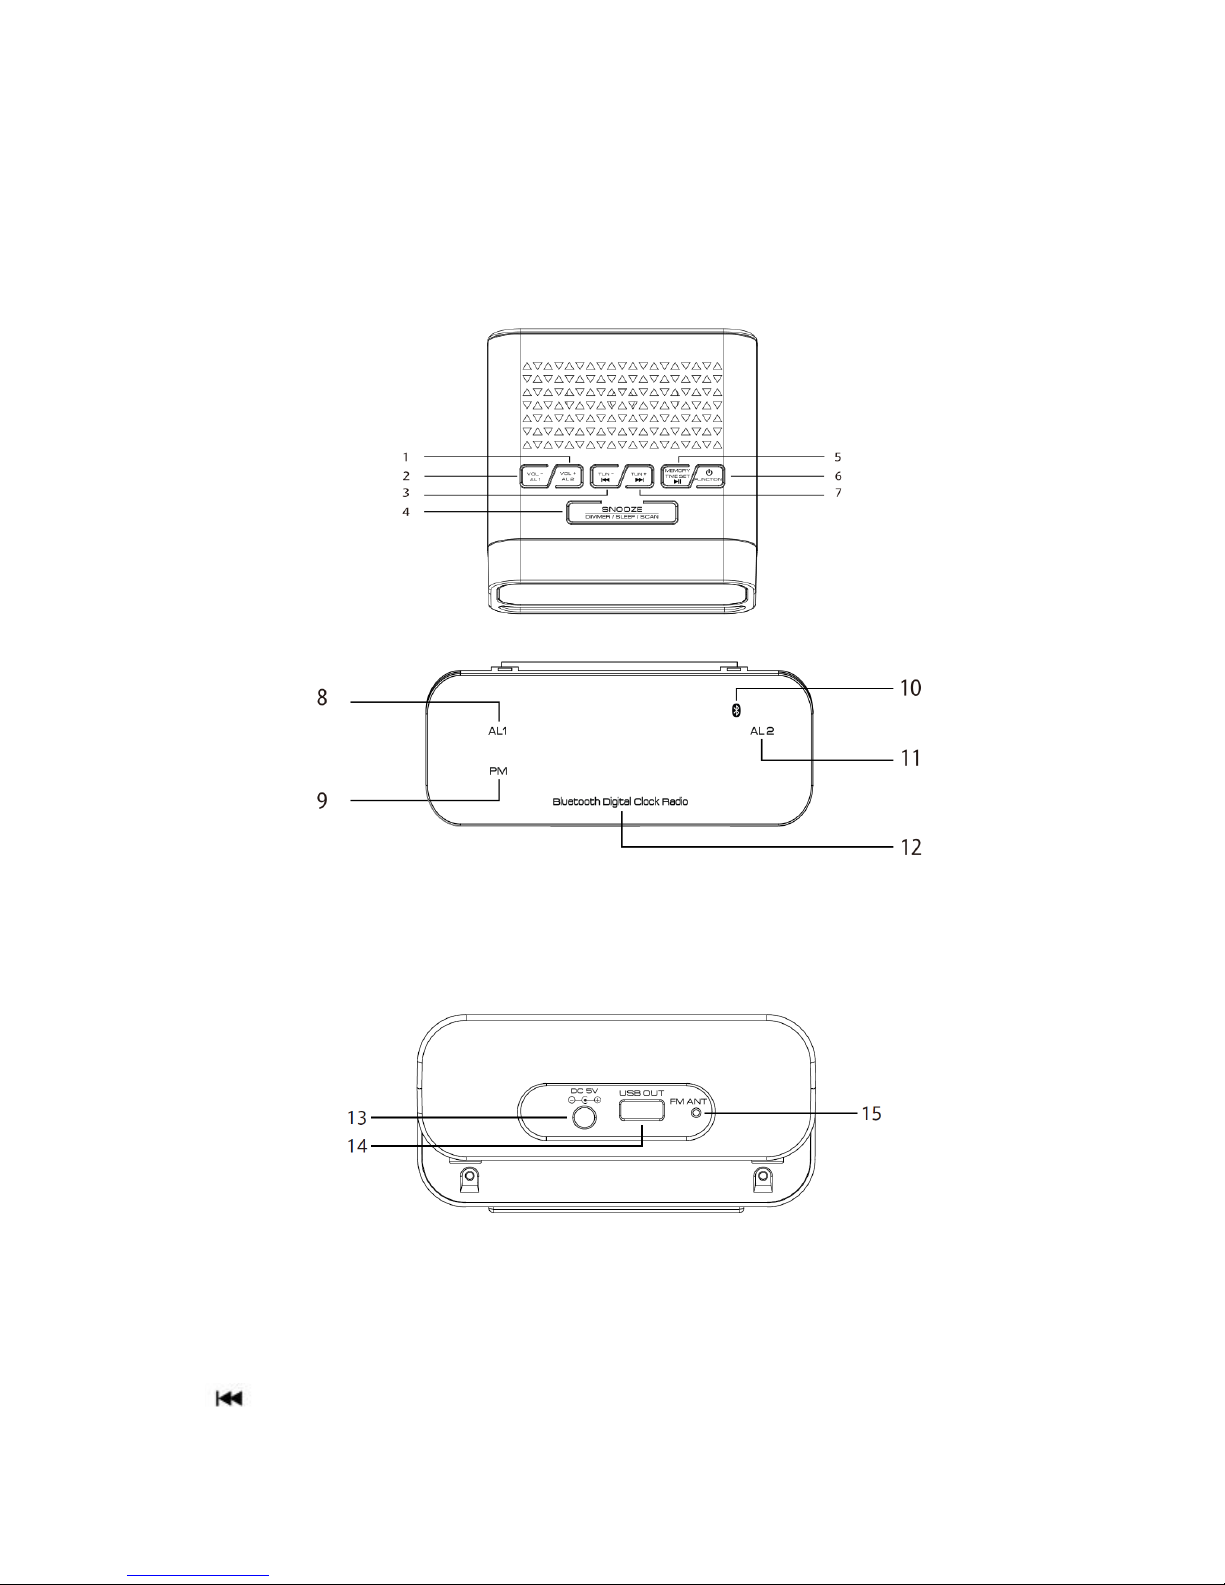
3. Press MEMORY to activate the storing mode.
4. Press TUNING + - to select the preset number.
5. Press MEMORY again to store the radio station.
➢[P 01 ~ P 20] is preset station numbers.
➢If this position is occupied, the previous stored frequency will be displayed.
➢To remove a pre-stored FM radio station, you must store another station in its place.
LISTEN TO A PRESET FM RADIO STATION
1. In FM mode, press MEMORY to select a preset number.
Note
The display will return to clock display if no buttons are pressed for 10 seconds
PAIRING ABLUETOOTH DEVICE TO YOUR CLOCK RADIO
1. Press / FUNCTION to put clock radio into Bluetooth mode
2. [bt] displays on the screen.
3. Bluetooth indicator flash quickly to wait for Bluetooth enabled device / smartphone to pair with it.
4. Turn on Bluetooth function on Bluetooth enable device / smartphone.
5. Scan for Nero clock radio as device name.
6. Select Nero clock radio on device name list
7. Bluetooth indicator will flash slowly after connecting and pairing
8. Once connected you are now ready to listen to your music
FUNCTIONS
1. Press Volume + / - or adjust volume level on the device/ smartphone to desired level.
2. Press skip to select previous song.
3. Press skip to select next song.
4. Press to play or pause the song that is being played back.
Note
The display returns to clock display if no button are pressed for 10 seconds.
SET ALARM TIMER
Make sure that you have set the clock correctly.
You can set two separate alarm times. For the alarm sound, you can select the FM radio or the
buzzer.
1. Press / FUNCTION to Clock mode.
2. Press and hold AL1/AL2 for two seconds.
➢Hour digit is now flashing.
3. Press TUNING –/+ to set hour once desired hour is set press AL1 now set minutes
Minutes will now flash

5
Adjust minutes by pressing tune + when done press AL1 again
Now choose to wake up to radio or buzzer
Then select and press AL1
If radio was selected then you can choose a preset station
➢Press AL1 a red light will light up meaning your alarm is on. Press again red light will disappear
Meaning your alarm is off
Repeat all steps for alarm 2
➢SNOOZE ALARM
When alarm sounds, press SNOOZE to activate the snooze time
SET SLEEP TIMER
This clock radio can switch to radio off automatically after a preset period.
1. Press / FUNCTION to radio mode.
2. Press SNOOZE/DIMMER/SLEEP/SCAN multi-function button repeatedly to select the sleep
timer period (in minutes).
To deactivate the sleep timer, press SNOOZE/DIMMER/SLEEP/SCAN multi-function button
repeatedly until radio shuts off.
ADJUST VOLUME
While listening, press VOLUME + or VOLUME–to adjust volume.
ADJUST DISPLAY BRIGHTNESS
During standby mode, press DIMMER once to select high press again for low brightness levels.
USB Charging
Use the USB charging port to charge your smartphone
To connect your cell phone for charging:
Use a USB cable (not included) to connect your cell phone to the USB connector on the back of the
Nero Edge clock radio. Your cell phone should start charging.
Backed by the Nero 12 Month Warranty.
Nero is a registered trademark of
R Weatherdon & Co Pty Ltd
Email: sales@weatherdon.com.au Ph: +61 2 9906 2202 Visit: www.weatherdon.com.au
Made in China
Table of contents
Other Nero Clock Radio manuals