Neroptics NPi-300 User manual

NPi®
-300
Pupillometer
Quick Start Guide
Power Up
Charging the NPi-300 Pupillometer
1. Connect the NPi-300 Power Adapter to the NPi-300 Charging Station and
plug into a power outlet. The indicator light at the base of the Charging
Station will display a white color to indicate power has been established to
the Charging Station.
2. Place the NPi-300 into the Charging Station. The Charging Station indicator
light will turn blue, and the LCD screen will display within the battery
icon, indicating the NPi-300 is charging. The indicator light will turn green
when fully charged.
NOTE: Prior to first-time use, ensure the NPi-300 is fully charged and
Date/Time are set accurately (refer to Setting Date and Time section).
1
2
3. The NPi-300 Pupillometer goes to sleep in the Charging Station to
eciently charge:
• The NPi-300 will initially turn ON (or remain on) upon being placed in the
Charging Station.
• After 5 minutes in the Charging Station, the NPi-300 will go to sleep to
eciently charge. The screen will go dark. If any button is pressed or the
screen is touched within this 5-minute window, the time period before the
NPi-300 goes to sleep is extended by an additional 5 minutes.
• To use the NPi-300 after it has gone to sleep in the Charging Station, simply
remove from the Charging Station, and it will wake up automatically.
4. If the NPi-300 Pupillometer is not in the Charging Station, to conserve
battery life it will:
• Go into sleep mode after 5 minutes. To turn ON, touch the screen or push
any button.
• Power down after 20 minutes.
Turning On the NPi-300 Pupillometer
5. If the NPi-300 is out of the Charging Station and has powered down, press
(do not hold) the On/O button on the side of the device.
5
3
leaders at the point of care
prospectdiagnostics.co.uk
8
6
7
9-10
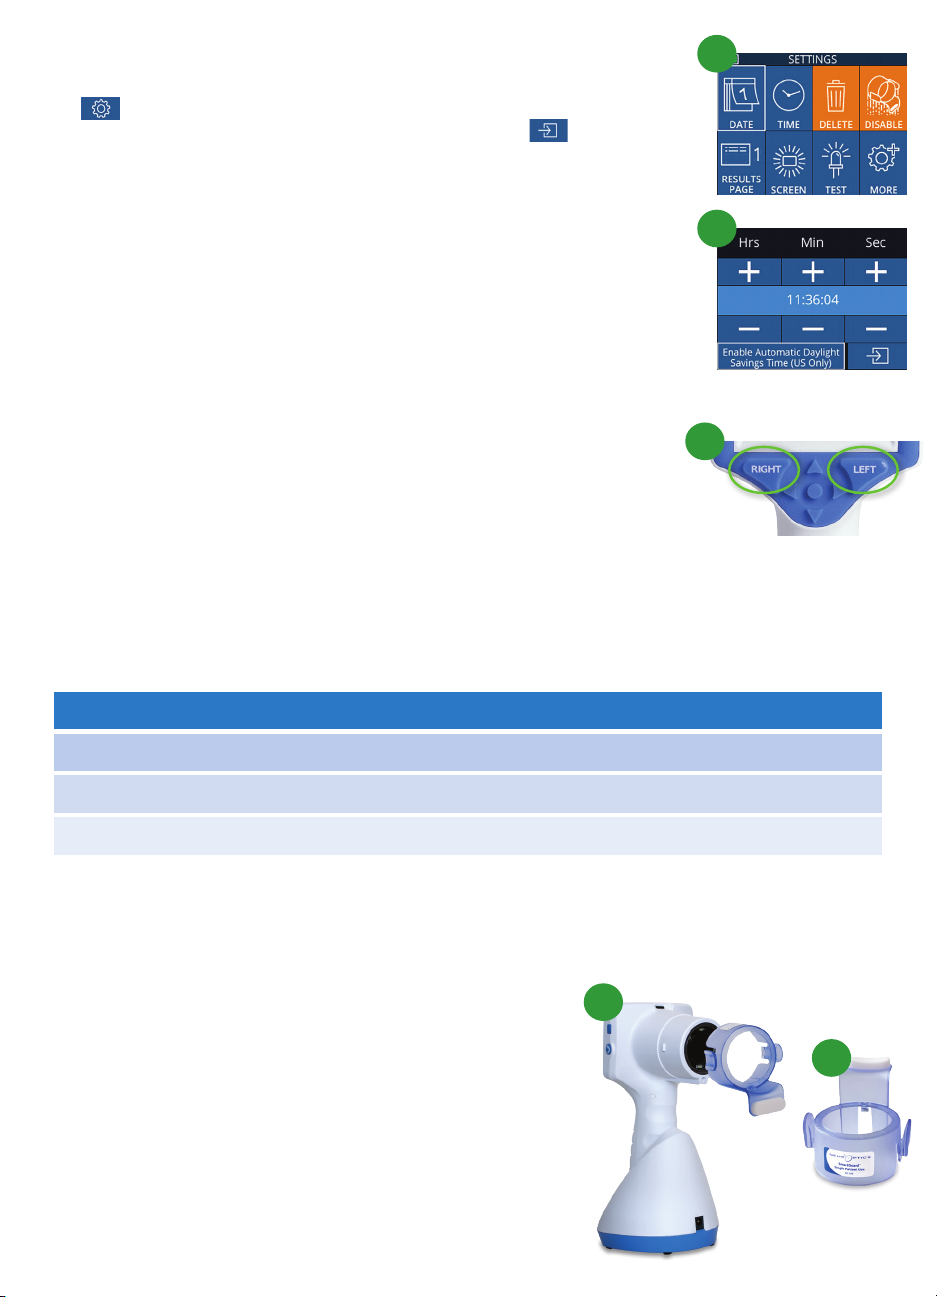
. Two components are required to initiate a bilateral
pupil measurement:
• NPi-300 Pupillometer (Ex. 9)
• Single Patient Use SmartGuard (Ex. 10)
Open a new SmartGuard. Slide the SmartGuard onto
the NPi-300 with the foam pad at the bottom (Ex. 9).
There will be an audible click when the SmartGuard is
properly positioned.
The NPi-300 provides objective pupil size and reactivity data independent of examiner – removing
variability and subjectivity. The NPi-300 expresses pupil reactivity numerically as the Neurological
Pupil index, NPi (see the Neurological Pupil index Scale below).
The Neurological Pupil index (NPi) Pupil Reactivity Assessment Scale
Setting Date and Time
6.
To modify the date and time, from the Home Screen, select the Settings icon
and then select Date or Time. Follow the prompts to input the current
date and time using 24-hour time configuration and select .
7. Customers in the United States have the option to enable Automatic Daylight
Savings Time (DST) in the Time settings. Automatic DST is disabled by default.
Automatic adjustments occur based only on US DST regulations and are not
updated according to geographic location.
Date and Time Maintenance:
• Regular quarterly maintenance is necessary to ensure date and time are
correct. The set date and time will aect the timestamp listed for subsequent
patient pupil measurements on the NPi-300 and SmartGuard. Changing the
date and time will not alter the timestamps on previous measurements.
• Immediately adjust the time after any time change if Automatic DST is disabled.
Returning to the Home Screen
8. Press the RIGHT or LEFT buttons (green circles) to return to the Home Screen.
9
10
Measuring Pupils Using the NPi-300 Pupillometer
Taking a Bilateral Pupil Measurement
Measured Value* Assessment
3.0 – 4.9 Normal/“Brisk”
< 3.0 Abnormal/“Sluggish”
0Non-Reactive, Immeasurable, or Atypical Response
*A dierence in NPi between Right and Left pupils of 0.7 may also be considered an abnormal pupil reading
*Per the Neurological Pupil index (NPi) algorithm
Associate SmartGuard with Patient ID
For the first patient use, the SmartGuard requires a one-time association
of the Patient ID. For subsequent measurements, the Patient ID will be
permanently saved on the SmartGuard, which can store up to 168 bilateral
pupil measurements of the associated patient.
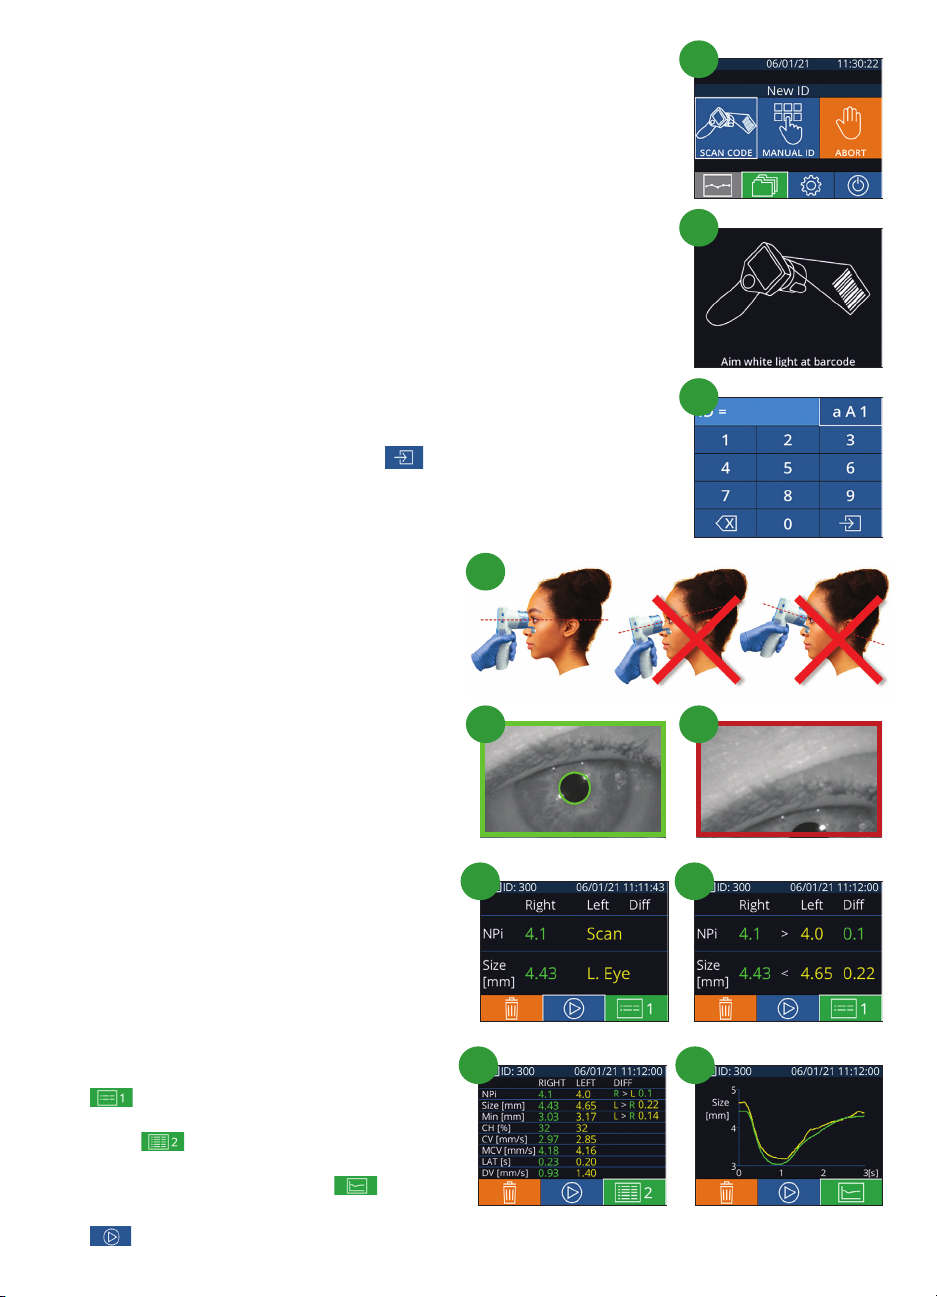
11. There are two options for associating the Patient ID to the SmartGuard.
Select Scan Code to scan the patient’s wristband barcode using the
NPi-300 Incorporated Barcode Scanner, or select Manual ID to manually
enter the Patient ID with either alpha or numeric characters.
Scan Barcode Using Incorporated Barcode Scanner
12
.
Select Scan Code. The NPi-300 will emit a white light from the top of the
device. Center the light over the barcode until you hear an audible beep.
13
. The Patient ID will now appear on the NPi-300 touchscreen. Confirm the
patient information is correct and select Accept.
Manual Entry of the Patient ID
14
. Select Manual ID. Using the touchscreen or keypad, enter the
alpha or numeric Patient ID and select . Confirm the patient
information on the screen is correct and select Accept.
11
Measure Pupils
15. Position the NPi-300 with SmartGuard at a right
angle to the patient’s axis of vision, minimizing
any tilting of the device.
16-17. Press and hold either the RIGHT or LEFT
button until the pupil is centered on the
touchscreen and the display shows a green circle
around the pupil. A green frame around the
screen indicates the pupil is properly targeted
(Ex. 16), while a red frame indicates the pupil
needs to be re-centered on the screen before
the measurement is initiated (Ex. 17). Once the
green frame appears, release the button, holding
the NPi-300 in place for approximately three
seconds until the results screen is displayed.
18. Repeat the scan procedure for the patient’s
other eye to complete the bilateral pupil exam.
19. When the bilateral pupil exam is complete, the
NPi-300 measurement results will be displayed
in green for the Right eye and in yellow for
the Left eye. The NPi-300 is defaulted to
open “Results Page 1,” displaying NPi and Size
measurements, following the completion of
the Bilateral Pupil Measurement.
20-21
. Using the touchscreen or keypad, select
to view “Results Page 2” with additional
Pupillary Measurement Parameters (Ex. 20).
Select to view the Pupillary Light Reflex
Waveform (Ex. 21). To return to “Results Page 1”
with NPi and Size, simply select .
22
. From the Results screen, select the Video icon
to view the playback of the reading.
12
14
15
16 17
1918
20 21
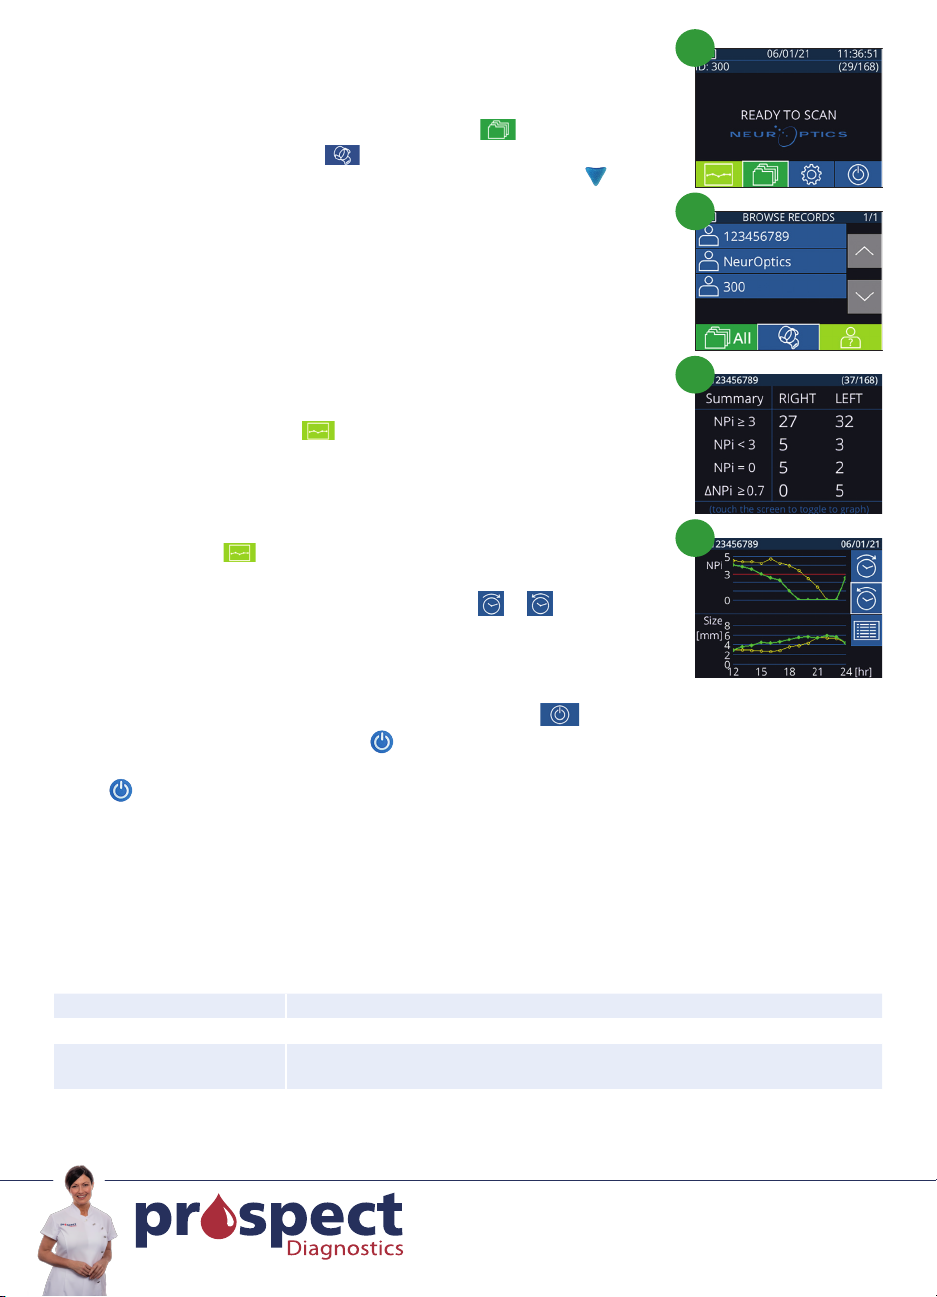
Trend for Changes
23-24. To review the patient’s previous bilateral pupil measurements stored on
the attached SmartGuard and Trend for Changes:
• From the Home Screen: Select the Records icon (Ex. 23).
• Select the SmartGuard icon (Ex. 24). The most recent
measurement will appear first. Press the DOWN Arrow button on
the keypad to scroll through all previous patient measurements
stored on attached SmartGuard.
NPi Summary Table
25. The NPi Summary Table provides a quantitative summary from the attached
SmartGuard of the number of Right and Left Eye NPi Measurements in the
following categories:
• NPi 3 • NPi < 3 • NPi = 0 • ¨NPi 0.7
To view the NPi Summary Table:
• Return to the Home Screen by pressing either the RIGHT or LEFT
buttons on the keypad.
• Select the Trend icon from the bottom left of the Home Screen.
NPi/Size Trending Graph
26. To visualize the trend of all NPi and Size measurements taken on the
attached SmartGuard over 12-hour time windows:
• Navigate to the NPi Summary Table from the Home Screen by selecting
the Trend icon .
• Tap anywhere on the screen to access the NPi/Size Trending Graph.
• Move forward and backward in time by pressing or .
To turn the NPi-300 Pupillometer OFF, either:
• Navigate to the Home Screen and select the Power icon , then confirm Yes to power OFF.
• Press and hold the On/O button on the side of the NPi-300.
The NPi-300 may occasionally require a System Reboot. To reboot, simply press and hold the On/O
button on the side of the NPi-300 until it powers OFF.
Isopropyl alcohol (IPA)-based cleaning solutions, in formula concentrations up to 70% IPA, are recommended
for use in cleaning the NPi-300 Pupillometer and NPi-300 Charging Station. Please refer to the Cleaning and
Maintenance Instructions included in the Instructions For Use, which can be found at NeurOptics.com.
For additional information regarding our product, please refer to the Instructions For Use, which can be
found at NeurOptics.com.
B^fRaAŪ
Cleaning and Maintenance
Ordering Information
23
24
25
26
9223 Research Drive | Irvine, CA 92618 | USA
p: 949.250.9792 | Toll Free North America: 866.99.PUPIL
info@NeurOptics.com | NeurOptics.com
QSG-0001-00 Rev A (HOMA-BD5UFZ)
NPi-300-SYS NPi®-300 Pupillometer System
SG-200 SmartGuard®
SGR-01 SmartGuard® Reader (Please contact Customer Service to determine the
specific reader compatible with the hospital requirements)
leaders at the point of care
Tel: 01246 292 955 Fax: 01246 292 966
Viking Court, 31 Princess Road, Dronfield S18 2LX
customercare@prospectdiagnostics.co.uk
prospectdiagnostics.co.uk
Prospect Diagnostics Limited
Table of contents


