Nertpow CH010 User manual

INSTRUCTION MANUAL
Model No.: CH010
110-120V 1500W
ASSEMBLE & OPERATION INSTRUCTION
Please read carefully and Save this instruction for future
reference

Introduction
The infrared heater contains an gold halogen lamp formed reflector heating system that provides even heat distribution.
The infrared heater saves 30%-40% of electricity in comparison to traditional heaters. The infrared heater is commonly used
for outdoor heating.
Warning
READ CAREFULLY-The infrared heater is designed for safe operation. Nevertheless, installation,
maintenance and operation of the heater can be dangerous. Observing the following procedures
will reduce the risk of fire, electric shock, injury to person and keep installation time to a minimums.
Save these instructions for future use.
1. Read all instruction before using this heater.
2. Remove the unit from its packaging and check to make sureit is in good condition before using.
3. Do not let children play with parts of package (such as plastic bags).
4. Check the household voltage to ensure it matches the heater’s rated specification.
5. Check the power cord and plug carefully before use to make sure that they are not damaged.
6. Before unplugging the power cord, be sure to turn off the power. When powering on the device, make
sure your hands are dry to avoid electric shock.
7. Do not use flammable materials, such as furniture and pillows, near or pointing to the heater. Bedding, paper,
cloth, and curtains should be at least 3 feet (1 meter) in front of the heater, and always place them on the sides
and back.
8. Do not use the heater near bathtubs, swimming pools or any liquid source.
9. To protect against electric shock, do not immerse cord or plug in water or any other liquid.
10. Do not insert or allow foreign objects to enter any ventilation or exhaust opening , as this may cause an
electric shock, fire or damage to the heater.
11. Be sure to unplug the heater when not in use.
12. Do not let the power cord hang on the table where it is easy to be pulled by
children.
13. Do not put fingers or foreign objects into the heater while in operation.
14. Do not leave the appliance unattended during use.
15.This heater is not intended for use in bathrooms, laundry and similar indoor locations, never located heater
where it may fall into a bathtub or other water container.
16.No liability can be accepted for any damage caused by non compliance with these instructions or any other
improper use or mishandling.
17. This appliance is not suitable for use by persons (including children) who have defects in physical, sensory or
mental abilities or lack experience and knowledge, unless the person responsible for their safety supervises or

instructs them on the use of the appliance. Children and vulnerable people should be supervised to ensure that
they do not play with the appliance.
18. If the supply cord is damaged in any way, it must be replaced by the manufacturer or its service agent or a
similarly qualified person in order to avoid a hazard.
19. To prevent overheating of this appliance, keep the air inlets and outlets clean and free of anything that may
cause blockage. Check all inlets and outlets from time to time to ensure it is clear of any dirt or dust accumulation.
20. The heater parts may exceed 200℃(392℉), and touch with the heating tube, reflector, or metal parts near
the heating tube may cause severe burns. To avoid burns, do not allow bare skin to touch hot surfaces.
21. ALWAYS allow heating element to cool at least 10 minutes before touching the heating tube or adjacent parts.
22. This product contains recyclable materials. Do not dispose this product as unsorted municipal waste. Please contact
your local municipality for the nearest collection point.
WARNING: Hot Surface! Do Not Touch!
Introduction
The CH010 halogen heater produce instant and comfortable heat like the sun. These robust and weatherproof heaters are
designed for domestic and commercial heating applications at outdoor well-protected area.
Model
CH010
Voltage(V)
110-120V AC
Wattage(W)
1500W
Hertz(Hz)
60Hz
Dimensions W×H×D
62.5*10.5*7.0cm/ 24.6*4*2.7inch
Weight
1.7kg/ 3.7lb
This heater is for use on 120 volts. The cord has a plug as below. The green grounding lug extending from the adapter must be
connected to a permanent ground such as a properly grounded outlet box. The adapter should not be used if a three-slot
grounded receptacle is available.


ASSEMBLY INSTRUCTIONS
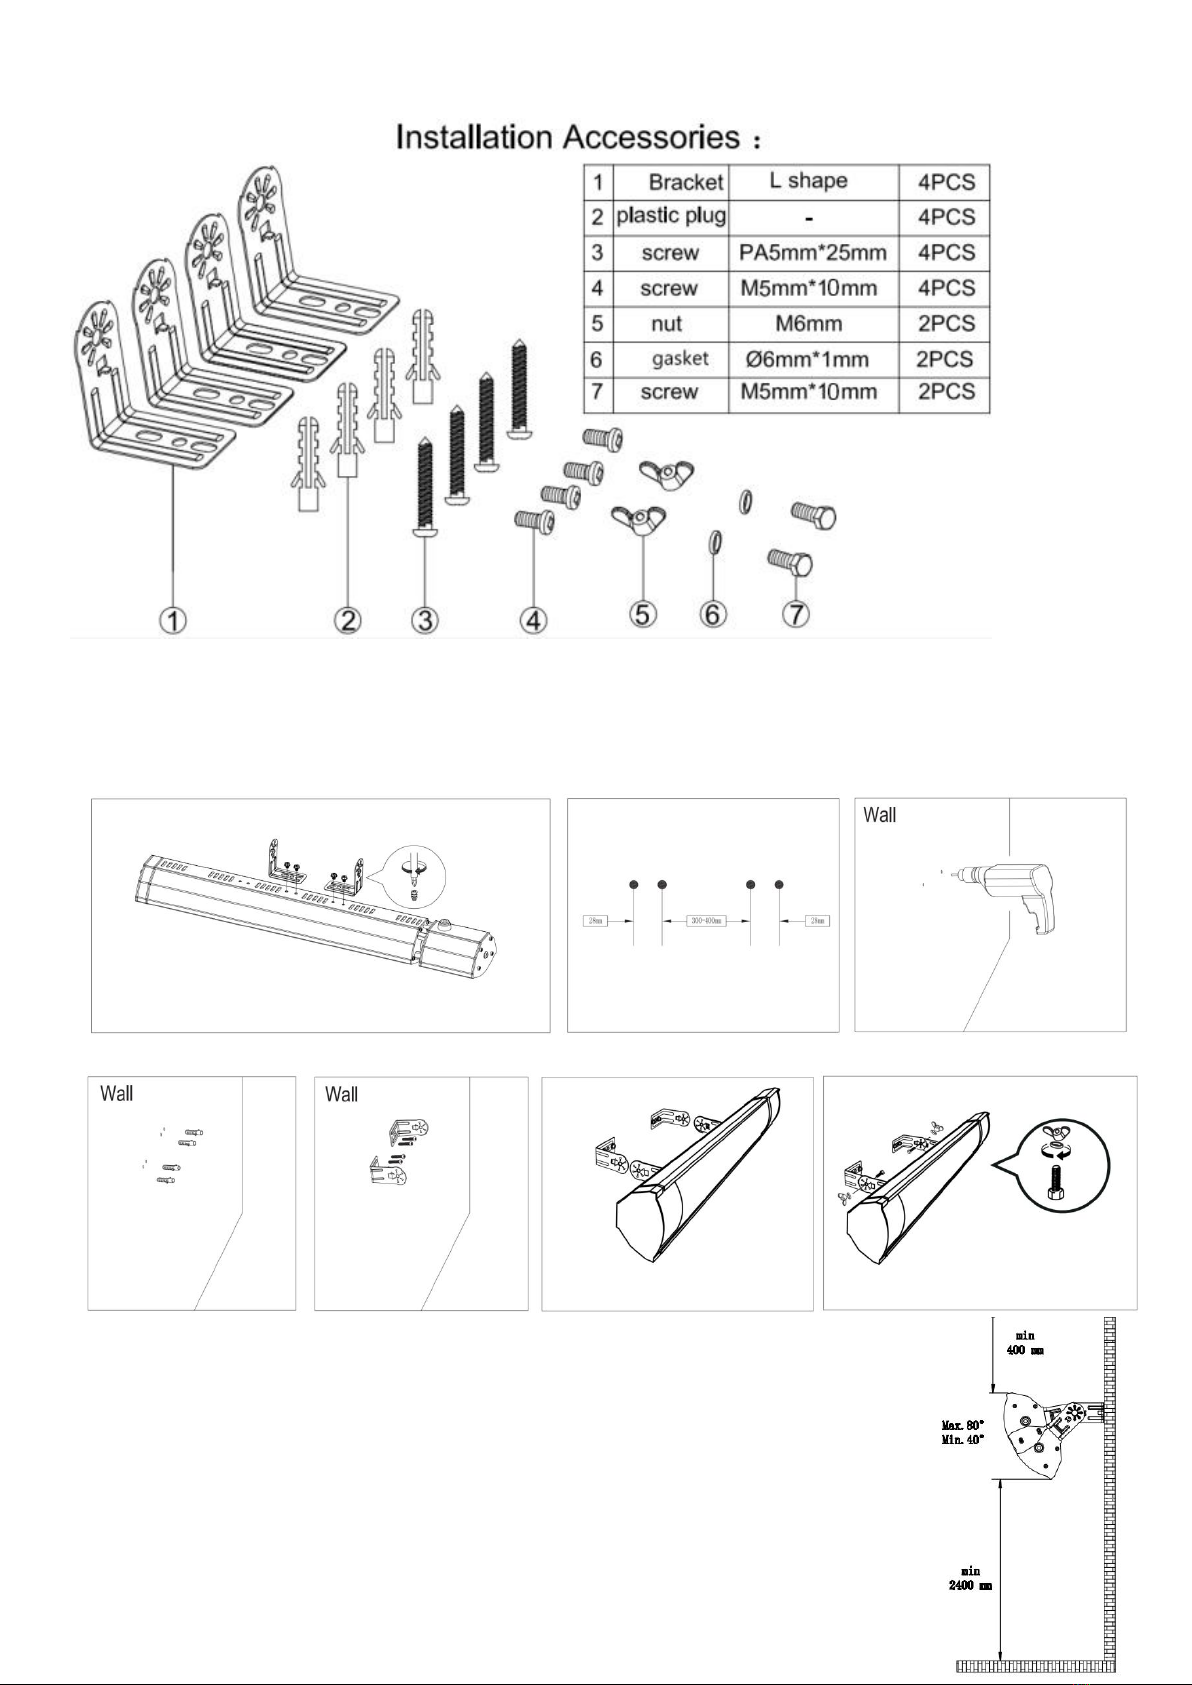
Installation for wall mounted
* Pencil *Hammer *Level *Screw Driver *Power Drill and drill bits
BLUE/GREEN flashing means tip over function work. Heater with tip over function, make sure
the correct working angel in 45-80°.
The wall bracket is provided with the heater. The bracket is specially designed to install the
product on the wall or ceiling before drilling. The wall/ceiling bracket is sturdy and has no hidden
water pipes or wires. The heater must be installed at least 16 inches from the wall and at least 6
inches from the ground.

Caution: Always keep a distance of 400mm(1.5inch) from the wall to prevent
touching flammable objects such as curtains.
Important: Ensure that the supply cables is well mounted and won’t touch the
reflector of the heater or hot surface. The supply cable can be fixed to the metal
mounting bracket behind heater with plastic zip ties.
The heater must be installed at least 2.4M(7.8ft) above the floor. (Wall Mounted Installation)
Attention: Cable should not pass through the heater.
Attention: The heater can only be used horizontally.

Tripod Installation:
1.
Placing L-shaped bracket to stand 2. Securing L-shaped bracket to
stand with screw&nut
3.
Moving the slip panels to the
proper place
Accessories
Quantity
L shape bracket
2pcs
Screw & nut
1 set
M5*10mm screw
2pcs
4. Fix the L-shaped bracket on the sliding panel on the heater with screws M5*10mm. Before tightening the screws,
please align the correct position with the hole on the back of the heater.
Attention: This side is on the left
5. Make correct angel in 35-60°.
Note: Wrong installation working position could
cause tip over function work, heater indicator will
flash green/blue.
Note: When used outdoors, it is recommended to reinforce the tripod
with sandbags or other heavy objects to prevents the wind from falling over.
(The sandbags are not included in the package.)
REMOTE CONTROL INSTRUCTION OPERATING
Remote Function:
1. Turn ON/OFF the power
2. Operation: Press the button, then press the heat levels (L1-L2-standby - off)
3. Indicator color:
Red- Standby; Green-L1 750W; Blue-L2 1500W; Blue&Green flashing -Tip over function / Overheat protection
Button
Function
ON/OFF
Turns heater on or off
Ⅰ
Set the power level at 750W
Ⅱ
Set the power level at 1500W

Note: All heaters and their remote controls have the same frequency, so it is possible to control several
heaters with just one remote.
PUSH BUTTON: On the right side of the heater, it can be operated manually without a remote control.
Inserting Batteries (not included)
Insert 2 AAA/ Alkaline type batteries into your remote control
1. Remove the case at the back of the remote, insert the batteries in it.
2. Change the batteries in the same way.
FUNCTION & OPERATION
1. PLUG the unit into a plug socket, make sure the power supply is the same as rated.
2. PRESS the power button on the right side of heater.
3. TURN ON/OFF the heater by remote control.
4. DOWN & UP BUTTON is for setting the power level.
Troubleshooting
1. Check if the power cord is plugged into an electrical outlet, if not, plug in.
2. Check if electricity to the main fuse is working.
3. Light on, but no heat: Bulb is damaged. Arrange for replacement bulb with local dealer.
4. Blue&Green flashing -Tip over function/ overheat protection, cooling down the heater for 1 hours and then re-
start the heater. Make heater angel at 45-60° for the correct working position.
MAINTENANCE
Note: Careful and regular maintenance of your heater is very important. Doing so can make your
equipment run efficiently in the long term.
1. Check whether the reflector and IR-Filament are dirty or not at least once a month. If required cleaning,
follow the clean maintenance instructions.
2. If it is a dirty environment, please check the heater more frequently.
3. Visually check the heater, power cord and plug for any damage at least once a month. If damaged,
please consult technical service team.
CLEANING
Regular and careful cleaning can extend the life of your infrared heater. To clean the heater, please follow
the steps below:
1. For your safety, be sure unplug the power cord before cleaning.
2. Make sure the heater is cool before cleaning.
3. To keep the heater clean, use a soft damp cloth to clean the outer surface. If necessary, you can use a
mild detergent. After cleaning, wipe the machine dry with a soft cloth.(Caution: Do not let any liquid enter
into the heater.)
4. DO NOT use alcohol, gasoline, abrasive powders, furniture polish or rough brushes to clean the heater

since it may cause damage or deterioration to the surface of the heater.
5. DO NOT immerse the heater in water.
6. Wait until the heater is completely dry before use.
Storage: When not in use, put the heater in the packaging carton, and then put it in a cool and dry place to
prevent dust and dirt.
ATTENTION:
1. Always disconnect the heater from the electricity supply and make sure it is cool down before
attempting to work on it.
2. If the heater accumulates dust or dirt inside the device or around the heating element, the device must
be cleaned by qualified service personnel. Do not operate the heater in this situation.
3. The only maintenance required is to clean the outer surface of the heater.
4. Do not touch the heating element with your bare hands, because the residue on your hands will affect
the life of the bulb. If you accidentally touch it, use a soft cloth dipped in menthol or alcohol to remove
fingerprints.
5. Do not attempt to repair or adjust any electrical or mechanical functions of this heater.
6. The heater does not contain user-serviceable parts. If the product is damaged or malfunctions, it must
be returned to the manufacturer or its service agent.
7. The damage power cord should be replaced by the manufacturer, service agent or similar qualified
personnel to avoid any danger.
RECYCLING
When the heater totally broke down, it should not be disposed of with household waste. Please recycle the
heater where facilities exist. Check with your local authority or retailer for recycling advice in your country.
Thank you for choosing our products, for any other concerns or problems, please
We will reply within 12 hours and provide you with a good solution.
Table of contents
Popular Heater manuals by other brands

Lavor
Lavor FF45 User's manual & operating instructions

Veltron
Veltron VHOE-90 user manual

Clarke
Clarke DEVIL 371SPD Operating & maintenance instructions

Williams
Williams 1773512 Installation instructions and owner's manual

Tylo
Tylo SENSE SPORT user guide

Creda
Creda CPH05T Installation and operating instructions


 Installation commisioning servicing & user instructions")


