Nesco Perfecta NC-5565 User manual
1
2
ภาษาไทย
ถึงท่านผู้มีอุปการะคุณทุกท่าน
ขอขอบคุณทุกท่านที่ไว้วางใจเลือกใช้
ผลิตภัณฑ์ของเนสโก้ด้วยประสบการณ์
และการออกแบบที่ทันสมัยและโดดเด่น
ของผลิตภัณฑ์ที่มากด้วยคุณประโยชน์
ในการใช้งานจะสามารถตอบสนองความ
พึงพอใจในการใช้งานของท่านได้อย่าง
คุ้มค่า
หม้อหุงข้าวไฟฟ้าอเนกประสงค์
รุ่น Perfecta NC-5565
1000 วัตต์ 220-240 โวลต์ 50/60 เฮิร์ซ
A.
B.
C.
D.
E.
F.
G.
H.
I.
J.
K.
L.
M.
N.
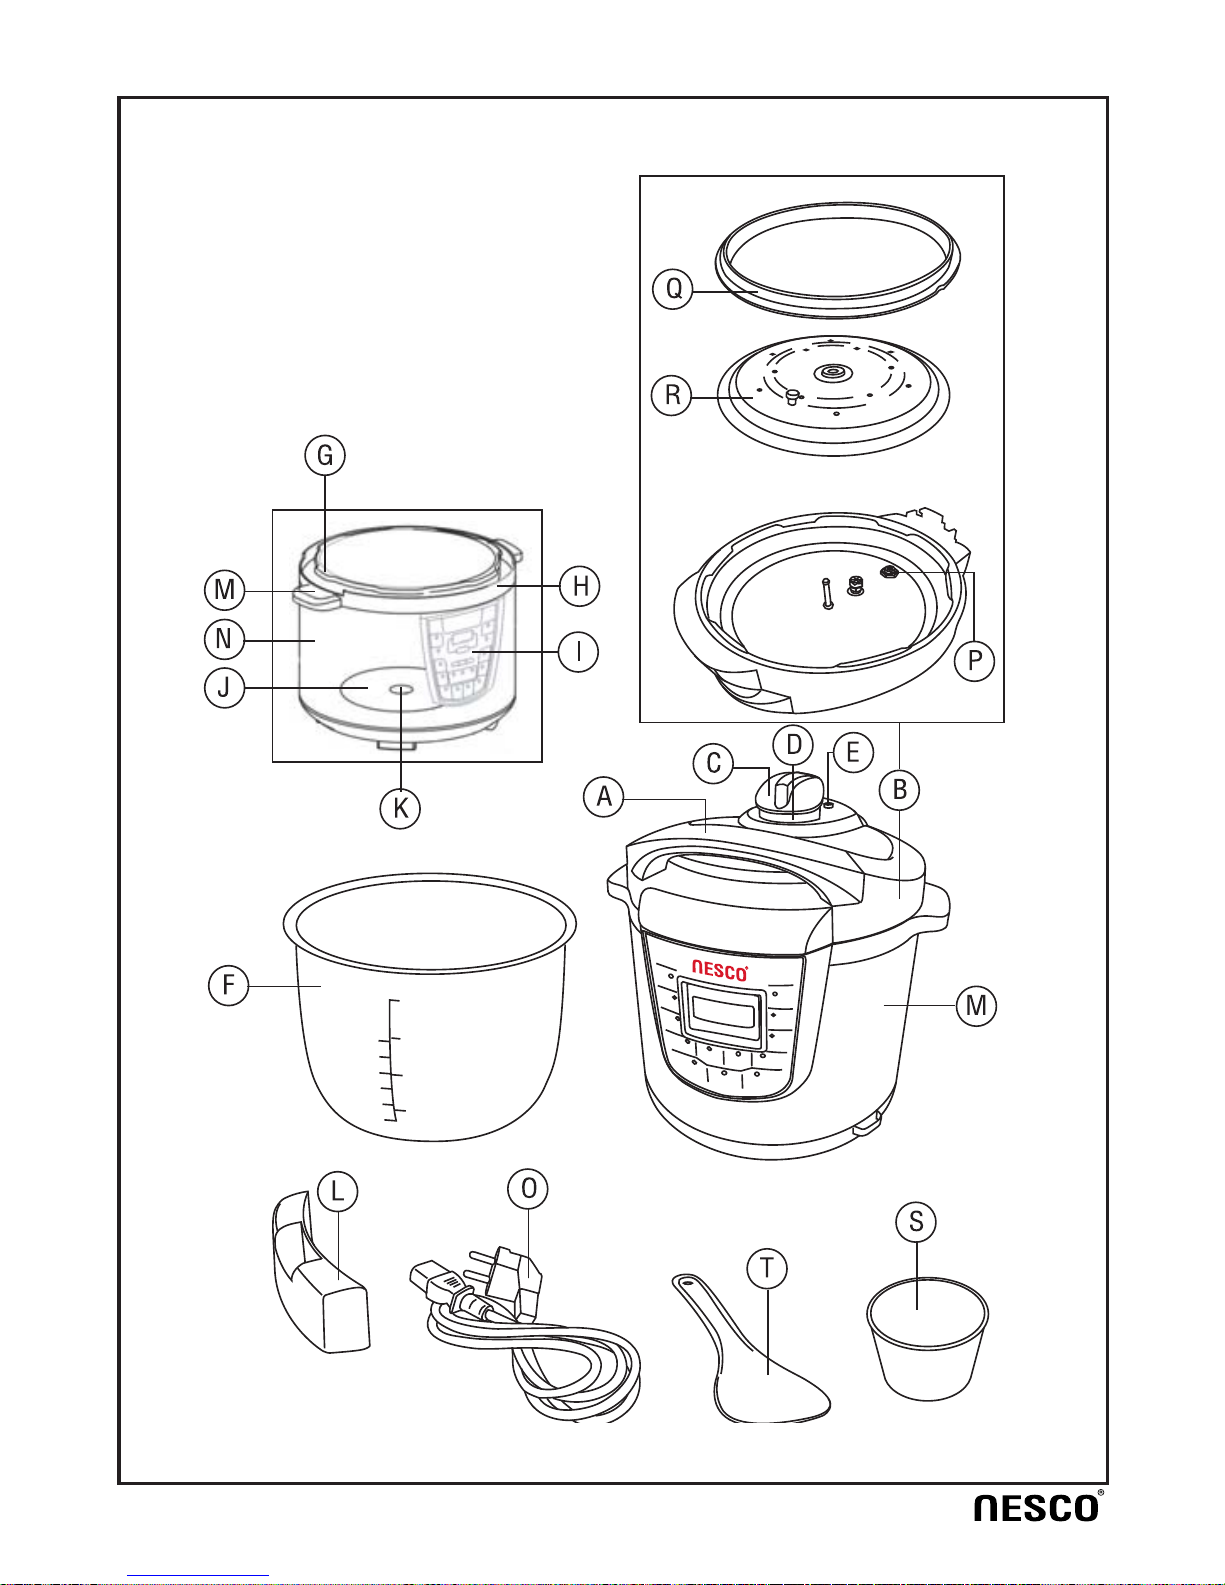
ส่วนประกอบ
ปลั๊กและสายไฟ
ซีลยางของวาล์วลูกลอย
ซีลยาง
ฝาหม้อด้านใน
ถ้วยตวง
ทัพพี
O.
P.
Q.
R.
S.
T.
มือจับ
ฝาหม้อ
วาล์วระบายแรงดัน
ท่อปล่อยไอน้ำ
วาล์วลูกลอย
หม้อชั้นใน
หม้อชั้นนอก
ขอบบนหม้อ
แผงควบคุมการทำงาน
แผ่นทำความร้อน
เซ็นเซอร์ควบคุมอุณหภูมิ
ช่องรองรับหยดน้ำ
หูจับหม้อ
ตัวหม้อ
คุณสมบัติ
หม้อหุงข้าวอเนกประสงค์เป็นผลิตภัณฑ์
เครื่องครัวที่เราพัฒนาขึ้นมาล่าสุด ด้วย
เทคโนโลยีที่ทันสมัย ผลิตภัณฑ์นี้ได้
รวมคุณสมบัติการใช้งานของหม้อแรงดัน
หม้อไฟฟ้าและหม้ออบเข้าด้วยกัน
เป็นอีกหนึ่งความภาคภูมิใจ ด้วยโครง-
สร้างและรูปลักษณ์ดีไซน์ที่ทันสมัย
พร้อมด้วยคุณภาพและความปลอดภัย
ประหยัดพลังงานเหมาะสำหรับครอบครัว
สมัยใหม่ฟังก์ชั่นครบครัน จนคุณต้อง
ลืมหม้อแรงดันแบบเดิมไปเลย
1. ครบทุกฟังก์ชั่นการทำอาหารรวมถึงตุ๋น
และเคี่ยว มีคุณสมบัติควบคุมอุณหภูมิ
และแรงดันอัตโนมัติ
2. ท่านไม่จำเป็นต้องตั้งค่าแรงดันของหม้อ
และตั้งเวลาเพียงแค่กดเลือกเมนูที่ต้องการ
หม้อหุงข้าวแรงดันจะทำงานโดยอัตโนมัติ
เมื่อเสร็จสิ้นการปรุงอาหารหม้อจะเข้าสู่
สถานะ“อุ่นอาหาร” อาหารของท่าน
ก็พร้อมเสิร์ฟได้เลย

3
จนแรงดันภายในหม้อสูงเกินระดับปกติ
หม้อจะระบายแรงดันแรงดันอัตโนมัติ
โดยระบายแรงดันออกรอบๆฝา เพื่อ
หลีกเลี่ยงการระเบิด
- ระบบควบคุมอุณหภูมิ : เครื่องจะตัดไฟ
อัตโนมัติเมื่ออุณหภูมิภายในหม้อสูงกว่า
อุณหภูมิที่ตั้งโปรแกรมไว้
-ระบบความปลอดภัยเมื่ออุณหภูมิสูง
เกินไป : เครื่องจะตัดไฟอัตโนมัติเมื่อ
อุณหภูมิภายในหม้อสูงกว่าระดับที่ตั้งไว้
คำเตือนเพื่อความปลอดภัย
1.ควรอ่านและทำความเข้าใจคู่มือฉบับนี้อย่าง
ละเอียดก่อนการใช้งานเครื่อง
2.ควรตรวจสอบให้แน่ใจว่าแรงดันไฟฟ้า
ของเครื่องตรงกับแรงดันไฟฟ้าที่ใช้ในบ้าน
ท่านโดยตรวจสอบได้จากฉลากใต้เครื่อง
3.ไม่ควรสัมผัสแผ่นทำความร้อน ตัวหม้อ
หรือฝาในขณะที่เครื่องกำลังทำงานเพราะ
อาจเกิดอันตรายจากความร้อนได้ควรจับ
ที่มือจับเท่านั้น
4.ควรปล่อยให้เครื่องเย็นลงก่อนการทำ
ความสะอาด
5.ควรถอดปลั๊กออกทุกครั้งเมื่อไม่ได้ใช้งาน
และก่อนการทำความสะอาด
6.ไม่ควรจุ่มฐานเครื่องรวมถึงปลั๊กและสายไฟ
ลงในน้ำหรือของเหลวใดๆ
7.เพื่อความปลอดภัยสูงสุดไม่ควรเคลื่อน
ย้ายเครื่องในขณะที่ยังบรรจุอาหารร้อนๆอยู่
3. การตั้งเวลาการทำงานไว้ล่วงหน้า:
หม้อหุงข้าวจะนับถอยหลังเวลา เมื่อครบ
เวลาที่ตั้งไว้หม้อหุงข้าวจะเริ่มทำงาน
ให้ความร้อน
4. มีหน่วยความจำบันทึกเมื่อไฟตัดหรือ
ไฟตก: หม้อหุงข้าวจะทำงานต่อจากเดิม
เมื่อไฟติดอีก
5. ประหยัดเวลาและพลังงาน: ประหยัด
พลังงานได้มากกว่า 60% และประหยัด
เวลาได้มากกว่า 40 % เมื่อเทียบกับ
หม้อหุงข้าวทั่วไป
6. การปรุงอาหารด้วยระบบแรงดัน
สูญญากาศช่วยคงคุณค่าทางโภชนาการ
และรสชาติดั้งเดิมของอาหาร
7. ตัวหม้อชั้นใน เคลือบกันติด ทำความ
สะอาดง่าย ฝาปิดและหม้อชั้นนอกแบบ
สแตนเลสสตีลมั่นใจว่ามีอายุการใช้งานที่
ยาวนาน
8. ภายในมีอุปกรณ์เพื่อความปลอดภัย:
- หม้อหุงข้าวจะไม่สร้างแรงดัน หากไม่ได้
ปิดฝาหม้อให้สนิทและจะไม่สามารถเปิด
ฝาได้ในกรณีที่ภายในหม้อมีแรงดันสูงเกินไป
- ระบบระบายแรงดัน:เมื่ออุณหภูมิและแรง
ดันภายในหม้อมากเกินค่าปกติวาล์วระบาย
แรงดันจะปล่อยแรงดันไอน้ำออกมา เพื่อ
ควบคุมแรงดันภายในหม้อให้อยู่ในระดับปกติ
- ระบบDe-pressure function: หากอุปกรณ์
ควบคุมแรงดันภายในหม้อทำงานผิดปกติ
4
ดึงที่สายไฟเพื่อถอดปลั๊กจากเต้ารับควรจับ
ที่หัวปลั๊กแล้วดึงถอดปลั๊กออกให้ถูกวิธี
17.เมื่อใช้งานปลั๊กพ่วงกับเครื่องควรแน่ใจว่า
ปลั๊กพ่วงนั้นมีคุณภาพและสามารถรองรับแรง
ดันไฟฟ้าของเครื่องได้
18.เครื่องนี้ออกแบบมาสำหรับใช้งานในครัว
เรือนเท่านั้น
19.เครื่องนี้ถูกออกแบบมาเพื่อใช้งานตามคำ
แนะนำในคู่มือ ไม่ควรใช้เครื่องผิดวัตถุ
ประสงค์
20.ไม่ควรใช้ใยหรือฝอยขัดที่เป็นโลหะ
เพราะอาจทำให้เกิดรอยขูดขีดและชิ้นส่วนโลหะ
จากฝอยขัดอาจไปสัมผัสกับชิ้นส่วนไฟฟ้า
อาจทำให้เกิดอันตรายได้
21.ไม่ควรใช้งานเครื่อง หากสายไฟหรือ
ปลั๊กชำรุดหรือเสียหาย หรือเครื่องมีความ
ผิดปกติไม่ควรแกะหรือเปลี่ยนสายไฟด้วยตัว
ท่านเองควรส่งซ่อมหรือเปลี่ยนอะไหล่โดย
ช่างผู้มีความชำนาญของศูนย์บริการของ
ตัวแทนจัดจำหน่ายเท่านั้น
8.ทำความสะอาดและขจัดวัตถุแปลกปลอม
ออกจากก้นหม้อก่อนใช้งาน
9.ไม่ควรเปิดการทำงานเครื่องหากไม่ได้วางหม้อ
ชั้นในลงไปหรือไม่มีอาหารอยู่ในหม้อ
10.ไม่ควรสัมผัสเครื่องและตัวหม้อระหว่าง
เครื่องทำงานหรือทำความร้อนหรือวางเครื่อง
ไว้ในบริเวณที่มีไอน้ำร้อนหรือเปิดฝาหม้อ
ให้ไอน้ำร้อนระเหยใส่คน เพราะอาจเกิด
อันตรายจากความร้อนหรือไอน้ำร้อนได้
11.ไม่ควรใช้อุปกรณ์ที่ไม่ได้มาพร้อมกับตัว
เครื่องเพราะอาจทำให้เกิดความเสียหายและ
เกิดอันตรายต่อผู้ใช้งานได้ควรใช้อุปกรณ์ที่
มาพร้อมกับเครื่องหรือที่แนะนำในคู่มือเท่านั้น
12.ไม่ควรใช้งานเครื่องนอกอาคาร
13.เครื่องใช้ไฟฟ้านี้ไม่มีวัตถุสงค์ให้เด็กหรือ
บุคคลที่บกพร่องทางด้านร่างกายหรือและจิตใจ
เป็นผู้ใช้งาน ยกเว้นเป็นการใช้งานที่อยู่
ภายใต้การควบคุมดูแลของผู้ที่มีหน้าที่
รับผิดชอบ ต่อความปลอดภัยของบุคคล
เหล่านั้น ควรดูแลไม่ให้เด็กเล่นกับเครื่อง
ใช้ไฟฟ้าหรือนำเครื่องใช้ไฟฟ้าไปเป็นของเล่น
14.ไม่ควรปล่อยให้สายไฟพาดผ่านขอบหรือ
มุมโต๊ะ เคาน์เตอร์ที่มีขอบแหลมคมหรือ
สัมผัสกับพื้นผิวที่มีความร้อน
15.ไม่ควรใช้งานเครื่องใกล้กับบริเวณที่มี
ความร้อน เช่น เตาแก๊ส หรือเตาอบไฟฟ้า
16.ไม่ควรใช้สายไฟในทางที่ผิด เช่น หิ้ว
หรือยกเครื่องด้วยการหิ้วที่สายไฟ หรือ
วิธีการใช้งาน
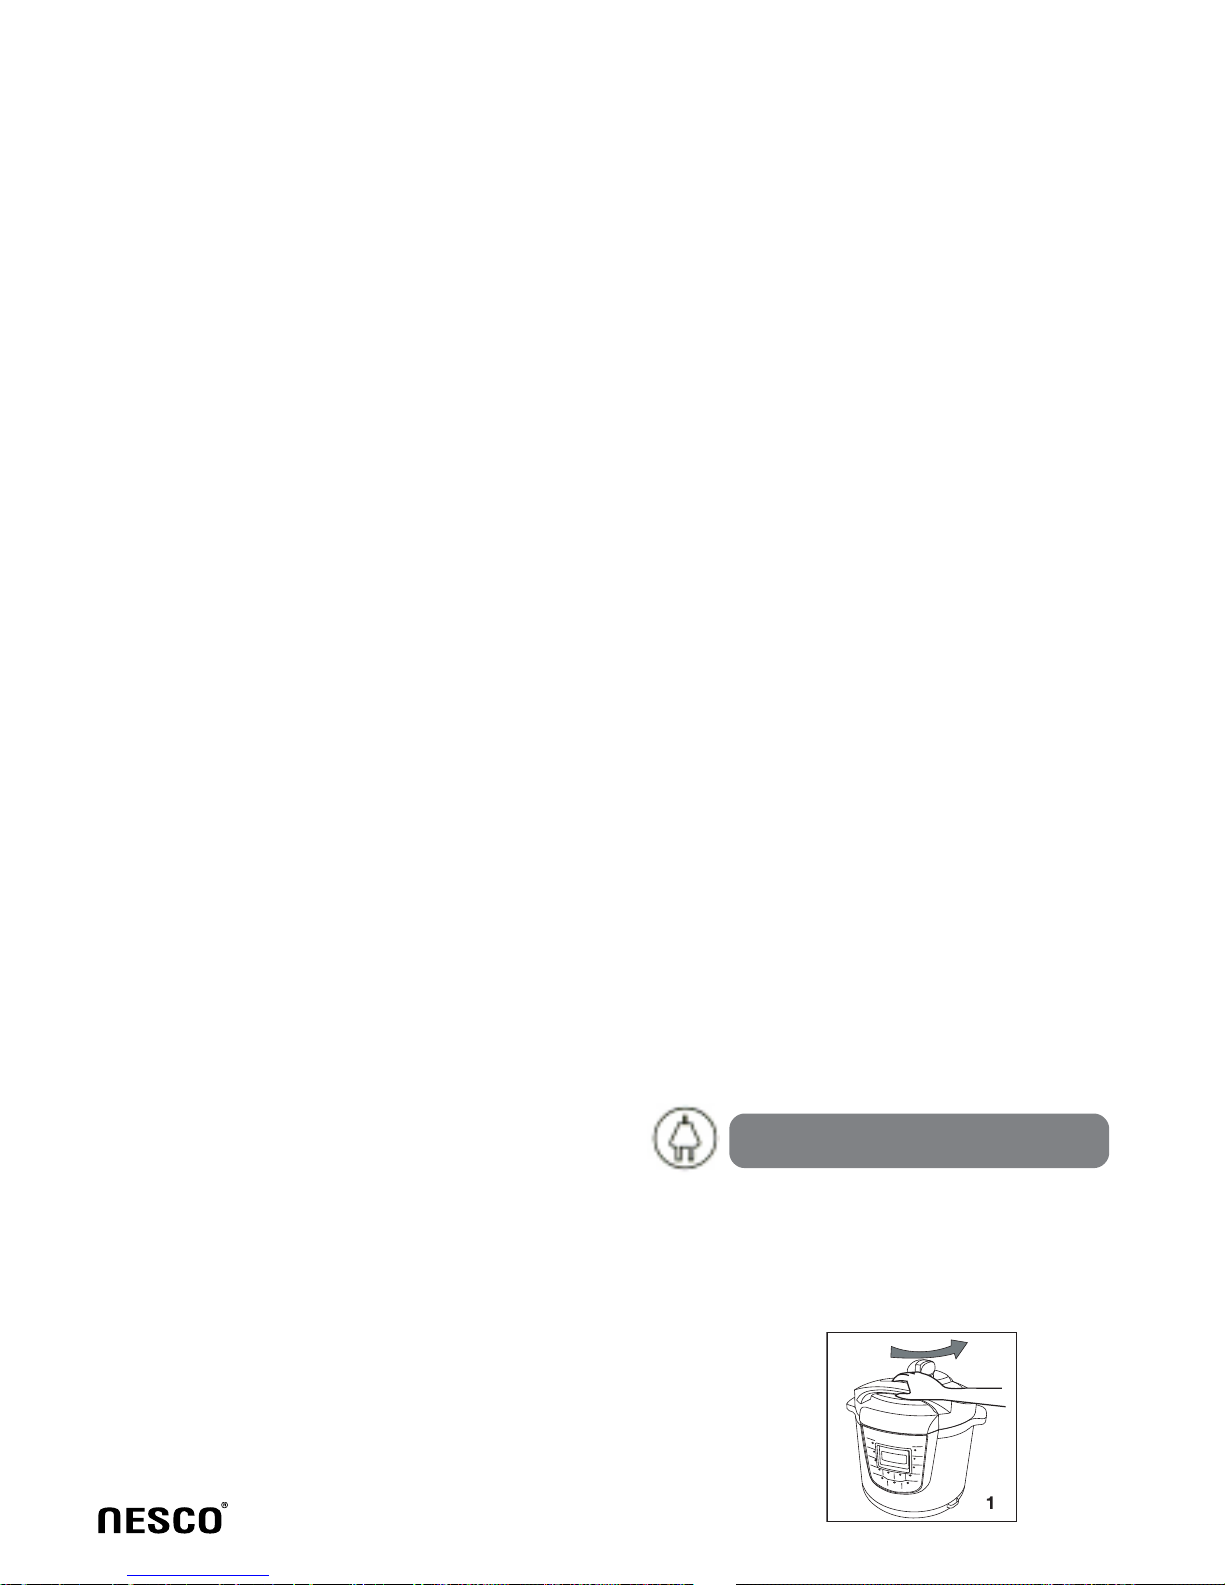
1. เปิดฝาหม้อ : จับที่มือจับบนฝาหม้อ
แล้วหมุนฝาทวนเข็มนาฬิกาจนกระทั่ง
ฝาคลายล็อก (ดูภาพประกอบ 1-2)
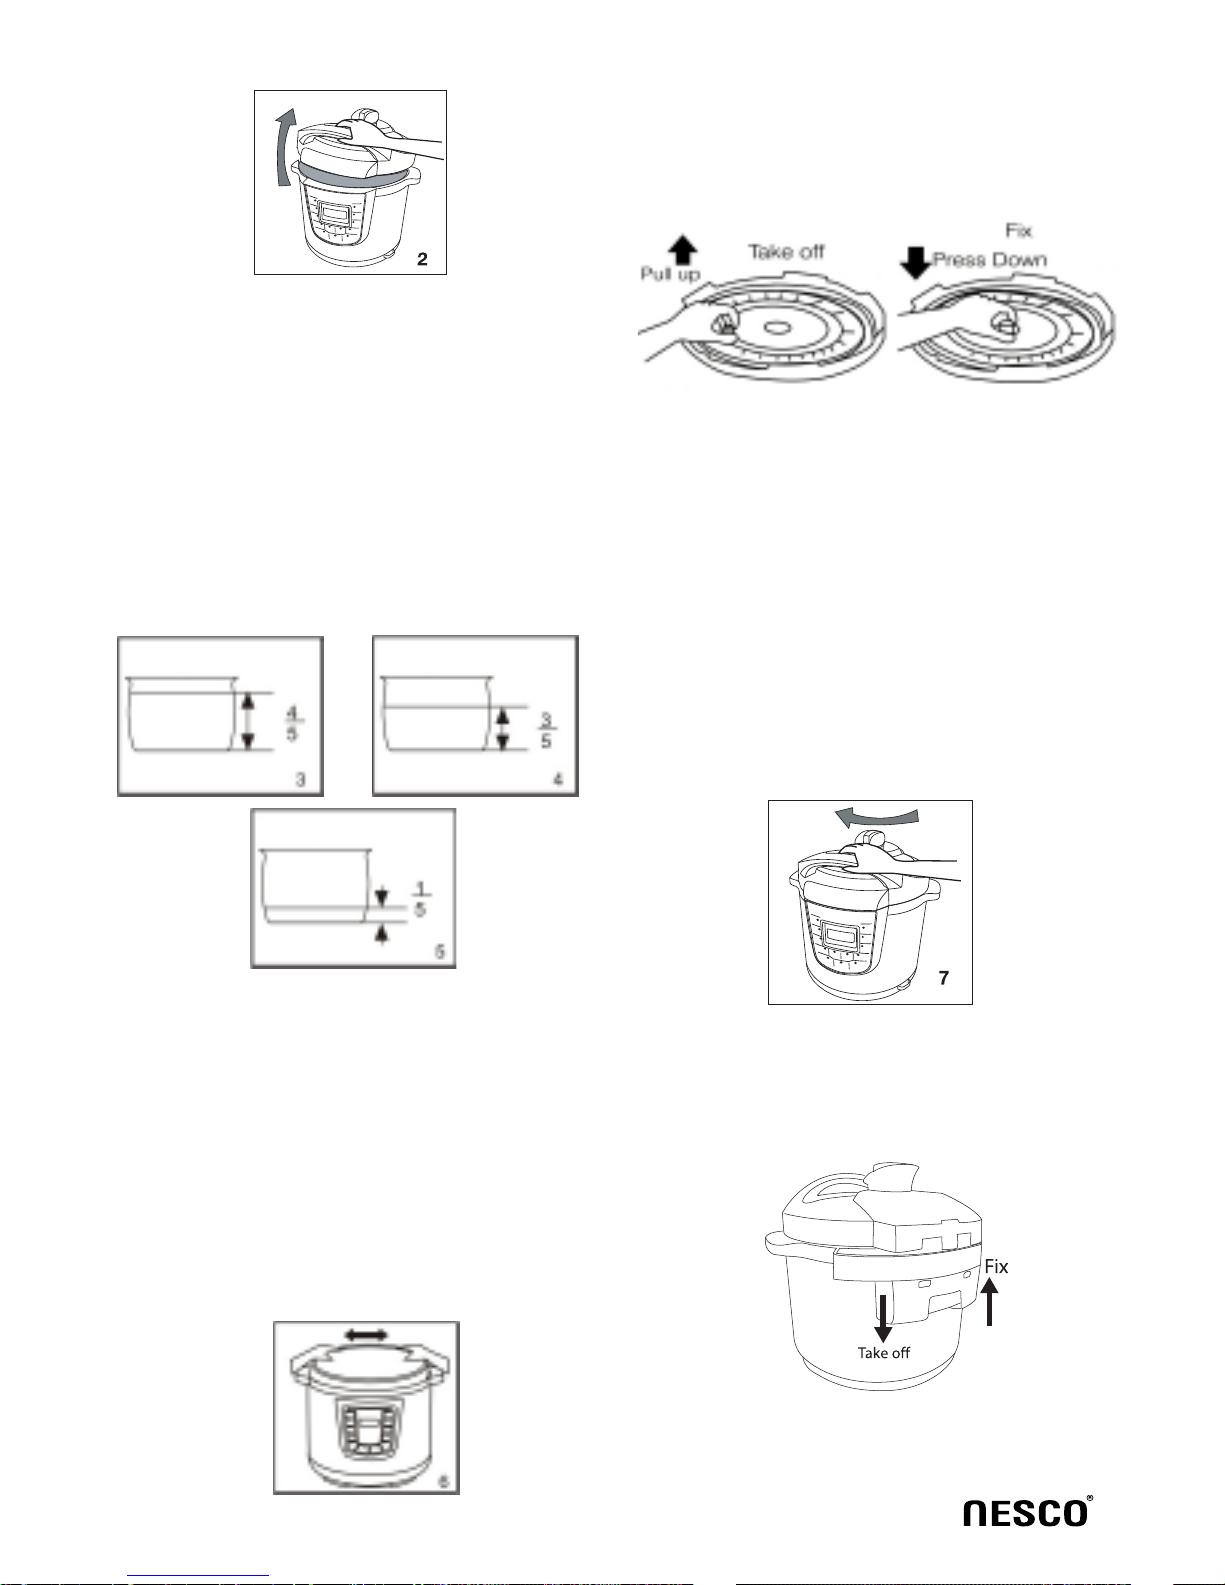
4. ปิดฝาหม้อ
- ตรวจสอบซีลยางบนวาล์วลูกลอยและซีล
ยางบนฝาชั้นในว่าประกอบอยู่
-หมุนซีลยางดูเพื่อให้แน่ใจว่าประกอบ
แน่นสนิทกับขอบฝาชั้นใน
- ปิดฝาหม้อจากนั้นหมุนทวนเข็มนาฬิกา
จนกระทั่งฝาหม้อเข้าล็อก(ดูภาพประกอบ
7)
5
2. นำหม้อชั้นในออกมาจากนั้นใส่อาหาร
และน้ำรวมทั้งเครื่องปรุงต่างๆ ลงในหม้อ
ปริมาณอาหารและน้ำต้องไม่สูงเกิน 4/5
ของหม้อ และ ไม่ต่ำกว่า 1/5 ของหม้อ
และสำหรับอาหารที่สามารถขยายตัวได้ปริมาณ
อาหารไม่ควรสูงเกิน 3/5 ของหม้อ (ดูภาพ
ประกอบ 3-4-5)
3.เช็ดทำความสะอาดภายนอกของหม้อชั้นใน
และแผ่นทำความร้อนก่อนวางหม้อชั้นในลงไป
เพื่อให้แน่ใจว่าไม่มีสิ่งสกปรกหรือคราบเปื้อน
ติดอยู่บนแผ่นทำความร้อนหรือภายในหม้อ
ชั้นนอก หลังจากนั้น วางหม้อชั้นในลงไป
โดยหมุนหม้อชั้นในเล็กน้อยเพื่อให้วางพอดี
กับแผ่นทำความร้อน (ดูภาพประกอบ 6)
-ประกอบฝาหม้อชั้นในตามภาพประกอบ
ด้านล่าง ( FIX )
-ประกอบช่องรองรับหยดน้ำ ตามภาพ
ประกอบด้านล่าง ( FIX )
6
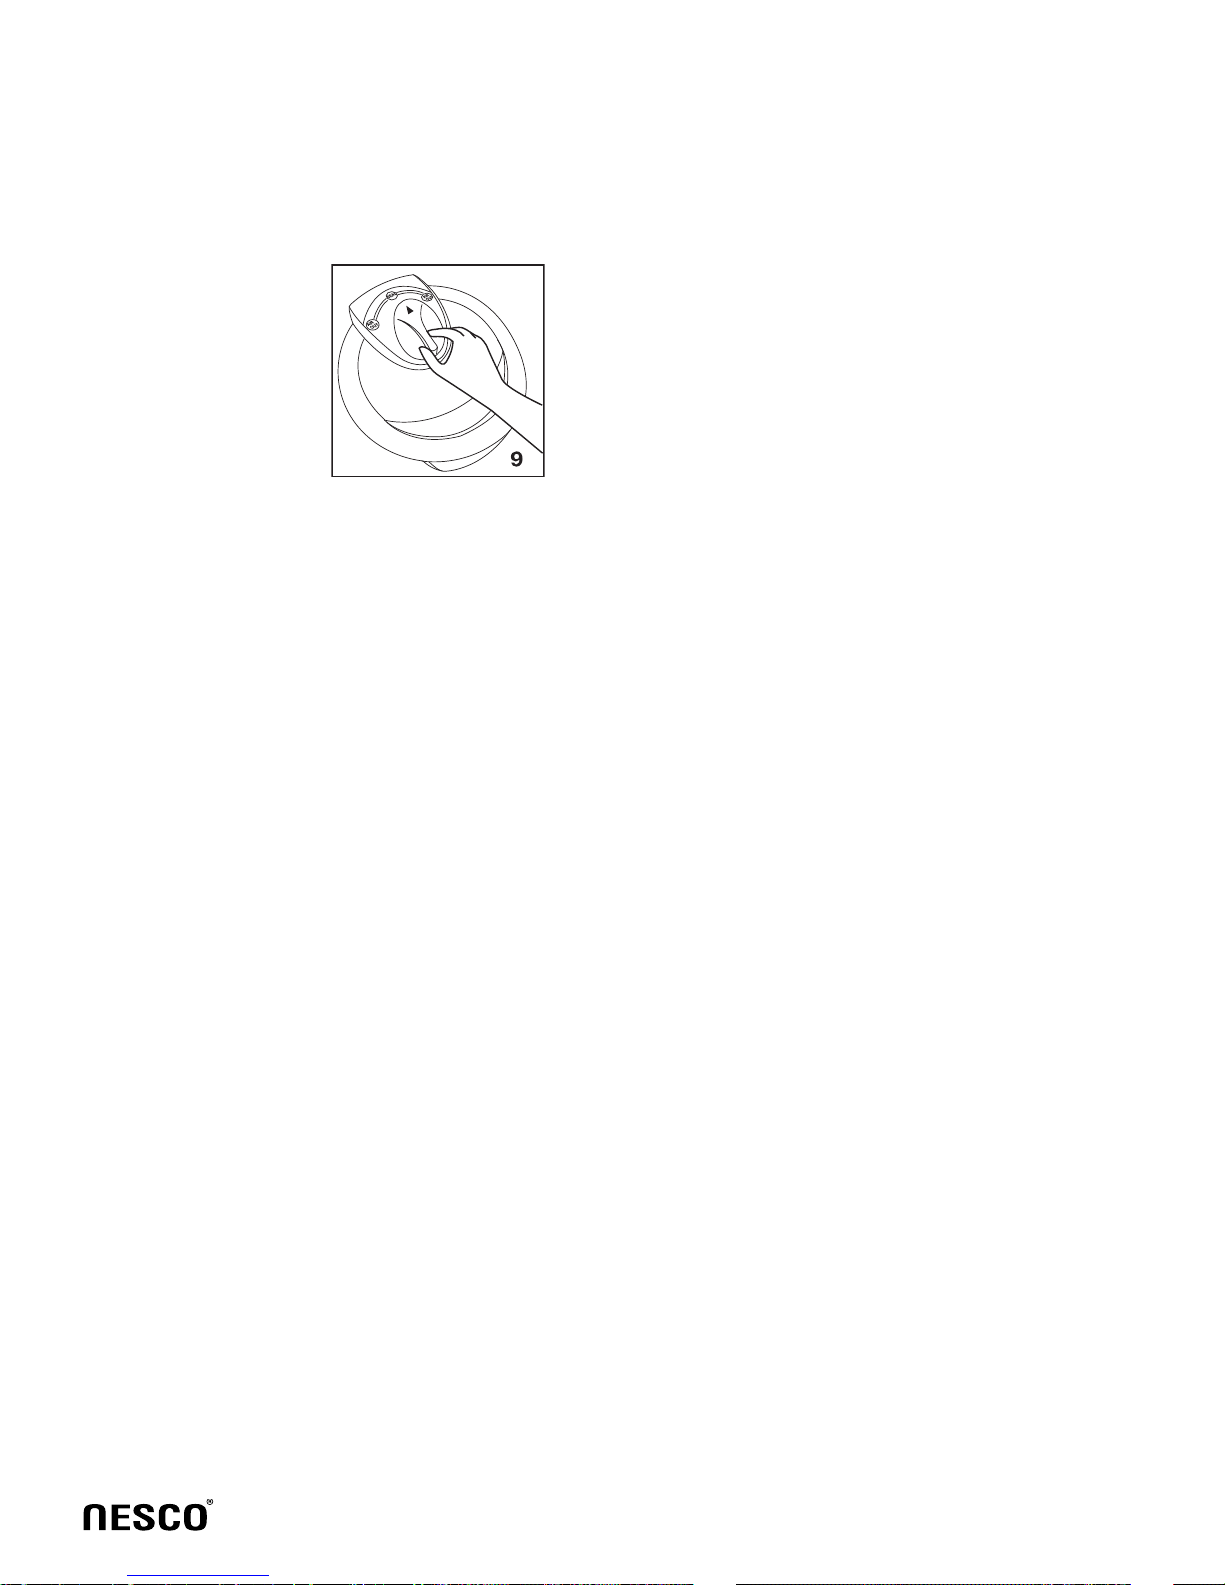
5. ประกอบวาล์วระบายแรงดันไปบนฝา
จากนั้นหมุนวาล์วไปยังตำแหน่ง “Seal”
ต้องแน่ใจว่าวาล์วลูกลอยอยู่ในตำแหน่งลง
(ดูภาพประกอบ 9)
- ในกรณีที่ไม่ต้องการตั้งเวลาท่านสามารถ
กดเลือกเมนูที่ต้องการบนปุ่มบนแผงควบคุม
จากนั้นกดปุ่ม“เริ่มทำงาน(start)”ไฟบนปุ่ม
ดังกล่าวและบนปุ่มเมนูที่เลือกจะติดและเครื่อง
จะเริ่มทำงาน
- เมื่อความร้อนหรือแรงดันภายในหม้อสูง
เกินไป ไฟบริเวณปุ่ม “อุ่นอาหาร(Keep
warm)”จะกระพริบ(แสดงถึงความร้อนและ
แรงดันภายในหม้อสูงเกินไป)เมื่อแรงดันกลับ
สู่สภาวะปกติไฟจะหยุดกระพริบและติดสว่าง
- กดปุ่ม “อุ่นอาหาร/ยกเลิก(Keep warm/
Cancel)” เพื่อยกเลิกโปรแกรมที่ตั้งไว้หรือ
ยกเลิกการทำงาน
- เมื่อไม่ได้ตั้งโปรแกรมใดๆหรือไม่ได้
อยู่ในสถานะทำงาน กดปุ่ม “อุ่นอาหาร/
ยกเลิก (Keep warm/Cancel)” ไฟบริเวณ
ปุ่มจะติดขึ้น เครื่องจะอยู่ในสถานะอุ่น
อาหารหากกดปุ่มดังกล่าวอีกครั้งจะเป็นการ
ยกเลิกการอุ่นอาหารไฟบริเวณปุ่มจะดับ
6. เสียบปลั๊กเครื่องเข้ากับเต้ารับหน้าจอจะ
แสดง “00”
7. กดเลือกโปรแกรมที่ต้องการ จากนั้นกด
ปุ่ม “เริ่มทำงาน(Start)”
-ตั้งเวลาล่วงหน้า(ท่านสามารถข้ามขั้นตอน
นี้ไปได้หากไม่ต้องการตั้งเวลา) ให้กดปุ่ม
“ตั้งเวลาล่วงหน้า(Preset)” 1ครั้ง เวลาจะ
เพิ่มครั้งละ0.5 ชั่วโมงท่านสามารถตั้งเวลา
ได้นานที่สุด 24 ชั่วโมง และ หากกดเลย
จากนั้นเวลาจะเริ่มรอบใหม่ที่ 0.5
- เลือกเมนูที่ต้องการ: กดเลือกเมนูที่ต้องการ
ที่ปุ่มบนแผงควบคุม เช่น กดเลือกปุ่ม
“เนื้อ(Meat)” จากนั้นกดปุ่ม “เริ่มทำงาน
(Start)”และไฟแสดงการทำงานบริเวณปุ่ม
“ตั้งเวลาล่วงหน้า(Preset)” และ บริเวณ
ปุ่มเมนูที่เลือกจะติดขึ้น
- ในกรณีที่ตั้งเวลาล่วงหน้าไว้เครื่องจะเริ่ม
นับเวลาถอยหลังจนกระทั่งสิ้นสุดเวลาที่
ตั้งไว้หน้าจอจะแสดง “00”และเครื่องจะ
เริ่มทำงาน
8. เมื่อไฟแสดงสถานะบนปุ่ม “อุ่นอาหาร/
ยกเลิก (Keep warm/Cancel)” เริ่มกระพริบ
แสดงว่าอาหารทำเสร็จขั้นตอนแล้วให้กด
ที่ปุ่มดังกล่าวเพื่อเสร็จสิ้นการทำอาหาร
และพร้อมนำอาหารออกจากหม้อ
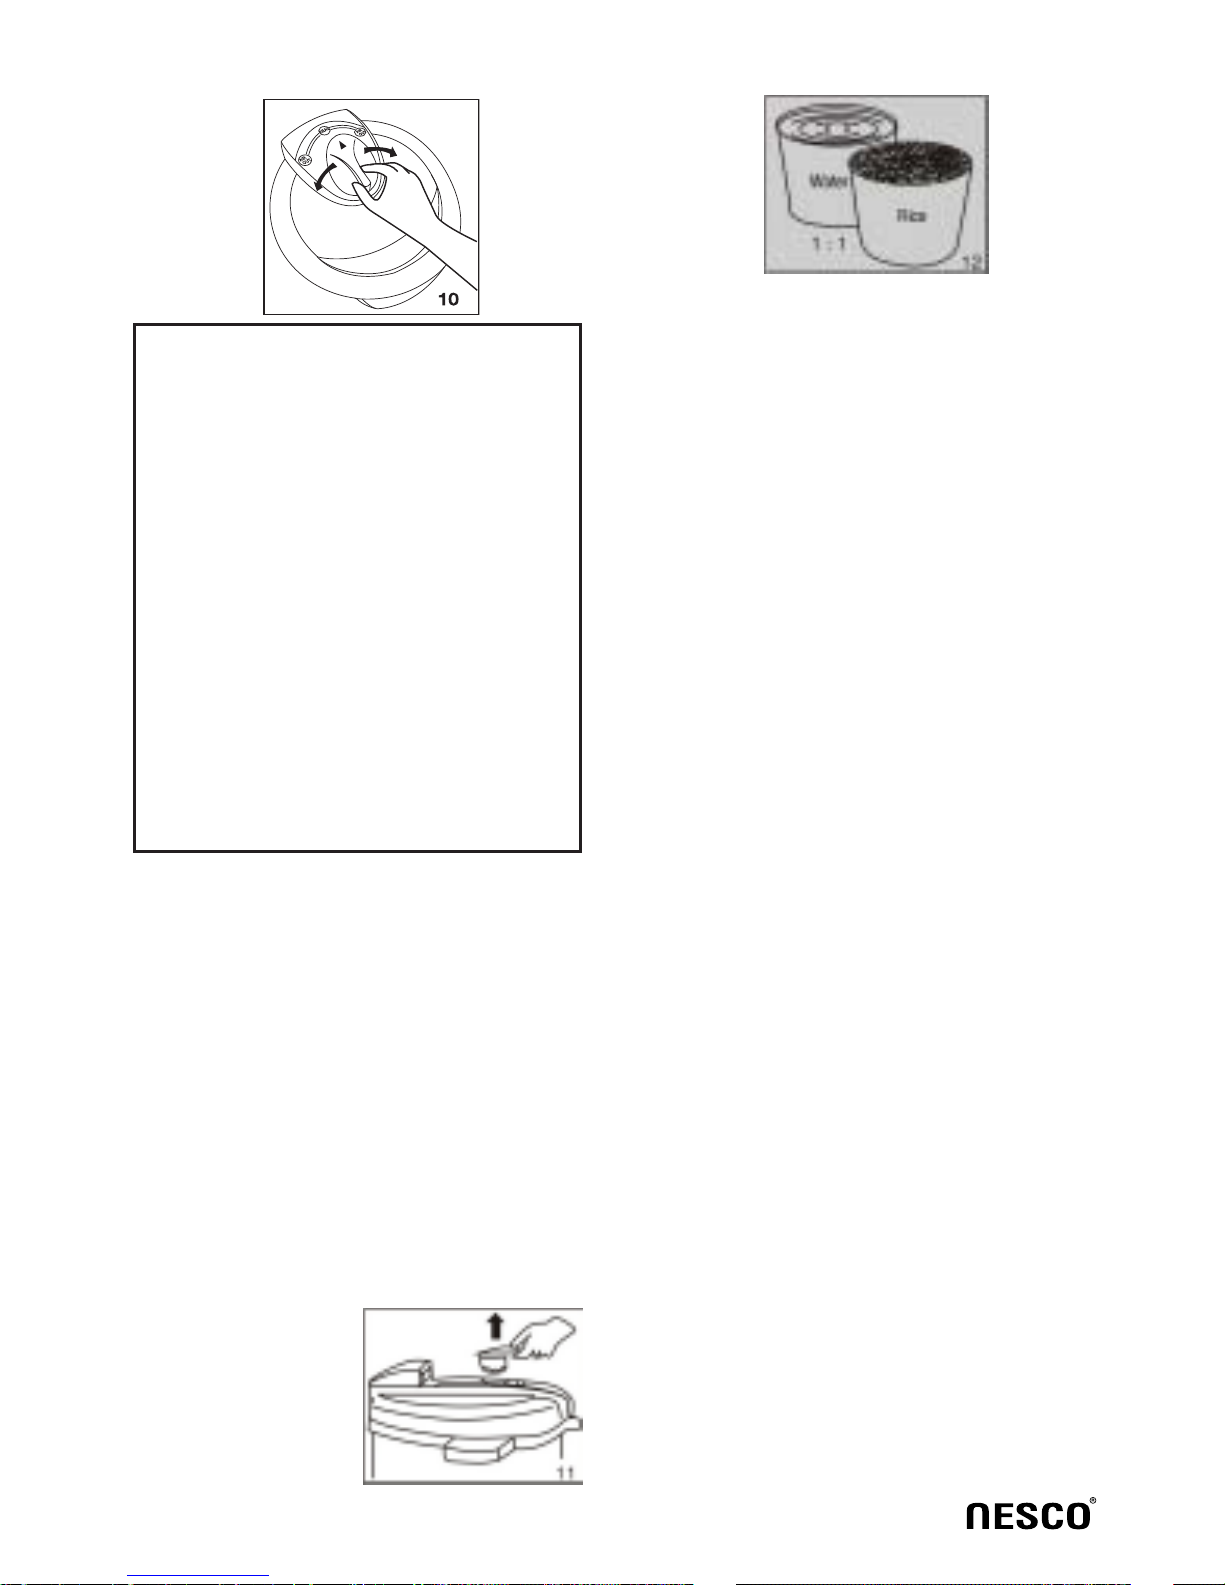
- หมุนวาล์วระบายแรงดันไปยังตำแหน่ง
“Air Out” และระบายแรงดันออกจนหมด
จนกระทั่งวาล์วลูกลอยตกลง(ดูภาพประกอบ10)
7
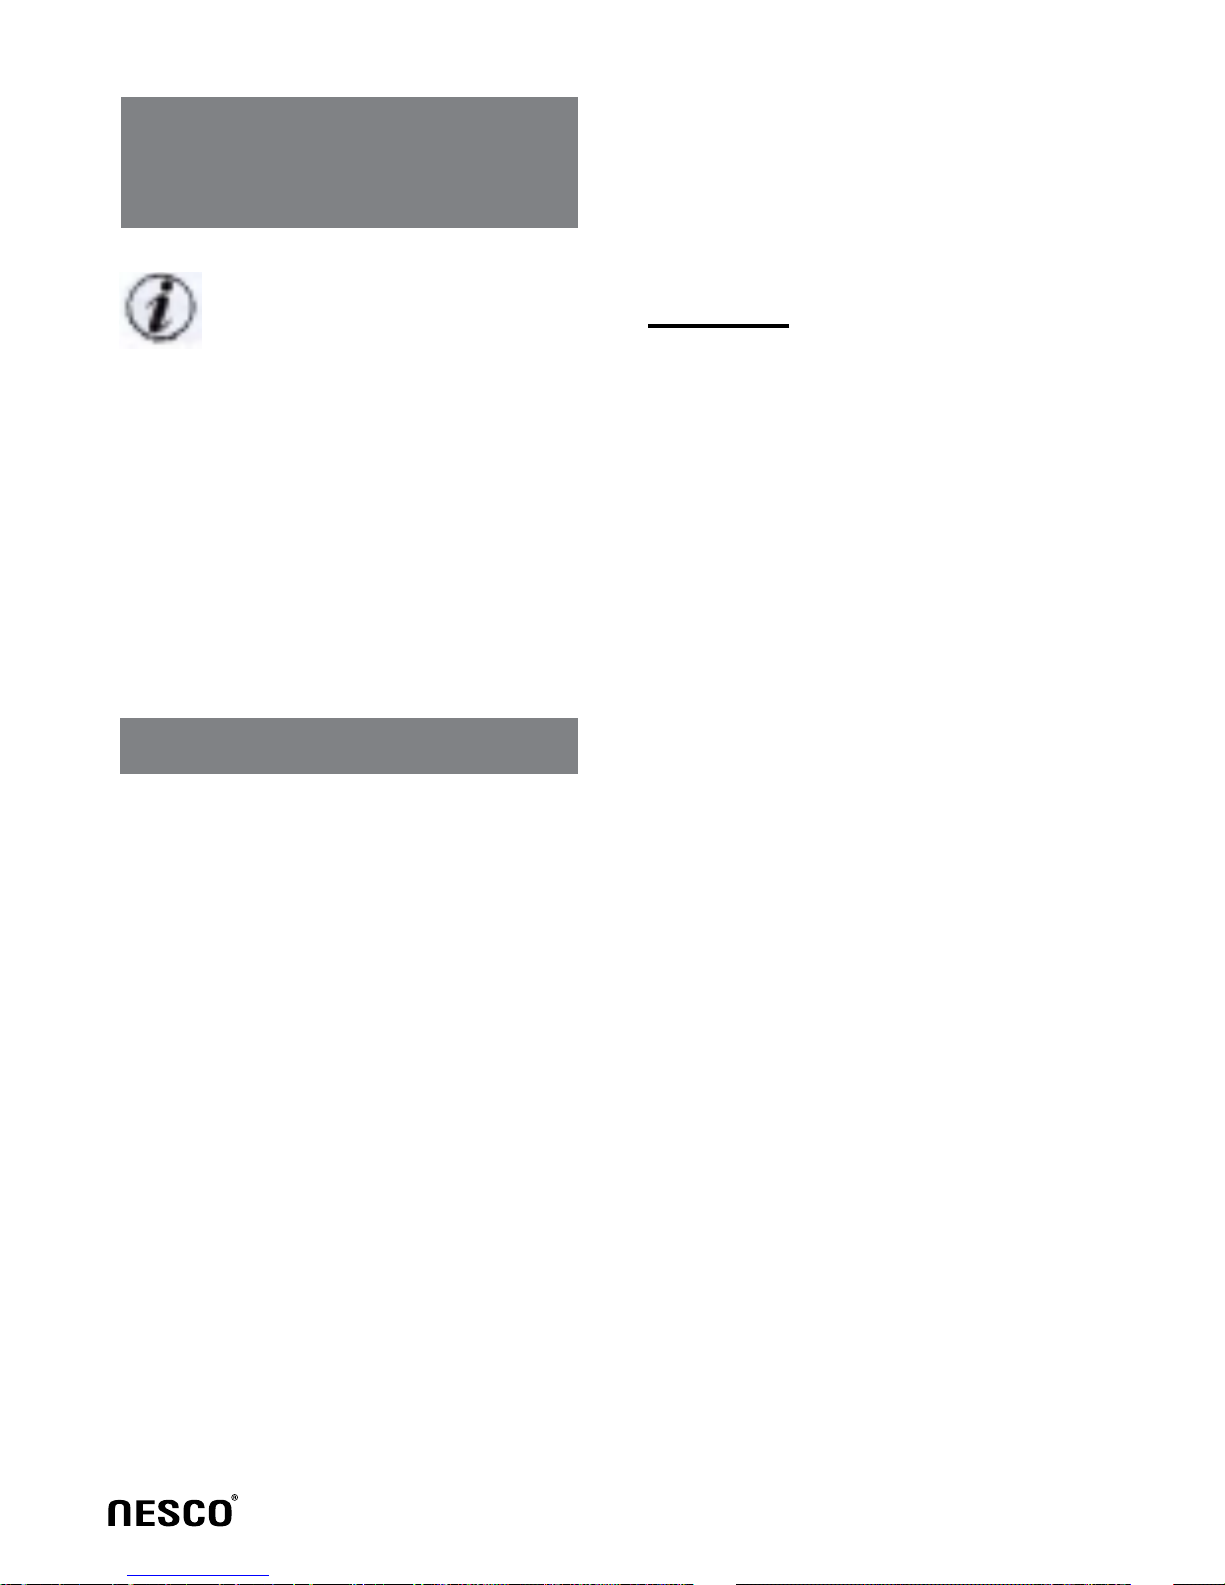
-ข้อควรระวัง
กรุณาดึงวาล์วระบายแรงดันออกหากท่าน
เลือกทำอาหารในเมนู“ข้าวกรอบ (Crispy
rice)” (ดูภาพประกอบ 11) และควรเติมน้ำ
1ถ้วย ต่อข้าว 1 ถ้วย ในเมนูข้าวกรอบ
(ดูภาพประกอบ12)
คำเตือน
1.ไม่ควรใช้งานหม้อใกล้กับวัสดุที่ติดไฟง่าย
หรือในสภาพแวดล้อมที่มีความชื้น
2.เติมน้ำในหม้อชั้นในตามปริมาณที่แนะนำ
ในข้อ2 ในหัวข้อวิธีการใช้งาน
3.ระวังไม่ให้ซีลยางชำรุดหรือนำซีลยางอื่นๆ
มาเปลี่ยน
4.ไม่ควรใช้มือหรืออุปกรณ์ใดๆบิดหรือ
ม้วนงอฝารองด้านในถ้าฝารองด้านใน
หลุดออกไปต้องหยุดใช้งานจนกว่าจะได้รับ
การซ่อมแซมหรือเปลี่ยนอะไหล่ให้เรียบร้อย
5.ฝารองด้านในต้องได้รับการดูแลรักษา
ด้วยการทำความสะอาดอย่างสม่ำเสมอ
6.ห้ามพยายามเปิดฝาหม้อในขณะที่วาล์ว
ลูกลอยยังลอยอยู่
7.ห้ามวางวัตถุหนักลงบนวาล์วระบายแรงดัน
หรือเปลี่นวาล์วโดยใช้วัสดุอื่นๆ
8.เพื่อความปลอดภัย ไม่ควรปิดกั้น
ภายนอกส่วนต่อระหว่างฝาหม้อกับตัวหม้อ
9.พื้นผิวของหม้อและแผ่นทำความร้อนต้อง
ได้รับการทำความสะอาด ไม่ควรใช้หม้อ
ชั้นในไปประกอบอาหารกับเตาหรือหม้อ
ประเภทอื่นและไม่ควรนำภาชนะอื่นๆมาใช้
กับเครื่องแทนหม้อชั้นใน
-ถอดปลั๊กออกจากเต้ารับ
-จับที่มือจับแล้วหมุนไปในทิศทางทวนเข็ม
นาฬิกาจนกระทั่งฝาคลายล็อกแล้วเปิดฝาขึ้น
(ดูภาพประกอบ 1-2)
*เมื่ออาหารเหลว เช่น โจ๊ก สุกเรียบร้อยแล้ว
ไฟแสดงสถานะบนปุ่ม “อุ่นอาหาร/ยกเลิก
(Keep warm/Cancel)” จะกระพริบขึ้น
ท่านจะไม่สามารถหมุนวาล์วระบายแรงดัน
ได้ทันทีรอจนกระทั่งวาล์วลูกลอยตกลง
อาหารเหลวอาจพุ่งออกมากับไอน้ำ การวาง
ผ้าขนหนูเปียกบนฝาจะช่วยให้หม้อระบาย
ความร้อนได้เร็วขึ้น
* ควรหมุนวาล์วระบายแรงดัน เมื่อไฟแสดง
สถานะKeep warm ติดต่อเนื่องโดยไม่
กระพริบซึ่งแสดงว่าแรงดันและไอน้ำภายใน
หม้อลดต่ำลงแล้ว

8
นานสูงสุด 24 ชั่วโมง อย่างไรก็ตาม
แนะนำให้อุ่นอาหารโดยใช้ระยะเวลาน้อยกว่า
6 ชั่วโมงเพื่อให้ได้ผลลัพธ์ในการปรุงอาหาร
ที่ยอดเยี่ยม
13.หากมีไอน้ำจำนวนมากจะระบายออกจาก
ขอบหม้อในระหว่างที่หม้อทำงานแสดงว่า
หม้อทำงานผิดปกติและวาล์วทำงานปล่อยไอน้ำ
ออกมาเพื่อการป้องกัน ให้หยุดใช้งานและ
ถอดปลั๊กออกนำเครื่องส่งตรวจเช็คยังศูนย์
บริการของตัวแทนจัดจำหน่าย
14.ในกรณีระหว่างการใช้งานแล้วเครื่อง
มีเสียงสัญญาณเตือนแสดงอาการผิดปกติ
และหน้าจอบนแผงควบคุมแสดงรหัสดังต่อไป
นี้ ให้ส่งตรวจเช็คและซ่อมแซมโดยช่างผู้
ชำนาญของศูนย์บริการของตัวแทนจัดจำหน่าย
10.หม้อชั้นใน ถูกเคลือบด้วยวัตถุกันติด
ควรหลีกเลี่ยงการขีดข่วนแนะนำให้ใช้ทัพพี
ที่ทำจากไม้หรือพลาสติก
สาเหตุ
วงจรไฟฟ้าของเซ็นเซอร์ได้
รับความเสียหาย
เกิดไฟฟ้าลัดวงจร
ของเซ็นเซอร์
เครื่องมีความร้อนสูงเกินไป
เกิดความผิดปกติของสวิตซ์
สัญญาณ
รหัสที่แสดง
E1
E2
E3
E4
15.เมื่อต้องการเคลื่อนย้ายหม้อ ให้จับที่
หูหม้อแทนการจับที่มือจับบนฝาหม้อ
16. ไม่ควรถอดรื้อเครื่องด้วยตัวท่านเอง
หรือเปลี่ยนอะไหล่ด้วยอุปกรณ์อื่นๆ
11.เมื่อท่านจะเปิดวาล์วระบายแรงดันควร
ระมัดระวังมือหรือใบหน้ารวมถึงส่วนต่างๆ
ของร่างกายให้อยู่ห่างจากช่องระบายอากาศ
บนวาล์วระบายแรงดันหรือท่อระบายไอน้ำ
ไม่ควรสัมผัสฝาหรือตัวหม้อเพื่อหลีกเลี่ยง
การถูกลวกหรือเผาไหม้จากความร้อน
12.หม้ออเนกประสงค์นี้สามารถอุ่นอาหารได้

9
อาการ สาเหตุการแก้ไข
ปิดฝายาก ซีลยางวางไม่ถูกตำแหน่ง วางซีลยางในตำแหน่งที่ถูกต้อง
วาล์วลูกลอยติดอยู่บนแหวนรอง กดวาล์วลงเบาๆ
เปิดฝายาก วาล์วลูกลอยไม่ลงมาอยู่ในตำแหน่งลง ใช้ตะเกียบกดวาล์วเบาๆ
มีไอน้ำรั่วออกมา
ไม่ได้ใส่ซีลยาง
มีสิ่งสกปรกติดอยู่ในซีลยาง
วงแหวนยางชำรุดเสียหาย
ปิดฝาหม้อไม่สนิท
ใส่ซีลยาง
ทำความสะอาดซีลยาง
ส่งเครื่องไปยังศูนย์บริการของตัวแทน
จัดจำหน่ายเพื่อเปลี่ยนอะไหล่
ปิดฝาให้ถูกต้องตามคำแนะนำ
ในหัวข้อวิธีการใช้งาน
วาล์วลูกลอยรั่ว มีสิ่งสกปรกติดอยู่ในซีลยางของวาล์วลูกลอย
วงแหวนยางชำรุดเสียหาย
ทำความสะอาดซีลยางของวาล์วลูกลอย
ส่งเครื่องไปยังศูนย์บริการของตัวแทน
จัดจำหน่ายเพื่อเปลี่ยนอะไหล่
ลูกลอยในวาล์ว
ไม่ลอยขึ้น
ไม่มีอาหารในหม้อหรือมีอาหาร
ปริมาณน้อยเกินไป
เกิดการรั่วของฝาหรือแรงดันผิดปกติ
ใส่อาหารและน้ำลงในหม้อตามคำแนะนำ
ในหัวข้อวิธีการใช้งาน
ส่งเครื่องไปยังศูนย์บริการของตัวแทน
จัดจำหน่ายเพื่อเปลี่ยนอะไหล่
การแก้ไขปัญหา
ขั้นตอนการดูแลรักษา
1.ถอดปลั๊กออกทุกครั้งก่อนทำความสะอาด
2.ใช้ผ้าซับทำความสะอาดด้านล่างของหม้อ
ห้ามจุ่มหม้อลงในน้ำหรือฉีดน้ำเพื่อล้างเครื่อง
3.นำกล่องรองรับหยดน้ำออกแแล้วล้างทำความ
สะอาด
4.ทำความสะอาดด้านในตัวหม้อ รวมถึง
ซีลยาง วาล์วระบายแรงดัน ฝาหม้อชั้นใน
การทำความสะอาด
ท่อระบายไอน้ำและวาล์วลูกลอย ด้วยน้ำ
สะอาดจากนั้นเช็ดซับด้วยผ้า
5.ห้ามใช้ใยขัดที่เป็นโลหะทำความสะอาด
หม้อชั้นในให้ใช้ฟองน้ำหรือใยขัดที่อ่อนนุ่ม
แล้วเช็ดด้วยผ้า
6.ทำความสะอาดช่องของวาล์วระบายแรงดัน
และช่องระบายน้ำด้วยแปรงเล็กๆเพื่อช่วย
รักษาประสิทธิภาพให้ไอน้ำออกจากช่องระบาย
ได้อย่างสะดวกไม่ติดขัด

สินค้าจะหลุดพ้นจากการรับประกันเมื่อ
-รับประกันเฉพาะในพื้นที่รับประกัน
เท่านั้น ( รับประกันเฉพาะฮีตเตอร์)
- เพื่อเป็นการพัฒนาสินค้า บริษัทขอสงวน
สิทธิ์ในการเปลี่ยนแปลงรายละเอียดของ
คู่มือการใช้และคุณสมบัติของสินค้าโดยไม่
ต้องแจ้งให้ทราบล่วงหน้า
- เสียหายจากการใช้งานไม่ถูกต้อง
(ไม่ปฏิบัติตามคู่มือ) หรือดัดแปลงสินค้า
-เสียหายจากการไม่ปฏิบัติตามคำแนะนำ
ในคู่มือหรือใช้งานผิดวัตถุประสงค์
- เสียหายจากการขนส่ง
หมายเหตุ
ผลิตภัณฑ์ให้เรียบร้อยแล้วเขียน ชื่อ ที่อยู่
เบอร์โทรศัพท์และเขียนสาเหตุที่ส่ง
เครื่องมาว่าเป็นเพราะเหตุใดพร้อมแนบ
สัญญาการรับประกันมาด้วย
- เสียหายจากการใช้งานเป็นประจำ หรือ
ขาดการดูแลรักษาเครื่อง
- เสียหายจากการสูญหาย หรือชิ้นส่วน
บางอย่างหายไปจากการถอดประกอบสินค้า
บริษัทเท่านั้นทางบริษัทจะไม่รับประกัน
สินค้าที่เสียหายจากการที่ท่านไม่ปฏิบัติ
ตามคำแนะนำในคู่มือนี้เด็ดขาดรวมถึง
การตกแตก การสึกหรอจากการใช้งาน
- หากท่านดัดแปลง เปลี่ยนชิ้นส่วนใดๆ
ที่ไม่ใช่อุปกรณ์ที่มาเป็นชุดของผลิตภัณฑ์
การรับประกันสินค้าถือว่าเป็นโมฆะทันที
- หากเครื่องของท่านเกิดความเสียหาย
แล้วอยู่ในเงื่อนไขการรับประกัน ท่าน
สามารถส่งเครื่องตรวจเช็คยังศูนย์
ตัวแทนจัดจำหน่ายได้โดยบรรจุหีบห่อ
เงื่อนไขการรับประกันสินค้า
- สัญญาการรับประกันมีระยะเวลา 1ปี
นับจากวันที่ท่านซื้อสินค้า
- การรับประกันจะมีผลกับความ
บกพร่องที่เกิดจากความผิดพลาดของ
10

11
12
Dear Customer
Thank you for choosing a
NESCO appliance.The experi-
ence, design, feature and tech-
nologyofthisappliance,aswell
as the strict quality controls
used during manufacture, will
provide full satisfaction for
many years.
MULTI RICE COOKER
Model : NC-5565
PERFECTA
Description
English Q.
R.
S.
T.
1000 W 220-240 V 50/60 Hz
Sealant washer
Inner steel ring
Gauging cup
Ladle
A.
B.
C.
D.
E.
F.
G.
H.
I.
J.
K.
L.
M.
N.
O.
P.
Handle
Lid
Pressure discharging valve
Steam relief pipe
Floating valve
Inner tank
Outer tank
Upper ring
Control panel
HeatingPlate
Temp.(Pres.) sensor
Water collector
Ear
Cooker
Plug and cord
Sealant washer
Features
Multi rice cooker, a brand-new
kitchen tool developed using
our lastest technology, the
product has a combined merits
of the pressure control, this
cooker is proud of new and
distinctivestructure and outlook
design, reliable and safe tool for
modern family and a substitute
for conventional pressure
cooker.
1. Combined functions of
cooking, stewing and braising.
2. You need not to set the
pressure and time but select the
menu, the cooker will do it all
automatically.
When finish cooking and enters
“keep warm” status, you are
ready to serve.
3. Timer preset: cooker keeps
time countdown; when the
countdown comes to an end the
cooker begins to heat.
4. Power Failure Memory:
cooker resumes original

13
Tip&safety precautions
1.Carefully read and understand
thismanualbeforeoperatingthis
appliance.
2. Check the rating label on
your appliance, if it
corresponds to your local
mains.
3. Do not touch the heating
plate when in use. It might
cause severe burnt.
4. Allow the appliance to cool
down before cleaning.
5. Always unplug when not in
use or before cleaning.
6. Do not immerse this
appliance or cord into water or
any liquids.
7. Be extreme cautious when
movingtheappliancecontaining
hot liquids.
8. Clean and remove any
foreign objects from the bottom
and the surface of the pot before
usage.
sequence when power is
supplied again.
5. Time & power saving.
Power and time saved by over
60% and 40% respectively than
common electric cookers.
6. Airtight cooking retains
nutrition and original taste.
7. Non sticking inner tank, easy
to clean, stainless lid and outer
tank ensure long service life.
8. Following built-in safety
devices:
- The cooker cannot gain
pressure when the lid is not well
closed and the lid cannot be
opened when the inner pressure
is too high.
- Relief function, when
temperature and pressure inside
the cooker go beyond the
normal value, the pressure
dischargingvalve will discharge
the steam to regulate.
- De-pressure function: when
pressure limit device inside
cooker fails and pressure goes
beyond the limit, cooker
automatically de-pressure
aroundlidto avoid an explosion.
- Temperature Limit: power
automatically cut off when
temperature inside cooker goes
beyond preset temperature.
- Ultrahigh temperature safe:
power automatically cut off
when temperature inside cooker
goes beyond limit value.

14
edge of table top, counter or
touch hot surfaces.
15. Do not operate or place this
appliance on or near heated
surfaces (such as a gas or
electric burner, or in a heated
oven)
16. Do not abuse the cord.
Never carry the appliance by
the cord or yank it to disconnect
from the outlet; instead grasp
the plug and pull to disconnect.
17. When using an extension
cord with your appliance, make
sure the extension cord is
correctly wired and rated for its
use.
18. This appliance is intended
for domestic household use only.
19. This appliance should be
only be used for its intended
application.
20. Do not clean with metal
scouring pads/ steel wool.
Pieces could break off the pad
and touch electrical
components, which could
cause electric hazards.
21.Do not operate the appliance
if there is a damage cord, or any
malfunctions. Do not attempt to
9.Do not switch on the power
supply if there is nothing on the
heating element or in the pot.
10. Do not touch the appliance
and the outer pot in the midst
of cooking, heating or placed
the appliance near any opening
where there is steam. It may
posed a danger for scalding.
11. The use of attachments or
accessories which not come
with the set are not
recommended, which may
cause fire, electric shock or
personal injury.
12. Do not use for outdoors.
13. This appliance is not
intended for use by persons
(including children) with
reduced physical, sensory or
mental capabilities, or lack of
experience and knowledge,
unless they have been given
supervision or instruction
concerning use of the appliance
by a person responsible for their
safety. Children should be
supervised to ensure that they
do not play with the appliance.
14. Do not let cord hang over

15
Operating Instruction
repair the appliance by yourself,
instead, take it to an authorized
service centre for repair.
1. Open the lid; hold firmly the
handle, turn the lid
anticlockwise until it loosens.
(See figure1-2)
2. Take out the inner tank and
fill in food and water. Food and
water should be no higher than
4/5 and no lower than 1/5 of
the height of inner tank, and for
expandable food, no higher than
3/5. (See figure 3-4-5)
3. Clean the inner tank and
heating plate before put in the
inner tank. Be sure no dirt or
smear on the heating place and
outer tank. After that, turn
slightly the inner tank to make
it well fit to the heating plate.
(See figure6)
4. Put on the cover
- Check the sealant washer,
make sure it has been put on
the inner steel ring.
- Turn the sealant washer to
make sure it well fit to the steel
ring.
- Cover up the lid and turn it
counter-clockwise until it gears
with a clamping sound. (See
figure 7)
- Fix the inner steel ring see
“Fix” as figure below.

16
6. Switch power on and the
indicator displays “00”
7. Set up the parameters and
start up.
- Set timer (Skip this step if you
think it not necessary). Press
“Timer” once and the timer
increases by 0.5 hour. The max
time set is 24 hours and after
that it begins a new cycle.
- Select from the menu for
cooking. Press the selected
function button such as press
“Meat” for cooking and then
press “start” button, the timer
indicator and the selected
cooking indicator lights up.
- In case of a time set, the timer
begins to count down each time
by 0.5 hour. When the
countdown ends, the indicator
displays “00” and the cooker
begins to heat.
- In case of no time set, once
you select menu and press
“Start” button, the menu
indicator lights up and it begins
to heat.
-When heating andpressurizing
is over, the “Keep warm”
indicator begins to flicker
(indicating high pressure inside
the cooker). When pressure is
at normal, the “Keep warm”
indicator is in constant “light”.
- Press “Keep warm/Cancel” to
cancel parameter set or working
status.
- When no parameter set or not
in working status, press “Keep
warm/Cancel” and the “Keep
warm” indicator lights up for
on-warm status. Press once
more time to cancel the “Keep
warm” status and the indicator
goes out.
5. Put the pressure discharging
in its position, then set it to
“seal” point,Be sure that the
floating valve is in down
position (see figure 9)
- Fix the water collector see
“Fix” as figure below.

17
- Unplug the power cable.
- Hold and turn the handle
anticlockwiseuntilthelidcomes
to the loosening position and
take up the lid. (See figure 1-2)
*When fluid food such as
porridge is cooked, the
pressure discharging valve
cannot be taken up
immediatelyafter the
“keepwarm”indicatorbegins to
flash. What until the floating
valve is no longer floating or
the food may puff off with the
steam.
Awet towelonthe lidcan speed
up the cooling.
*It is recommended that the
steam be discharged when the
indicator is on without
flashing. The pressure is much
lower at this time.
Attention:
Please pull out pressure
discharging valve prior if you
select menu of cooking “crispy
rice”. (Please refer to the figure
11) and please put one cup of
water for each cup of rice when
cooking crispy rice. (Please
refer to the figure 12)
Cautions
1.Never use the cooker along
with inflammable products or in
a humid location.
2.The amount of water added
to the inner tank should be
determined in line with step 2
of directions.
3.Never damage the sealant
washer or replace it with other
rubber washer or tension
washer.
8. “Keep warm” indicator
flickers to indicate the food is
ready. Press “Keep warm/
cancel” to cancel and you can
take food now.
- Set the pressure discharging
valveto“AirOut”anddischarge
the air until the floating valve
drops. (Please refer to the figure
10)

4.Nevertwist the inner steelring
with hand or other tools. If the
steel ring slips off place,
stopping using the cooker until
replacement is conducted.
5.The inner steel ring should be
keptclean by cleaningregularly.
6.Never attempt to uncover the
cooker when the floating valve
is floating.
7.Never apply any weight on
the pressure discharging valve
or replace it with other
materials.
8.Never block the periphery of
the clamping position to ensure
safety.
9.The surface of the cooker and
the heating plate should be
clean, never use the inner tank
to cook on other thermal
sources or have it replaced by
other cookers.
10.The inner tank is coated
with non-stick materials. To
avoid scratch, wooden or
plastic ladles are recommended.
11. Be sure to keep your hand
or face away from the air exit
hole of the pressure discharging
valve when you discharge the
air; never touch the lid of the
Broken circuit of the
sensor
Short circuit of the
sensor
Over heating
Signal switch
malfunction
Indicator
Code
E1
E2
E3
E4
Cause
pot to avoid any scald burn
when the cooker is turned on.
12.The maximum length for
keeping warm is 24 hours.
However, the duration less than
6 hours is recommended to
ensure excellent cooking effect.
13.Large amount of steam
discharging from the periphery
duringoperations,and abnormal
phenomenonandthereliefvalve
is working for protection.
Unplug the power cable. Get it
repaired in the maintenance
shop of our company prior to
use.
14.In case of alarming during
operation and displaying the
following trouble code, have it
repaired in our maintenance
shop prior to use.
18

19
Maintenance &Cleaning
15.When moving the cooker,
hold the ears instead of the
handle.
16.Dismantling or replacement
by using accessories other than
ours is not recommended.
water and clean it with a mop.
5. Use a sponge or nonmetal
softbrush to clean the inner tank
and clean it with a mop.
1.Unplug the power cable prior
to cleaning.
2.Brush the bottom of the
cooker with a mop. Never sleep
the cooker into water or spray
water on it.
3. Take off and clean the water
collector and wash it with a wet
towel.
4. Clean the inner side of the
cooker, including the sealant
washer, pressure discharging
valve, anti-blocking case, steam
relief pipe, floating valve with
6. Clean the seat of pressure
discharging valve and water
drain hole with a small brush,
so that water can be freely
discharged.
Warranty:
Waranty heater only
-Damage or defect from not
follow this instruction manual.
-Electrical shock or any
electrical problem.
-Lost or damage some part by
accident or natural damage.
-Damage or defective from
manufacturer, dealer & service.
-1 year warranty for house hold
use only.
-Use according to this
instruction carefully.
Warranty is expired
When(void of warranty)
-Damage or defect from
misunderstand how to use or
service from non authorized
people.
-Warranty only in service area.
- This instruction may be
changed with out prior notice.
- Company reserved the right
to change all details before
notice.
Note :
Table of contents
Languages:
Other Nesco Rice Cooker manuals


